
Can you start embroidery without a knot? Yes, you absolutely can! What is a knotless embroidery start? It’s a clever way to begin your stitching that keeps the back of your work smooth and clean, without any bumpy knots. This guide will show you several simple methods for starting embroidery without using a knot, helping you create beautiful pieces with a professional-looking finish. We’ll cover key Embroidery thread starting techniques like the Loop Start method and the Waste Knot technique, and how to ensure a Clean finish embroidery by Burying thread ends. Mastering these methods is key to Avoiding knots in embroidery and achieving a Smooth back embroidery.
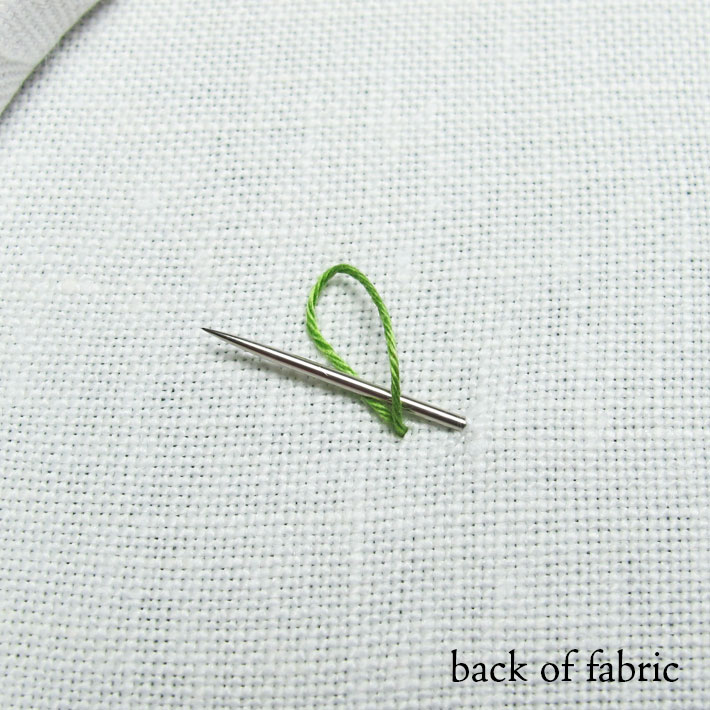
Image Source: d2culxnxbccemt.cloudfront.net
Why Skipping the Knot is a Good Idea
Many people learn to start stitching with a simple knot at the end of their thread. This is quick and easy, but it’s not always the best way for embroidery. Avoiding knots in embroidery offers many good points.
The Look of Your Work
A big reason to start without a knot is how it makes your finished piece look. With no knots, the back of your work is smooth. This is especially nice if your work might be seen from both sides. Think of a tea towel or something framed in clear glass. A Smooth back embroidery looks neat and shows careful work. A bumpy back with knots can take away from the beauty of your stitches on the front.
Keeping Your Work Safe
Knots can cause problems. They can pull through the fabric over time, especially if you are using a loose weave or if the knot isn’t very big. They can also snag on things or unravel. Starting without a knot, using a Secure embroidery start method like the loop start or buried ends, helps keep your stitches safe. The thread is held firmly by other stitches or the fabric itself, not just a single point. This means your embroidery is stronger and will last longer.
Working More Easily
Sometimes, knots can get in the way. They can catch on other threads as you stitch. They can make it hard to hoop your fabric smoothly. A knotless start prevents these little annoyances, making your stitching time more enjoyable. A Clean finish embroidery starts from the very first stitch.
Better for Framing
If you plan to frame your finished embroidery, a smooth back is a big plus. Knots can create uneven spots that make it hard to press the fabric flat. This can cause ripples or bumps under the glass. A Smooth back embroidery lies flat easily, giving you a much better result when you frame your piece.
Learning the Loop Start Method
The Loop Start is one of the most popular Knotless embroidery start methods. It’s simple, fast, and very secure, especially when you are using an even number of thread strands (like 2, 4, or 6). This method uses the thread itself to create the hold, needing no knot at all.
What You Need for the Loop Start
- Embroidery thread (floss)
- Embroidery needle
- Your fabric
- Embroidery hoop (helpful but not always needed for practice)
Step-by-Step Loop Start Method
Let’s say you need two strands of thread for your stitch. Embroidery floss usually comes as six strands twisted together. You will pull out two strands. But for the Loop Start, you will use one length of two strands folded in half.
- Get Your Thread Ready: Cut a length of thread. A good length is about 18-24 inches (45-60 cm). Take two strands from the six.
- Fold the Thread: Hold the two strands together. Fold the length of thread in half so the two ends meet. You now have a loop at one end and two cut ends at the other.
- Thread Your Needle: Thread the two cut ends through the eye of your needle. Do not thread the loop end.
- Start from the Back: Bring your needle up from the back of your fabric at the spot where your stitch will start. Pull the thread almost all the way through, but leave a small loop (the folded end) on the back of the fabric.
- Make Your First Stitch: Make your first embroidery stitch as you normally would. This stitch will go back down through the fabric, usually very close to where you came up.
- Secure the Loop: On the back of your fabric, you will see the small loop you left. When you bring the needle down for your first stitch, make sure the needle goes through this loop on the back.
- Pull Gently: Pull the thread through the loop gently. The loop will close around the thread.
- Check Your Work: Pull the working thread on the front. The loop on the back should be snug and secure around the thread. You have now started your stitch without a knot!
This Loop start method is very secure because the thread is held by itself and the fabric. It leaves a super Smooth back embroidery right from the start. It’s a great way to achieve a Knotless embroidery start.
When to Use the Loop Start
- When you need an even number of strands (2, 4, 6).
- For most types of embroidery stitches.
- On most fabrics, especially those with a clear weave.
Benefits of the Loop Start
- It’s a true Knotless embroidery start.
- It’s very secure.
- It creates a very Smooth back embroidery.
- It’s quick once you practice it a few times.
Trying the Waste Knot Method
The Waste Knot method is another way to begin your embroidery without a knot at your starting point. It’s especially helpful when you need an odd number of thread strands (like 1, 3, or 5) where the Loop Start doesn’t work as easily. Instead of starting with a knot you keep, you start with a knot you will later remove.
When to Use the Waste Knot Technique
- When using an odd number of strands.
- When your fabric is very thick or has an uneven weave where a loop start is tricky.
- When you need to start in the middle of a large area with no existing stitches to hide ends under yet.
How the Waste Knot Technique Works
The idea is simple: you tie a temporary knot, make your stitches, and then cut the knot off, burying the thread tail under the stitches you just made.
- Get Your Thread Ready: Cut your thread to length. Take the number of strands you need (e.g., 3 strands). Do not fold it.
- Tie a Knot: Tie a simple knot (an overhand knot is fine) about 2-3 inches (5-8 cm) from one end of the thread. This is your Waste knot technique.
- Start from the Front: Bring your needle down through the front of your fabric. The knot you just made should stop the thread from pulling all the way through. Place this knot away from where your first actual stitch will be. Place it a few inches or centimeters away, following the line your stitches will take.
- Make Your Stitches: Start stitching from the back of the fabric, bringing the needle up at your real starting point. Make your stitches, working towards the waste knot. As you stitch, make sure your stitches on the back of the fabric pass over the loose thread tail running from your starting point to the waste knot. Stitch over this tail for about 1/2 to 1 inch (1-2.5 cm). This is a form of Burying thread ends as you go.
- Snip the Knot: Once you have stitched over the thread tail for a secure length, turn your work over. Find the waste knot on the front of the fabric. Carefully snip the thread right behind the knot, where it enters the fabric. Do not cut the fabric or your stitches.
- Remove the Tail: Pull the snipped thread end through to the back. It should pull out easily because you stitched over it.
- Finish Burying (If Needed): If the tail feels loose, or you didn’t stitch over it much, you can run the needle under a few more stitches on the back to fully bury the tail. This ensures a Secure embroidery start.
This Waste knot technique leaves the front clean once the knot is cut, and the back is kept tidy by stitching over the tail. It’s a great alternative for a Knotless embroidery start when the Loop Start isn’t suitable.
Mastering Burying Thread Ends
Burying thread ends is not just a way to finish your thread; it’s also a great method for starting, especially if you have some existing stitches on the back of your work. It’s essential for achieving a Clean finish embroidery and Smooth back embroidery.
How Burying Thread Ends Works
This method involves running your needle and thread under existing stitches on the back of your fabric. The existing stitches hold the new thread in place.
Starting with Burying Thread Ends
- Get Your Thread Ready: Thread your needle with the desired number of strands. Do not tie a knot.
- Go to the Back: Insert your needle from the back of your fabric.
- Run Under Stitches: Gently slide your needle under several nearby stitches that are already on the back of your fabric. Guide the thread through, pulling it until only a small tail is left near where you inserted the needle.
- Bring Needle Through: After running under stitches for about 1/2 to 1 inch (1-2.5 cm), bring your needle up through the fabric at the exact point where your first new stitch will begin. Make sure you haven’t pulled the buried tail all the way through.
- Secure and Trim: Stitch as normal. The buried tail on the back is held by the existing stitches. You can run the needle under a few more stitches right next to where the tail came out to make it extra secure. Once secure, carefully snip the short tail close to the fabric. This is Hiding thread tails within your stitches.
This method is great because it uses existing work to make a Secure embroidery start. It keeps the back very flat.
Finishing with Burying Thread Ends
This is the standard way to end your thread without a knot on the back, crucial for Clean finish embroidery.
- Finish Your Stitch: Complete your last stitch and bring the needle to the back of the fabric.
- Run Under Stitches: Turn your work over. Slide your needle under several nearby stitches on the back. Run the thread under the stitches for about 1/2 to 1 inch (1-2.5 cm).
- Secure: For extra security, especially if the area gets stress, you can bring the needle up just slightly from where you finished running the thread, then put it back down right next to that spot, running the thread under the same stitches again. This makes a tiny loop that is hidden but locks the thread better.
- Trim: Carefully snip the thread close to the fabric where it last went under the stitches. The tail is now hidden and secured. This completes the process of Burying thread ends and Hiding thread tails.
Using Burying thread ends for both starting and finishing leads to the tidiest possible Smooth back embroidery.
Other Ways to Start Knotless
Besides the main methods, there are a few other simple Embroidery thread starting techniques you can use to avoid knots.
Starting by Stitching Over the Tail
This is similar to the Waste Knot method but without the temporary knot.
- Thread Your Needle: Use any number of strands. Don’t knot the end.
- Come Up: Bring your needle up from the back where you want to start. Leave a tail of about 1 inch (2.5 cm) on the back.
- Hold the Tail: On the back, hold the tail flat against the fabric along the path your stitches will take.
- Stitch Over: Make your first few stitches. As you bring the needle down and up, make sure the stitches on the back go over the thread tail you are holding.
- Secure: After stitching over the tail for several stitches, it should be secure.
- Trim: Carefully snip the remaining tail close to the fabric.
This method is quick but requires careful handling of the tail on the back while you stitch. It contributes to Hiding thread tails and a Clean finish embroidery.
Comparing Thread Starting Ways
Each method has its best uses. Here is a quick look at when each might be your top choice for a Knotless embroidery start.
| Method | Best Used For | Number of Strands | Back Appearance | Security | Ease for Beginners |
|---|---|---|---|---|---|
| Loop Start Method | Even numbers of strands, most projects | Even (2, 4, 6) | Very Smooth | Very Secure | Easy to Learn |
| Waste Knot Technique | Odd numbers of strands, thick fabric | Any (1, 3, 5+) | Mostly Smooth (tail is buried) | Secure (once tail is buried) | Easy to Learn |
| Burying Thread Ends | Starting near existing stitches, finishing | Any | Very Smooth (hidden tails) | Secure (under stitches) | Easy to Learn |
| Stitching Over Tail | Quick start when no stitches are nearby | Any | Mostly Smooth (tail is buried) | Secure (once stitched over) | Needs Practice |
Choosing the right Embroidery thread starting technique helps you achieve a Smooth back embroidery and a Clean finish embroidery every time. It’s all about Avoiding knots in embroidery from the get-go.
Getting Your Materials Ready
Before you start practicing your Knotless embroidery start methods, make sure you have the right supplies.
- Embroidery Needles: Choose a needle that matches your fabric and thread thickness. A needle with a large eye is easier to thread, especially for multiple strands or folded thread (like the Loop Start). Sharp needles work well for most fabrics.
- Embroidery Thread (Floss): Standard 6-strand cotton floss is perfect for practicing. You can separate the strands to get the number you need.
- Fabric: Any fabric suitable for embroidery will work. Cotton or linen with a clear weave is great for beginners as it’s easy to see where your needle is going.
- Embroidery Hoop: A hoop keeps your fabric tight, making it easier to stitch evenly and control where your needle goes, especially when Burying thread ends or working with tails on the back.
- Small, Sharp Scissors: Essential for snipping thread ends very close to the fabric without cutting your work. This is key for a Clean finish embroidery.
The Benefit of Practice
Learning these Embroidery thread starting techniques might feel a little strange at first if you are used to using a knot. But like any new skill, practice makes it easy.
Try each method a few times on a scrap piece of fabric. Don’t worry if it’s not perfect right away. Focus on:
- Getting the loop size right for the Loop Start.
- Placing the Waste Knot correctly and stitching over the tail fully.
- Running your needle smoothly under existing stitches when Burying thread ends.
- Keeping the tail flat and stitching over it for the Stitching Over Tail method.
The more you practice, the faster and more natural these Knotless embroidery start methods will feel. Soon, Avoiding knots in embroidery will be your normal way of working, giving you beautiful, Smooth back embroidery every time.
Extra Tips for Success
Here are a few more pointers to help you master starting embroidery without a knot:
- Keep Your Thread Length Manageable: Don’t use super long threads. They are more likely to tangle. Shorter threads mean you’ll start and end more often, giving you extra practice with these methods!
- Pull Gently: Whether you are pulling the loop snug, stitching over a tail, or burying ends, pull the thread just enough to secure it. Pulling too hard can pucker your fabric or pull tails out before they are secured.
- Stitch Enough Over Tails: When using the Waste Knot technique or Stitching Over Tail method, make sure you stitch over the tail for at least 1/2 inch (1 cm). This length is important for a Secure embroidery start. Shorter lengths might unravel.
- Check the Back: Get into the habit of flipping your work over regularly to check the back. This helps you see how the buried ends look, how the loops are sitting, and ensures you are building a Smooth back embroidery.
- Use a Needle with the Right Size Eye: For the Loop Start, the needle eye needs to be big enough for two strands of folded thread. For other methods, it just needs to fit the number of strands you are using.
These little tips can make a big difference as you learn Embroidery thread starting techniques for Avoiding knots in embroidery.
What If Things Go Wrong?
Sometimes, despite your best efforts, a thread might feel loose at the start, or a tail might pop out. Don’t worry!
- If the Start Feels Loose: If you’ve just started and the thread feels like it might pull out, you might not have secured the loop enough (for Loop Start) or stitched over the tail sufficiently (Waste Knot/Stitching Over Tail). If there are only one or two stitches, you might carefully undo them and try the start again. If you have already made several stitches and don’t want to undo, you could try Burying thread ends by running the needle under the stitches you’ve made on the back, securing that initial tail more. As a last resort, you could place a tiny, tiny spot of fabric glue on the very end of the buried tail on the back, but try to avoid this if possible as it can make the fabric stiff.
- If a Buried Tail Pops Out: If a tail you buried comes loose, thread a needle with that tail (if it’s long enough) and re-bury it under nearby stitches. If the tail is too short to thread, you might carefully try to tuck it back under stitches using a needle point or pin. If it won’t stay, a tiny dot of fabric glue on the end on the back can secure it. The goal is still a Clean finish embroidery and Smooth back embroidery, so fix it neatly.
Learning Secure embroidery start methods reduces these problems, but knowing how to fix them is part of the journey!
Why Knotless is Best
Let’s quickly look again at why putting in the effort to learn Embroidery thread starting techniques that avoid knots is worth it.
- It Looks Better: A Smooth back embroidery is visually pleasing and shows high-quality work. It’s a sign of a skilled embroiderer.
- It Lasts Longer: A Secure embroidery start method prevents threads from pulling out or unraveling easily. Your work will be more durable.
- It Feels Better: No knots mean no bumps on the back, which makes the finished piece feel nicer, especially for items that will be touched, like clothing or blankets.
- It’s More Professional: If you ever plan to sell or show your work, a Clean finish embroidery (front and back) is expected and highly valued.
- It avoids Snags: Knots can catch on things. Knotless starts don’t.
By focusing on Avoiding knots in embroidery from the beginning, you set yourself up for success and create truly beautiful pieces.
Questions You Might Ask
Here are answers to some common questions about starting embroidery without a knot.
Can I use the Loop Start method for every stitch type?
The Loop Start works well for many stitches, especially those made with an even number of strands. For stitches like French knots or single straight stitches that use only one strand, the Loop Start isn’t possible. In those cases, you would use the Waste Knot technique or start by Burying thread ends under existing stitches.
What if my fabric is very thin? Will burying ends work?
Yes, Burying thread ends can work on thin fabric, but you need to be extra careful. Run the thread under stitches very gently so you don’t pull the fabric and create puckers. Ensure the stitches you run under are dense enough to hide the thread tail completely and provide a Secure embroidery start. If the fabric is see-through, you might still see the buried tail faintly, but it will be much less noticeable than a knot.
How long should my buried thread tail be?
When starting by burying or finishing by burying, aim to run the thread under stitches for about 1/2 to 1 inch (1-2.5 cm). This length provides enough security for the thread.
Is a Waste Knot always needed for odd numbers of strands?
No, not always. You can also use the method of Stitching Over the Tail (without a waste knot) or start by Burying thread ends under existing stitches if you have them. The Waste Knot technique is just one good option for odd strands or when starting in an open area.
Do these methods work for all types of embroidery thread?
These methods work best for stranded threads like cotton or silk floss. For thicker threads or ribbon, you might need different ways to start and end, but the core idea of Avoiding knots in embroidery and aiming for a Secure embroidery start and Clean finish embroidery still applies.
Wrapping Up
Starting your embroidery without a knot is a key skill for making clean, strong, and beautiful pieces. The Loop start method, Waste knot technique, and Burying thread ends are excellent Embroidery thread starting techniques that help you achieve a Knotless embroidery start. By using these methods, you will successfully create a Smooth back embroidery, master Hiding thread tails, and ensure a Clean finish embroidery every time.
Take your time, practice each method on a scrap piece of fabric, and soon, Avoiding knots in embroidery will become a natural part of your stitching process. Happy stitching!