
Image Source: i.ytimg.com
Guide: How To Thread A Bobbin On A Brother Sewing Machine
Knowing how to thread a bobbin on your Brother sewing machine is a key step for any sewing project. This guide will show you how. We will cover winding a bobbin, putting it into the machine, and fixing common problems. You will learn the correct way to handle your sewing machine’s lower thread. This is especially true for Brother machines. Most Brother sewing machines use a simple drop-in bobbin. This makes the process easy for new sewers. Learning this skill helps you get ready for any sewing task. It also makes sure your stitches look neat and even.
Getting Ready to Sew
Before you start winding or loading your Brother bobbin, do some simple checks. These steps help make sure your machine is ready. They prevent problems later on.
Gathering Your Tools
You need a few basic things. Having them ready saves time.
* Your Brother sewing machine.
* A spool of thread. Use the same kind of thread you will sew with.
* An empty Brother bobbin. Make sure it is the right size for your machine. Brother bobbins are often clear plastic. They have a specific shape. Using the wrong bobbin can cause problems.
* A pair of small scissors.
Powering On and Clearing the Deck
First, turn on your machine. Plug it in safely. Then, clear the sewing area. Remove any fabric or tools from the needle plate. Make sure the needle is in its highest position. You can use the handwheel on the side of your machine for this. Turn it towards you. Lift the presser foot lever. This raises the presser foot. It makes it easier to work.
Brother Bobbin Winding: A Step-by-Step Guide
Winding a bobbin correctly is very important. It affects how your stitches look. A poorly wound bobbin can lead to tangled threads. It can also cause skipped stitches. Most Brother machines make bobbin winding easy. This process is called winding a bobbin Brother machine.
Step 1: Place the Thread Spool
Put your thread spool onto the spool pin. This is usually at the top of your machine. Make sure the thread comes off the spool correctly. For most spools, the thread should come from the bottom front. It should unroll smoothly. If your spool pin is horizontal, use the spool cap. This cap holds the spool in place. It stops the thread from tangling.
Step 2: Guide the Thread
Now, guide the thread through the machine’s thread guides. Look for a diagram on your machine. It usually shows the path with numbers.
* First, take the thread from the spool.
* Pull it through the first thread guide. This is often a small hook or clip. It is usually above the spool pin.
* Next, wrap the thread around the tension disc for bobbin winding. This disc usually has a small arrow or picture of a bobbin. It helps keep the thread tight while winding. Make sure the thread sits inside the disc. Do not just lay it on top.
Step 3: Put the Thread on the Bobbin
Take your empty Brother bobbin. Find the small hole on the top edge of the bobbin.
* Push the end of the thread through this hole. Push it from the inside of the bobbin to the outside.
* Leave about two to three inches of thread hanging out. This tail helps you start.
* Place the bobbin onto the bobbin winder spindle. This is a small metal or plastic peg. It is usually near the spool pin. Make sure the bobbin clicks into place firmly.
Step 4: Engage the Bobbin Winder
Now, you need to engage the bobbin winder.
* Push the bobbin winder spindle to the right. You should hear a click. This means it is locked into place.
* Many Brother machines will stop the needle from moving when the bobbin winder is engaged. If your machine does not do this automatically, you might need to loosen the handwheel. Some older models have a small knob in the center of the handwheel. You turn it to stop the needle.
Step 5: Start Winding
Hold the thread tail that sticks out of the bobbin. Hold it gently but firmly.
* Lightly press the foot controller. The bobbin will start to spin.
* Let the bobbin wind slowly at first. This helps the thread wrap evenly.
* After a few wraps, you can cut the thread tail close to the bobbin. This stops it from tangling.
* Continue to press the foot controller. The bobbin will fill quickly. Most Brother machines have an auto-stop feature. The winder will stop when the bobbin is full. It will move back to the left.
Step 6: Finish Winding
Once the bobbin stops winding, release the foot controller.
* Push the bobbin winder spindle back to the left.
* Remove the full bobbin from the spindle.
* Cut the thread connecting the bobbin to the spool.
You now have a perfectly wound bobbin. This bobbin is ready for loading Brother bobbin into your machine.
Table: Common Brother Bobbin Winding Issues and Fixes
| Issue | Possible Cause | Simple Fix |
|---|---|---|
| Thread winds unevenly (lumps) | Thread not in tension disc; bobbin not seated | Re-thread through tension disc; ensure bobbin clicks onto spindle. |
| Bobbin doesn’t wind or winds too slow | Bobbin winder not engaged; foot controller not pressed | Push spindle fully to the right; press foot controller firmly. |
| Thread breaks during winding | Too much tension; thread caught; faulty thread | Check thread path for snags; reduce winding speed; use better quality thread. |
| Bobbin overflows or keeps winding | Auto-stop not working; bobbin not right size | Stop manually if auto-stop fails; check bobbin type for your machine. |
| Bobbin won’t spin | Spindle stuck; thread tangled | Clear any thread from spindle; ensure spindle moves freely left/right. |
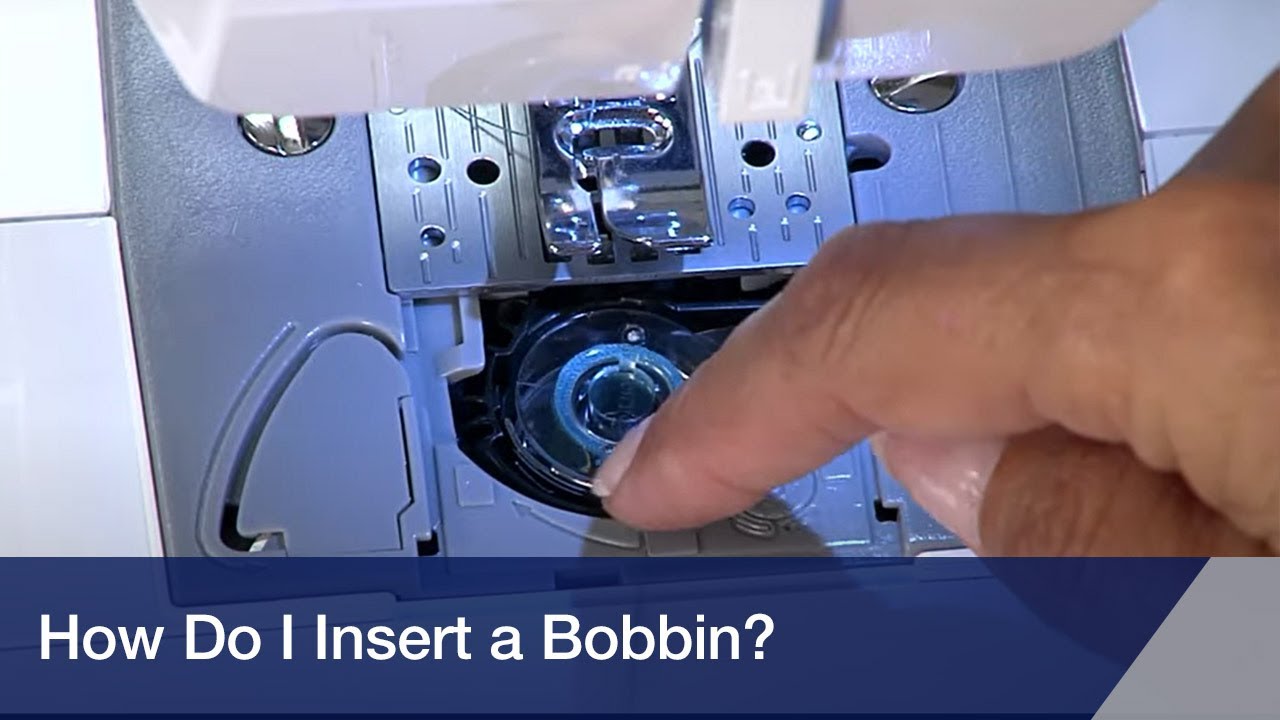
Inserting Bobbin Brother Machine: Drop-In Style
Most modern Brother sewing machines use a horizontal drop-in bobbin system. This makes loading the sewing machine lower thread very easy. This is known as Brother drop-in bobbin loading.
Step 1: Open the Bobbin Cover
The bobbin cover is usually a clear plastic plate. It is located on the flat part of your sewing machine. This is directly under the needle.
* Slide the cover to the right or left. It will unlatch.
* Remove the cover completely. You will see the bobbin housing. This is where the Brother bobbin case usually sits, though with drop-in, it’s more of a built-in area.
Step 2: Position the Bobbin
Take your freshly wound bobbin.
* Hold it so the thread unwinds in the correct direction. For most Brother drop-in bobbins, this means the thread should unroll counter-clockwise. It should look like the letter “P” when you hold it up. Or, think of it unwinding from the left side of the bobbin.
* Gently drop the bobbin into its slot. It should sit flat and snug.
Step 3: Guide the Thread
This is a critical step for proper bobbin thread tension Brother.
* With the bobbin in place, find the thread guide slots. These are small grooves. They lead from the bobbin area.
* Pull the bobbin thread through these grooves. Follow the arrows or numbers marked on the machine.
* The thread should go under a small metal tension spring. It will then pass into a cut-out slot.
* Pull the thread firmly until it clicks into place. This click means the thread is correctly seated under the tension spring. This is vital for even stitches. Leave a tail of about 4-6 inches.
Step 4: Retrieve the Bobbin Thread
Now you need to bring the bobbin thread up through the needle plate hole. This joins it with the upper thread.
* Make sure your presser foot is up.
* Hold the end of the upper thread. Do not hold the bobbin thread yet.
* Slowly turn the handwheel towards you. Turn it one full rotation. The needle will go down into the needle plate. It will then come back up.
* As the needle comes up, it should catch the bobbin thread. It will pull a loop of the bobbin thread up through the needle plate hole.
* Use your fingers or a small tool to pull this loop up.
* Once you have the loop, pull the bobbin thread tail through.
Step 5: Close the Bobbin Cover
- Put both the upper thread and the bobbin thread under the presser foot. Lay them towards the back of the machine.
- Replace the bobbin cover plate. Slide it back until it clicks shut.
You have now successfully threaded your Brother drop-in bobbin. This completes the sewing machine lower thread setup.
Table: Drop-In Bobbin Threading Checklist
| Step | Check | Common Error |
|---|---|---|
| 1. Cover Removal | Cover removed completely? | Not fully open, blocks access. |
| 2. Bobbin Direction | Thread unwinding counter-clockwise (P shape)? | Winding clockwise, causes tension issues. |
| 3. Thread Path | Thread through all grooves/tension spring? | Thread not seated, causes loose stitches. |
| 4. Retrieve Loop | Upper thread held; handwheel turned fully? | Upper thread not held, no loop forms. |
| 5. Threads Under Foot | Both threads under presser foot and back? | Threads not positioned, causes tangles. |
| 6. Cover Replaced | Cover snapped shut securely? | Cover loose, can fall off during sewing. |
Dealing with the Brother Bobbin Case (Older Models)
Some older Brother sewing machines, or specialty models, use a removable Brother bobbin case. This case holds the bobbin. It slides into the machine from the front or side. While less common on new Brother home machines, it’s good to know.
Step 1: Remove the Bobbin Case
- Open the accessory tray or front cover of your machine.
- Locate the bobbin case. It is usually a small metal case. It has a latch or handle.
- Unhook the latch or pull the handle. Carefully pull the bobbin case out.
Step 2: Load the Bobbin into the Case
- Take your wound bobbin.
- Place it into the bobbin case. The thread should unwind in the correct direction. For most bobbin cases, the thread unwinds clockwise. It should come over the top of the bobbin. It should then pass to the left side of the case.
- Pull the thread into the small slot on the side of the bobbin case. This slot leads to the tension spring.
- Pull the thread firmly under the tension spring. Continue pulling until the thread is in the final guide. There might be a second, smaller slot or hole.
- Leave a thread tail of about 4-6 inches.
Step 3: Insert the Bobbin Case into the Machine
- Hold the bobbin case by its latch or hinge. The thread tail should hang freely.
- Carefully slide the bobbin case back into the shuttle area of your machine. This is where you removed it from.
- Push it firmly until it clicks into place. The latch should snap shut.
- Make sure the bobbin case is fully seated. If not, it won’t sew right.
Step 4: Retrieve the Bobbin Thread
This step is the same as with the drop-in bobbin.
* Raise the presser foot.
* Hold the upper thread tail with one hand.
* Turn the handwheel towards you. Turn it slowly for one full cycle. The needle will dip down and come back up. It will catch the bobbin thread.
* Pull the loop of bobbin thread up through the needle plate.
* Pull the full bobbin thread tail through.
Step 5: Close Up
- Place both threads under the presser foot. Point them towards the back of the machine.
- Close the accessory tray or front cover.
Adjusting Bobbin Thread Tension Brother
Proper bobbin thread tension is very important. It makes your stitches look good. Both the upper thread and the lower thread (bobbin thread) need to have balanced tension. If the bobbin thread tension Brother is off, your stitches will look loose or bumpy.
Signs of Incorrect Tension
- Top thread showing on the bottom of the fabric: The bobbin thread is too tight. Or the upper thread is too loose.
- Bottom thread showing on the top of the fabric: The bobbin thread is too loose. Or the upper thread is too tight.
- Loopy stitches: Can be from very loose bobbin tension or problems with how the thread is seated.
How to Adjust Bobbin Thread Tension
For Brother drop-in bobbins, you generally cannot adjust the bobbin tension directly. It is set at the factory. If you have tension issues with a drop-in bobbin, first check these things:
1. Is the bobbin correctly wound? An unevenly wound bobbin can cause tension problems.
2. Is the bobbin thread correctly seated? Make sure it is fully in the tension spring groove. This is the most common cause of bad tension with drop-in bobbins. Pull the thread. You should feel a slight resistance.
3. Is the upper thread tension correct? Most tension adjustments are done using the upper tension dial. If your upper thread tension is too high, it can pull the bobbin thread up. If it is too low, the bobbin thread can be pulled up by the upper thread. Adjust the upper tension dial first. Start at the middle setting. Test it. Adjust by small amounts.
For machines with a removable Brother bobbin case:
* The bobbin case itself has a small screw. This screw controls the tension.
* To tighten the tension, turn the screw slightly clockwise.
* To loosen the tension, turn the screw slightly counter-clockwise.
* Only turn the screw a tiny bit at a time. A quarter turn can make a big difference. Test after each small adjustment.
Tip: Always test your tension on a scrap piece of fabric. Use the same fabric and thread that you plan to sew with.
Brother Sewing Machine Troubleshooting Bobbin Issues
Even with careful setup, problems can happen. Knowing how to fix them saves time and frustration. This section helps with Brother sewing machine troubleshooting bobbin problems.
Problem 1: Thread Jams or Tangles (Nesting)
- Cause: This often happens when the bobbin thread is not properly pulled through the tension spring. Or the upper thread is not threaded correctly.
- Fix:
- Remove the bobbin and upper thread.
- Re-thread the entire machine, both upper and bobbin. Make sure the presser foot is up when threading the upper part. Make sure the bobbin thread snaps into its tension guide.
- Use the correct bobbin for your machine.
- Make sure both thread tails are under the presser foot and towards the back before starting.
Problem 2: Skipped Stitches
- Cause: Bobbin thread not correctly seated. Or the needle might be bent or dull.
- Fix:
- Check if the bobbin thread is fully in its tension groove.
- Change the needle. A fresh needle can solve many stitch problems.
- Make sure the bobbin is wound evenly.
Problem 3: Uneven or Loose Stitches
- Cause: Incorrect bobbin thread tension Brother or upper thread tension.
- Fix:
- For drop-in bobbins: Check the upper thread tension dial first. Also, make sure the bobbin thread is seated properly in its tension path.
- For bobbin cases: Adjust the small screw on the bobbin case slightly.
- Make sure the bobbin thread is not too full or too empty.
Problem 4: Bobbin Thread Breaks Often
- Cause: Bobbin thread pulled too tight. Poor quality thread. Burrs on the needle plate or bobbin area.
- Fix:
- Check if the bobbin thread is snagging anywhere in the bobbin area.
- Loosen bobbin tension slightly (for bobbin case).
- Use higher quality thread.
- Check the needle plate hole for rough edges. If you find any, a light sanding with fine-grit sandpaper can help, but be very careful.
Problem 5: Bobbin Not Spinning or Winding
- Cause: Bobbin winder not engaged. Thread not routed correctly for winding.
- Fix:
- Push the bobbin winder spindle fully to the right until it clicks.
- Ensure the thread is wrapped around the bobbin winding tension disc.
- Make sure the handwheel is disengaged (if your machine requires this).
Why Proper Bobbin Threading Matters
Getting the bobbin threading right is more than just following steps. It impacts your sewing in many ways.
* Neat Stitches: When the bobbin thread is correct, your stitches look clean. They are even on both sides of the fabric.
* No Tangling: Correct threading prevents thread jams. It stops nests of thread from forming under your fabric. This saves you time and thread.
* Smooth Sewing: A well-threaded bobbin helps your machine run smoothly. You will have fewer stops to fix problems.
* Strong Seams: When thread tension is balanced, your seams are strong. They hold up better over time.
* Less Frustration: Learning to do this well reduces common sewing headaches. It makes sewing more fun.
Beginner Brother Sewing Machine Setup Tips
For those just starting, setting up your Brother machine might seem like a lot. Focus on these points. They will help you feel more confident.
Practice Makes Perfect
Don’t expect to get it right the first time. Take your time.
* Practice winding a bobbin. Do it a few times until it feels natural.
* Practice inserting bobbin Brother machine until you can do it quickly.
* Repeat the thread retrieval step. This is a common tricky part for new sewers.
Use Good Quality Supplies
- Thread: Use good quality thread. Cheap thread can break easily. It can leave lint in your machine. This leads to problems.
- Bobbins: Always use bobbins made for your Brother machine. They are usually clear plastic. They have the Brother logo or specific model number. Universal bobbins can cause issues.
- Needles: Use the right needle for your fabric. Change your needle often. A dull or bent needle causes many sewing problems.
Clean Your Machine
Lint and dust can build up in the bobbin area. This can affect tension and cause jams.
* After a few projects, remove the bobbin cover and bobbin.
* Use a small brush (often comes with your machine) to clean out any lint.
* Never use canned air. It can push lint deeper into the machine.
Read Your Manual
Your Brother sewing machine manual is your best friend.
* It has specific diagrams for your model. These show the exact thread path.
* It gives tips for your specific machine’s features.
* Keep it handy for quick reference.
Take It Slow
When you are new to sewing, do not rush.
* Follow each step carefully.
* Do not force anything. If something feels stuck, stop and check your steps.
* Adjust tension in small steps. Test after each change.
Frequently Asked Questions (FAQ)
Q1: Can I use any bobbin in my Brother sewing machine?
A1: No. You should only use bobbins made for your Brother machine. These are often clear plastic bobbins, specific to Brother. Using the wrong size or type can cause thread jams. It can also damage your machine.
Q2: My bobbin thread keeps tangling. What am I doing wrong?
A2: This is a common issue often called “nesting.” It usually means the top thread is not threaded correctly. Or the bobbin thread is not seated correctly in its tension path. Re-thread both the top and bobbin threads very carefully. Make sure the presser foot is up when threading the top. Make sure the bobbin thread clicks into its tension slot.
Q3: Why does my bobbin thread look uneven on the fabric?
A3: Uneven bobbin thread usually points to a tension problem. For drop-in bobbins, check your upper thread tension dial first. Also, make sure the bobbin thread is fully seated in its tension guide. For machines with a removable bobbin case, you might need to adjust the small screw on the bobbin case.
Q4: How do I know if my bobbin is wound correctly?
A4: A correctly wound bobbin looks smooth and even. The thread should be wrapped flat. It should fill the bobbin from edge to edge. It should not have lumps or gaps.
Q5: My machine isn’t pulling up the bobbin thread loop. What now?
A5: This often happens if the upper thread is not held firmly when turning the handwheel. Or if the bobbin thread isn’t seated properly. Make sure the upper thread is held gently but with some tension. Turn the handwheel slowly and a full rotation. Ensure the bobbin thread is correctly guided through its tension pathway.
Q6: Do I need to remove the needle for bobbin winding?
A6: No, you do not need to remove the needle. Most Brother machines automatically disengage the needle when the bobbin winder is pushed to the right. If your machine does not, you might need to loosen the handwheel knob to stop the needle from moving. Check your manual for specific instructions for your model.
Concluding Thoughts
Mastering the bobbin winding and threading process is a big step for any sewer. It is especially true for those with a Brother sewing machine. With practice, these steps will become second nature. You will be able to set up your machine quickly. This means more time for creating and less time troubleshooting. Remember to consult your machine’s manual for model-specific details. Happy sewing!