
What is the best way to thread a Brother sewing machine? The best way is to follow a clear, step-by-step process, ensuring each part of the threading path is correct. This guide will walk you through every stage, from setting up your machine to achieving perfect stitches. We’ll cover everything you need to know about your Brother sewing machine bobbin, the upper thread, and ensuring proper tension.
Threading a sewing machine can seem tricky at first, but with a little practice, it becomes second nature. This guide is designed for anyone who has a Brother sewing machine, whether you’re a beginner or just need a refresher. We’ll break down the process into simple, manageable steps.
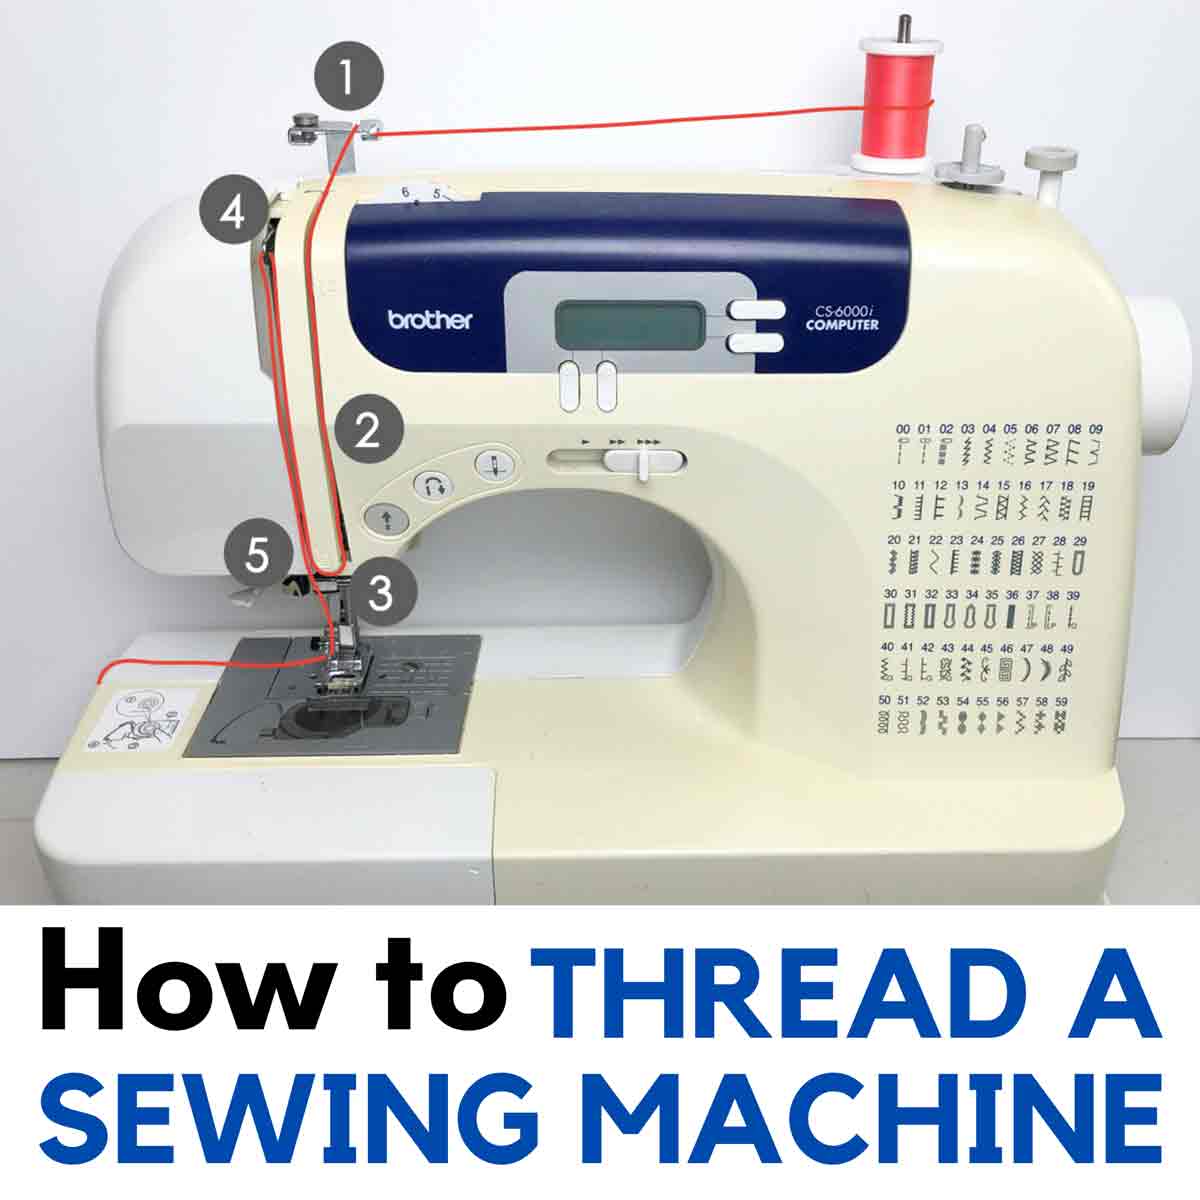
Image Source: mindymakes.com
Getting Started: Your Brother Sewing Machine Setup
Before you begin threading, proper Brother sewing machine setup is crucial. This involves ensuring your machine is ready and that you have the correct supplies.
Essential Supplies for Threading
- Brother Sewing Machine Manual: Always have your Brother sewing machine manual handy. It contains specific diagrams and instructions tailored to your model.
- Quality Thread: Use good quality thread. Cheap thread can break easily and cause issues with tension.
- Correct Bobbin: Ensure you are using the correct type of Brother sewing machine bobbin for your machine. These are usually plastic or metal and are designed to fit perfectly.
- Brother Sewing Machine Needle: Make sure your Brother sewing machine needle is the correct size and type for your fabric and thread. A dull or bent needle can cause skipped stitches or fabric damage.
Preparing Your Machine
- Power Off: Always turn off your sewing machine before threading.
- Raise the Presser Foot: Lift the presser foot lever. This is very important as it opens up the tension discs, allowing the thread to pass through correctly.
- Remove Old Thread: If there’s any old thread still in the machine, remove it completely.
Threading the Upper Thread: Your Brother Sewing Machine Upper Thread
The Brother sewing machine upper thread is what forms the stitches on the top of your fabric. Following the Brother sewing machine threading path accurately is key here.
Step 1: Place the Spool of Thread
- Locate the spool pin on your Brother sewing machine.
- Place your spool of thread onto the spool pin. Ensure it’s facing the correct direction as per your machine’s diagram (usually the thread unwinding from the front or top).
- If your machine has a second spool pin for twin needles or other purposes, ensure it’s either tucked away or used correctly if you’re using it.
Step 2: Wind the Bobbin (If Not Already Done)
Before you can thread the upper thread, you might need to wind a bobbin. This is a separate process, but essential for sewing.
How to Wind a Brother Sewing Machine Bobbin
Winding the Brother sewing machine bobbin is a straightforward process:
- Place the Bobbin: Put an empty bobbin onto the bobbin winder spindle.
- Thread the Bobbin: Guide the end of the thread from your spool through the bobbin winder threading hole, then up and through the small hole in the bobbin itself.
- Secure the Thread: Hold the tail of the thread, and start the winder. Sew a few stitches manually to secure the thread.
- Cut Excess Thread: Trim the excess thread tail close to the bobbin.
- Engage the Winder: Push the bobbin winder spindle towards the designated winder position.
- Start Winding: Press the foot pedal gently. The bobbin will start to wind.
- Stop Winding: Once the bobbin is full, stop the machine. Some machines have an automatic shut-off or a bobbin that stops winding once it reaches a certain fullness.
- Cut the Thread: Cut the thread and remove the wound bobbin.
- Disengage Winder: Return the bobbin winder spindle to its original position.
Table 1: Bobbin Winding Tips
| Tip | Detail |
|---|---|
| Thread Type | Use the same type and weight of thread for bobbin and upper thread. |
| Winding Tension | Ensure thread is wound evenly, not too tight or too loose. |
| Bobbin Winder Tension | Some machines have a tension disc for the bobbin thread. Consult your manual. |
| Direction of Winding | Always wind the bobbin in the direction indicated by your machine’s manual. |
Step 3: Follow the Threading Path
This is where carefully observing the Brother sewing machine threading path comes into play. Look for the numbered or indicated guides on your machine.
- First Guide: Bring the thread from the spool down. Guide it through the first thread guide, usually located near the spool pin.
- Tension Discs: Bring the thread up and then down through the tension discs. This is a critical step. Ensure the thread is seated between the discs. You should feel a slight resistance.
- Take-Up Lever: Guide the thread up again and thread it through the eye of the take-up lever. This lever moves up and down as you sew and helps regulate the thread.
- Second Thread Guide: Bring the thread down and guide it through the second thread guide, often located above the needle bar.
- Needle Clamp Guide: There might be another small guide close to the Brother sewing machine needle. Thread the Brother sewing machine upper thread through this guide.
- Thread the Needle: This is often the most challenging part for beginners.
- Manual Threading: Hold the thread taut with one hand and use the other to guide the end of the thread through the eye of the Brother sewing machine needle.
- Automatic Needle Threader: Many Brother machines have an automatic needle threader. Consult your Brother sewing machine manual for how to use this feature. It typically involves pushing a lever and guiding the thread through a hook.
Step 4: Secure the Thread
- Pull Thread Under Presser Foot: After threading the needle, pull about 4-6 inches of thread through the needle’s eye.
- Place Under Presser Foot: Bring both the upper thread and the bobbin thread (pulled up from underneath) towards the back and place them under the presser foot.
- Lower Presser Foot: Lower the presser foot. This is crucial for the Brother sewing machine tension to work correctly.
Threading the Bobbin (Lower Thread): Your Brother Sewing Machine Lower Thread
The Brother sewing machine lower thread comes from the bobbin and works in conjunction with the upper thread to create a stitch.
Step 1: Insert the Bobbin
- Locate the bobbin case or bobbin holder on your machine. This is usually a removable part or a compartment under the needle plate.
- Hold the wound bobbin with the thread unspooling in the correct direction (usually counter-clockwise, but check your manual).
- Place the bobbin into the bobbin case or holder.
- Guide the thread through the small slit or notch in the bobbin case.
- Pull the thread through the tension spring of the bobbin case.
- Pull the thread further until it comes out of the designated exit slot or hole.
Step 2: Pull Up the Bobbin Thread
- Hold the Upper Thread: Hold the tail of the Brother sewing machine upper thread loosely with your left hand.
- Turn the Handwheel: Slowly turn the machine’s handwheel towards you (counter-clockwise) to lower the needle into the bobbin area.
- Catch the Bobbin Thread: As the needle goes down and comes back up, it will catch the bobbin thread. You should see a small loop of bobbin thread appear.
- Pull the Loop: Use your fingers or tweezers to pull the bobbin thread loop through and out from under the presser foot.
- Position Threads: Now, with the presser foot still up, pull both the upper thread and the bobbin thread towards the back of the machine and place them under the presser foot.
- Lower the Presser Foot: Lower the presser foot.
Checking Your Work: The Importance of Brother Sewing Machine Tension
Proper Brother sewing machine tension is what makes your stitches look neat and professional. If the tension is off, you’ll get loops, puckering, or uneven stitches.
Signs of Incorrect Tension
- Upper thread showing on the underside of the fabric: This usually means the upper thread tension is too loose, or the bobbin tension is too tight.
- Bobbin thread showing on the top side of the fabric: This usually means the upper thread tension is too tight, or the bobbin tension is too loose.
- Fabric puckering: Can be caused by too much tension (either upper or lower) or using the wrong needle/thread combination.
- Skipped stitches: Often caused by a dull needle, incorrect needle size, or the thread not being properly threaded through the tension discs or take-up lever.
Adjusting Tension
Most Brother sewing machines have a dial for adjusting the Brother sewing machine tension of the upper thread.
- Increasing Tension: Turn the dial to a higher number.
- Decreasing Tension: Turn the dial to a lower number.
Important: Only adjust the upper thread tension initially. If you are consistently having issues, your bobbin tension might need adjustment, but this is less common and often requires consulting your Brother sewing machine manual as the bobbin case mechanism can be delicate.
Troubleshooting Common Threading Issues
Even with clear instructions, you might encounter problems. Here are some common issues and their solutions.
Issue: Thread Snapping
- Cause: Dull or bent Brother sewing machine needle, wrong needle size for fabric, poor quality thread, thread snagged on something, tension too high.
- Solution: Replace the needle. Ensure the needle is the correct size for your fabric and thread. Try a different spool of thread. Re-thread the machine carefully, ensuring the thread path is clear. Check and adjust Brother sewing machine tension.
Issue: Skipped Stitches
- Cause: Needle inserted incorrectly, needle too small or large, bent or dull needle, thread not seated properly in tension discs, presser foot not lowered, incorrect needle type (e.g., ballpoint for knit vs. universal for woven).
- Solution: Ensure the needle is inserted correctly and all the way up. Use the correct needle size and type. Re-thread the machine, paying close attention to the tension discs and take-up lever. Make sure the presser foot is down.
Issue: Thread Bunching Under Fabric
- Cause: Bobbin not inserted correctly, bobbin thread tension too loose, upper thread tension too tight, Brother sewing machine bobbin not wound properly, presser foot not lowered.
- Solution: Ensure the bobbin is inserted correctly and the thread is through the tension slit. Adjust upper thread tension (usually decrease). Make sure the presser foot is down. Re-wind the Brother sewing machine bobbin if it’s uneven.
Issue: Machine Not Picking Up Bobbin Thread
- Cause: Bobbin inserted backward, bobbin thread not pulled through the tension slit, needle not threaded correctly, presser foot not lowered, upper thread not threaded properly.
- Solution: Re-insert the bobbin in the correct direction and ensure the thread is through the tension slit. Re-thread the upper thread, paying attention to all guides and the take-up lever. Make sure the presser foot is down.
Advanced Tips and Maintenance
Once you’ve mastered basic threading, consider these tips for smoother sewing.
Understanding Your Brother Sewing Machine Parts
Familiarize yourself with the key Brother sewing machine parts involved in threading:
- Spool Pin: Holds the thread spool.
- Thread Guides: Direct the thread along the correct path.
- Tension Discs: Control the tightness of the upper thread.
- Take-Up Lever: Moves up and down to regulate thread flow.
- Needle Clamp: Holds the needle in place.
- Presser Foot: Holds the fabric down while sewing.
- Bobbin Winder: Used to wind bobbins.
- Bobbin Case/Holder: Houses the bobbin.
- Needle Plate: Where the needle passes through the fabric.
Threading Variations for Different Fabrics
While the general Brother sewing machine threading path remains the same, the type of thread and needle you use will change based on your fabric.
- Delicate Fabrics (Silk, Chiffon): Use a fine needle (size 60-70) and fine thread. Ensure tension is not too tight to avoid puckering.
- Medium Weight Fabrics (Cotton, Linen): Use a universal needle (size 70-80) and all-purpose thread.
- Heavy Fabrics (Denim, Canvas): Use a stronger needle (size 90-110) and heavier duty thread. You may need to adjust the Brother sewing machine tension slightly tighter.
- Knits and Stretchy Fabrics: Use a ballpoint or stretch needle to avoid snagging or breaking the fabric threads. Polyester thread is often recommended for its stretch.
When to Seek Professional Help
If you’ve followed all steps and troubleshooting tips from your Brother sewing machine manual and are still experiencing issues, it might be time to have your machine serviced by a qualified technician. This is especially true if you suspect problems with the internal mechanisms affecting tension or thread path.
Frequently Asked Questions (FAQ)
Here are some common questions about threading a Brother sewing machine:
Q1: Why does my Brother sewing machine keep jamming?
A1: Jamming usually occurs when the Brother sewing machine upper thread and Brother sewing machine lower thread are not synchronized correctly. This can be due to incorrect threading, a Brother sewing machine bobbin inserted backward, the presser foot being up, or the Brother sewing machine tension being significantly off. Always ensure you’ve followed the threading path precisely and have pulled up the bobbin thread before starting to sew.
Q2: Can I use any brand of thread with my Brother sewing machine?
A2: While you can use most brands of good quality thread, it’s best to use thread specifically recommended for sewing machines. Avoid very cheap or old thread, as it can be prone to breaking and may affect your Brother sewing machine tension. Always match the thread weight to your fabric and needle.
Q3: How do I know if I’ve threaded the tension correctly?
A3: When the presser foot is down, you should feel a slight resistance when pulling the Brother sewing machine upper thread through the guides and tension discs. If it pulls too easily, the tension is likely too loose. If it’s very hard to pull, the tension might be too tight. The best way to check is to sew a test seam on a scrap of your fabric.
Q4: My Brother sewing machine skips stitches. What should I do?
A4: Refer to the troubleshooting section above. Most commonly, skipped stitches are caused by a damaged or incorrectly inserted needle, or the thread not being properly routed through the machine’s guides and tension discs.
Q5: Where can I find a diagram for the Brother sewing machine threading path?
A5: The most reliable place for a diagram specific to your machine is the Brother sewing machine manual. If you don’t have a physical copy, you can usually find a PDF version on the official Brother website by searching for your specific sewing machine model number.
By following these steps and tips, you’ll be able to thread your Brother sewing machine with confidence, ensuring smooth and beautiful stitches for all your sewing projects. Happy sewing!