
Image Source: i.ytimg.com
Step-by-Step: How to Thread a Brother Sewing Machine Bobbin
What is the most crucial step in preparing your Brother sewing machine for a project? It’s loading the bobbin correctly. This guide will walk you through the entire process, ensuring your Brother sewing machine bobbin winding is smooth and your Brother sewing machine setup is complete. We will cover everything from the initial threading to troubleshooting common Brother bobbin winder problems.
Getting Your Brother Sewing Machine Ready for Bobbin Winding
Before you start the actual Brother sewing machine bobbin winding, it’s important to prepare your machine and your supplies. This ensures a hassle-free experience and prevents common errors.
Gathering Your Supplies
To begin, you’ll need a few essential items:
- Your Brother Sewing Machine: Of course, this is the main star!
- A Bobbin: Make sure it’s the correct type for your Brother model. Using the wrong bobbin can cause stitching issues.
- Thread: Select the thread color and type you’ll be using for your project.
- Thread Spool: The spool of thread you’ll be using.
- Bobbin Winder: This is usually a small spindle on your machine.
- Scissors or Thread Cutter: To snip the thread.
Locating Key Bobbin Winding Components
Every Brother sewing machine has specific parts dedicated to bobbin winding. Familiarizing yourself with these is key to mastering the how to wind a Brother bobbin process.
- Bobbin Winder Spindle: This is where you’ll place the bobbin to be wound. It’s usually a small peg that pops out or lifts up when you engage the winding function.
- Thread Guide for Winding: A specific thread guide is designated for bobbin winding. It’s often different from the main thread guides used for sewing.
- Bobbin Winder Stopper or Clutch: This mechanism disengages the sewing needle from the drive system when you’re winding a bobbin, so your needle doesn’t move up and down.
The Step-by-Step Guide to Brother Sewing Machine Bobbin Winding
Now that you have your supplies and know where the key components are, let’s dive into the actual Brother bobbin threading guide.
Step 1: Preparing the Thread and Bobbin
This initial step sets the stage for a perfectly wound bobbin.
- Place the Thread Spool: Put your spool of thread onto the main spool pin of your sewing machine. Ensure it’s seated correctly and the thread unwinds smoothly.
- Thread the Bobbin Winder: This is where it differs from threading the needle.
- Find the designated thread guide for bobbin winding. It’s usually a small metal loop or hole located near the bobbin winder spindle.
- Pass the thread from the spool through this specific bobbin winding thread guide.
- Insert the Bobbin: Place your empty bobbin onto the bobbin winder spindle. Make sure it sits snugly and is oriented correctly. Some bobbins have a small hole on the side that should align with a notch on the spindle.
- Bring the Thread Through the Bobbin: Take the end of the thread and pass it through the hole in the bobbin. You want to pull about 4-6 inches of thread through the bobbin and let it hang down.
Step 2: Engaging the Bobbin Winder
This step prepares the machine for winding.
- Push the Bobbin Winder Spindle: Gently push the bobbin winder spindle towards the side of the machine where the bobbin sits. You should hear or feel a slight click as it engages.
- Disengage the Needle: On most Brother sewing machines, engaging the bobbin winder automatically disengages the needle. This is crucial for safety and to prevent damage. If your machine has a separate clutch mechanism, you might need to turn a knob or push a lever to disengage the handwheel from the main sewing mechanism. Check your machine’s manual if you’re unsure.
Step 3: Starting the Bobbin Winding Process
With everything prepared, it’s time to start winding.
- Hold the Thread Tail: Before you start the motor, hold the tail of the thread that you pulled through the bobbin firmly. This prevents it from getting tangled in the initial winding.
- Gently Press the Foot Pedal: Slowly and gently press the foot pedal. The bobbin should start to spin, and the thread will begin to wind onto it.
- Maintain Tension: As the bobbin starts to wind, keep a light tension on the thread tail. This helps ensure the first few wraps are secure.
- Trim the Thread Tail: Once a few wraps of thread are on the bobbin, use your scissors or thread cutter to trim the excess thread tail that you were holding. Be careful not to cut the thread that’s actively winding.
Step 4: Winding the Bobbin Evenly
Even winding is key for good stitch quality.
- Observe the Winding: Watch as the thread winds onto the bobbin. The Brother bobbin winding mechanism is designed to distribute the thread evenly.
- Guide the Thread (If Necessary): In most cases, your Brother sewing machine will handle the thread distribution automatically. However, if you notice the thread building up on one side, you can very gently guide the thread with your finger, ensuring it goes onto the bobbin evenly. Don’t force it; a light touch is all that’s needed.
- Watch the Speed: Try to maintain a consistent speed with the foot pedal. Too fast can lead to uneven winding or thread breakage.
Step 5: Stopping the Bobbin Winding
Knowing when to stop is as important as knowing when to start.
- Automatic Stop: Many Brother sewing machines have an automatic stop feature. Once the bobbin is full, the bobbin winder spindle will usually disengage on its own, or the winding will slow down significantly.
- Manual Stop: If your machine doesn’t have an automatic stop, you’ll need to watch the bobbin. When it’s nearly full, but not overflowing, ease up on the foot pedal to stop the machine.
- Disengage the Bobbin Winder: Once winding is complete, push the bobbin winder spindle back to its original position. This will re-engage the sewing needle with the drive system.
Step 6: Removing the Wound Bobbin
The final step in the winding process.
- Cut the Thread: Cut the thread connecting the bobbin to the spool.
- Lift the Bobbin: Carefully lift the wound bobbin off the bobbin winder spindle.
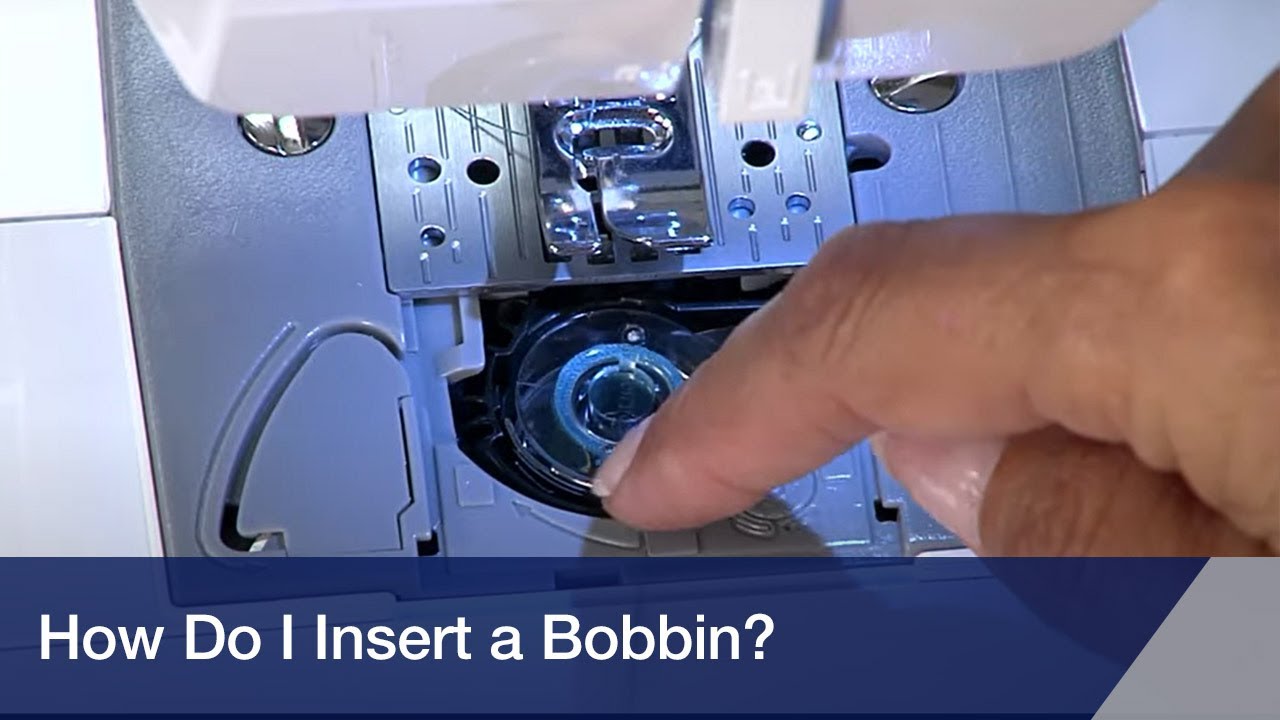
Loading the Wound Bobbin into the Brother Sewing Machine Bobbin Case
Now that you have a beautifully wound bobbin, it’s time to learn Brother sewing machine bobbin loading. The way you load the bobbin depends on whether your Brother machine has a top-loading bobbin or a front-loading bobbin case.
For Top-Loading Bobbin Systems
Top-loading bobbins are very user-friendly.
- Remove the Needle Plate: Lift off the sewing machine’s needle plate or presser foot area cover. This typically slides or lifts off easily.
- Locate the Bobbin Case: You’ll see a clear plastic cover where the bobbin is housed. Remove this cover if it’s in place.
- Insert the Bobbin: Place the wound bobbin into the bobbin case holder. The thread should be coming from the top of the bobbin.
- Thread the Bobbin Case: This is a crucial step for proper stitch formation.
- Look for a small slot or groove on the side of the bobbin case holder.
- Take the end of the thread from the bobbin and guide it into this slot.
- Pull the thread through the small tension opening at the end of the slot.
- The thread should be running from the bobbin, up and to the left, through the tension.
- Replace the Bobbin Cover: Put the clear plastic cover back in place.
For Front-Loading Bobbin Case Systems
Front-loading systems involve a removable bobbin case.
- Open the Machine Cover: Open the flap or cover on the front of your Brother sewing machine where the bobbin compartment is located.
- Remove the Empty Bobbin Case: Your machine will have a removable bobbin case. Gently pull it out.
- Insert the Bobbin: Place the wound bobbin into the removable bobbin case. Ensure the thread is unwinding from the front of the bobbin.
- Thread the Bobbin Case: This is critical for the correct Brother bobbin tension.
- You’ll see a small slot on the side of the bobbin case.
- Pass the thread through this slot and then through the small hole at the end of the slot.
- The thread should exit the bobbin case, ready to be picked up by the needle.
- Insert the Loaded Bobbin Case: Carefully place the loaded bobbin case back into the machine’s compartment. Make sure it’s seated correctly and the bobbin case lever (if present) is in the correct position. Close the front cover.
Bringing the Bobbin Thread Up to the Needle
Once the bobbin is loaded correctly, you need to bring the bobbin thread up to meet the needle thread.
- Position the Needle: Turn the handwheel towards you to lower the needle.
- Catch the Bobbin Thread: As the needle goes down and comes back up, it will catch the bobbin thread.
- Pull the Thread: Use your fingers or a seam ripper to gently pull the bobbin thread loop up through the needle plate opening.
- Thread the Machine: Now, thread the top thread through the needle as usual.
- Bring Both Threads to the Back: Hold both the top thread and the bobbin thread ends and gently pull them towards the back of the machine, under the presser foot. You should now have both threads ready to start sewing.
Common Brother Bobbin Winder Problems and Solutions
Even with a good guide, you might encounter some issues. Here are common Brother bobbin winder problems and how to fix them:
| Problem | Possible Cause | Solution |
|---|---|---|
| Bobbin not winding evenly. | Thread not guided correctly, tension too tight, or wrong bobbin. | Ensure the thread is going through the correct bobbin winding guide. Check if the thread is snagging. Use the correct type of bobbin. Gently guide the thread if needed. |
| Thread breaking during winding. | Thread snagging, sharp edges on bobbin or spindle, or tension too high. | Check for any burrs or rough spots on the bobbin or spindle. Ensure the thread is smoothly running through all guides. Loosen the Brother bobbin tension slightly if possible on the bobbin itself (if adjustable). |
| Bobbin winding too loosely. | Not holding the thread tail securely at the start, or not enough thread pulled through the bobbin. | Hold the thread tail firmly for the first few wraps. Ensure you pull enough thread (4-6 inches) through the bobbin hole. |
| Machine stops winding before bobbin is full. | Bobbin winder clutch not fully engaged, or the machine’s automatic stop sensor is dirty or faulty. | Ensure the bobbin winder spindle is pushed in fully. Clean any lint or debris around the bobbin winder area. Consult your manual or a technician if the issue persists. |
| Bobbin spins but thread doesn’t wind. | Thread not passed through the bobbin hole, or bobbin is not seated properly. | Make sure the thread is fed through one of the bobbin’s holes. Check that the bobbin is securely on the spindle. |
| Bobbin winds, but thread slips off. | Not enough thread tail secured initially, or thread guide issues. | After trimming the tail, ensure the thread is guided into the bobbin hole before starting. Re-check the path of the thread for the winding. |
Maintaining Your Brother Sewing Machine Bobbin Holder and Winding Mechanism
Regular maintenance ensures your Brother bobbin winding mechanism and Brother sewing machine bobbin holder function optimally.
- Clean Lint and Dust: After each significant sewing session, remove the bobbin and brush away any lint or dust from the bobbin case area and the bobbin winder spindle. A small brush or compressed air can be very effective.
- Check for Thread Snags: Periodically inspect the thread path for the bobbin winder, looking for any frayed threads or snags that could interfere with the winding process.
- Lubrication: While not always necessary for the winding mechanism itself, keeping the main sewing machine parts lubricated according to your manual’s instructions can indirectly contribute to smoother operation.
Tips for Perfect Bobbin Winding on Your Brother Machine
Here are some extra tips to help you master how to wind a Brother bobbin:
- Use the Right Bobbin: Always use bobbins specifically designed for your Brother sewing machine model. Generic bobbins can cause tension issues and damage.
- Check the Brother Bobbin Tension: While the bobbin case itself usually has internal tension, sometimes the way you thread it can affect the final outcome. Ensure the thread passes through the tension slot cleanly.
- Wind Multiple Bobbins: If you have a large project, wind several bobbins at once to save time later.
- Match Thread Weight: For best results, try to match the weight and type of thread on your bobbin to the thread you’re using in the needle.
- Don’t Overwind: Overwinding can lead to thread breakage or the thread unraveling prematurely. Stop when the bobbin is full.
- Practice: The more you practice, the more comfortable and proficient you’ll become with Brother bobbin threading guide.
Frequently Asked Questions About Brother Bobbin Winding
Q: Can I use any type of thread to wind my Brother sewing machine bobbin?
A: While you can wind many types of thread, it’s best to use thread that is similar in weight and fiber content to the thread you’ll be using in the needle. This ensures balanced stitches and prevents skipped stitches or puckering. Very thick or very thin threads might require special attention.
Q: Why does my bobbin thread keep breaking when winding?
A: This could be due to several reasons: the thread might be snagging on something, there might be a burr on the bobbin or winder spindle, or the thread path isn’t correct. Double-check all the thread guides and ensure the bobbin is seated correctly.
Q: My bobbin isn’t winding evenly. What should I do?
A: Ensure you are holding the thread tail firmly for the first few wraps to secure it. If the thread still winds unevenly, you can very gently guide it with your finger to distribute it, but avoid forcing it. Make sure the thread is coming smoothly from the spool.
Q: What is the correct way to insert a bobbin into the Brother bobbin case?
A: For most Brother machines, the bobbin should sit in the case so the thread unwinds from the front. Then, the thread needs to be passed through the tension slot on the side of the bobbin case. Always refer to your specific model’s manual for precise instructions.
Q: I can’t seem to get the bobbin thread to come up. What’s wrong with the Brother sewing machine bobbin loading?
A: Ensure the needle is correctly inserted and that you’re turning the handwheel towards you. The needle must be down to catch the bobbin thread. If it still doesn’t work, check that the bobbin is loaded correctly and the thread is properly guided through the bobbin case tension.
By following this comprehensive guide, you’ll be well-equipped to tackle any Brother sewing machine bobbin winding task and ensure your Brother sewing machine is always ready for your creative projects. Happy sewing!