
Can I thread a Brother sewing machine easily?** Yes, threading a Brother sewing machine can be a straightforward process once you know the steps. This guide will walk you through how to thread your Brother sewing machine, from setting up the machine to winding and inserting the bobbin, and finally threading the upper thread.
The Essential Steps to Brother Sewing Machine Threading
Sewing is a wonderful hobby and a practical skill. At its heart is the ability to get your machine ready to stitch. For anyone who owns a Brother sewing machine, mastering the threading process is the first crucial step. This isn’t just about getting the thread through the right holes; it’s about ensuring your machine is set up correctly for beautiful, consistent stitches. Whether you’re a beginner or just need a refresher, this guide will break down Brother sewing machine threading into simple, manageable steps. We’ll cover everything from preparing your thread and needle to winding and inserting the bobbin, and finally, the all-important task of threading the upper thread, including how to use the sewing machine needle threader on compatible models.
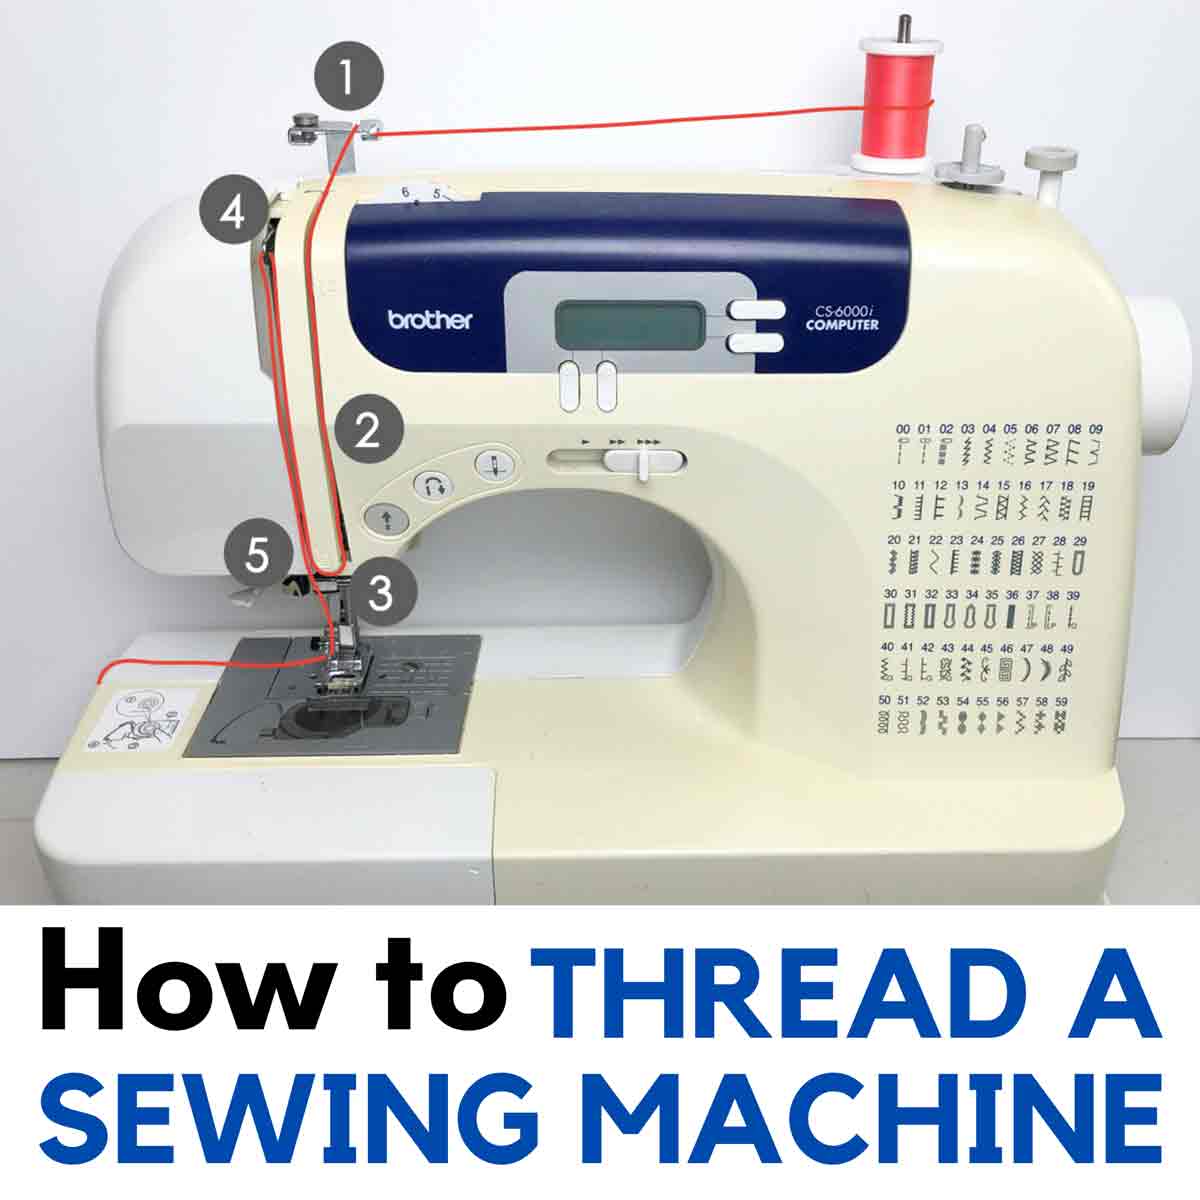
Image Source: mindymakes.com
Preparing Your Sewing Machine for Threading
Before you even touch the thread, proper sewing machine setup is key. This involves a few foundational checks to ensure a smooth threading experience and prevent common issues.
Checking Your Needle
The needle is where the upper thread enters the fabric. A bent, dull, or incorrect needle can cause skipped stitches, thread breakage, and even damage to your machine.
- Inspect the Needle: Gently feel the needle for any burrs or rough spots. Look for any signs of bending or damage.
- Ensure Correct Type: Brother sewing machines often have specific needle recommendations. Consult your Brother sewing machine manual to confirm you’re using the right type of needle for your fabric and thread. Common types include universal, ballpoint (for knits), and sharp (for wovens and leather).
- Install Properly: Needles are typically inserted with the flat side facing the back of the machine. Push the needle up into the needle clamp as far as it will go, then tighten the clamp screw.
Selecting the Right Thread
The quality and type of thread significantly impact your stitches.
- Choose Good Quality Thread: Cheap thread can fray easily, break, and cause lint buildup in your machine. Opt for reputable brands.
- Match Thread to Fabric: Use thread that is suitable for your fabric type. Cotton thread for cotton fabrics, polyester for most synthetics, and specialized threads for silks or heavy-duty materials.
- Avoid Old Thread: Thread can degrade over time, becoming brittle. Use fresh thread for best results.
Preparing the Thread Spool
How you place your thread spool can affect how smoothly it unwinds.
- Spool Placement: Most Brother machines have a vertical spool pin. Place your spool on the pin with the thread unwinding from the front or the top, depending on your machine’s design (refer to your manual). Some machines may have a horizontal spool pin for specific types of thread or if using a twin needle.
- Thread Cap/Stopper: Use the thread cap or stopper provided with your machine to keep the spool securely in place and prevent it from wobbling.
Bobbin Winding and Insertion: The Foundation of Your Stitches
The bobbin provides the lower thread that interlocks with the upper thread to create a stitch. Proper bobbin winding and inserting bobbin are fundamental.
Bobbin Winding: Getting the Lower Thread Ready
Winding a bobbin correctly ensures an even supply of thread for your stitches.
Steps for Bobbin Winding:
- Place the Bobbin on the Winder: Take an empty bobbin and place it onto the bobbin winding spindle. It usually clicks or slides into place.
- Guide the Thread:
- Take the end of your thread from the spool.
- Find the small hole on the side of the bobbin.
- Pass the thread through this hole from the inside to the outside.
- Hold the thread end securely.
- Engage the Bobbin Winder:
- Many Brother machines have a bobbin winder stopper. Push the bobbin winder spindle towards the stopper to engage the bobbin winding mechanism.
- On some models, you might need to lift the presser foot slightly or disengage the handwheel for winding. Check your Brother sewing machine manual.
- Start Winding:
- Hold the thread tail firmly for the first few wraps.
- Begin sewing slowly. The machine will start winding the thread onto the bobbin.
- Once you have a few wraps, snip the thread tail close to the bobbin.
- Wind Evenly: As the bobbin fills, guide the thread gently from side to side across the bobbin. Some machines have an automatic thread guide that moves for you. Try to wind the bobbin evenly, without overlapping or gaps.
- Stop Winding: The bobbin will stop winding automatically when it’s full, or you can stop it manually. Some machines have a mechanism that automatically disengages the stitching when the bobbin is full.
- Cut the Thread and Remove the Bobbin: Cut the thread coming from the spool. Release the bobbin winder spindle from the stopper and remove the wound bobbin.
Tips for Bobbin Winding:
- Use the Correct Bobbins: Always use the bobbins recommended for your specific Brother sewing machine model. Using the wrong size or type can cause serious issues.
- Match Thread Color: Wind multiple bobbins in advance with different colors to be ready for various projects.
- Wind with the Right Tension: The thread should be wound snugly but not so tight that it’s difficult to unwind.
Inserting Bobbin: Placing the Bobbin in the Machine
The correct placement of the bobbin is crucial for threading the bobbin case and for the machine to function properly.
Steps for Inserting Bobbin:
The method for inserting the bobbin varies slightly depending on whether your Brother machine has a front-loading or top-loading bobbin system.
For Top-Loading Bobbin Systems (Most Common on Modern Brothers):
- Lift the Needle: Ensure the sewing machine needle is in its highest position.
- Remove the Bobbin Cover: Lift off the clear plastic bobbin cover (if present) and remove the bobbin case.
- Place the Bobbin:
- Take your wound bobbin.
- Look for an arrow or a diagram on the bobbin case or the machine itself indicating the direction the bobbin should spin. Typically, the thread should unwind counter-clockwise.
- Place the bobbin into the bobbin case, ensuring it spins in the correct direction.
- Thread the Bobbin Case:
- Find the small slit or notch on the bobbin case.
- Pull the thread from the bobbin through this slit or notch. This secures the thread and helps with tension. The thread should lead off the bobbin smoothly.
- Reinsert the Bobbin Case:
- Align the bobbin case with the housing inside the machine.
- Gently push it into place. You might hear a faint click.
- Replace the bobbin cover.
For Front-Loading Bobbin Systems (Drop-in Bobbin):
- Lift the Needle: Ensure the sewing machine needle is in its highest position.
- Remove the Needle Plate: You might need to remove a small metal plate or a cover to access the bobbin area.
- Place the Bobbin:
- Take your wound bobbin.
- Identify the direction of rotation. The thread usually unwinds counter-clockwise from the bobbin.
- Place the bobbin into the bobbin holder (the bobbin case is often integrated into the machine’s shuttle race).
- Thread the Bobbin:
- Pull the thread from the bobbin and guide it through the tension slot or a small clip designed to hold the thread securely. The thread should be able to pull smoothly.
- Replace the Needle Plate: Reattach any covers or plates you removed.
Important Note on Bobbin Insertion: If you insert the bobbin incorrectly or don’t thread it through the tension slot, the machine will not stitch properly, or the thread will jam. Always refer to your Brother sewing machine manual for precise instructions for your model.
Threading the Upper Thread: The Final Crucial Step
This is where the upper thread sewing machine comes into play. Getting this right is essential for creating a balanced stitch.
Steps for Threading the Upper Thread:
- Raise the Presser Foot: Always ensure the presser foot is in the UP position. This opens the tension discs, allowing the thread to pass through correctly.
- Follow the Thread Path: Your Brother sewing machine will have a series of numbered guides or markings etched onto the machine’s body. These are your roadmap for threading.
- Thread the Spool Pin: Place your thread spool on the spool pin and secure it with a cap.
- First Guide: Take the thread and pass it through the initial thread guide near the spool pin.
- Thread Take-Up Lever: This is a crucial step. Guide the thread through the eye of the thread take-up lever. The thread MUST go INTO the eye of the lever from the right side and OUT through the left side (or vice-versa depending on machine, but always follow the etched path). Ensure the thread is properly seated in the groove of the lever.
- Second Set of Guides: Continue guiding the thread down, passing it through any additional thread guides as indicated by the numbered path on the machine.
- Tension Discs: The thread will then pass between the tension discs. Make sure it goes between them and not around the outside.
- Lower Thread Guides: Continue guiding the thread downwards, passing it through the lower thread guides and the needle bar thread guides.
- Threading the Needle:
- Manual Threading: Bring the thread to the front of the needle. Hold the thread tail taut with one hand. With the other hand, pass the thread through the eye of the needle. It’s often easier to pass the thread from front to back, but some machines or needle positions might make side-to-side easier.
- Using the Sewing Machine Needle Threader (if available): Many Brother sewing machines come equipped with a sewing machine needle threader.
- Activate the Threader: Usually, there’s a small lever you pull down. This lever will position a small wire hook through the eye of the needle.
- Guide the Thread: Place the thread into the notch on the threader’s hook.
- Release the Lever: Gently push the lever back up or out. The hook will pull the thread through the needle’s eye, leaving a small loop.
- Pull the Loop: Pull the loop of thread through the needle.
- Pull Thread to the Back: After threading the needle, pull a generous amount of thread (about 4-6 inches) to the back of the machine.
Bringing Up the Bobbin Thread
This is the final step in the sewing machine setup for threading. You need to bring the bobbin thread up to meet the upper thread.
Steps to Bring Up the Bobbin Thread:
- Hold the Upper Thread: Gently hold the tail of the upper thread with your left hand.
- Turn the Handwheel: Slowly turn the handwheel towards you (counter-clockwise) to lower the needle into the fabric and then back up to its highest position.
- Catch the Bobbin Thread: As the needle rises, it will catch the bobbin thread and pull a loop of it up through the needle plate opening.
- Pull Up the Loop: Use your fingers or tweezers to grasp the loop of bobbin thread and pull it completely out from under the needle plate.
- Position Threads: Lay both the upper thread and the bobbin thread tails together towards the back of the machine, under the presser foot.
Adjusting Sewing Machine Thread Tension
Once threaded, it’s crucial to check and adjust your sewing machine thread tension for optimal stitch quality.
Checking Your Tension
A balanced stitch looks the same on both the top and bottom of the fabric.
- Test Stitch: Sew a few straight stitches on a scrap piece of fabric similar to what you’ll be using for your project.
- Examine the Stitch:
- Too Tight (Upper Thread): If the bobbin thread is showing on the top side of the fabric, or the stitches look puckered and tight, the upper thread tension is likely too high.
- Too Loose (Upper Thread): If the upper thread is breaking, or the bobbin thread loops are visible on the underside of the fabric, the upper thread tension might be too loose.
- Balanced Stitch: The top and bottom stitches should interlock neatly in the middle of the fabric layers, with no visible thread loops on either side.
Adjusting Tension
- Upper Thread Tension Dial: Most Brother machines have a numbered dial for adjusting the upper thread tension. Lower numbers typically mean looser tension, and higher numbers mean tighter tension.
- Bobbin Tension: The bobbin tension is usually pre-set and rarely needs adjustment. If you suspect a bobbin tension issue (e.g., the bobbin thread is always too loose and you can’t fix it by adjusting the upper tension), consult your Brother sewing machine manual or a service technician, as it often involves a small screw on the bobbin case itself.
- Making Adjustments: If your test stitch shows imbalance, adjust the upper thread tension dial by one or two numbers at a time and sew another test stitch until the tension is balanced.
Troubleshooting Common Threading Issues
Even with a guide, you might encounter a few hiccups. Here are some common problems and solutions:
| Problem | Possible Cause | Solution |
|---|---|---|
| Thread Breaking | 1. Needle is bent, dull, or wrong type. 2. Thread is old or poor quality. 3. Thread is caught or jammed in guides. 4. Upper thread tension is too tight. 5. Bobbin is wound unevenly or incorrectly inserted. |
1. Replace the needle. 2. Use fresh, good-quality thread. 3. Re-thread the machine carefully, ensuring thread follows all paths. 4. Reduce upper thread tension. 5. Rewind the bobbin, ensure correct insertion. |
| Skipped Stitches | 1. Needle is blunt or bent. 2. Needle is inserted incorrectly (flat side wrong way). 3. Needle is the wrong type for the fabric (e.g., using a sharp needle on knits). 4. Machine is not fully threaded, especially the take-up lever. 5. Bobbin is not seated properly. |
1. Replace the needle. 2. Reinsert the needle correctly. 3. Use the correct needle type. 4. Re-thread the machine completely. 5. Ensure the bobbin is correctly inserted and threaded. |
| Thread Bunching Underneath | 1. Upper thread tension is too loose. 2. Bobbin is not seated correctly, or thread is not in the tension slot. 3. Needle is threaded incorrectly through the machine. |
1. Increase upper thread tension. 2. Re-insert the bobbin and ensure the thread is in the tension slot. 3. Re-thread the machine, paying close attention to the take-up lever and all guides. |
| Machine Won’t Stitch | 1. Presser foot is not lowered. 2. Needle is not threaded. 3. Bobbin is missing or not inserted correctly. 4. Handwheel is disengaged for bobbin winding. |
1. Lower the presser foot. 2. Re-thread the needle. 3. Check and correctly insert the bobbin. 4. Ensure the handwheel is in the sewing position. |
Frequently Asked Questions (FAQ)
Q1: How often should I re-thread my Brother sewing machine?
You should re-thread your Brother sewing machine every time you change your upper thread color or type, or when you change the bobbin. It’s also a good practice to re-thread if you encounter stitching problems, as thread can become knotted or misplaced within the machine’s guides.
Q2: What is the sewing machine needle threader?
The sewing machine needle threader is a mechanical device built into some sewing machines, including many Brother models, that helps to automatically pull the thread through the eye of the sewing machine needle. This is a very helpful feature, especially for those who find manual needle threading difficult.
Q3: What does it mean to thread the bobbin case?
Threading the bobbin case refers to the specific way you guide the thread from the wound bobbin through a small slot or notch in the bobbin case itself. This action engages the bobbin tension and allows the machine to pull thread smoothly from the bobbin during sewing.
Q4: How do I know if my sewing machine thread tension is correct?
A balanced stitch is the best indicator of correct sewing machine thread tension. When you sew a test stitch on a fabric scrap, the stitches on the top and bottom should look identical, with no thread loops visible on either side and no puckering.
Q5: Can I use any brand of thread in my Brother sewing machine?
While you can use most reputable brands of sewing thread, it’s best to use good quality thread that is appropriate for your fabric. Very cheap or old thread can cause lint buildup and breakage. Always check your Brother sewing machine manual for any specific thread recommendations.
Mastering Brother sewing machine threading is a foundational skill that unlocks the full potential of your machine. By following these detailed steps and paying attention to the small but important details, you’ll be well on your way to creating beautiful and professional-looking stitches. Happy sewing!