
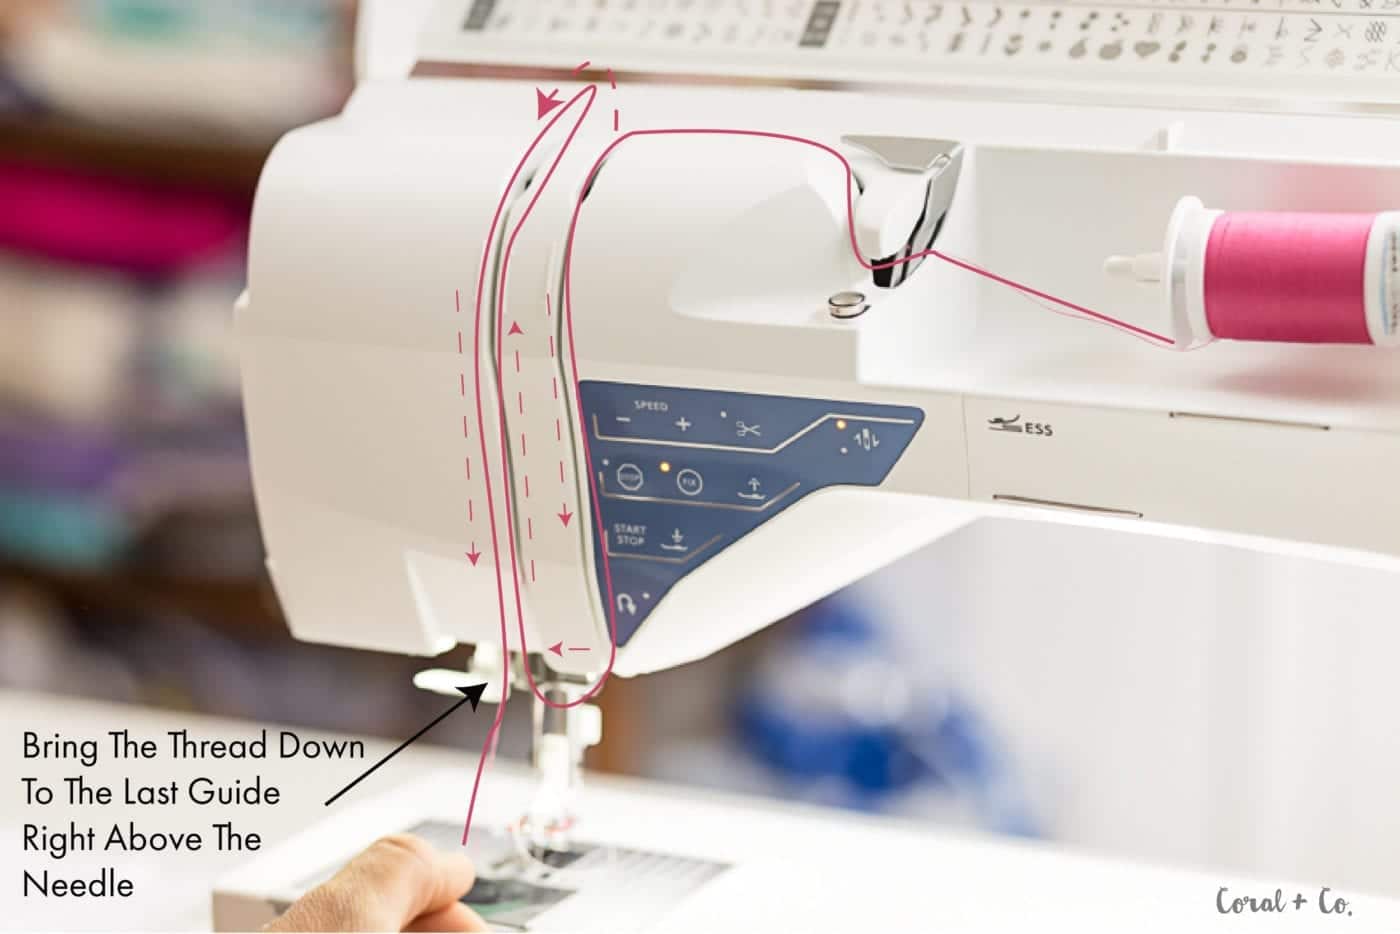
Image Source: www.coralandco.com
Step-by-Step: How To Thread A Husqvarna Viking Sewing Machine
Is threading a Husqvarna Viking sewing machine the same for all models? Not exactly, but many Husqvarna Viking machines share a very similar threading process. This guide will show you the common steps. We will walk through putting thread on the bobbin, putting the bobbin in the machine, and getting the top thread ready to sew. Getting the thread right is key for good stitches.
Knowing how to thread your sewing machine helps you start sewing fun projects. It also helps you fix problems later. If your machine makes messy stitches, often the thread is the reason. This guide will make threading clear and easy for you.
Getting Started with Threading Your Machine
Before you put any thread in your Husqvarna Viking, make sure the machine is ready. Safety first!
- Turn the machine power off. Unplug it if you can easily reach the plug.
- Put the presser foot up. There is a lever for this, usually at the back of the needle area. The presser foot is the little foot that holds your fabric down. Lifting it opens up parts of the threading path.
- Put the needle in its highest spot. Most machines have a handwheel on the side. Turn this wheel towards you slowly until the needle is all the way up.
- Look at your thread. Is it good quality? Does it look smooth? Old or bad thread can cause problems.
Doing these simple steps helps make sure the threading goes smoothly. It opens the path for the thread. It keeps you safe.
Things You Need Ready
Gather these simple things before you start threading:
- Your Husqvarna Viking sewing machine.
- A spool of sewing thread you want to use.
- An empty bobbin that fits your machine. Husqvarna Viking machines use specific bobbin types. Check your manual if you are unsure. Using the wrong bobbin can cause issues.
- Small scissors or thread snips.
- Maybe your Husqvarna Viking sewing machine manual. It’s always good to have it near.
Having everything ready helps you go step-by-step without stopping.
Filling the Bobbin: First Steps
You need two threads to sew: one on top and one from the bottom. The bottom thread is on a bobbin. You need to fill the bobbin with thread before you can use it. This is called bobbin winding.
Grasping Bobbin Winding
This part is easy. Your Husqvarna Viking sewing machine has a special place to fill the bobbin.
- Put the spool on the pin: Find the pin or holder for your thread spool. It’s usually on top or on the side of your machine. Put your spool of thread onto this pin. Make sure the thread comes off the spool the right way. Look at the spool. The thread should come off the front or top, not get stuck.
- Find the bobbin winding guide: There is usually a little hook or guide for the thread near the spool pin. This helps the thread go where it needs to. Pull the thread from your spool and put it under or through this guide.
- Go to the tension disk: Next, the thread needs to go to a small tension disk or area meant for bobbin winding. This makes sure the thread wraps tightly and smoothly onto the bobbin. This
sewing machine tension diskis different from the main one for the top thread. It’s usually a simple round disk or a metal arm with a groove. Wrap the thread around it, usually once or twice, following the marks on your machine. This is part of the specificHusqvarna Viking thread pathfor winding the bobbin. - Get the bobbin ready: Take your empty bobbin. Look for a small hole on the side or top edge of the bobbin. Push the end of your thread through this hole.
- Put the bobbin on the winder pin: Find the bobbin winder pin on your machine. It often sticks out from the top or side. It might have a small clip. Put the bobbin onto this pin. Make sure the thread end sticking out of the bobbin hole is on top.
- Move the pin: Most machines have a way to move the bobbin winder pin. You push it to the side, towards the right. This connects it to the machine’s motor. You might hear a click. When you move the pin, the needle usually stops moving. This is normal.
- Hold the thread end: Hold onto the short end of the thread coming out of the bobbin hole. Keep it tight for the first few turns.
- Start winding: Gently press the foot pedal or the Start/Stop button. The bobbin will begin to spin very fast. It will fill with thread. Hold that thread end for a few seconds, then stop. Cut off that short thread end close to the bobbin. Now keep winding.
- Watch the bobbin fill: Let the bobbin fill up. The machine will usually wind until the bobbin is full. There might be a small guide or stopper. When the thread reaches this stopper, the winding might slow down or stop on its own. Don’t overfill the bobbin.
- Stop and cut: Stop the machine. Move the bobbin winder pin back to its first spot (usually towards the left). Take the full bobbin off the pin. Cut the thread connecting the full bobbin to the spool.
You have now finished Husqvarna Viking bobbin winding. The bobbin is ready to go into the machine. This part is very important. A badly wound bobbin (too loose, too tight, not full) can cause big stitch problems.
Putting the Bobbin in Place
Now you need to put the full bobbin into the machine. This is where the lower thread comes from. Husqvarna Viking machines can have different places for the bobbin. It might go in the front (a front-load style) or drop in from the top (a drop-in style). We will talk about both common ways.
Deciphering Bobbin Placement
Knowing where and how to place the bobbin is key.
For Front-Load Bobbins:
This type of bobbin goes into a metal case, then the case goes into the machine.
- Find the bobbin case: The bobbin case is a small metal part. You will find it under the needle plate. You usually open a cover on the front of the machine.
- Take out the old bobbin (if there is one): If a bobbin case is inside, take it out. There is often a small latch or handle on the case to help you pull it out. Take out the old bobbin.
- Insert the new bobbin: Take your newly wound bobbin. Put it inside the metal bobbin case. Look closely at the bobbin case. There is a slit or opening. The thread needs to go into this slit.
- Tip: Hold the bobbin case in your hand. Put the bobbin in. The thread should come off the bobbin in a certain direction. On many machines, this means the thread should come off the bobbin so it looks like the letter “P” or “Q” when you hold the case. Or, it might come off the other way. Check your
Husqvarna Viking sewing machine manualor look for a little picture on your machine. This direction is very important!
- Tip: Hold the bobbin case in your hand. Put the bobbin in. The thread should come off the bobbin in a certain direction. On many machines, this means the thread should come off the bobbin so it looks like the letter “P” or “Q” when you hold the case. Or, it might come off the other way. Check your
- Pull the thread through the case: After putting the bobbin in the case, pull the thread tail through the slit and under a little spring on the side of the case. This spring provides tension for the bottom thread. Pull about 4-6 inches of thread tail out.
- Put the bobbin case back in: Now, put the bobbin case with the bobbin inside back into the machine. It goes into a round opening under the needle plate. There is usually a little part that sticks out on the bobbin case. This part needs to line up with a notch inside the machine. Push the case in until it clicks or sits firmly in place. Hold onto the thread tail so it doesn’t get caught.
- Close the cover: Close the cover you opened to get to the
Husqvarna Viking bobbin case. Let the thread tail hang out.
You have now used insert bobbin Husqvarna Viking for a front-load machine.
For Top-Load (Drop-in) Bobbins:
This type is more common on newer machines. The bobbin drops right into a spot on top, under a clear cover.
- Open the bobbin cover: This cover is usually a clear plastic slide or door right on the flat part of the machine, under the needle. Slide or open this cover.
- Take out the old bobbin (if there is one): Lift out the old bobbin.
- Insert the new bobbin: Take your newly wound bobbin. Drop it into the bobbin area. Again, the direction the thread comes off the bobbin is very important.
- Tip: Look for a picture printed near the bobbin area. It will show you which way the bobbin should spin. Often, the thread should come off so it spins counter-clockwise (the top of the bobbin turns to the left) as you drop it in. This helps the
sewing machine tension diskwork correctly for the bottom thread.
- Tip: Look for a picture printed near the bobbin area. It will show you which way the bobbin should spin. Often, the thread should come off so it spins counter-clockwise (the top of the bobbin turns to the left) as you drop it in. This helps the
- Guide the thread: Once the bobbin is sitting in its spot, pull the thread tail into the guiding path. There are usually grooves or arrows showing you where the thread needs to go. Pull the thread through these grooves, often around a corner and then towards the back or side. There is a small metal piece or area that provides tension here. Make sure the thread goes under this tension part.
- Leave a thread tail: Pull out about 4-6 inches of thread tail. Leave it sitting on the needle plate.
- Close the cover: Slide or close the clear bobbin cover.
This explains how to insert bobbin Husqvarna Viking for a drop-in style. Now both the top and bottom thread sources are ready.
The Top Thread: Guiding the Way
This is often seen as the main threading process. It takes the thread from the spool down to the needle. Following the correct path is a must for good stitches. Your Husqvarna Viking thread path is marked on the machine with numbers or lines.
Make sure the presser foot is up before you start this part! This is super important. Lifting the presser foot opens the tension disks, allowing the thread to sit inside them properly. If the foot is down, the tension disks are closed, and the thread won’t go in right. This will cause very bad stitches (loops on the bottom).
Tracing the Husqvarna Viking Thread Path
Let’s go step-by-step through the top thread path.
- Put the spool on the pin: Put your thread spool onto the spool pin at the top of your machine. Use the right size cap to hold the spool on. The cap should hold the spool nicely but not push it too hard.
- Go through the first guide: Find the first
upper thread guide sewing machine. This is usually a hook, loop, or slot near the spool pin at the top. Pull the thread from the spool and guide it through this first spot. This keeps the thread from jumping around as you pull it. - Follow the path down: Now, look for the path marked on your machine. It often starts with a number “1” or an arrow. The thread usually goes straight down the front of the machine. Follow the lines or grooves. Make sure the thread stays in the path.
- Turn the corner: At the bottom of the first downward path, you will usually turn a corner, following another arrow or line (maybe marked with a “2”). The thread will then go upwards.
-
Reach the take-up lever: As you pull the thread upwards, it needs to go through a part called the take-up lever. This is a metal arm that moves up and down as the machine sews. It pulls the thread up after each stitch.
- Important: The take-up lever must be at its highest point. Remember how we turned the handwheel at the start? This put the needle up, which also puts the take-up lever up.
- Put the thread through the eye or hole in the take-up lever. The path usually shows you how. It might be a simple hole or a slot. Make sure the thread is fully seated in the lever. If the lever was not at the top, you might miss putting the thread through it. This is a very common reason for bad stitches.
-
Go back down: After going through the take-up lever, the thread path turns downwards again, following more lines or arrows (maybe marked with a “4” or “5”). You are guiding the thread towards the needle area.
- Find guides near the needle: As the thread goes down towards the needle, it usually passes through one or two more small guides. These are often small metal hooks or loops just above the needle. Make sure the thread passes through these guides. They help keep the thread straight and close to the needle. This is part of the final path before the thread goes through the needle eye.
Following the marked Husqvarna Viking thread path step-by-step is critical. Each guide and turn helps control the thread flow and tension.
Finding the Upper Thread Guide
The upper thread guide sewing machine parts are simple but important. They are the first points the thread touches after leaving the spool. They keep the thread steady and guide it into the main path. Look for hooks or loops at the top of your machine. Your manual or the machine itself will show you the first one to use. There are also often lower guides closer to the needle assembly. Each one plays a small role in a smooth threading journey.
Navigating the Tension Area
One of the most important stops on the Husqvarna Viking thread path is the tension area. This is where the sewing machine tension disk lives. On most Husqvarna Viking machines, this is a set of two metal disks that press together. The thread passes between these disks.
When the presser foot is up, these disks are slightly open. This lets you slide the thread easily between them. When the presser foot is down, these disks close, putting pressure on the thread. This pressure is the “tension.”
- Why tension matters: The tension controls how much the top thread pulls against the bobbin thread. If the tension is too loose, you get loops on the bottom of your fabric. If it’s too tight, the fabric might pucker, or the thread might break.
- How thread gets in: As you pull the thread down from the first guide and make the first turn, you guide it past the tension disk area. Make sure the thread clicks or slides into the space between the disks. You often pull the thread upwards slightly after going past the disks to make sure it seats correctly in them. The path marked on your machine shows this turn and seating action.
Getting the thread correctly between the tension disks is vital. If it’s just draped over them or misses them, your stitches will not look right.
Going Down to the Needle
After passing through the take-up lever and any lower guides, the thread is ready for the very last step: going through the needle itself.
The path brings the thread straight down, right in front of the needle.
Putting Thread Through the Needle
This is the final step for the top thread. It goes through the small hole in the needle.
Mastering Threading the Needle Eye
Threading the needle on your Husqvarna Viking sewing machine involves pushing the end of the thread through the eye of the needle.
- Make the thread end clean: Cut the end of your thread with sharp scissors. This makes a nice clean end that is easier to push through the small needle eye. A frayed end is hard to thread.
- Check the needle position: The needle must be at its highest point. Use the handwheel to make sure.
- Thread direction: On most sewing machines, you thread the needle from the front to the back. Some special needles or machines thread from the side, but front-to-back is standard for Husqvarna Viking.
- Push the thread through: Hold the thread end straight. Push it through the eye of the needle from the front. It can help to put a piece of white paper behind the needle to see the eye better.
- Pull it through: Once the thread end pops through the back of the needle, pull it with your fingers or tweezers. Pull about 4-6 inches of thread through the needle eye.
- Put the thread tail back: Guide this thread tail back under the
Husqvarna Viking presser footand then back towards the machine. Leave it resting on the needle plate.
Many Husqvarna Viking machines have a built-in needle threader. This is a great tool!
Using the Built-in Needle Threader:
If your machine has one, it makes threading sewing machine needle much faster.
- Needle must be up: Make sure the needle is at its highest point.
- Lower the threader: Lower the needle threader lever or part. It swings down in front of the needle.
- Catch the thread: Hook the thread under a guide on the threader.
- Align the threader: Push the threader forward slightly. A small hook will go through the eye of the needle from the back.
- Loop the thread: Lay the thread across the front of the needle, right in the path of the small hook.
- Let the threader back: Slowly let the threader move back. The small hook pulls a loop of the thread through the needle eye to the back.
- Pull the loop: Grab the loop of thread from the back and pull the thread tail through.
Check your Husqvarna Viking sewing machine manual for the exact steps for your specific needle threader, as they can look a little different.
Final Checks Before Sewing
You have threaded the bobbin and the top thread. Before you start sewing, do a few final checks. These are part of the full sewing machine setup instructions.
Checking the Presser Foot
We lifted the Husqvarna Viking presser foot at the start. Now, it’s time to lower it.
- Why lower it? Lowering the presser foot does two main things:
- It closes the tension disks on the top thread path, putting tension on the thread. Without this tension, your stitches will be loose loops.
- It holds your fabric down against the feed dogs (the little teeth that move the fabric) so the machine can sew correctly.
Make sure the presser foot is down before you start sewing! This is a very common mistake that causes stitch problems.
Completing Sewing Machine Setup Instructions
You’re almost ready!
- Bring up the bobbin thread: You need both threads (top and bobbin) to be on top of the needle plate, ready to start sewing on the fabric.
- Hold the tail of the top thread (the one coming out of the needle) gently to the side.
- Slowly turn the handwheel towards you for one full turn.
- As the needle goes down and then comes back up, it will catch the bobbin thread from below.
- Look under the presser foot, near the needle. You will see a loop of the bobbin thread.
- Use your finger or tweezers to pull this loop up completely.
- You now have two thread tails coming from under the presser foot: the top thread and the bobbin thread.
- Place threads back: Pull both the top thread and the bobbin thread tails towards the back of the machine, under the presser foot. Leave about 4-6 inches of both threads hanging behind the foot.
- Place your fabric: Put your fabric under the
Husqvarna Viking presser foot, lining it up with the seam guides on the needle plate. - Lower the presser foot: Use the lever to lower the presser foot onto your fabric.
Now you are fully set up according to basic sewing machine setup instructions and ready to sew!
If Things Go Wrong: Simple Fixes
Even if you follow the steps, sometimes stitches don’t look right. Most times, it’s a threading issue.
- Loops on the bottom of the fabric: This usually means the top thread tension is too loose. The most common reason is threading with the presser foot down. Go back and re-thread the top thread with the presser foot up. Make sure the thread is fully in the
sewing machine tension disk. - Loops on the top of the fabric: This usually means the bobbin thread tension is too loose. Or, the top thread tension is too tight. First, check the bobbin area. Is the bobbin in the
Husqvarna Viking bobbin casecorrectly (for front-load)? Is the thread in the guide path for drop-in bobbins? If that looks okay, check the top tension setting. - Thread keeps breaking (top thread):
- Is the machine threaded correctly? Check the whole
Husqvarna Viking thread path. Did you miss a guide? Is the thread in the take-up lever? - Is the needle okay? Is it bent or old? Change the needle. Is it the right kind of needle for your fabric and thread?
- Is the thread tangled on the spool?
- Is the top tension too tight?
- Is the machine threaded correctly? Check the whole
- Thread keeps breaking (bobbin thread):
- Is the bobbin wound smoothly? Re-wind the bobbin (
Husqvarna Viking bobbin winding). - Is the bobbin in the
Husqvarna Viking bobbin caseor drop-in area correctly? Is the thread in the tension path for the bobbin? - Is the bobbin case damaged (for front-load)?
- Is the bobbin wound smoothly? Re-wind the bobbin (
- Machine is noisy or jammed: STOP sewing right away! Check for thread jams, especially under the needle plate in the bobbin area. You might need to take out the bobbin and maybe the needle plate to clear thread bits.
Always start troubleshooting stitch problems by re-threading the entire machine, both top and bobbin. Make sure you follow the steps carefully and use the correct Husqvarna Viking thread path.
Finding More Help
Each Husqvarna Viking sewing machine model is a little different. The best place for model-specific help is your Husqvarna Viking sewing machine manual.
- It shows the exact
Husqvarna Viking thread pathfor your machine model with pictures. - It shows how to wind the bobbin (
Husqvarna Viking bobbin winding). - It shows how to
insert bobbin Husqvarna Vikingfor your specific type of bobbin case. - It shows how to use your
threading sewing machine needlehelper if you have one. - It gives details on adjusting the
sewing machine tension disk. - It shows how to put on and use the
Husqvarna Viking presser foot. - It lists detailed
sewing machine setup instructionsfor different sewing tasks.
If you lost your paper manual, you can often find a digital copy (PDF) on the Husqvarna Viking website. Just search for your machine model number. Your manual is your best friend for learning all about your specific machine.
Common Questions About Threading
This section answers quick questions people often ask about threading.
Can I Use Any Thread In My Machine?
Most common sewing threads work fine. But very cheap, fuzzy, or old thread can cause problems. Special threads (like metallic or very thick threads) might need a special needle or a slower sewing speed. Always use thread meant for sewing machines.
Does The Size Of The Needle Matter For Threading?
Yes, very much! The needle eye needs to be large enough for your thread to pass through easily. If the needle is too small for the thread, the thread can break or fray. Also, a damaged needle can make threading hard and break thread. Use the right needle size for your thread and fabric.
What Happens If I Miss A Thread Guide?
Missing a guide or not putting the thread correctly in the take-up lever or tension disk will cause poor stitch quality. The machine relies on the thread following the exact Husqvarna Viking thread path to control its movement and tension. Missing a guide means the thread is not controlled properly.
Do I Need To Change The Bobbin Thread When I Change The Top Thread Color?
For best results and appearance, yes. The bobbin thread shows on the bottom of your fabric. If you want the stitches to look the same on both sides, use the same color thread in the bobbin as on top. For some stitches or projects, you might use a different color on purpose.
How Do I Know If My Tension Is Correct After Threading?
Sew a test seam on a scrap of your fabric. Look at the stitches.
* If there are loops on the bottom of the fabric, the top tension is too loose (or the machine was threaded with the presser foot down).
* If there are loops on the top of the fabric, the bobbin tension is too loose (or the top tension is too tight).
* Good tension makes stitches that look the same on both sides, with the threads meeting neatly in the middle of the fabric layers.
Adjust your top sewing machine tension disk dial or setting if needed. Check your manual for how to adjust bobbin tension (it’s less common to need to do this).
Why Do I Have To Raise The Presser Foot To Thread The Top Thread?
Raising the Husqvarna Viking presser foot opens the tension disks. This lets the thread slip down between the disks. If the foot is down, the disks are closed, and the thread just lies on top. It won’t have tension, and the stitches will be bad. It’s a simple but vital step in the Husqvarna Viking thread path.
Threading your Husqvarna Viking sewing machine is a basic skill. Once you do it a few times, it becomes quick and easy. Just remember to follow the path, make sure the presser foot is up when threading the top, and check your bobbin is put in the right way. Happy sewing!