
Can you thread a Singer Heavy Duty sewing machine easily? Yes, with this step-by-step guide, you can master Singer Heavy Duty threading with confidence. This article will walk you through the entire process, from setting up your machine to winding a bobbin and achieving the correct upper thread tension. We’ll cover the essential Singer sewing machine threading steps, focusing on making the Singer Heavy Duty needle threading as simple as possible.
Sewing machines can seem daunting at first, especially when it’s time to thread them. But don’t worry! Threading your Singer Heavy Duty sewing machine is a fundamental skill that, once learned, will open up a world of creative possibilities. Whether you’re a beginner or just need a refresher, this comprehensive Singer sewing machine threading guide will help you get your machine ready to stitch in no time. We’ll cover everything you need to know for a smooth Singer Heavy Duty setup, ensuring you follow the correct Singer sewing machine thread path for optimal results.
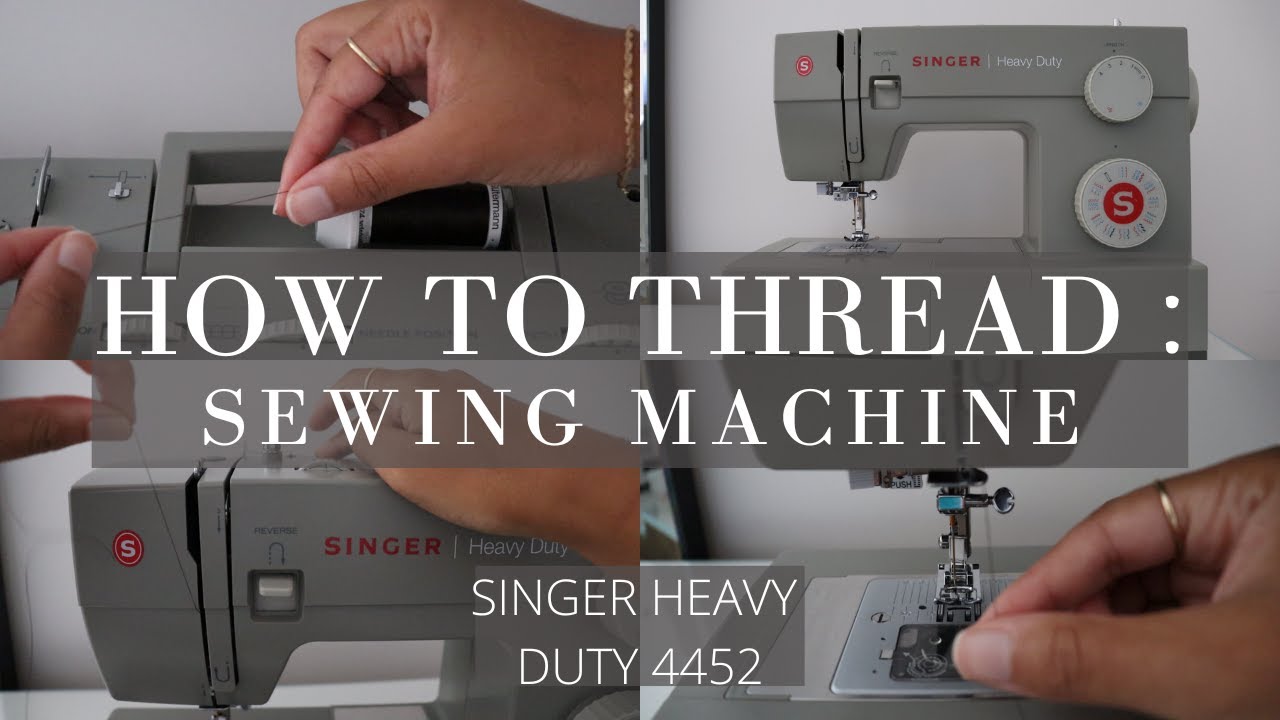
Image Source: i.ytimg.com
Getting Started: Pre-Threading Checks for Your Singer Heavy Duty
Before you begin the actual threading process, there are a few important checks to perform. Ensuring these are done correctly will prevent frustration and ensure your Singer Heavy Duty performs beautifully.
Essential Supplies
To successfully thread your Singer Heavy Duty, you’ll need a few key items:
- Your Singer Heavy Duty Sewing Machine: Ensure it’s plugged in and the power is switched off for now.
- Thread: Use good quality thread that is suitable for your fabric. For heavy-duty fabrics, a polyester or cotton-wrapped polyester thread is often recommended.
- Bobbin: Make sure you have a compatible bobbin for your Singer Heavy Duty model.
- Needle: A sharp, correctly sized needle appropriate for your fabric is crucial. A new needle is always best.
- Fabric: Have the fabric you intend to sew ready.
Understanding Your Machine’s Layout
Familiarize yourself with the key threading points on your Singer Heavy Duty. While specific layouts can vary slightly between models, most Singer Heavy Duty machines share common threading pathways. Referencing your manual Singer Heavy Duty is always a good idea if you’re unsure.
Key areas to locate:
- Spool Pin: Where the main spool of thread sits.
- Thread Guides: Various points the thread passes through to guide it correctly.
- Take-up Lever: An arm that moves up and down as you sew, pulling the thread through the needle.
- Tension Discs: These control the tightness of your stitches.
- Lower Threading Path: The route the thread takes to reach the bobbin area.
- Needle Clamp Screw: This holds the needle in place.
Step-by-Step: Singer Heavy Duty Bobbin Winding
A properly wound bobbin is essential for successful sewing. Let’s learn how to wind a bobbin on your Singer Heavy Duty.
Preparing for Bobbin Winding
- Turn on the machine: Ensure the power is on.
- Place the bobbin: Put a bobbin onto the bobbin winder spindle. Make sure it’s seated correctly.
- Thread the bobbin: Bring the end of the thread from your spool over to the bobbin.
The Bobbin Winding Process
Here’s how to complete the Singer sewing machine bobbin winding:
- Thread the bobbin winder:
- Pass the thread from the spool through the upper threading path up to the bobbin winder area.
- Find the small hole on the side of the bobbin.
- Insert the thread end into this hole from the inside out.
- Pull about 3-4 inches of thread through the hole.
- Engage the bobbin winder:
- Most Singer Heavy Duty machines have a bobbin winder stopper or clutch. You’ll need to push the bobbin winder spindle to the right (or engage a specific lever) to disengage the needle bar. This ensures the needle doesn’t move during winding.
- Hold the thread tail firmly as you begin winding.
- Start winding:
- Press the foot pedal gently.
- The thread will start winding onto the bobbin.
- Keep holding the thread tail until a few wraps are on the bobbin. This prevents the thread from unraveling.
- Once a few wraps are on, you can trim the excess thread tail close to the bobbin.
- Winding evenly:
- Try to guide the thread so it winds evenly across the bobbin. Some machines have a thread guide that moves back and forth for this purpose.
- Fill the bobbin to the desired level, usually until it’s almost full but not overflowing. Most bobbins have a slightly recessed core to prevent overfilling.
- Stopping and disengaging:
- Release the foot pedal to stop winding.
- Move the bobbin winder spindle back to its original position to re-engage the needle bar.
- Cut the thread.
- Remove the wound bobbin.
Tip: If the thread is winding unevenly or loosely, check that you are holding the thread tail initially and that the thread is passing through the tension guide on the bobbin winder correctly.
Mastering the Upper Thread Path: Singer Heavy Duty Setup
Now that your bobbin is wound, let’s focus on the main event: threading the upper thread. This is where most beginners have questions. Follow these Singer sewing machine threading steps carefully.
Preparing for Upper Threading
- Raise the Presser Foot: This is crucial! Always raise the presser foot before threading. This opens the tension discs, allowing the thread to pass through them properly. If the presser foot is down, the thread won’t engage with the tension mechanism.
- Raise the Needle: Ensure the needle is in its highest position. You can do this by turning the handwheel towards you.
- Place the Thread Spool: Place your spool of thread onto the spool pin. Ensure it’s oriented correctly – usually with the thread coming off the top of the spool. Some machines may have a horizontal spool pin and require the thread to come off the side. Check your manual Singer Heavy Duty.
Following the Singer Sewing Machine Thread Path
This is the core of Singer Heavy Duty threading. We’ll trace the path the thread takes.
- Thread Guide (Top): Take the end of your thread and pass it through the first thread guide, usually located near the spool pin.
- Thread Guide (Around Arm): Bring the thread down and around the top casting of the machine, following the marked thread path. There will be specific guides, often numbered or indicated with arrows, to show you where to go.
- Tension Discs: This is a critical step. Lower the thread between the two tension discs. You should feel a slight resistance as you pull the thread through. Ensure the thread is seated correctly in the “gap” between the discs. This is where the upper thread tension Singer is controlled.
- Thread Guide (Below Tension): Continue bringing the thread down to the next thread guide, which is often a small hook or slot located below the tension discs.
- Take-up Lever: Now, guide the thread up and through the eye of the take-up lever. The thread must go through the eye of this lever, not just around it. Make sure the take-up lever is in its highest position for this step. This is a common point of error in Singer sewing machine threading guide.
- Thread Guide (Above Needle): After passing through the take-up lever, bring the thread back down. There will be another thread guide closer to the needle assembly.
- Needle Clamp Thread Guide: Pass the thread through this final guide, which is usually attached to the needle clamp itself.
Singer Heavy Duty Needle Threading
This is the final, and often most delicate, step in the Singer Heavy Duty needle threading.
Manual Needle Threading
- Position the Thread: Hold the thread tail in your left hand.
- Thread the Needle: Take the thread with your right hand and guide it through the eye of the needle from front to back. It can be helpful to snip the thread end cleanly with sharp scissors to prevent fraying. Some people find it easier to moisten the thread tip slightly.
- Pull Through: Pull about 4-6 inches of thread through the eye of the needle. This is the tail that will form the upper loop.
Using the Automatic Needle Threader (If Equipped)
Many Singer Heavy Duty models come with an automatic needle threader, which can be a lifesaver.
- Raise the Needle: Ensure the needle is in its highest position.
- Lower the Presser Foot: Lower the presser foot.
- Follow Machine Instructions: Your manual Singer Heavy Duty will have specific instructions for your model. Generally, you’ll bring the thread over a small hook or guide.
- Engage the Threader: A lever or button is usually pressed to push a small hook through the needle eye, carrying the thread with it.
- Release Thread: Once the thread is through the needle eye, pull the needle threader mechanism back, leaving a loop of thread.
- Pull Thread Through: Pull about 4-6 inches of thread through the needle.
Inserting the Bobbin and Completing the Threading
With the upper thread in place, it’s time to get the bobbin into position and complete the threading.
Inserting the Bobbin Case
- Locate the Bobbin Case: On most Singer Heavy Duty machines, you’ll be working with a removable bobbin case. Lift the bobbin cover or a small plate to access the bobbin area.
- Place the Bobbin: Take your wound bobbin and place it into the bobbin case. The thread should be coming off the bobbin in the correct direction (usually counter-clockwise, but check your manual).
- Thread the Bobbin Case: There’s a small slit or notch in the bobbin case. Guide the thread from the bobbin into this notch, pulling it slightly under a small tension spring.
- Place the Bobbin Case into the Machine: Insert the bobbin case back into the machine shuttle. It usually clicks or snaps into place. There’s often a small hook or lever on the bobbin case that needs to align with a groove in the machine.
Bringing Up the Bobbin Thread
This is the final step in the Singer sewing machine threading guide.
- Hold Upper Thread: Gently hold the tail of the upper thread with your left hand.
- Turn the Handwheel: Slowly turn the handwheel towards you (one full rotation).
- Catch the Bobbin Thread: As you turn the handwheel, the needle will go down, loop around the bobbin thread, and come back up. The take-up lever will pull the upper thread, causing the bobbin thread to form a loop.
- Retrieve the Loop: Use your fingers or a seam ripper to catch the loop of bobbin thread that appears near the needle.
- Pull Through: Pull the bobbin thread loop completely through to the top of the machine. You should now have both the upper thread and the bobbin thread tails coming out from under the presser foot.
- Position Threads: Place both thread tails towards the back of the presser foot. This prevents them from getting caught when you start sewing.
Congratulations! You have successfully completed the Singer Heavy Duty setup and threaded your machine.
Troubleshooting Common Threading Issues
Even with a detailed guide, you might encounter minor hiccups. Here are some common problems and their solutions for Singer Heavy Duty threading.
| Problem | Possible Cause | Solution |
|---|---|---|
| Thread breaking during sewing | Needle is bent, blunt, or the wrong type/size for fabric. Upper thread tension is too tight. Lint buildup in tension discs. | Replace the needle with a new, sharp one of the correct type and size. Adjust the upper thread tension (loosen it). Clean the tension discs with a small brush or compressed air. |
| Skipped stitches | Needle is inserted incorrectly (blunt side forward). Needle is bent or damaged. Bobbin is wound unevenly or thread is snagged. | Re-insert the needle, ensuring the flat side faces the correct direction (usually right). Replace the needle. Check the bobbin winding and ensure the thread path is clear and smooth. |
| Thread tangling under the fabric | Bobbin is inserted incorrectly. Bobbin thread tension is too loose. Upper thread is not threaded through the tension discs correctly. | Ensure the bobbin is in the case with the thread coming off in the correct direction and seated under the tension spring. Check the upper thread tension Singer setting; it might be too loose. Re-thread the upper thread, ensuring it’s properly seated in the tension discs and take-up lever. |
| Machine not picking up bobbin thread | Bobbin case is not inserted correctly. Upper thread is not threaded through the take-up lever. Needle is in the wrong position. | Re-insert the bobbin case securely. Re-thread the upper thread, making sure it goes through the take-up lever. Ensure the needle is in its highest position before inserting the bobbin and bringing up the thread. |
| Uneven tension (loops on one side) | Uneven thread winding on bobbin. Incorrect tension setting for both upper and lower threads. | Rewind the bobbin neatly. Adjust the upper thread tension Singer dial and, if your machine allows external adjustment of bobbin tension, check that too. |
| Thread not feeding smoothly | Thread spool is tangled or snagged. Thread is caught in a guide. | Untangle the thread spool. Double-check the entire Singer sewing machine thread path to ensure the thread isn’t caught anywhere. |
Maintaining Your Singer Heavy Duty
Regular maintenance ensures your machine runs smoothly and makes threading easier.
Cleaning Your Machine
After each sewing session, or at least weekly depending on usage:
- Remove Lint: Use a small brush to clean out any lint and stray threads from the bobbin area, feed dogs, and around the needle plate.
- Check for Obstructions: Ensure no threads or fabric scraps are caught anywhere in the machine’s mechanisms.
Oiling Your Machine
Your manual Singer Heavy Duty will specify which parts require oiling and how often. Using the correct sewing machine oil is essential. Over-oiling can attract dirt.
Needle Care
- Replace Regularly: Change your needle after every 6-8 hours of sewing, or sooner if you notice any issues like skipped stitches or thread breakage.
- Use the Right Needle: Always use the correct type and size of needle for your fabric and thread.
Frequently Asked Questions About Singer Heavy Duty Threading
Here are some common questions regarding Singer Heavy Duty threading.
FAQ
Q1: Why does my Singer Heavy Duty keep breaking the thread?
A: Thread breakage is often due to a dull or bent needle, incorrect needle insertion, too much upper thread tension, or lint buildup in the tension discs. Ensure you’re using a sharp, appropriate needle and that the machine is clean.
Q2: What is the correct way to thread the bobbin on my Singer Heavy Duty?
A: You need to wind the bobbin evenly, ensuring the thread passes through the bobbin winder tension guide. Then, insert the wound bobbin into the bobbin case, thread it under the tension spring, and place the case into the machine. Finally, turn the handwheel to bring up the bobbin thread loop.
Q3: My stitches look messy, with loops on the top. What should I do?
A: This usually indicates an issue with the upper thread tension or how the upper thread is threaded. Double-check that the thread is properly seated between the tension discs and that you have threaded the take-up lever correctly. You might need to increase the upper thread tension Singer setting slightly.
Q4: Can I use any type of thread with my Singer Heavy Duty sewing machine?
A: While the Singer Heavy Duty is designed for robust sewing, it’s best to use good quality thread appropriate for your fabric. For heavy fabrics, a stronger polyester or cotton-wrapped polyester thread is recommended. Avoid very fine or cheap threads as they can break easily and cause issues.
Q5: How do I adjust the upper thread tension on my Singer Heavy Duty?
A: Most Singer Heavy Duty machines have a numbered dial on the front or top of the machine that controls the upper thread tension. Turning the dial to a higher number increases tension, while turning it to a lower number decreases it. Always make small adjustments and test sew on a scrap piece of fabric.
Mastering Singer Heavy Duty threading is a key skill for any sewer. By following these steps, paying attention to the Singer sewing machine thread path, and performing regular maintenance, you’ll ensure your machine is always ready for your next project. Happy sewing!