
Image Source: i.ytimg.com
Easy Steps: How To Thread An Antique Singer Sewing Machine
Can you thread an antique Singer sewing machine? Yes, absolutely! Threading an antique Singer sewing machine is a rewarding process that unlocks the potential of these incredible machines. This comprehensive guide will walk you through each step of Singer sewing machine threading, ensuring your vintage Singer works beautifully.
Antique sewing machines are marvels of engineering and craftsmanship. Owning one is like holding a piece of history, but to make it sing, you need to know how to thread it correctly. Whether you have a classic treadle Singer, a hand-crank Singer threading, or a machine powered by an early electric motor, the fundamental principles of manual sewing machine threading remain consistent. This guide is designed to be your vintage Singer threading guide, demystifying the process and bringing your antique machine back to life.
Getting Started: Preparing Your Antique Sewing Machine
Before you begin the actual Singer sewing machine threading, a little preparation goes a long way. This ensures a smooth and successful experience.
1. Cleanliness is Key for Antique Machine Parts
Dust and old oil can interfere with smooth operation. Gently wipe down all visible antique machine parts with a soft, dry cloth. Pay special attention to areas where the thread will pass.
2. Check the Needle
- Is it the right needle? Antique Singers often use specific needle types. Ensure you have a suitable needle installed. If unsure, consult a manual for your specific model or research common needle types for vintage machines.
- Is it inserted correctly? Singer needle placement is crucial. The flat side of the needle shank should typically face towards the back of the machine. The needle should be pushed up as far as it will go into the needle clamp. Tighten the needle clamp screw securely.
3. Inspect the Thread Path
Familiarize yourself with the intended path of the thread. Most Singer sewing machine parts involved in threading are designed logically. Look for:
- The spool pin: Where the spool of thread rests.
- Thread guides: Small loops or hooks that direct the thread.
- The tension discs: Two small, stacked discs that control how tightly the thread is pulled.
- The take-up lever: An arm that moves up and down, pulling the thread through the needle.
- The needle eye: The hole the thread passes through.
Step-by-Step: Threading the Upper Thread
This is where the magic of Singer sewing machine threading truly begins. Follow these steps carefully.
1. Place the Thread Spool
Securely place your spool of thread onto the spool pin. Ensure the thread unwinds smoothly from the spool.
2. Thread Through Initial Guides
- Guide the thread down from the spool pin, following the marked numbers or arrows on your machine if they are present. These are designed to indicate the correct path.
- Pass the thread through the first thread guide(s) from the front to the back, or vice versa, as indicated by your machine’s design.
3. Engaging the Tension Discs
This is a critical step in manual sewing machine threading.
- The “Whirlpool” or “In-between the Discs” Method: For most antique Singers, the thread needs to be “hooked” or “whipped” between the tension discs. This is often done by opening the tension discs (usually by lifting the presser foot). Then, pass the thread down and around the back of the top disc and between the two discs, so it comes out between them.
- Ensure Contact: Make sure the thread is making contact with both discs. This is what provides the tension.
- The Presser Foot Connection: Lifting the presser foot is essential because it separates the tension discs, allowing the thread to seat properly between them. When you lower the presser foot, the discs press together, creating the necessary tension.
4. Through the Take-Up Lever
- Guide the thread up from the tension discs and loop it through the eye of the take-up lever. This lever is usually located above the needle.
- Ensure the thread goes through the lever from the side it comes from after the tension discs. The take-up lever is designed to pull the thread taut as it moves up and down.
5. Down to the Needle
- Continue guiding the thread downwards towards the needle.
- Pass the thread through any additional thread guides located lower on the machine, moving closer to the needle.
6. Threading the Needle
- This can be one of the trickiest parts of antique Singer sewing machine setup. Depending on your machine and your eyesight, you may need a needle threader or good lighting.
- Pass the thread through the eye of the needle. For most Singers, the thread should go from the left to the right. Some older models might differ, so check your machine’s specifics.
- Leave a tail of about 4-6 inches of thread extending from the needle.
Step-by-Step: Preparing and Inserting the Bobbin
The bobbin is what creates the stitch on the underside of your fabric. Old Singer bobbin winding and proper bobbin placement are vital.
1. Winding the Bobbin
This is a crucial part of old Singer bobbin winding.
- Find the Bobbin Winder: Locate the bobbin winder assembly. This usually involves a small spindle and a tension disc or guide.
- Thread the Bobbin Winder:
- Place an empty bobbin onto the bobbin winder spindle.
- Take the end of your top thread and guide it through the small hole in the bobbin from the inside out.
- Pass the thread through the bobbin winder tension guide. This is often a small spring or a single hole near the spindle.
- Guide the thread through the designated thread guide on the machine.
- Hold the tail of the thread firmly.
- Engage the Winder: Most machines have a mechanism to engage the bobbin winder. This might be a small lever that pushes the bobbin against a friction wheel (often the handwheel), or a separate clutch mechanism.
- Start Winding: Hold the thread tail until a few wraps are on the bobbin, then trim the excess close to the bobbin. Start turning the machine’s handwheel (or motor, if applicable) to wind the bobbin.
- Even Winding: Aim for an even wind. Don’t overfill the bobbin, as this can cause tangling. Stop winding when the bobbin is full, or when the thread starts to build up unevenly.
- Disengage the Winder: Once wound, disengage the bobbin winder mechanism so it doesn’t spin with the main handwheel.
2. Inserting the Bobbin into the Bobbin Case
Antique Singer sewing machine parts include a bobbin case. The bobbin case is a small, often metal, housing that holds the bobbin.
- Identify the Bobbin Case: Locate the bobbin case. It might be a removable metal piece or integrated into the shuttle mechanism.
- Proper Bobbin Placement:
- Place the wound bobbin into the bobbin case.
- The thread should unwind from the bobbin in the correct direction. For most Singer machines, the bobbin thread should unwind counter-clockwise when the bobbin is in the case and the case is viewed from the side where the thread comes out. A common way to check is to pull the thread taut; it should be snug.
- The “Tail” Check: You should see a small notch or slot in the bobbin case where the thread from the bobbin is meant to sit. Guide the thread into this notch.
- Leave a Tail: Leave a tail of about 4-6 inches of thread extending from the bobbin case.
3. Inserting the Bobbin Case into the Shuttle
- Locate the Shuttle Area: This is usually a curved compartment under the needle.
- Orientation: The bobbin case has a specific way it fits into the shuttle. There’s often a small “tongue” or projection on the bobbin case that aligns with a corresponding slot in the shuttle.
- Secure the Case: Gently slide the bobbin case into the shuttle until it clicks or seats firmly into place. The thread from the bobbin should be coming out from under the presser foot.
Bringing it Together: Bringing Up the Bobbin Thread
Now you need to bring the bobbin thread up to meet the upper thread.
1. Holding the Top Thread
- With your left hand, hold the tail of the upper thread loosely.
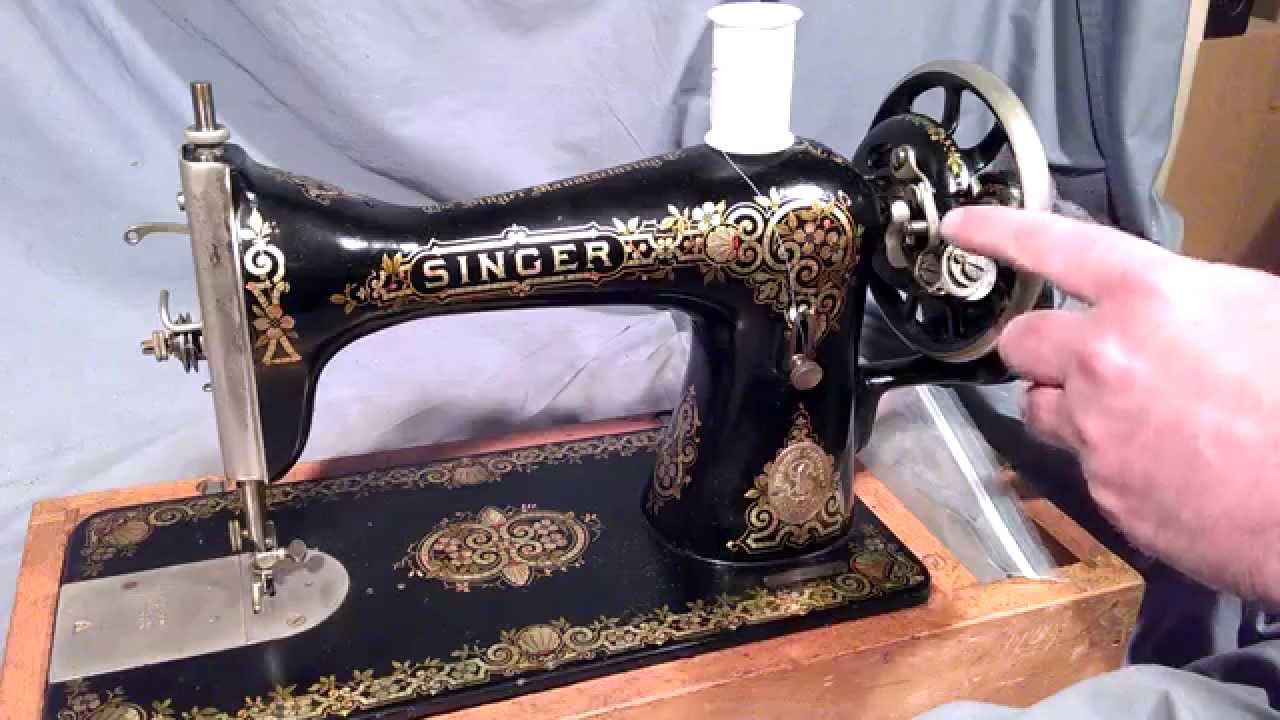
2. Rotating the Handwheel
- With your right hand, slowly turn the machine’s handwheel towards you. This is essential for threading a treadle Singer and hand-crank Singer threading as well. Always turn the handwheel towards you.
- As you turn the handwheel, the needle will go down and then start to come back up.
3. The Loop Appears
- As the needle reaches the top of its stroke, the upper thread will form a small loop.
- Use your fingers or a seam ripper to catch this loop of thread.
4. Pulling the Bobbin Thread Through
- Gently pull the loop of thread through the needle plate opening. This is the bobbin thread.
- You now have both the upper thread and the bobbin thread emerging from the needle plate.
5. Positioning the Threads
- Pull both the upper thread and the bobbin thread under the presser foot and towards the back of the machine. Leave a generous tail (about 4-6 inches each) to prevent them from being pulled back through the needle plate when you start sewing.
Fine-Tuning for Perfect Stitches
Once threaded, a few checks and adjustments ensure your stitches are beautiful.
Tension Adjustment
This is crucial for any Singer sewing machine threading.
- The Ideal Stitch: A perfect stitch is balanced. On the top, you’ll see straight stitches. On the bottom, you’ll see straight stitches. The bobbin thread shouldn’t be pulling the top thread down, nor should the top thread be pulling the bobbin thread up.
- Too Much Top Tension (Bobbin thread visible on top): If you see loops of bobbin thread on the top surface of your fabric, you need to decrease the top tension. Turn the tension knob counter-clockwise.
- Too Much Bobbin Tension (Top thread visible on bottom): If you see loops of top thread on the underside of your fabric, you need to increase the top tension. Turn the tension knob clockwise. Alternatively, sometimes the bobbin case tension needs adjustment, but this is less common and requires more careful handling.
- Testing: Always test your tension on a scrap piece of the fabric you intend to sew.
Needle Placement Recap
Remember, correct Singer needle placement is paramount. If you’re experiencing skipped stitches or thread breaking, double-check that your needle is inserted correctly with the flat side facing the back and is pushed fully up.
Understanding Thread Path Variations
While the core principles apply, different antique Singer sewing machine parts might have slight variations.
- Treadle Singers: Threading a treadle Singer is mechanically identical to electric models in terms of thread path, but you control the speed and power with your feet.
- Hand-Crank Singers: Similarly, hand-crank Singer threading follows the same path, but you power the machine by turning the crank.
Troubleshooting Common Threading Issues
Even with a vintage Singer threading guide, issues can arise.
- Skipped Stitches: Often due to incorrect needle insertion, a bent or blunt needle, or improper threading of the upper or bobbin thread.
- Thread Breaking: Can be caused by burrs on the machine where the thread passes, incorrect tension, a damaged needle, or the thread snagging on the spool.
- Knots or Bunching: Usually indicates a problem with tension, or the bobbin thread not being properly seated or wound.
Maintaining Your Antique Singer
Proper threading is part of a larger care routine for your antique machine. Regularly oiling the designated Singer sewing machine parts and keeping the machine clean will ensure its longevity and optimal performance.
Frequently Asked Questions (FAQ)
- What type of thread should I use for my antique Singer?
Generally, a good quality all-purpose cotton or cotton-blend thread is suitable. Avoid very thick or very thin threads initially, as they can be more challenging to work with. - Can I use modern sewing machine needles in an antique Singer?
In many cases, yes, but it’s best to confirm the correct needle system for your specific model. Many vintage Singers use needles that are still readily available. - My bobbin won’t wind evenly. What’s wrong?
Ensure the thread is guided through the bobbin winder tension guide correctly. Check that the bobbin is seated properly on the spindle and that the thread isn’t catching on anything as it winds. - The thread keeps breaking when I sew. What should I do?
Check your needle for damage or bluntness. Re-thread the machine, ensuring the presser foot is up when threading the tension discs. Also, verify that the thread isn’t catching on any rough spots on the machine. - How do I adjust the bobbin case tension?
Bobbin case tension adjustment is usually done by a small screw on the bobbin case itself. Turning the screw clockwise increases tension, counter-clockwise decreases it. Make very small adjustments, testing after each one. This is a more advanced adjustment, so proceed with caution.
Threading an antique Singer sewing machine is a journey of discovery and connection to the past. By following these detailed steps and tips, you can master the art of Singer sewing machine threading and enjoy the wonderful results your vintage machine can produce. Happy sewing!