
Threading a bobbin on a sewing machine is a fundamental skill that allows you to create a continuous stitch.
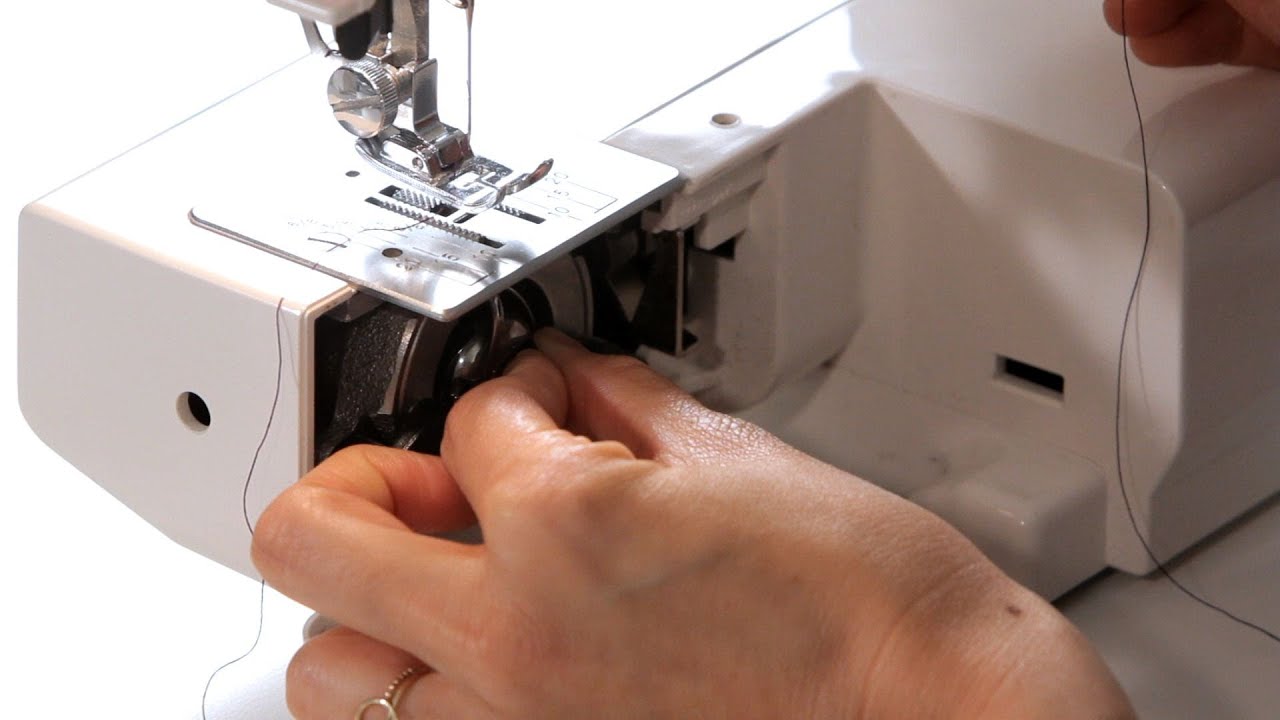
Image Source: i.ytimg.com
Step-by-Step How To Thread Bobbin Sewing Machine
Learning how to thread a bobbin sewing machine is a key step for any sewer. It’s not as complicated as it might seem at first! This guide will walk you through the entire process, from getting your bobbin ready to placing it correctly in your sewing machine. Mastering this will help you fill bobbin sewing machine efficiently and ensure smooth stitching.
Why is Bobbin Winding Important?
A properly wound bobbin is crucial for successful sewing. It provides the bottom thread that locks with the top thread, creating a strong stitch. If your bobbin is wound unevenly, too loosely, or too tightly, you’ll likely experience skipped stitches, thread breaks, or jams. This process is a vital part of sewing machine bobbin setup.
Gathering Your Supplies
Before you begin, make sure you have everything you need:
- Sewing Machine: Your trusty sewing machine.
- Bobbin Winder: Most machines have a built-in bobbin winder.
- Bobbin: The small spool that holds the bottom thread. Make sure it’s the correct type for your machine.
- Thread: The spool of thread you’ll use for your project.
- Scissors: To cut your thread.
- Instruction Manual: Your machine’s manual can be a great reference.
How to Wind a Bobbin Sewing Machine: The Process
Sewing machine bobbin winding is a skill that improves with practice. Follow these steps carefully to ensure a perfectly wound bobbin.
Step 1: Prepare Your Thread and Bobbin
- Select Your Thread: Choose the thread you’ll be using for your project. It’s best to use the same type and weight of thread for both the top spool and the bobbin.
- Place the Thread Spool: Most sewing machines have a spool pin. Place your spool of thread onto the spool pin. Some machines have a vertical spool pin, while others have a horizontal one. Consult your manual if you’re unsure where it is.
- Thread the Bobbin Winder: This is where you guide the thread from the spool to the bobbin winder. The path varies slightly between machines, so refer to your manual. Generally, you’ll thread the thread through a small tension disc on the bobbin winder mechanism. This disc helps control the tension as the bobbin winds.
Step 2: Secure the Bobbin and Start Winding
- Place the Bobbin on the Winder: Locate the bobbin winder spindle. It’s usually a small, often spring-loaded, peg that sticks up from the machine. Place your empty bobbin onto this spindle. Ensure it’s seated correctly.
- Guide the Thread Through the Bobbin Hole: Take the end of the thread and guide it through one of the small holes in the side of the bobbin. This secures the thread so it doesn’t unravel as you start winding.
- Hold the Thread Tail: Hold the end of the thread tail firmly for the first few wraps. This prevents the thread from becoming loose and creating an uneven start.
- Engage the Bobbin Winder: Most machines have a lever or a mechanism that you push or move to engage the bobbin winder. This often disengages the needle from sewing.
- Begin Winding: Gently press the foot pedal to start the bobbin winding. As the bobbin starts to fill, you can release the thread tail you were holding. The machine will begin to wind bobbin sewing machine automatically.
Step 3: Winding the Bobbin Evenly
Even winding is key to a good bobbin.
- Initial Wraps: Ensure the first few wraps of thread cover the entire surface of the bobbin evenly. This creates a stable base.
- Controlled Speed: Avoid winding the bobbin too fast. A moderate speed allows the thread to lay down smoothly.
- Automatic Stop: Many bobbin winders have an automatic stop mechanism that engages when the bobbin is full. Some might also have a thread cutter to snip the thread once it’s done.
- Manual Stop: If your machine doesn’t have an automatic stop, keep an eye on the bobbin. Stop winding when the thread reaches about 1/8 inch from the top edge of the bobbin. Overfilling can cause problems.
Step 4: Finishing the Bobbin Winding
- Stop the Winder: Once the bobbin is full or you’ve reached the desired amount of thread, stop the machine.
- Disengage the Winder: Move the bobbin winder mechanism back to its original position. This will re-engage the needle for sewing.
- Cut the Thread: Cut the thread from the spool.
- Remove the Bobbin: Carefully slide the wound bobbin off the bobbin winder spindle.
Inserting Bobbin Sewing Machine: Getting Ready to Sew
Now that you have a perfectly wound bobbin, it’s time to insert bobbin sewing machine. The method for this varies depending on whether your machine has a top-loading or front-loading bobbin case.
For Top-Loading Bobbin Cases (Drop-In Bobbins)
This is the most common type of bobbin system on modern machines and is often considered easier to manage.
Step 1: Locate the Bobbin Area
- Remove the needle plate (the removable metal cover around the needle).
- You’ll see a clear plastic cover over the bobbin case area. Remove this cover.
Step 2: Prepare the Bobbin
- Take your wound bobbin.
- Identify the thread end.
Step 3: Place Bobbin Sewing Machine Correctly
- Orientation is Key: Look at the bobbin. There’s usually a small arrow or notch on it, and the bobbin case itself often has a corresponding mark. You need to place bobbin sewing machine so the thread unwinds in the correct direction. For most drop-in bobbins, the thread should unwind counter-clockwise (or to the left). Consult your manual if unsure.
- Drop the Bobbin In: Place the bobbin into the bobbin case.
- Thread the Bobbin Case: Now you need to guide the thread.
- There’s a small slit or opening in the bobbin case.
- Pull the thread end through this slit, leaving a short tail hanging out.
- There’s also a small tension spring within the bobbin case that the thread must pass through. Make sure the thread is seated correctly in this spring.
Step 4: Replace Covers
- Replace the Clear Cover: Put the clear plastic cover back over the bobbin case area.
- Replace the Needle Plate: Slide the metal needle plate back into place.
For Front-Loading Bobbin Cases (Removable Bobbin Case)
Older machines, and some newer ones, use a removable bobbin case.
Step 1: Locate the Bobbin Area and Remove the Case
- Open the Compartment: Open the small door or cover on the front of your sewing machine, usually below the needle.
- Remove the Bobbin Case: You’ll see the bobbin case holder. Gently pull it out. The bobbin will be inside this case.
- Remove the Bobbin: Take the wound bobbin out of the bobbin case.
Step 2: Prepare the Bobbin and Case
- Choose Your Bobbin: Ensure you have the correct type of bobbin for your machine. Metal or plastic bobbins are often used.
- Wind or Use a Wound Bobbin: If you haven’t already, follow the steps above to wind bobbin sewing machine.
Step 3: Thread the Bobbin Case
- Place Bobbin in Case: Place the wound bobbin into the bobbin case.
- Thread the Case: You’ll see a small slot or notch on the side of the bobbin case. Guide the thread from the bobbin through this slot.
- Tension: Ensure the thread is running through the tension spring of the bobbin case.
- Leave a Tail: Leave a few inches of thread tail hanging out.
Step 4: Insert the Bobbin Case Back into the Machine
- Proper Orientation: This is critical. Look closely at the bobbin case and the shuttle hook assembly inside the machine. There’s usually a small “finger” or “ear” on the bobbin case that needs to align with a notch or groove in the machine. The thread tail should also typically hang down and to the left. Refer to your manual for the exact orientation.
- Slide it In: Gently slide the bobbin case back into its housing. You might feel a slight click when it’s properly seated.
- Secure the Door: Close the compartment door.
Bringing Up the Bobbin Thread
Once the bobbin is inserted, you need to bring the bobbin thread up to meet the top thread.
Step 1: Position the Needle
- Turn the handwheel of your sewing machine towards you (counter-clockwise).
- Lower the needle into the bobbin area.
Step 2: Catch the Bobbin Thread
- Continue turning the handwheel towards you. As the needle goes down and then starts to come back up, it will catch the bobbin thread.
- You’ll see a small loop of bobbin thread emerge from the needle plate.
Step 3: Pull the Bobbin Thread Through
- Use your fingers or a seam ripper to gently pull this loop of thread up and out from under the needle plate.
- You should now have two thread tails: one from the top spool and one from the bobbin, both emerging from under the needle plate.
Step 4: Prepare for Sewing
- Hold both thread tails gently behind the presser foot.
- You can now begin to sew your project.
Common Issues and How to Fix Them
Even with careful sewing machine bobbin setup, you might encounter a few snags.
| Issue | Possible Cause | Solution |
|---|---|---|
| Thread Snapping | Bobbin wound unevenly, wrong needle, tension too high. | Re-wind the bobbin carefully. Check if the needle is bent or dull; replace it. Adjust top thread tension (loosen it). Ensure the bobbin is properly seated and threaded. |
| Skipped Stitches | Bobbin inserted incorrectly, wrong needle, tension issues. | Re-insert the bobbin, ensuring it’s in the correct orientation. Check the needle; make sure it’s sharp and inserted correctly. Adjust both top and bobbin thread tensions. Ensure you are using the correct needle type for your fabric. |
| Bird’s Nesting (Thread Jams) | Bobbin not seated correctly, thread tangling, tension issues. | Stop immediately. Remove the top thread and bobbin. Re-thread the entire machine, paying close attention to how you thread bobbin and the top thread. Ensure the bobbin is seated correctly. Check that the bobbin winder tension disc is properly engaged. Make sure the presser foot is down when sewing. |
| Bobbin Runs Out Quickly | Bobbin not wound to capacity, or project uses excessive thread. | Ensure you are fully utilizing the bobbin’s capacity when you fill bobbin sewing machine. If sewing a large project, prepare multiple bobbins beforehand. |
| Uneven Stitches | Incorrect bobbin thread, tension mismatch. | Use the same type and weight of thread for both the top spool and the bobbin. Adjust the tension settings on your machine. |
Maintaining Your Bobbin Winder
The bobbin winder sewing machine mechanism itself is fairly robust, but a little care goes a long way.
- Cleanliness: Keep the bobbin area clean. Lint and dust can build up and interfere with winding. Use a small brush or compressed air to clean it regularly.
- Lubrication: Check your machine’s manual for any lubrication points around the bobbin winder.
- No Force: Never force the bobbin onto the spindle or try to wind a damaged bobbin.
Frequently Asked Questions (FAQ)
Here are some common questions about loading bobbin sewing machine and winding:
Q1: What is the best way to wind a bobbin?
A1: The best way to wind a bobbin is to ensure the thread is threaded correctly through the machine’s tension disc for the bobbin winder and that the thread starts smoothly onto the bobbin. Wind at a consistent, moderate speed, and stop when the bobbin is nearly full.
Q2: Can I use any bobbin for my sewing machine?
A2: No, you cannot. Bobbins are specific to sewing machine models. Using the wrong type of bobbin can damage your machine or cause stitching problems. Always use bobbins recommended by your machine’s manufacturer.
Q3: My bobbin thread is always breaking. What should I do?
A3: Check that your bobbin is wound evenly and not too tightly or loosely. Ensure the bobbin is inserted correctly in the bobbin case. Also, verify that the thread is passing through the bobbin case’s tension mechanism properly. You might also need to adjust the tension on your sewing machine.
Q4: How do I know if my bobbin is wound correctly?
A4: A correctly wound bobbin will have an even layer of thread, with no loose spots or overhanging loops. The thread should be wound smoothly from the base to just below the top edge of the bobbin. It should feel firm but not so tight that it’s difficult to pull thread from.
Q5: What if my bobbin winder won’t engage?
A5: First, check that the needle is up and that the presser foot is down. Ensure that any levers or buttons to engage the bobbin winder are properly set. Sometimes, the needle bar might be in a position that prevents engagement. Consult your machine’s manual for specific troubleshooting steps.
Q6: How much thread should I put on the bobbin?
A6: You should fill bobbin sewing machine until the thread is almost to the top edge, leaving about 1/8 inch of space. Overfilling can cause the thread to snag or unravel during sewing. Underfilling means you’ll have to change the bobbin more often.
By following these detailed steps, you’ll be able to confidently thread bobbin sewing machine and ensure a smooth and enjoyable sewing experience. Happy stitching!