
So, you want to know how to thread a Brother sewing machine? It’s a fundamental skill for any sewing enthusiast, and with this guide, you’ll be threading your Brother sewing machine like a pro in no time. We’ll cover everything from the upper thread to the bobbin, ensuring a smooth and successful sewing experience.
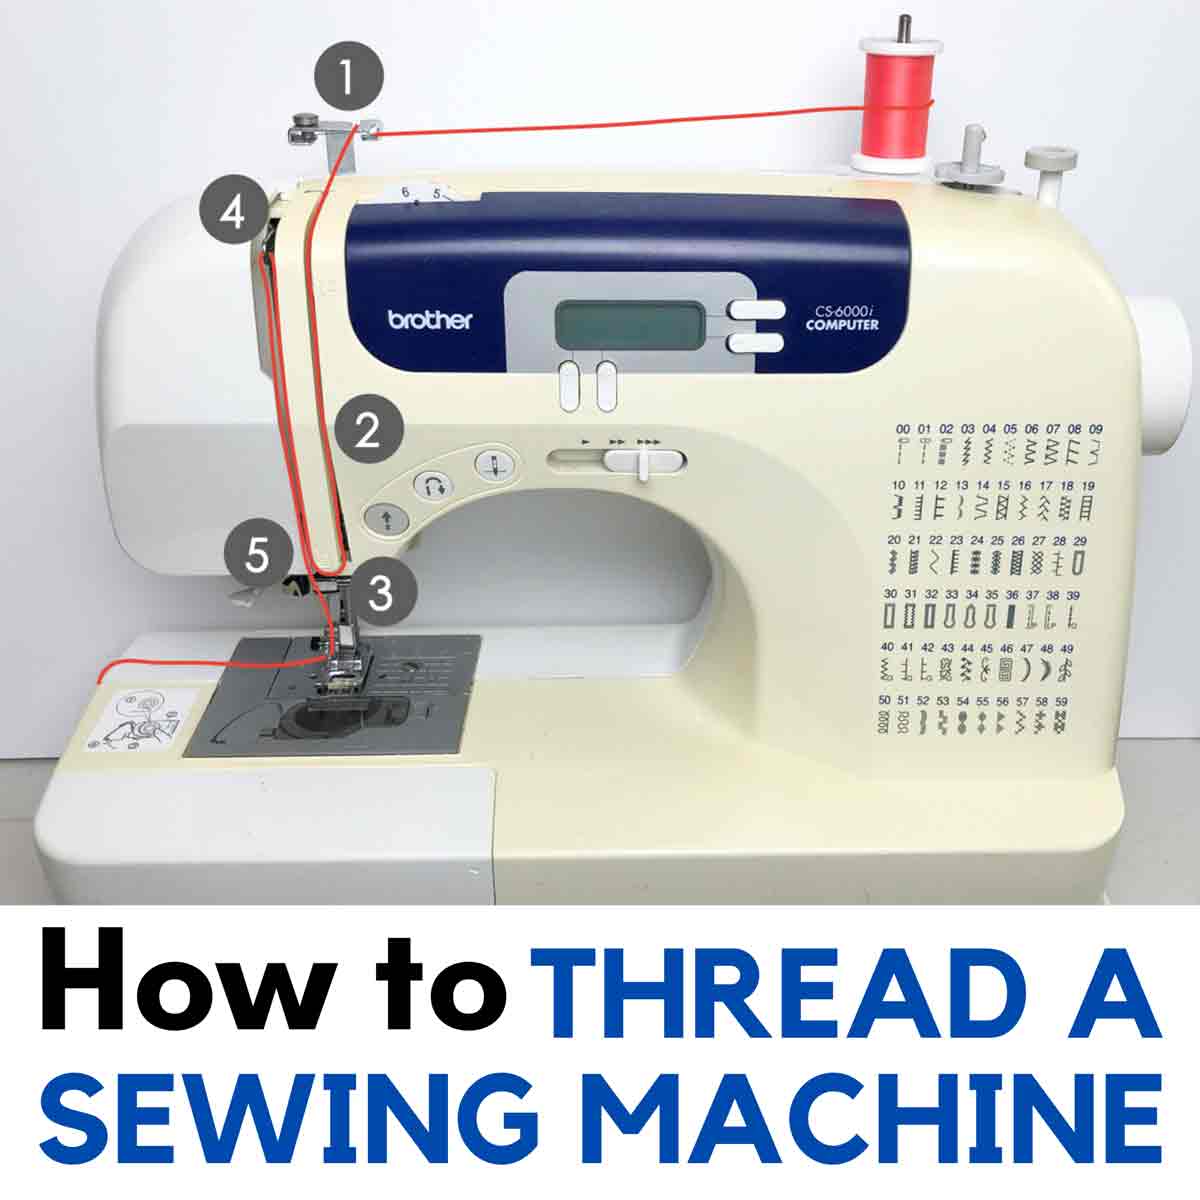
Image Source: mindymakes.com
Getting Started with Your Brother Sewing Machine Setup
Before you dive into threading, it’s essential to ensure your Brother sewing machine setup is correct. Make sure your machine is plugged in, the power switch is on, and the presser foot is in the raised position. Many Brother sewing machines have a built-in needle threader, which can be a fantastic time-saver. However, even with this feature, knowing the manual threading process is crucial.
Preparing for Threading
- Turn on your machine: Locate the power switch, usually on the side or back of the machine.
- Raise the presser foot: This is important to allow the thread to move freely through the tension discs.
- Ensure the needle is in the highest position: Turn the handwheel towards you to raise the needle to its topmost point.
- Check the bobbin: Make sure you have a properly wound bobbin ready. We’ll cover bobbin winding shortly.
Threading the Upper Thread Brother
The upper thread Brother setup is the first major step in getting your machine ready to sew. This process involves guiding the thread from the spool, through various guides, and finally to the needle.
Step-by-Step: Upper Threading
-
Place the spool of thread:
- Locate the spool pin on your Brother sewing machine. It’s usually at the top.
- Place your spool of thread onto the spool pin with the thread unwinding from the back of the spool. Some machines might recommend unwinding from the front – always check your specific model’s manual.
- If your machine has a second spool pin for twin-needle sewing, ensure you are using the correct one for single-needle sewing.
-
Thread the thread path: Follow the numbered guide path indicated on your machine. These numbers are usually printed directly on the machine’s casing, guiding you through the correct route.
- First guide: The thread typically goes from the spool to the first thread guide, which is often a small hook or eyelet near the spool pin.
- Thread disc tension: Next, guide the thread down and into the upper thread Brother tension discs. This is a critical step. Ensure the thread is properly seated between the tension discs. You should feel a slight resistance when you pull the thread.
- Take-up lever: Continue guiding the thread downwards. It will then go up and through the eye of the take-up lever. This lever moves up and down as you sew and helps to draw the thread through the needle.
- Second tension guide: After the take-up lever, the thread will go back down. You might encounter another guide or bracket before heading towards the needle.
- Needle guide: Finally, the thread will be guided to the needle itself.
-
Thread the needle:
- Using the needle threader (if applicable): Most modern Brother sewing machines come with a built-in needle threader.
- Lower the presser foot.
- Bring the thread to the needle threader mechanism.
- Follow the specific instructions for your model, but generally, you’ll guide the thread through a small hook or loop on the threader.
- Push the needle threader lever or button. The threader will push a small hook through the needle’s eye and loop the thread around it.
- Gently pull the looped thread through the needle’s eye.
- Manual needle threading: If your machine doesn’t have a needle threader, or if you prefer manual threading:
- Cut the end of the thread cleanly with sharp scissors.
- Hold the thread firmly.
- Bring the thread to the eye of the needle.
- Push the thread through the eye of the needle. You may need to slightly twist the thread to make it stiff.
- Pull about 4-6 inches of thread through the needle’s eye.
- Using the needle threader (if applicable): Most modern Brother sewing machines come with a built-in needle threader.
Checking the Upper Thread
Once the upper thread is through the needle, gently pull a few inches of thread through. It should move freely without snagging.
Brother Sewing Machine Bobbin Winding
A properly wound bobbin is just as important as the upper thread for creating a perfect stitch. Brother sewing machine bobbin winding is a straightforward process.
Step-by-Step: Bobbin Winding
-
Prepare the bobbin:
- Select a bobbin that is compatible with your Brother sewing machine. Using the wrong type of bobbin can cause serious damage.
- Place the bobbin onto the bobbin winder spindle. The spindle is usually located at the top right of the machine.
-
Thread the bobbin:
- Place your thread spool on the spool pin (the same one used for upper threading or a separate bobbin winder spindle, depending on your model).
- Guide the thread from the spool to the bobbin winder thread guide.
- Pass the thread through the hole in the bobbin. It’s a good idea to hold the end of the thread firmly.
- Start the bobbin winding by pushing the bobbin winder spindle to the side (or activating the bobbin winder as per your machine’s instructions). This engages the winding mechanism.
- Sewists often recommend passing the thread through a small hole or slot on the bobbin to secure the end before winding begins.
- Wind a few turns of thread around the bobbin manually, holding the thread tail to prevent it from unraveling.
-
Start winding:
- Once you have a few turns secured, press the foot pedal to start the bobbin winding.
- The machine will begin to wind the thread onto the bobbin. Keep the thread tail held for the first few seconds until it’s secured by the winding thread.
- Important: Most Brother sewing machines have an automatic bobbin winder stopper. When the bobbin is full, the spindle will automatically disengage or stop winding. Do not overfill the bobbin, as this can lead to uneven stitches.
- Bobbin tension: The tension on the bobbin is generally factory-set and doesn’t need adjustment for most sewing. Ensure the thread is winding evenly and not too tightly or loosely.
-
Cut the thread and remove the bobbin:
- Once the bobbin is full, stop the machine.
- Cut the thread from the spool.
- Push the bobbin winder spindle back to its original position.
- Remove the wound bobbin.
Inserting the Bobbin and Threading the Lower Thread Brother
Now that you have your wound bobbin, it’s time to insert it and thread the lower thread Brother system. The way the bobbin is inserted depends on whether your Brother machine has a front-loading or top-loading bobbin case.
Front-Loading Bobbin Case
- Open the bobbin cover: Slide open the cover plate located below the needle area.
- Insert the bobbin:
- Take your wound bobbin.
- Place the bobbin into the bobbin case with the thread unwinding in the correct direction (usually counter-clockwise, but check your manual or the diagram on the machine). The thread should be coming off the top of the bobbin.
- Hold the bobbin in place with your finger.
- Thread the bobbin case:
- Pull about 4-6 inches of thread from the bobbin.
- Guide the thread through the small slit or notch in the bobbin case. This is crucial for proper tension.
- Pull the thread to the left and through the tension spring slot.
- Pull the thread towards you, under the presser foot, and up through the hole in the presser foot.
Top-Loading Bobbin Case (Brother’s Quick-Set Bobbin System)
Many modern Brother sewing machines feature a top-loading bobbin system, often called the “Quick-Set” bobbin. This is generally simpler.
- Remove the needle plate: Lift off the needle plate (the metal piece around the needle).
- Open the bobbin cover: Lift the bobbin cover.
- Insert the bobbin:
- Take your wound bobbin.
- Place the bobbin into the bobbin case holder. The thread should be unwinding counter-clockwise (again, check your machine’s diagram). The tail of the thread should be pointing upwards.
- Thread the bobbin and bring up the lower thread:
- Hold the end of the upper thread with your left hand.
- Turn the handwheel towards you, lowering the needle into the bobbin area.
- As the needle goes down and comes back up, it will catch the bobbin thread and loop it.
- With your left hand, gently pull the upper thread to help form a loop of the bobbin thread.
- Using a seam ripper or a needle, pull this loop of bobbin thread up through the hole in the needle plate.
- Once the bobbin thread loop is pulled through, place both the upper thread and the lower thread behind the presser foot and to the left.
- Replace the needle plate.
Brother Sewing Machine Needle Threading (The Final Step)
We’ve already touched on threading the needle as part of the upper thread setup. However, let’s reiterate the importance and ensure you’ve got it right. Correct Brother sewing machine needle threading is paramount for a good stitch.
Verifying Needle Threading
- Thread through the eye: Ensure the thread passes cleanly through the eye of the needle.
- Thread tail length: Leave about 4-6 inches of thread hanging through the needle. This gives you enough to start sewing and to be caught by the bobbin thread.
Brother Sewing Machine Tension
The Brother sewing machine tension is what balances the upper and lower threads to create a neat, uniform stitch. Incorrect tension is a common cause of sewing problems like skipped stitches, puckering, or thread breakage.
Adjusting Tension
- Upper Thread Tension:
- This is usually adjusted using the tension dial, typically located near the take-up lever. The numbers on the dial indicate the tension setting, with higher numbers meaning tighter tension.
- For most fabrics and general sewing, a setting between 3 and 5 is common.
- Test: Always test your tension on a scrap piece of fabric that you’ll be using for your project.
- Signs of incorrect upper tension:
- Too tight (high number): The bobbin thread will start to show on the top side of the fabric, or the stitch will look puckered.
- Too loose (low number): The upper thread will be loopy on the underside of the fabric.
- Lower Thread Tension (Bobbin Case):
- The tension of the lower thread is controlled by the bobbin case. Most Brother machines have a bobbin case with a small screw that adjusts the tension.
- To tighten: Turn the screw slightly clockwise.
- To loosen: Turn the screw slightly counter-clockwise.
- Important: Make very small adjustments to the bobbin case tension. It is set at the factory for optimal performance. Only adjust if you are experiencing significant issues with the lower thread showing on the top.
- Test: When testing bobbin case tension, hold the upper thread and lift the bobbin case. The bobbin should not fall out freely but should release with a gentle tug.
When to Adjust Tension
- Fabric type: Different fabrics require different tension settings. Thicker fabrics might need a slightly tighter upper tension, while delicate fabrics might need a looser setting.
- Thread type: Different types of thread (e.g., cotton, polyester, silk) can also affect tension.
- Needle size: A needle that is too large or too small for the fabric and thread can also impact tension.
Brother Sewing Machine Stitch Selection
Once your machine is threaded, you can move on to Brother sewing machine stitch selection. Most Brother machines offer a variety of stitches, from basic straight stitches to decorative ones.
Selecting a Stitch
- Choose your stitch type: Your machine will have buttons, dials, or a digital display for selecting stitches.
- Select the stitch length and width: For a straight stitch, you’ll primarily adjust the length. For zigzag or decorative stitches, you’ll also adjust the width.
- Refer to your manual: Each Brother model has a unique way of selecting stitches. Your Brother sewing machine manual is the best resource for detailed instructions specific to your model.
Troubleshooting Common Threading Issues
Even with a guide, you might encounter problems. Here are some common issues and their solutions:
Thread Bunching Up Under the Fabric (Bird’s Nests)
- Cause: Most often, the upper thread is not properly threaded through the tension discs, the take-up lever, or the needle. The bobbin might also not be seated correctly.
- Solution: Re-thread the upper thread, ensuring it is fully seated in all guides and tension discs. Check that the presser foot is up when threading the upper thread. Ensure the bobbin is inserted correctly and the thread is pulled through the bobbin case slot.
Skipped Stitches
- Cause: This can be due to a bent or dull needle, the needle being inserted incorrectly, or the upper thread not being threaded properly.
- Solution:
- Replace the needle. Ensure it’s the correct size and type for your fabric and thread.
- Make sure the needle is inserted with the flat side facing the correct direction (usually towards the back).
- Re-thread the upper thread.
Thread Breaking
- Cause: Thread breaking can happen for several reasons:
- The needle is too small for the thread or fabric.
- The thread is old or knotted.
- The upper thread tension is too tight.
- The bobbin case tension is too tight.
- Thread snagging on the spool or in the machine.
- Solution:
- Check and replace the needle.
- Use fresh, good-quality thread.
- Adjust the upper thread tension to a lower setting.
- Gently adjust the bobbin case tension if necessary.
- Ensure the thread path is smooth and free of burrs or snags.
Puckering Fabric
- Cause: Usually indicates that the upper thread tension is too tight, or the lower thread tension is too loose.
- Solution:
- Reduce the upper thread tension setting.
- Ensure the bobbin is seated correctly and the thread is pulled through the bobbin case slot.
- If the problem persists, you might need to slightly tighten the bobbin case tension (very minor adjustments).
Frequently Asked Questions (FAQ)
Q1: What is the most common mistake when threading a Brother sewing machine?
A1: The most common mistake is not threading the upper thread properly through the tension discs. The thread must be seated between the two discs for the tension to work correctly. Another frequent error is forgetting to raise the presser foot while threading the upper thread.
Q2: Can I use any brand of thread with my Brother sewing machine?
A2: While you can use most reputable brands of sewing thread, it’s best to use good quality thread. Very cheap or old thread can cause breakage or lint build-up. Always use the correct type of bobbin (plastic or metal) as specified for your Brother sewing machine.
Q3: My Brother sewing machine is making a strange noise when I try to sew. What could be wrong?
A3: Strange noises can be caused by several things. Often, it’s related to threading issues (like the thread catching on something), or the bobbin isn’t inserted correctly. It could also be a mechanical issue. First, re-thread both the upper and lower threads meticulously. Ensure the bobbin is wound correctly and inserted properly. If the noise persists, check for lint build-up in the bobbin area and under the needle plate. If you suspect a mechanical problem, consult your Brother sewing machine manual or contact customer support.
Q4: How do I know if my bobbin is wound correctly for my Brother sewing machine?
A4: A correctly wound bobbin will have thread wound evenly across its surface, without overlapping or gaps. It shouldn’t be too tight or too loose. The thread should unwind smoothly from the bobbin. If the thread is wound sloppily or unevenly, re-wind it.
Q5: My Brother sewing machine is skipping stitches. What should I do?
A5: Refer to the “Troubleshooting Common Threading Issues” section above. The most likely culprits are a dull or bent needle, incorrect needle insertion, or improper upper thread threading. Always try a new, correctly inserted needle first.
Threading your Brother sewing machine might seem daunting at first, but with practice and by following these steps, it becomes a simple and routine part of your sewing journey. Remember to consult your specific Brother sewing machine manual for detailed diagrams and model-specific instructions. Happy sewing!