
Can you easily thread a Singer Heavy Duty sewing machine? Yes, you can! Threading your Singer Heavy Duty machine is a simple task if you follow each step carefully. It helps you get ready to sew strong, even stitches. This guide shows you the easy way to put the thread in your machine, from the spool down to the needle. We will cover winding the bobbin, putting the bobbin in, and threading the top part of the machine.
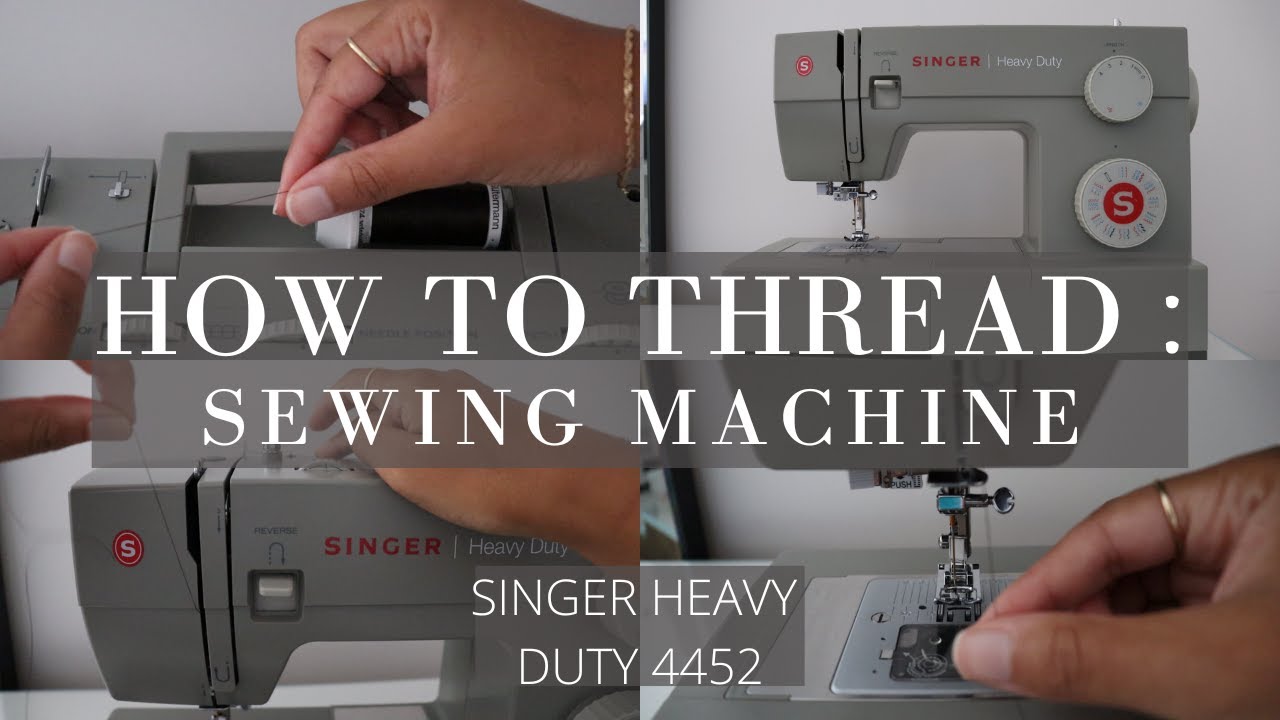
Image Source: i.ytimg.com
Getting Your Machine Ready
Before you start threading, do a few quick things. This makes threading easier and safer.
Turn Off the Power
Always turn off your sewing machine. Make sure the power switch is in the “off” position. Unplug the machine from the wall. This stops the machine from starting by accident. Safety first!
Raise the Presser Foot
Find the lever that lifts the presser foot. This is usually at the back of the needle area. Push this lever up. Lifting the presser foot opens the tension discs. This lets the thread sit correctly in the machine. If the foot is down, the thread will not go into the tension discs right.
Lift the Needle
Turn the handwheel on the side of the machine. Turn it towards you. Keep turning until the needle is at its highest point. Also, watch the take-up lever. The Singer Heavy Duty take up lever is a metal arm that moves up and down as you sew. Make sure it is also at its highest point. This is important for the Singer Heavy Duty thread path.
Winding the Bobbin Correctly
You need two threads to sew. One comes from the top spool. The other comes from the bobbin below. Winding the bobbin Singer sewing machine is the first step. You need to put thread onto a small metal or plastic spool called a bobbin.
Finding the Bobbin Winding Parts
Look on the top or front of your Singer Heavy Duty machine. You will see a spool pin for the thread you are winding. You will also see guides for the thread. There is a bobbin winding spindle. This is where the bobbin sits to get wound. There is also a bobbin winding tension disc. This helps wind the thread smoothly.
How to Wind the Bobbin
- Put Thread on Spool Pin: Place your spool of thread on the spool pin. Make sure the thread comes off the spool the right way. For most threads, it should come off the front or top of the spool.
- Guide the Thread: Take the thread from the spool. Guide it to the bobbin winding tension disc. Wrap the thread around this disc. The Singer Heavy Duty bobbin winding system uses this disc to keep the thread tight as it winds.
- Thread the Bobbin: Take the end of the thread. Put it through the small hole on the bobbin. Some bobbins have one hole, some have more. Just use one hole from the inside to the outside.
- Place Bobbin on Spindle: Put the bobbin onto the bobbin winding spindle. Make sure the thread end coming out of the hole is sticking up on top of the bobbin.
- Engage the Winder: Push the bobbin winding spindle to the side. You will feel it click. This locks the spindle into place. It disconnects the needle from the motor. Now, the machine will only wind the bobbin.
- Start Winding: Hold the thread tail that comes from the bobbin hole. Slowly press the foot pedal. The bobbin will start to spin and wind thread. After a few wraps, stop. Cut off the small thread tail that you were holding.
- Fill the Bobbin: Press the foot pedal again. Wind the bobbin until it is full. Do not overfill it. Most machines have a stopper. It will stop winding when the bobbin is full.
- Cut and Remove: Once the bobbin stops or is full, release the foot pedal. Push the bobbin winding spindle back to its first position. Cut the thread between the spool and the bobbin. Take the full bobbin off the spindle.
This process is key for winding bobbin Singer sewing machine models, especially the Heavy Duty ones. Proper winding prevents thread problems later.
Inserting the Bobbin Correctly
Now you have a full bobbin. You need to put it into the machine. The Singer Heavy Duty machines (like the Singer 4423 threading setup) often have a top-drop-in bobbin system. This is easy to use.
Find the Bobbin Area
Open the cover plate near the needle and presser foot. It is often a clear plastic plate. Slide it or lift it to open. This shows the bobbin case area.
Put the Bobbin In
- Hold the Bobbin: Take your freshly wound bobbin. Look at which way the thread comes off. For most top-drop-in systems on Singer Heavy Duty models, the thread should come off the bobbin towards the left. It should look like the letter “P” if you hold the bobbin and thread.
- Drop It In: Place the bobbin into the bobbin case area. Let it sit flat.
- Guide the Thread: Find the slot on the edge of the bobbin case area. Take the thread from the bobbin. Pull it through this slot.
- Follow the Path: After the first slot, pull the thread along the channel. It usually goes under a small metal guide or tension spring. Pull it until it comes out near the needle plate. There is often a cutter here. You can pull the thread lightly to make sure it moves easily. It should not be too tight or too loose.
Inserting bobbin Singer Heavy Duty machines is simple with the drop-in system. Make sure the thread is seated right in the slot and channel. This controls the bobbin thread tension.
Close the Cover
Slide or snap the bobbin cover plate back into place. The bobbin thread is now in the machine.
Threading the Upper Part
Now, let’s thread the top part of your machine. This involves guiding the thread from the spool down to the needle. Following the Singer Heavy Duty thread path is very important.
Starting at the Spool
- Place the Spool: Put your spool of thread on the main spool pin on top of the machine. Use the right size spool cap to hold the spool in place. The spool cap stops the thread from jumping off the pin.
- First Thread Guide: Find the first thread guide. This is usually a hook or loop right above the spool pin. Take the thread from the spool. Pull it through this first guide. This is the start of the Singer Heavy Duty upper thread guide system.
Following the Thread Path
The Singer Heavy Duty thread path is usually marked on the machine with numbers or lines. Follow these marks.
- Guide Down: Pull the thread down along the first channel or guide on the front of the machine.
- Around the Bend: At the bottom of this channel, the path usually turns. You need to loop the thread around. Sometimes there is a small check spring here.
- Up to the Take-Up Lever: After looping around the bottom, guide the thread back up the other channel on the front of the machine. As you pull the thread up, it needs to go into the eye of the take-up lever. Remember, we raised the take-up lever earlier? Now you thread it. If the take-up lever is not at its highest point, you cannot thread it.
- Note: The Singer Heavy Duty take up lever is a key part. It pulls thread from the spool for each stitch. Thread must go through it.
- Guide Down Again: After going through the eye of the take-up lever, the thread goes back down. There are usually one or two more guides on the way down to the needle. These might be hooks or clips on the needle bar. Thread must go through all of them. These are also part of the Singer Heavy Duty upper thread guide system.
Following this path carefully ensures the thread goes through all the right tension and guide points. This is essential for proper stitching. A Singer sewing machine diagram in your manual can show you this path clearly. Look at your machine’s diagram to be sure.
Threading the Needle
You are almost done threading. The last step for the top thread is putting it through the needle. This is called threading needle Singer Heavy Duty.
Getting Ready to Thread the Needle
- Needle Position: Make sure the needle is still at its highest point.
- Cut the Thread: Cut the end of your thread with sharp scissors. A clean cut makes it easier to push through the needle eye. Cut at an angle.
- Needle Eye: Look closely at the needle eye. On home sewing machines, the eye usually faces the front.
Putting Thread Through the Eye
- Hold the Thread: Hold the thread end between your thumb and finger.
- Push Through Eye: Push the thread end through the eye of the needle from the front to the back.
- Pull Through: Pull about 6-8 inches of thread through the needle eye.
- Under the Foot: Pass this thread tail under the presser foot. Pull it towards the back of the machine.
Some Singer Heavy Duty machines (like the Singer 4423 threading setup) have a built-in needle threader. This tool helps push the thread through the needle eye.
Using a Built-in Needle Threader (If you have one)
- Needle Down: Lower the needle slightly from its highest point. Check your manual for the exact position needed for the threader.
- Lower Threader: Pull the needle threader tool down. There is a tiny hook on it.
- Guide Thread: Place the thread in front of the needle. Guide it through the arms of the threader tool.
- Engage Hook: Push the threader tool back gently. The tiny hook should go through the needle eye from the back. It will grab the thread.
- Pull Loop: Release the threader tool. It will pull a loop of thread through the needle eye to the back.
- Pull Thread: Pull the loop the rest of the way through the eye. Pull the thread tail under the presser foot to the back.
Threading needle Singer Heavy Duty is the final step for the upper thread. Make sure the thread is through the needle eye and goes under the presser foot.
Bringing Up the Bobbin Thread
You have the top thread ready. You have the bobbin thread in place. Now you need to bring the bobbin thread up through the needle plate.
How to Bring Up the Bobbin Thread
- Hold Top Thread: Hold the tail of the upper thread. Hold it lightly with your left hand. Keep it to the side of the presser foot.
- Turn Handwheel: Turn the handwheel on the side of the machine towards you. Turn it one full turn. Watch the needle go down and then come back up. As the needle goes down, the top thread will catch the bobbin thread.
- Pull Top Thread: As the needle comes back up, you will see a loop of bobbin thread appear under the presser foot. It will be held by the top thread. Gently pull on the top thread tail you are holding. This pulls the bobbin thread loop up through the hole in the needle plate.
- Pull Out Bobbin Thread: Use your fingers or tweezers to grab the loop of bobbin thread. Pull the bobbin thread tail out completely.
- Both Threads Back: You should now have two thread tails (top and bobbin) coming out from under the presser foot. Pull both threads under the presser foot and towards the back of the machine. Place them both behind the presser foot.
You are now threaded and ready to sew!
Setting the Tension
Singer Heavy Duty tension adjustment controls how the top thread and bobbin thread lock together in the fabric. Getting the tension right is key for nice stitches.
What is Tension?
Tension is the pull on the thread. The tension discs on the machine put drag on the thread. This makes the thread pull tighter. The bobbin case also has tension.
Finding the Tension Dial
The main tension control for the upper thread is a dial. It is usually on the front of the machine. It has numbers. Lower numbers mean less tension (looser thread). Higher numbers mean more tension (tighter thread).
Basic Tension Setting
For most sewing, a middle setting works well. On many Singer Heavy Duty machines, this is often around 4 or 5. This is a good starting point for Singer Heavy Duty tension adjustment.
Checking Your Tension
Sew a test stitch on a scrap piece of the fabric you will use.
* Look at the top side of the fabric. The stitches should look smooth. You should not see loops.
* Look at the bottom side of the fabric. The stitches should look smooth. You should not see loops.
Ideally, the top thread and bobbin thread meet exactly in the middle of the fabric layers.
Adjusting Tension
- If the bobbin thread shows loops on the top of the fabric: The top tension is too tight or the bobbin tension is too loose. Try lowering the top tension dial number.
- If the top thread shows loops on the bottom of the fabric: The top tension is too loose or the bobbin tension is too tight. Try raising the top tension dial number.
Do small changes (like half a number) to the tension dial. Sew another test line. Keep adjusting until your stitches look good on both sides.
The bobbin tension is factory set. You usually do not need to change it. If you think bobbin tension is the problem, check your manual or take it to a service person. Focus on the upper Singer Heavy Duty tension adjustment first.
Recap of the Singer Heavy Duty Thread Path
Let’s look again at the full journey of the top thread. This is the Singer Heavy Duty thread path:
- Spool Pin
- First Thread Guide (often on top)
- Down the first channel/guide
- Around the bend/check spring area
- Up the second channel to the take-up lever
- Through the eye of the Singer Heavy Duty take up lever
- Down through guides on the needle bar (Singer Heavy Duty upper thread guide system)
- Through the eye of the needle
- Under the presser foot
Following this path correctly every time is the most important part of threading. Even small mistakes, like missing a guide or not putting the thread through the take-up lever eye, will cause big problems when sewing. Your Singer sewing machine diagram will show this path clearly.
Tips for Better Threading
- Use Good Thread: Cheap or old thread can break easily or have slubs. Use good quality thread for best results.
- Match Thread and Needle: Use a needle size that fits your thread thickness. A common needle size for general sewing is 90/14.
- Needle Direction: Make sure your needle is inserted correctly. The flat side of the needle shaft usually faces the back on Singer Heavy Duty machines.
- Clean Your Machine: Lint and dust can build up in the thread path and bobbin area. This affects tension and threading. Clean your machine often.
- Check Manual: Your specific Singer Heavy Duty model (like Singer 4423 threading) might have small differences. Always look at your machine’s manual and Singer sewing machine diagram.
- Practice: The more you thread your machine, the faster and easier it becomes.
Common Threading Mistakes and Problems
Even with simple steps, problems can happen. Here are some common ones related to threading and how to fix them.
Thread Breaks Often
- Check Thread Path: Is the thread in every guide? Is it in the take-up lever? Is it through the tension discs with the presser foot up when threading? Missing a guide is a common reason for thread breaking.
- Thread Quality: Is the thread old, weak, or cheap? Try a new spool of good thread.
- Needle Problem: Is the needle bent, dull, or the wrong size for the thread or fabric? Change the needle. Make sure it is inserted correctly.
- Tension Too Tight: Is the upper tension set too high? Lower the number on the tension dial.
- Bobbin Problem: Is the bobbin wound unevenly? Is it the wrong size bobbin for the machine? Is the thread caught in the bobbin case? Rewind the bobbin or check the bobbin area.
Stitches Are Uneven or Loopy
- Incorrect Threading: This is the most likely cause. Go back and re-thread the machine from the spool, following the Singer Heavy Duty thread path exactly. Make sure the thread is in the tension discs (presser foot up when threading!) and in the take-up lever.
- Incorrect Bobbin Insertion: Is the bobbin inserted the right way? Is the thread seated correctly in the bobbin tension channel?
- Tension Setting: Is the Singer Heavy Duty tension adjustment correct for your fabric and thread? Adjust the tension dial using test scraps.
- Wrong Needle: Is the needle right for the fabric?
- Lint: Is there lint in the tension discs or bobbin area? Clean the machine.
Machine is Jammed
- Check Bobbin Area: Often, thread gets tangled in the bobbin case. Remove the bobbin. Cut away any tangled thread. Clean out the bobbin area.
- Check Needle: Is the needle bent or broken? Remove and replace it.
- Upper Thread: Is thread caught somewhere in the upper path? Cut the thread at the spool and pull it out carefully from the needle end. Re-thread the entire machine.
Proper threading prevents many sewing problems. Always start by checking your threading first if stitches look bad.
The Importance of Each Step
Every step in threading has a purpose.
- Winding the bobbin correctly (Singer Heavy Duty bobbin winding): This ensures the bottom thread pulls smoothly and has even tension.
- Inserting the bobbin right (inserting bobbin Singer Heavy Duty): This sets up the bobbin thread tension and feed.
- Following the upper thread path (Singer Heavy Duty thread path, Singer Heavy Duty upper thread guide): This guides the thread smoothly and correctly through the machine’s tension system and guides.
- Engaging the take-up lever (Singer Heavy Duty take up lever): This lever makes sure the right amount of thread is pulled for each stitch and forms the stitch loop.
- Threading the needle (threading needle Singer Heavy Duty): This is the final gateway for the top thread to meet the bobbin thread.
- Bringing up the bobbin thread: This gets both threads ready to start sewing together.
- Setting tension (Singer Heavy Duty tension adjustment): This makes the two threads lock together correctly in the fabric.
Ignoring any step or doing it wrong will cause stitch problems. Think of it like following a map (the Singer sewing machine diagram). You must go to every place on the map in the right order.
Why Singer Heavy Duty?
Singer Heavy Duty machines are made to sew through thick fabrics and multiple layers. They often have stronger motors and metal frames. The threading process is similar to many other machines, but getting it right is extra important because you are often working with tough materials. Proper Singer Heavy Duty threading ensures the machine can handle the stress of sewing heavy fabrics without breaking thread or making poor stitches. This is true whether you are using a Singer 4411, 4423 threading, 4432, or 44S model. The core steps are the same.
Table: Quick Threading Checklist
Use this checklist each time you thread your machine:
| Step | Done? | Notes |
|---|---|---|
| Machine Off & Unplugged | Yes/No | Safety first! |
| Presser Foot UP | Yes/No | Opens tension discs. |
| Needle & Take-Up Lever UP | Yes/No | Needed to thread take-up lever and needle. |
| Bobbin Wound Correctly | Yes/No | Evenly wound, not too full. |
| Bobbin Inserted Right | Yes/No | Thread direction correct, in tension channel. |
| Top Thread on Spool Pin | Yes/No | With spool cap. |
| Thread in 1st Guide | Yes/No | Start of upper path. |
| Thread Down & Around Tension | Yes/No | Through main tension area. |
| Thread Through Take-Up Lever Eye | Yes/No | Key step! Lever must be UP. |
| Thread Down Through Guides | Yes/No | Guides on needle bar. |
| Thread Through Needle Eye | Yes/No | Front to back. |
| Thread Under Presser Foot | Yes/No | Towards the back. |
| Bobbin Thread Pulled Up | Yes/No | Using handwheel and top thread. |
| Both Threads Under Foot to Back | Yes/No | Ready to sew! |
Frequently Asked Questions (FAQ)
Here are simple answers to common questions about threading a Singer Heavy Duty machine.
Q: Why does my top thread keep breaking?
A: Check if the thread is old or low quality. Make sure you threaded the machine correctly following all steps. Did you miss a guide or the take-up lever? Is the needle bent or old? Is your tension too tight? Is the presser foot up when you thread?
Q: Why are there loops on the bottom of my fabric?
A: This usually means the top tension is too loose. Turn your upper tension dial number higher, maybe by half a number. Sew a test line. Keep adjusting until stitches look good. It can also mean you missed threading the take-up lever or the main tension discs correctly. Re-thread the top part.
Q: Why are there loops on the top of my fabric?
A: This usually means the top tension is too tight. Turn your upper tension dial number lower. It can also mean the bobbin thread tension is too loose, but check the top tension first. Make sure the bobbin thread is seated right in the bobbin case channel.
Q: Does it matter which way the bobbin goes in?
A: Yes, it matters a lot for top-drop-in bobbins. For most Singer Heavy Duty machines, the thread should come off the bobbin towards the left, making the letter ‘P’. Check your manual and the picture inside the bobbin area cover.
Q: Do I need to lift the presser foot before threading?
A: Yes! Lifting the presser foot opens the tension discs. If the foot is down, the discs are closed, and the thread cannot sit inside them correctly. This leads to bad tension and stitches. Always lift the foot to thread the top.
Q: What is the take-up lever for?
A: The take-up lever pulls thread from the spool as the needle goes down. It then lifts to pull the loop tight and form the stitch. The thread must go through the eye of the take-up lever for the machine to sew correctly.
Q: Can I use cheap thread in my Heavy Duty machine?
A: You can, but it’s not a good idea. Cheap thread breaks more often, causes more lint, and can lead to stitch problems. Good quality thread works much better, especially with thick fabrics the Heavy Duty machine is built for.
Q: My machine has a needle threader. How do I use it?
A: Built-in needle threaders are handy. Lower the needle slightly from the top point. Pull the threader tool down. Place the thread in front of the needle. Gently push the tool back so the tiny hook goes through the needle eye from the back and grabs the thread. Release the tool to pull a loop through. Pull the loop to get the thread tail. Check your manual for exact steps as they vary slightly.
Q: Where can I find a diagram for my machine?
A: Look in the manual that came with your machine. If you don’t have it, you can usually find a free PDF copy on the official Singer website by searching for your model number (like Singer 4423 threading diagram).
Final Thoughts
Threading your Singer Heavy Duty sewing machine is a basic skill. Learning it well makes sewing much easier and more fun. By following these simple steps for the bobbin and the upper thread path, you help your machine make strong, perfect stitches. Always take your time, use good thread, and check your work. Soon, threading will be fast and easy for you. Happy sewing!