
Image Source: hellosewing.com
Easy How To Tie Fleece Blanket Corners Without Sewing
Want to learn how to knot fleece blanket corners without sewing? It’s simple! This DIY no-sew blanket tutorial will show you exactly how. You can make a soft, cozy fleece blanket quickly and easily. There’s no need for a sewing machine or fancy tools. We will teach you the best ways to get secure fleece blanket corners every time. This method creates beautiful no-sew fleece blanket edges. It helps preventing fleece unraveling, making your blanket last. You will master tying fleece blanket knots with ease. Let’s make a great blanket!
Why Pick a No-Sew Fleece Blanket?
Making a blanket without sewing is a great choice. It is easy. It is fast. You do not need special skills. Many people enjoy this craft. It is perfect for gifts. It is also good for charity projects.
Ease of Creation
Sewing can be hard. It needs a machine. It needs needles and thread. A no-sew blanket needs none of these. You just need fabric and scissors. This makes it a fun project for everyone. Kids can help too! It is a simple way to create something warm.
Speed of Completion
You can make a no-sew fleece blanket fast. A sewn blanket takes much longer. You need to cut. You need to pin. You need to sew many seams. With no sewing, you just cut and tie. Most people can finish a blanket in a few hours. This is great for last-minute gifts.
Cost Savings
Making things yourself saves money. Buying a fleece blanket can be costly. Buying fleece fabric is cheaper. You do not need to buy sewing tools. This helps your budget. You get a nice blanket without spending a lot.
A Fun Project for All Ages
This craft is safe. There are no sharp needles. There are no hot irons. Even young children can join in. With help, they can tie knots. It is a good family activity. Everyone can help make something cozy.
Customization Options
You pick your own fabric. You can choose colors you love. You can pick patterns that fit your home. This makes your blanket special. You can match it to any room. You can also make it for a favorite person. This is part of the joy of DIY no-sew blanket tutorial projects.
What You Need: Gathering Your Supplies
Before you start, get your items ready. Having everything at hand makes the job easy. You do not want to stop in the middle. Here is a list of what you will need for your easy fleece blanket tying project.
| Item | Description | Tips for Choice |
|---|---|---|
| Fleece Fabric | Two pieces, same size, different patterns | Choose soft, thick fleece. Avoid thin. |
| Sharp Fabric Scissors | For clean cuts | Dull scissors make rough edges. |
| Measuring Tape/Ruler | To get straight lines and even cuts | A yardstick works well for long cuts. |
| Fabric Marker/Chalk | To mark cutting lines | A light color works best on dark fabric. |
| Cardboard Square | For making even fringe strips | 4×4 inches is a good size. |
Choosing Your Fleece Fabric
This is the most important choice. Fleece fabric is soft. It comes in many colors. It comes in many patterns. Look for anti-pill fleece. This kind does not get little balls of fuzz. Choose two pieces of fleece. They should be the same size. They should be different patterns. This makes the blanket reversible. It looks nice on both sides. Think about who the blanket is for. Pick colors they will love.
The Right Scissors
Sharp scissors are key. Dull scissors will snag the fabric. This makes cuts rough. Use fabric scissors only for fabric. Do not use them for paper. This keeps them sharp. A rotary cutter is also an option. It cuts very fast. It needs a special mat.
Measuring Tools
You need to measure for even strips. A measuring tape is good. A long ruler or yardstick is even better. It helps you make straight lines. Use it to mark your cutting lines. This makes sure your fleece blanket fringe corners are neat.
Fabric Marker or Chalk
You will mark where to cut. A fabric marker or chalk works well. It washes off later. Make sure it shows up on your fabric. Use a light color on dark fabric. Use a dark color on light fabric.
Cardboard Square
This helps you cut even fringe. Cut a piece of cardboard. Make it 4 inches by 4 inches. You will use this as a guide. It helps make all your ties the same length. This gives your blanket a finished look.
Getting Ready: Prepping Your Fabric
Good prep makes tying easier. This step gets your fabric ready. It sets you up for success. It ensures your no-sew fleece blanket edges look great.
Laying Out the Fabric
Find a large, clean space. The floor works well. Lay one piece of fleece flat. Smooth it out. Make sure there are no wrinkles. Then, place the second piece of fleece on top. Line up all the edges. Make them match perfectly.
Trimming Uneven Edges
Fabric from the store might have rough edges. These are called selvages. They are often stiff. They do not look nice. Cut them off. Use your ruler to make straight lines. Trim all four sides. This makes your blanket neat. It also makes tying easier.
Creating the Cutting Guide
This step is very important. It helps you cut even fringe.
1. Measure 4 inches in from each corner. Mark this spot.
2. Do this for all four corners.
3. Draw a line connecting these marks. You will cut out a square from each corner. These squares will be 4×4 inches.
4. Also, mark lines for your fringe. These lines should be 1 inch wide. Use your ruler to draw these lines all around the edge of the blanket. Do this on all four sides. Stop your lines at the 4-inch mark you made earlier. This is your cutting guide.
The Knotting Process: A Step-by-Step DIY No-Sew Blanket Tutorial
Now, let’s learn how to knot fleece blanket corners. This is the fun part! Follow these steps carefully. You will have secure fleece blanket corners in no time.
H4. Cutting the Corners
This is the very first cut. It makes tying easier.
* At each of the four corners, cut out the 4-inch by 4-inch square you marked.
* Cut through both layers of fabric at once.
* These cuts create a neat space for your ties. It removes bulk.
H4. Making the Fringe Strips
Now, make the fringe. These are the strips you will tie.
* Starting from one edge, cut along your marked lines. Cut through both fabric layers.
* Cut strips that are about 1 inch wide.
* Cut them up to the 4-inch mark. This means each strip will be 4 inches long.
* Do this all around the entire blanket. This creates many little strips. These strips will form your fleece blanket fringe corners.
H4. Tying the Knots: Simple and Secure
This is where the magic happens! You will tie the strips together. This creates your no-sew blanket edge techniques.
H5. Step-by-Step Knot Tying
- Take one strip from the top layer of fabric.
- Take the matching strip from the bottom layer.
- Line them up. Make sure they are perfectly together.
- Tie them in a simple square knot.
- First, cross the top strip over the bottom strip.
- Loop it under and pull tight. This is half a knot.
- Then, cross the new top strip over the new bottom strip.
- Loop it under again and pull tight. This finishes the knot.
- Pull the knot very tight. This makes it
secure fleece blanket corners. - Move to the next pair of strips. Keep tying.
- Work your way around the blanket. Do all four sides.
H5. Tips for Even Knots
- Keep your knots even in tightness. This makes the edge look good.
- Do not pull too hard. Fleece can stretch.
- Make sure each knot is snug. Loose knots can come undone.
- Check your work as you go. If a knot is loose, untie it and redo it.
Boosting Security: Tips for Secure Fleece Blanket Corners
While tying is simple, a few tricks can make your knots extra strong. This helps preventing fleece unraveling over time.
Double Knotting
For extra security, tie a second knot. After you make the first square knot, make another one. This makes the knot thicker. It is harder for it to come undone. This is great for blankets that will get a lot of use.
Consistent Tension
Try to pull each knot with the same force. If some knots are loose and others tight, the edge will look bumpy. Steady tension makes a smooth, even edge. This makes your fleece throw corner finishing look professional.
Inspecting Your Work
As you tie, look at the knots. Are they all tight? Are they all the same size? If you find a loose one, fix it right away. It is easier to fix a knot now than after the whole blanket is done. This ensures your tying fleece blanket knots are perfect.
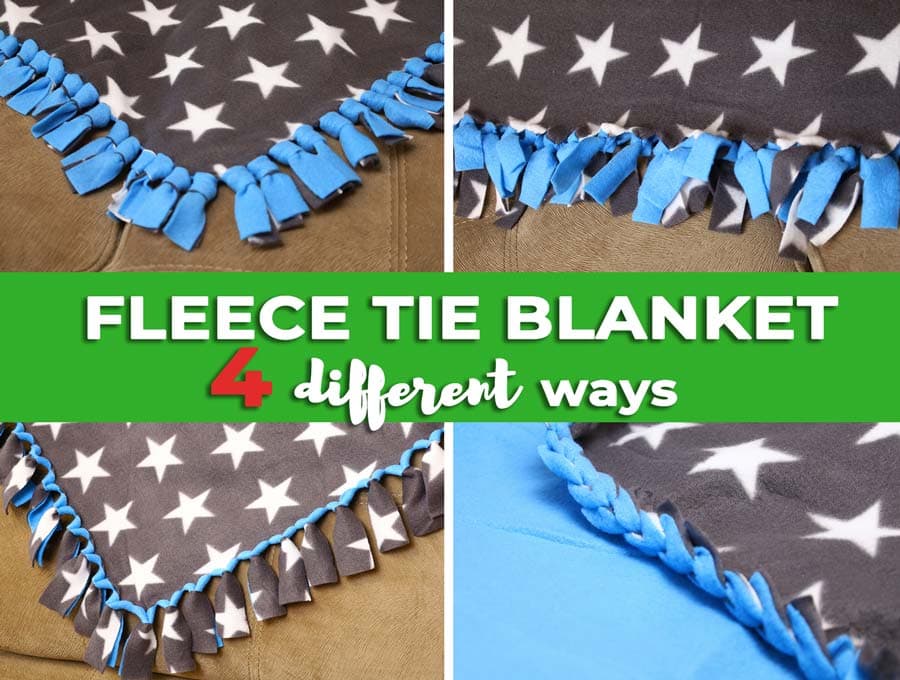
Creative Touches: Variations on Tying Fleece Blanket Knots
There is more than one way to tie fleece! Once you master the basic knot, you can try new styles. These variations add flair to your fleece blanket fringe corners.
The Loop Knot
This knot is quicker. It also gives a different look.
1. Take a top and bottom strip together.
2. Twist them once or twice.
3. Form a small loop near the base of the twisted strip.
4. Pull the ends of the strip through this loop.
5. Pull tight to form a knot. This creates a neat, rounded knot. It is a simple no-sew blanket edge techniques.
Braided Edge
This method takes more time. But it creates a very fancy edge.
1. Cut your fringe strips wider. Make them 1.5 to 2 inches wide.
2. Take three pairs of strips next to each other.
3. Treat each pair as one strand.
4. Braid these three “strands” together.
5. Secure the end of the braid with a simple knot or by tucking it in.
This makes a thick, decorative border.
Mixed Fabric Fringe
Want to add more color?
1. Cut your original two fleece layers.
2. Add a third, thinner fabric layer (like cotton or flannel) in between.
3. Cut all three layers into fringe strips.
4. Tie all three layers together.
This adds a new color or texture to your fringe. It gives your no-sew fleece blanket edges a unique look.
Keeping It Fresh: Caring for Your No-Sew Fleece Blanket
Proper care helps your blanket last. Fleece is easy to care for. But a few tips help preventing fleece unraveling and keep it soft.
Washing Instructions
Fleece likes cold water.
* Wash your fleece blanket in cold water.
* Use a gentle cycle.
* Do not use too much soap.
* Avoid fabric softener. It can make fleece less soft.
Drying Tips
Heat can harm fleece.
* Tumble dry on low heat.
* Or, hang your blanket to dry.
* High heat can melt fleece fibers. It can also make them stiff.
* Remove the blanket from the dryer quickly. This helps prevent static.
Dealing with Unraveling
Sometimes, a knot might come loose. Or a strip might fray.
* If a knot loosens, retie it tightly.
* If a strip frays, trim the frayed bits with sharp scissors.
* You can also add a dab of fabric glue to the knot. This adds extra hold. Make sure the glue is safe for fabric.
Problem Solving: Common Issues and Fixes
Even in easy fleece blanket tying, small problems can arise. Here are some common issues and how to fix them.
Uneven Fringe Strips
- Problem: Some strips are wider or shorter than others. This makes the edge look messy.
- Fix: Before tying, use your ruler. Redraw lines if needed. Use your cardboard guide for length. Trim any uneven strips. It is easier to fix before you tie.
Knots Coming Undone
- Problem: After some use, knots become loose. Or they untie completely.
- Fix: This usually means the knots were not tight enough. Untie the loose knots. Re-tie them. Pull them very, very snug. Consider double knotting for extra security. This is key for
secure fleece blanket corners.
Fabric Shifting While Cutting
- Problem: The two layers of fabric slide apart while you cut. This makes uneven fringe.
- Fix: Use fabric clips or pins along the edges. Pin every few inches. This holds the layers together. This makes cutting much easier.
Corners Not Lying Flat
- Problem: The corners of your blanket might stick up. They might not lay flat.
- Fix: This can happen if you did not cut out enough fabric from the corner. Or if the first few knots are too tight. Try to gently stretch the fabric around the corner area. If it’s a major issue, you might need to undo the first few knots. Then, re-tie them a little looser. Make sure your 4×4 inch squares were cut fully.
Extending Your Knowledge: More No-Sew Blanket Edge Techniques
Beyond basic tying, there are other no-sew methods. These can add different looks to your fleece projects.
Fringeless Edges
You can also make a no-sew blanket without fringe.
1. Lay out your two fabric pieces.
2. Cut them to size.
3. Use fabric glue or iron-on adhesive.
4. Apply a line of glue along the edge of one fabric piece.
5. Press the second fabric piece onto it.
6. Hold until dry. This creates a clean, no-fringe edge. It is not as common for blankets, but it is an option.
Blanket Stitch Look (with Ties)
You can make your knots look like hand stitches.
1. Cut your fringe strips a bit wider.
2. Tie your knots in a loop style.
3. Then, use a contrasting color of yarn.
4. Weave the yarn through the bases of the knots. This mimics a blanket stitch. This makes a very decorative no-sew fleece blanket edges.
The End Result: A Cozy and Lasting Creation
You have now learned how to knot fleece blanket corners! You have made a wonderful blanket. It is soft. It is warm. And you made it yourself. This DIY no-sew blanket tutorial proves you do not need to sew to create something great. Your secure fleece blanket corners will hold strong. Your fleece blanket fringe corners will look nice. Enjoy your new, cozy blanket! Give it as a gift. Or keep it for yourself. It is a project to be proud of.
Frequently Asked Questions (FAQ)
Q1: Can I use just one layer of fleece?
A1: Yes, you can. It will be thinner. It might not be as warm. The tying method still works. You just tie single strips onto themselves. Or, you can cut little holes and thread ribbon through them. This would be a different look for fleece throw corner finishing.
Q2: How long should the fringe strips be?
A2: Most people cut them 4 inches long. This means cutting a 4-inch square from each corner. Then, you cut strips up to that 4-inch line. You can make them shorter or longer if you wish. Shorter fringe is about 3 inches. Longer fringe can be 5 inches. It depends on the look you want.
Q3: What is the best type of fleece to use?
A3: Anti-pill fleece is best. It resists little balls of fuzz. It stays soft longer. It is easier to tie. Look for a medium weight fleece. Too thin, and it might not hold its shape. Too thick, and it can be hard to cut and tie.
Q4: My knots look messy. What did I do wrong?
A4: Messy knots often happen if the strips are not even. Or if the knots are not pulled tightly. Make sure your strips are all the same width (about 1 inch). Pull each knot snug and even. Go slowly. Practice on a scrap piece first. This helps with easy fleece blanket tying.
Q5: Can I wash my no-sew fleece blanket?
A5: Yes, you can. Wash it in cold water. Use a gentle cycle. Tumble dry on low heat or air dry. Avoid high heat. High heat can damage the fleece fibers. Proper washing helps with preventing fleece unraveling.
Q6: Can I use this method for other fabrics?
A6: This method works best with fleece. Fleece does not fray. Other fabrics like cotton or flannel fray easily. This means their edges will unravel. If you use other fabrics, you will need to hem them first. Or use a no-fray fabric treatment. This method is truly meant for no-sew fleece blanket edges.