
Yes, you absolutely can tighten a loose elastic waistband without needing a needle and thread. If your pants, skirt, or shorts have a waistband that feels too big or has lost its stretch, there are many easy ways to make it fit better using simple items you likely already have around your house. These methods are great for a quick fix, a temporary solution, or if you simply don’t know how to sew. This article will show you different no-sew ways to make that baggy waistband snug again.
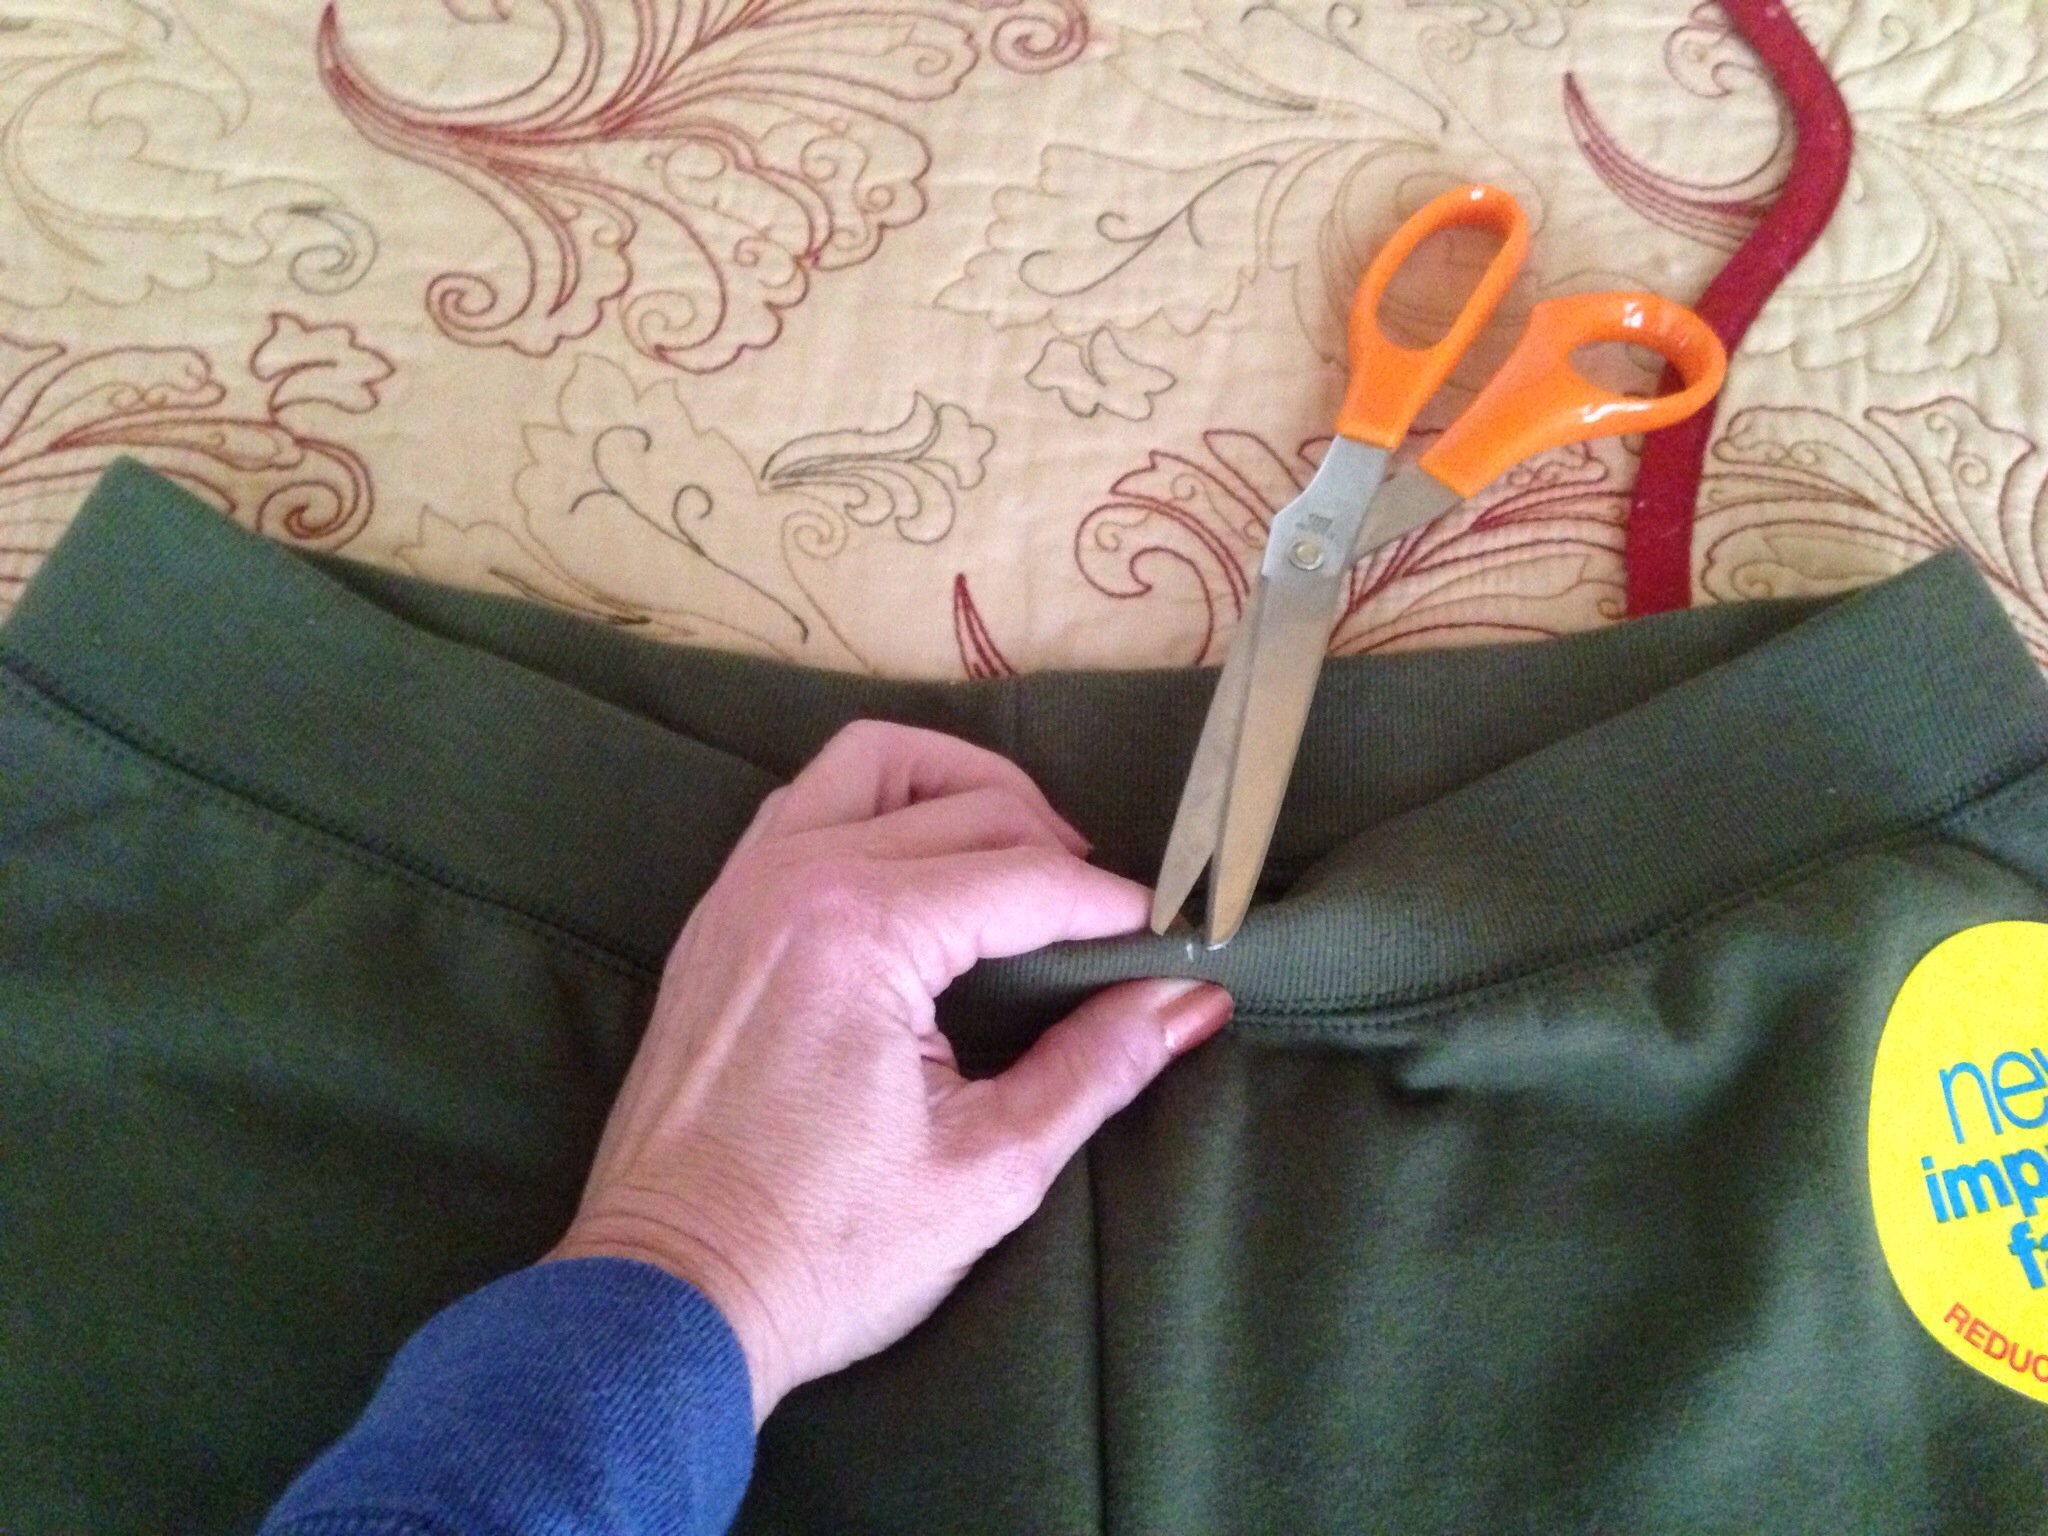
Image Source: assets.rbl.ms
Why Fix a Loose Waistband Without Sewing?
Lots of clothes have elastic waistbands. This makes them comfy and easy to wear. But over time, elastic can get stretched out. It can lose its snap. When this happens, your pants might fall down. Your skirt might not stay in place.
Sewing is one way to fix this. But sewing takes time. It needs special tools like a needle and thread or a sewing machine. Not everyone knows how to sew. Or maybe you need a fix right now for something you want to wear today.
This is where no-sew methods come in. They let you make your waistband tighter fast. You can cinch waist without sewing. These ways are often quick. They use simple things. They are good for a temporary waistband tightening. They are also great for a DIY waistband fix without needle. You can get a quick loose waistband fix no sew.
Learning About No-Sew Techniques
There are many clever ways to fix stretched elastic no sewing. Some methods work by making the waistband smaller. Others work by adding something else to hold the garment up. We will look at several simple ways.
Simple Fixes Using What You Have
These methods often use items you already use for clothes or have in your house.
Using Safety Pins
Safety pins are small, easy to find, and can make a quick change.
How to Use Safety Pins
- Put on the garment with the loose waistband.
- Feel where the waistband is too big. It is usually at the back or sides.
- Take a safety pin.
- Fold the extra fabric of the waistband inwards. Fold it towards your body. Do this at the spot where it is loose.
- Push the safety pin through the folded fabric layers.
- Make sure the pin goes through all layers of the fold.
- Close the safety pin.
- Check the fit.
- If it is still too loose, make a bigger fold. Or add more safety pins in other spots.
You can put pins on the inside of the waistband. This hides them better. Or you can put them on the outside if you don’t mind how it looks. You can use one pin or several pins spaced apart.
Pros of Using Safety Pins
- Very fast fix.
- Need only safety pins.
- Easy to do anywhere.
- Can change how tight you make it.
- Good for temporary waistband tightening.
Cons of Using Safety Pins
- Pins can come undone.
- They might poke your skin.
- They can snag other clothes in the wash.
- Can look messy if on the outside.
- Does not actually fix the stretched elastic itself.
Using safety pins is a simple fix for skirts loose elastic fix or shorts waistband too big solution. It is a common tighten pants waist non-sewing method when you are in a hurry.
Adding a Belt or Drawstring
If your garment has belt loops, adding a belt is the easiest fix. If it does not have belt loops, you can still use a belt over the waistband. Or you can add a drawstring.
Using a Belt
- Put on the garment.
- Put a belt through the belt loops if they are there.
- Pull the belt tight until the waistband feels snug.
- Fasten the belt.
- If there are no belt loops, just put the belt around your waist over the waistband. This holds the garment up.
Using a Drawstring (If it has one)
Some elastic waistbands already have a string or tie inside. This is a built-in way to cinch waist without sewing.
- Look for the drawstring ends. They are usually at the front of the waistband.
- Pull the ends to make the string tighter.
- Tie the string in a bow or knot.
- This pulls the elastic casing closed, making the waistband smaller.
This is the best way to use string to tighten waistband if your clothes have this feature already. It is a perfect elastic waistband adjustment method that needs no extra tools.
Pros of Belts/Built-in Drawstrings
- Very easy and quick.
- Looks normal if belt loops or drawstring are part of the design.
- Very secure.
- Can adjust the tightness easily.
Cons of Belts/Built-in Drawstrings
- Needs belt loops or a built-in string.
- A belt might not look good on all garments.
- Wearing a belt might not be as comfy as a pure elastic waist.
This method is a great loose waistband fix no sew, especially for pants or shorts meant to be worn with a belt or that have a drawstring.
Folding and Pinning Fabric (More Discreet)
This is like using safety pins but tries to hide the fix better.
How to Fold and Pin
- Take off the garment. Lay it flat.
- Find the part of the waistband that is loose. This is often at the back center.
- Pinch the fabric of the waistband. Make a fold that goes inwards.
- Hold the fold tight.
- Use safety pins to secure the fold on the inside of the waistband. Try to pin only through the inner layer of the waistband fabric. This way, the pins don’t show on the outside.
- You might need several pins along the fold to keep it flat and secure.
- Try the garment on. Check the fit.
- Adjust the fold size or add more pins if needed.
You can make one big fold in the back. Or you can make two smaller folds on the sides. This method is a DIY waistband fix without needle that keeps the outside looking clean.
Pros of Folding and Pinning
- Can be quite hidden if done on the inside.
- Uses only safety pins.
- Lets you control the size of the waistband change.
Cons of Folding and Pinning
- Can be tricky to pin only the inner layer.
- Pins can still move or poke.
- Not the most durable fix.
This method provides a good, temporary waistband tightening for skirts loose elastic fix or tighten pants waist non-sewing.
Using Fabric Clips or Clamps
Small clips, like binder clips or special fabric clips, can hold the folded fabric of a waistband.
How to Use Clips
- Put on the garment.
- Find the loose spot.
- Fold the extra waistband fabric inwards.
- Place a clip over the folded fabric to hold it tight.
- Use one clip or several clips along the loose area.
Pros of Using Clips
- Super fast and easy.
- No holes made in the fabric.
Cons of Using Clips
- Clips are very visible.
- Can be uncomfortable to wear.
- Not practical for most clothing unless it’s a costume or temporary photo prop.
This is less common for daily wear but is a quick fix for a photoshoot or similar where the fix needs to be instant and doesn’t need to be hidden.
Trying Heat (Very Temporary and Not Guaranteed)
Some types of elastic might shrink a tiny bit with heat. This is not a reliable fix and can even damage some fabrics or elastics.
How to Try Heat
- Check the care tag on your garment. Make sure it can handle heat.
- If safe, put the waistband part under a hot iron (use a pressing cloth to protect fabric). Or put the garment in a hot dryer.
- Use caution! Too much heat can melt elastic or damage fabric.
Pros of Trying Heat
- No added items needed.
- Might slightly improve the fit in some cases.
Cons of Trying Heat
- Risky! Can damage clothes.
- Results are often tiny or none.
- Not a real fix for truly stretched out elastic.
- Not an elastic waistband adjustment method we recommend often.
This is listed more as a “be aware” method rather than a recommended fix stretched elastic no sewing technique.
More Involved No-Sew Adjustments
These methods take a little more effort than just pinning or clipping. They might involve adding things to the garment using glue or iron-on tape. They are still DIY waistband fix without needle options.
Adding a No-Sew Drawstring Channel
This method creates a channel inside the waistband where you can thread a string. Then you can pull the string to make the waist tighter. This is a great way to use string to tighten waistband when there isn’t one built-in.
Materials Needed
- Fabric glue or iron-on hemming tape (like Stitch Witchery)
- A drawstring (ribbon, cord, shoelace, strip of fabric)
- Safety pin or bodkin (tool for threading string)
- Scissors
- Iron (if using hemming tape)
Steps to Add a Drawstring Channel
- Prepare the Waistband: Lay the garment flat. The waistband should already be a loop of fabric covering the elastic. You need to make an opening in this fabric casing.
- Create the Opening: Find a spot, usually in the front-center of the waistband. Carefully make a small cut in the inner layer of the waistband fabric. The cut should be just big enough to push a string through. Do not cut the elastic inside! Use small, sharp scissors. Make two small cuts about 1 inch apart, or one small horizontal slit.
- Seal the Edges (Optional but Good): To stop the cut fabric from fraying, you can put a tiny bit of fabric glue on the edges of the cut. Let it dry.
- Prepare the Drawstring: Cut your drawstring to the right length. It should be long enough to go around your whole waistband plus extra on each side for tying (at least 20-30 inches longer than the waistband).
- Attach String to Pin: Tie one end of the drawstring to a safety pin. Close the pin.
- Thread the String: Push the safety pin (with the string attached) into the opening you cut in the waistband casing.
- Work the Pin Through: Hold the waistband flat. Gently push and wiggle the safety pin through the entire waistband channel. You will feel it moving inside the fabric tube. Gather the fabric onto the pin, then push the fabric along the string. Keep doing this all the way around the waistband.
- Pull String Through: When the pin comes out the other side of the opening, pull the drawstring through.
- Even Out String: Make sure equal lengths of string come out of the opening on both sides.
- Test the Fit: Put on the garment. Pull the drawstring ends to tighten the waistband. Tie the string.
- Secure the Opening (Optional): You can put a tiny bit of fabric glue near the opening to help keep the elastic in place inside the casing, but be careful not to glue the drawstring! Or, if using iron-on tape, you could potentially use small bits around the opening edges before threading.
This method is a more lasting tighten pants waist non-sewing solution than just pins. It is a proper elastic waistband adjustment method without sewing that lets you adjust the fit every time you wear the garment. It is great for shorts waistband too big solution or skirts loose elastic fix.
Pros of No-Sew Drawstring
- Gives a way to adjust tightness every time.
- Can look like it was made that way.
- Hides the stretched elastic problem well.
- A good fix stretched elastic no sewing method.
Cons of No-Sew Drawstring
- Takes more effort than simple pins.
- Requires making a cut in the fabric.
- Need fabric glue or iron-on tape.
- Threading the string can take time.
Adding Belt Loops (No-Sew)
If you want to wear a belt with a garment that doesn’t have loops, you can add some. This is a DIY waistband fix without needle.
Materials Needed
- Ribbon, fabric scraps, or thick cord for loops
- Fabric glue or iron-on hemming tape
- Scissors
- Measuring tape or ruler
- Iron (if using hemming tape)
Steps to Add No-Sew Belt Loops
- Prepare the Loops: Cut strips of your chosen material. Make them about 1 inch wide and 4-6 inches long (depends on belt size). You will need about 5-7 loops for pants or skirts.
- Prepare the Waistband: Lay the garment flat. Decide where you want the belt loops. Mark the spots with chalk or pins. Common spots are center back, sides, and front quarter points.
- Add Glue or Tape: For each loop, put a small line of fabric glue or a piece of iron-on tape on one end of the strip.
- Attach First End: Press the glued/taped end onto the waistband. Let glue dry or iron the tape following package directions. The loop should stick upwards away from the waistband.
- Form the Loop: Bring the other end of the strip down to the waistband, forming a loop shape.
- Attach Second End: Put glue or tape on the second end of the strip. Press this end onto the waistband just below the first end. Make sure the loop is big enough for your belt.
- Secure: Let glue dry completely or iron the tape firmly. You can add a small amount of glue under the loop itself where it touches the waistband for extra strength.
- Repeat: Do this for all the loops you planned.
This method helps you use a belt effectively to cinch waist without sewing. It’s a visual fix but makes the belt look like it belongs.
Pros of No-Sew Belt Loops
- Lets you use a belt easily.
- Can look like part of the original design.
- Good for tighten pants waist non-sewing.
Cons of No-Sew Belt Loops
- Glue or tape might not be as strong as sewing.
- Loops can sometimes come off.
- Adds a visible feature to the garment.
Cutting and Tying the Elastic Inside
This method actually changes the elastic itself without sewing. It works if you can get to the elastic inside the waistband casing.
Materials Needed
- Small scissors
- Safety pin
- Maybe a needle and thread (optional, just to close a hole if needed, but we’ll try to avoid even this).
Steps to Cut and Tie Elastic
- Find Access Point: Look inside the waistband. Sometimes there is a small opening left when the garment was made. If not, you will need to make one. Find a seam inside the waistband casing. Carefully snip a few stitches on the inside layer of the waistband fabric, just big enough to reach the elastic. Do not cut the outer fabric!
- Find the Elastic: Reach into the opening. Find the elastic band inside the fabric tunnel.
- Pull Elastic Out: Gently pull out an inch or two of the elastic through the hole.
- Cut the Elastic: Carefully cut the elastic band in the middle of the part you pulled out.
- Overlap and Tie: Pull the two cut ends of the elastic out of the hole. Overlap the two ends. Pull them firmly to make the waistband fabric gather and get tighter.
- Tie a Knot: While holding the ends tight and overlapped, tie them together in a strong knot. A square knot or a surgeon’s knot works well. Make sure the knot is secure. You might need to tie it twice.
- Test Fit (Before Putting Elastic Back): Hold the knot and the garment. See how tight the waistband feels. You can untie and retie if needed to get the right tightness.
- Tuck Elastic Back: Once the knot is tied and the fit is right, gently push the knotted elastic back into the waistband casing. Make sure the knot lies flat inside.
- Close the Opening (No Sew): The fabric casing will likely close up around the elastic now that it’s shorter. If the hole is small, you can often just leave it. If it’s a bit bigger, you could use a tiny bit of fabric glue to hold the edges together, but be very careful not to glue the elastic or the main garment fabric. A safety pin can also hold the opening closed temporarily if needed.
This is a more advanced DIY waistband fix without needle. It directly addresses the stretched elastic issue. It is a good loose waistband fix no sew for clothes where the elastic can be reached.
Pros of Cutting and Tying Elastic
- Actually shortens the elastic itself.
- Makes the waistband smaller permanently (until the knot stretches).
- Hidden fix.
- Effective fix stretched elastic no sewing method.
Cons of Cutting and Tying Elastic
- Requires cutting the elastic (no going back).
- Need to make a small opening in the fabric.
- Getting the right tightness the first time can be tricky.
- The knot can be bulky inside the waistband.
- May require a small amount of glue to close the hole.
Choosing the Right Elastic Waistband Adjustment Method
With so many ways to tighten a loose waistband without sewing, how do you pick the best one? Think about these things:
- How loose is it? A little loose might just need a pin. Very loose might need a drawstring or tying the elastic.
- What kind of clothing? Pants often work well with belts or tying the elastic. Skirts loose elastic fix might be best with folding and pinning or a drawstring. Shorts waistband too big solution can use many of these methods.
- Do you need a temporary fix or something more lasting? Pins are temporary. Adding a drawstring is more lasting. Tying the elastic is also more lasting.
- What materials do you have? Safety pins are common. Fabric glue or iron-on tape might need a trip to the store.
- How do you want it to look? Pins are visible. Tying elastic or an added drawstring are hidden inside. An added belt is visible but can look good.
- How much effort do you want to put in? Pins are fastest. Adding a drawstring channel takes more steps.
Look at this table to help you decide:
| Method | How It Works | Effort Level | How Visible? | Permanence? | Good For… |
|---|---|---|---|---|---|
| Safety Pins | Folds fabric tighter | Easy | Can be visible | Temporary | Quick fixes, minor looseness |
| Belt (with loops) | Holds garment up | Easy | Normal belt | As long as worn | Pants/shorts with loops |
| Built-in Drawstring | Pulls waistband casing tighter | Easy | Normal string | As long as worn | Clothes that have it |
| Folding & Pinning | Folds fabric tighter on inside | Medium | Can be hidden | Temporary | Skirts, dresses, less visible fix needed |
| Fabric Clips | Clamps fabric fold | Very Easy | Very visible | Very Temporary | Photos, costumes |
| Heat (Iron/Dryer) | Might shrink elastic slightly | Easy/Risky | None | Very Temporary | Last resort, often ineffective or risky |
| No-Sew Drawstring Channel | Adds a channel for adjusting string | Harder | String visible | More Lasting | Adjustable fit needed, various garments |
| No-Sew Belt Loops | Adds points to use a belt | Harder | Loops visible | More Lasting | Using a belt is desired |
| Cutting & Tying Elastic | Shortens the elastic inside | Harder | Hidden | More Lasting | When elastic is truly stretched out |
This table helps compare the elastic waistband adjustment methods that don’t need sewing. It helps find the best loose waistband fix no sew for your situation.
Fixing Different Types of Clothes
The methods described work for many kinds of clothing with elastic waistbands.
- Pants: Tighten pants waist non-sewing methods like belts, tying elastic inside, or added drawstrings work well.
- Skirts: Skirts loose elastic fix can use folding and pinning, safety pins, or adding a drawstring.
- Shorts: Shorts waistband too big solution can use belts, folding, pins, or tying the elastic.
Think about how the garment hangs and how you want the fix to look. For flowy skirts, a hidden fix like tying elastic might be best. For casual shorts, an external drawstring might look fine.
What If It Still Doesn’t Fit?
No-sew methods are great, but they might not always work perfectly.
- If the elastic is completely broken or has lost all its stretch, simply shortening it might not be enough. You might need to replace the elastic, which usually requires sewing.
- If the garment is much too big, not just the waistband, you might need more serious changes that involve sewing.
- Sometimes, a temporary fix is fine, but for a favorite item you wear often, learning to replace the elastic (which involves sewing) might be the best long-term solution.
But before you give up and sew, try a few different no-sew elastic waistband adjustment methods! You might find one that works just right. These DIY waistband fix without needle ideas can save your clothes.
Keeping Your Elastic Waistbands Healthy
To help elastic waistbands last longer and avoid needing fixes:
- Follow washing directions on the care tag.
- Avoid high heat in the dryer, as heat can damage elastic.
- Don’t hang heavy items by the waistband for long periods, as this can stretch the elastic.
- Try not to overstretch the waistband when pulling clothes on or off.
Taking care of your clothes helps prevent the need for a loose waistband fix no sew later on.
Summary of No-Sew Solutions
Having a loose waistband is a common problem. Luckily, you don’t need to be a sewing expert to fix it. Many simple, no-sew methods can help you cinch waist without sewing.
From quick fixes using safety pins to more involved methods like adding a no-sew drawstring channel or cutting and tying the elastic inside, you have options. These elastic waistband adjustment methods let you get a good fit again.
Whether you need a temporary waistband tightening for a special event or a more lasting DIY waistband fix without needle, the techniques discussed here provide practical solutions for tighten pants waist non-sewing, skirts loose elastic fix, and shorts waistband too big solution. Don’t let stretched elastic make your clothes unwearable. Try a no-sew fix today!
Frequently Asked Questions (FAQ)
Q: Can I really make a stretched elastic waistband tight again without any sewing?
A: Yes, absolutely! There are many ways to make a loose waistband fit better without using a needle and thread. You can use things like safety pins, belts, or even make simple changes with fabric glue or iron-on tape. These methods provide a loose waistband fix no sew.
Q: How permanent are these no-sew fixes?
A: It depends on the method. Simple fixes like using safety pins are temporary. They might need to be redone or can come loose. Methods like adding a no-sew drawstring or cutting and tying the elastic inside are more lasting, but they might not be as strong or permanent as a sewn repair or replacement of the elastic.
Q: Will these methods work on all types of elastic waistbands?
A: Most of these methods work on waistbands that have the elastic enclosed in a fabric tunnel or casing. If the elastic is stitched directly onto the fabric (like on some underwear), some methods (like cutting and tying inside) won’t work. But methods like pins or belts can still help make the garment tighter overall.
Q: Is cutting the elastic inside safe for the garment?
A: Cutting and tying the elastic inside the casing can fix stretched elastic no sewing. However, it is a permanent change to the elastic itself. It won’t harm the fabric if done carefully, but you cannot undo the cut elastic. Make sure you are confident before trying this method.
Q: Which no-sew method is best for a quick fix?
A: Using safety pins to fold the fabric is usually the fastest and easiest method for a quick, temporary waistband tightening. Using a belt is also very fast if the garment has belt loops or you don’t mind wearing one over the fabric.
Q: Can I wash clothes after using these no-sew methods?
A: It depends on the method. Safety pins should be removed before washing to avoid damaging the garment or other clothes. Fabric glue needs to be fully cured (dried) before washing, and the glue might not hold up to repeated washing. Iron-on tape is usually washable. Tying the elastic inside should be fine in the wash, but the small opening might fray over time. Always be cautious and check the specific materials you used.
Q: Will these fixes damage my clothes?
A: Using safety pins can make small holes in the fabric over time or if the pins snag. Cutting the elastic inside makes a cut in the elastic and potentially a small hole in the inner waistband fabric. Using fabric glue or iron-on tape can sometimes be seen or felt through the fabric. Most methods, if done carefully, will not seriously damage the garment, but they do involve altering it.
Q: Can I use these methods on kids’ clothes?
A: Yes, these elastic waistband adjustment methods can be used on kids’ clothes. However, be extra careful with safety pins on clothes for young children, as they could come undone and be a hazard. A no-sew drawstring or cutting and tying the elastic might be better options for more active wear or items that are washed often.