
Starting out with a sewing machine can feel like a big step, but your Brother sewing machine is a great choice for beginners. Can you really learn to sew easily with one? Yes! Brother machines are known for being simple to set up and use, making them perfect for learning. This guide will walk you through the key steps to get you sewing in no time.
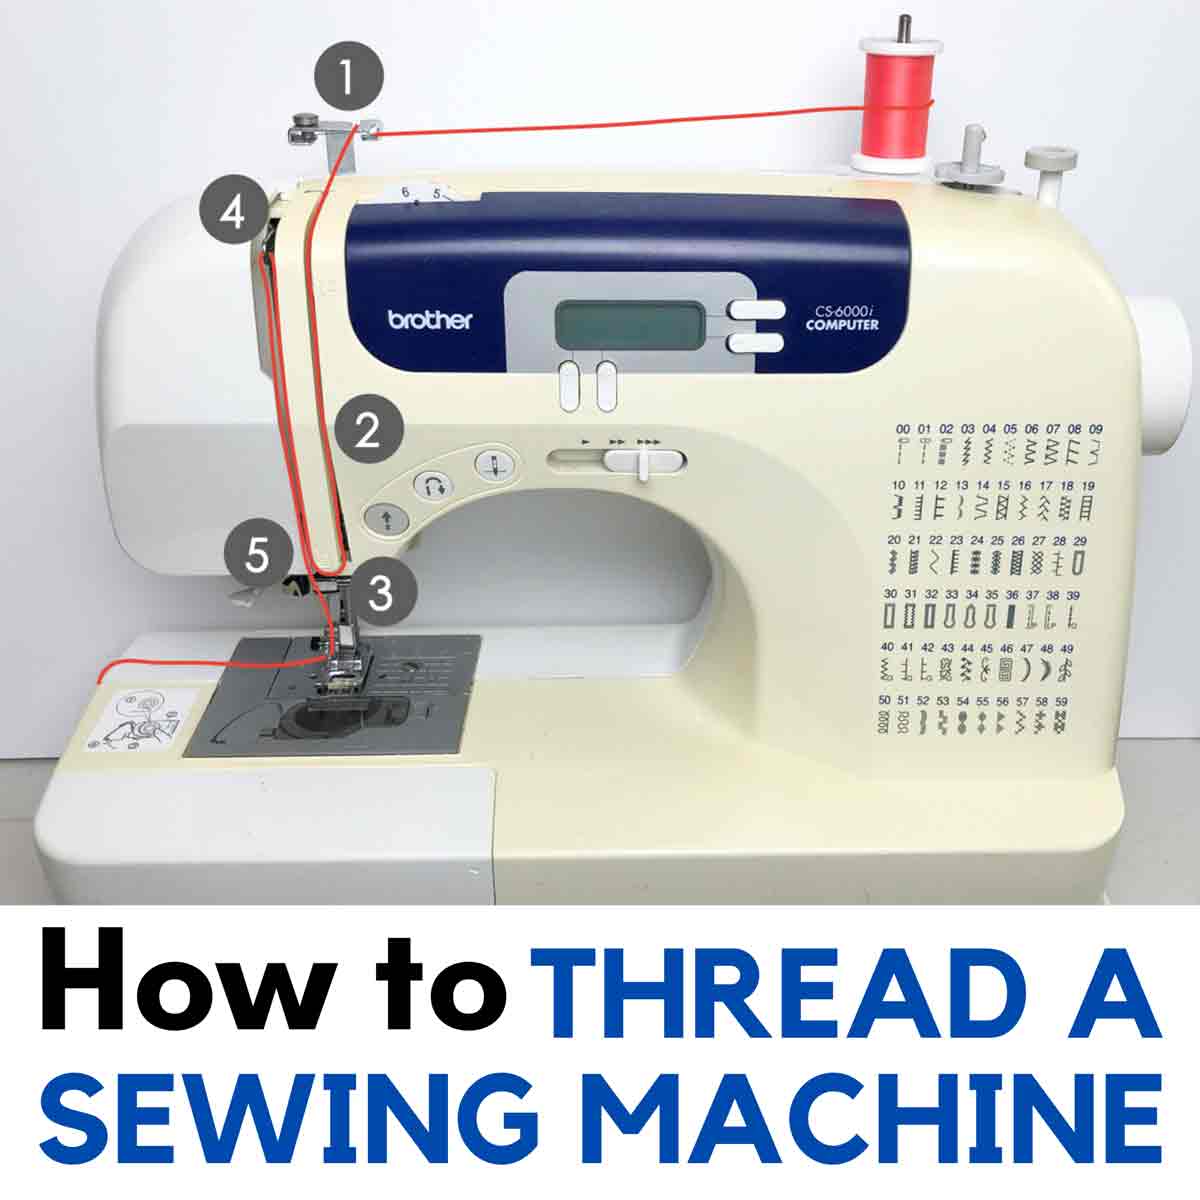
Image Source: mindymakes.com
Getting Acquainted with Your Machine
The first step is always to meet your machine. Take it out of the box and place it on a stable table. Make sure you have enough space to work.
- Find your machine parts.
- Connect the power cord.
- Find the foot controller (pedal).
You will also find a few tools and accessories. Look for needles, bobbins, and maybe a brush. Most importantly, find your Brother sewing machine manual. This book is your best friend. It shows you your specific machine parts and how they work. Keep it handy. This is the very first step in setting up Brother sewing machine.
For a beginner Brother sewing machine, like many Brother models, the setup process is very clear. The manual will show you exactly where everything plugs in and where the main switches are. Turn on the power switch. You might see a light come on.
Finding Your Way Around
Every sewing machine has main parts you need to know.
- Needle: This goes up and down to make stitches.
- Presser Foot: This holds your fabric flat while you sew.
- Bobbin Area: This is where the bottom thread comes from.
- Tension Dial: This controls how tight your thread is.
- Stitch Selector: This lets you pick different stitches.
The Brother sewing machine presser foot is very important. It lifts up so you can put fabric under it. Then it lowers down to hold the fabric tight against the feed dogs. The feed dogs are little teeth under the fabric that move it along.
Working with the Bobbin
The bobbin holds the bottom thread. You need thread on the bobbin to make stitches.
Winding the Brother sewing machine bobbin
This is a simple process.
- Place a spool of thread on the spool pin at the top of your machine.
- Put an empty bobbin onto the bobbin winder spindle. This spindle is usually on the top right.
- Guide the thread from the spool through the thread guides for bobbin winding. Your machine will have a picture showing you the path.
- Wrap the thread a few times around the empty bobbin.
- Push the bobbin winder spindle to the side (usually to the right). This tells the machine to wind the bobbin instead of sewing.
- Gently press the foot controller. The bobbin will spin and fill with thread.
- Stop when the bobbin is full. The winder might stop automatically.
- Cut the thread. Push the spindle back to its normal position. Remove the filled bobbin.
Your Brother sewing machine bobbin is now ready to go into the machine.
Putting the Brother sewing machine bobbin In
How you put the bobbin in depends on your machine model.
- Top-Loading Bobbin: Most newer Brother machines have a top-loading bobbin. There is a clear cover plate on the sewing surface.
- Open the cover.
- Drop the full bobbin into the case. Make sure the thread is coming off the bobbin in the correct direction (your manual will show this, often counter-clockwise).
- Pull the thread tail through the little slot or guide on the bobbin case.
- Close the cover plate.
- Front-Loading Bobbin: Some older or different models have a bobbin case that goes into a metal holder under the needle plate.
- Open the front cover of the machine.
- Take the bobbin and put it into the bobbin case. Follow the picture on the case or in the manual for thread direction.
- Open the latch on the bobbin case.
- Slide the bobbin case into the metal holder until it clicks.
- Close the front cover.
In both cases, you need to leave a tail of bobbin thread hanging out.
Getting the Thread Ready – Top Thread
Now you need to put thread through the top of the machine. This is called Threading Brother sewing machine. It is important to do this correctly. If not, your machine will not sew right.
Here are the basic steps for Threading Brother sewing machine:
- Raise the Presser Foot: Use the lever on the back or side of the machine column. Raising the foot opens the tension discs. This lets the thread sit correctly.
- Place the Spool: Put your spool of thread on the spool pin. Use the little cap that comes with your machine to hold it in place.
- Follow the Path: Look at the numbers or arrows on your machine. They show you the thread path.
- First, guide the thread through the first thread guide (often at the top).
- Bring the thread down along the channel on the front of the machine.
- Loop the thread around the tension dial area.
- Bring the thread back up the channel.
- Hook the thread through the take-up lever. This lever moves up and down as the machine sews. Make sure the thread goes through the eye or hook of the lever. The take-up lever should be in its highest position. You might need to turn the handwheel (the big wheel on the side) towards you to raise it.
- Bring the thread back down again.
- Pass the thread through any guides near the needle.
- Thread the Needle: Guide the thread through the eye of the needle. Thread the needle from front to back. Some machines have a needle threader tool to help you.
- Pull Thread Under Foot: Pull the thread tail about 6 inches long. Guide it under the Brother sewing machine presser foot and towards the back of the machine.
You have threaded the top! Now you need to bring the bobbin thread up. Hold the top thread tail gently. Turn the handwheel towards you one full turn. The needle will go down and then come back up. As it comes up, it will catch the bobbin thread and pull a loop up. Pull the loop with your finger or tweezers until the bobbin thread tail comes all the way up. Pull both the top thread and bobbin thread tails under the presser foot and to the back. Now you have both threads ready!
Choosing the Right Needle
The needle is a small but vital part. Using the wrong needle or a dull one can cause Brother sewing machine problems. Needles have different sizes and types for different fabrics.
- Universal Needles: Good for many fabrics. Sizes 70/10, 80/12, 90/14 are common for basic sewing.
- Ballpoint Needles: For knit fabrics. They push fabric fibers aside instead of cutting them.
- Denim Needles: Stronger, for thick fabrics like jeans.
- Microtex Needles: For very fine fabrics.
Always match your needle size to your fabric weight. A larger number means a thicker needle.
changing needle Brother sewing machine
Needles get dull or bent. You should change your needle often, perhaps after every project or every 8-10 hours of sewing time.
- Turn Off Machine: Safety first!
- Lower Presser Foot: This helps you reach the needle screw.
- Loosen Screw: Use the small screwdriver that came with your machine to loosen the needle clamp screw. It’s usually on the side of the needle bar. Do not remove the screw completely.
- Remove Old Needle: Pull the old needle straight down and out. Note which way the flat side of the needle shank is facing. This is important for putting the new one in.
- Insert New Needle: Take a new needle. The top part (shank) has one flat side. Push the new needle up into the clamp as far as it will go. Make sure the flat side of the shank faces the correct direction (usually to the back on Brother machines, but check your manual!).
- Tighten Screw: Hold the needle in place while you tighten the needle clamp screw firmly. Do not overtighten.
- Turn Machine On: You’re ready to sew with a fresh needle.
Picking Your Stitch
Your Brother machine can make different stitches. For beginners, you will mostly use two main types of Brother sewing machine stitches:
- Straight Stitch: This is the basic stitch for putting two pieces of fabric together. You can change the stitch length (how long each stitch is). Short stitches are strong, long stitches are for gathering fabric.
- Zigzag Stitch: This stitch goes back and forth. It is good for finishing fabric edges to stop them from fraying. You can change the stitch width (how wide the zigzags are) and the stitch length (how close together they are).
To select a stitch, look at your stitch selector dial or buttons. Find the picture for the straight stitch and the zigzag stitch. Turn the dial or push the button to choose the one you want. There will also be controls for stitch length and width. Start with medium settings and adjust as you learn.
Ready, Set, Sew!
Now for the fun part – sewing!
- Place Fabric: Put the edge of your fabric under the Brother sewing machine presser foot. Line up the fabric edge with a seam guide line on the needle plate (the metal plate under the needle). These lines help you sew straight.
- Lower Foot: Lower the presser foot using the lever. This holds the fabric firm. You cannot sew correctly with the foot up.
- Start Sewing: Gently press the foot controller (pedal). The machine will start sewing. Go slowly at first.
- Guide Fabric: Use your hands to gently guide the fabric. Do not push or pull the fabric hard. The machine’s feed dogs will move the fabric for you. Just keep it going in a straight line.
- Backstitch: At the start and end of a seam, you should backstitch. This locks the stitches so they don’t come undone. Most machines have a reverse lever or button. Sew forward a few stitches, press the reverse button, sew backward a few stitches, then release the button and sew forward to the end of your seam. Repeat at the end.
- Stop Sewing: Take your foot off the pedal.
- Raise Foot: Lift the presser foot lever.
- Pull Fabric Out: Gently pull your fabric away from the machine and towards the back or side.
- Cut Threads: Use the thread cutter built into the machine (usually on the side) or scissors to cut the threads close to the fabric.
You made your first line of stitches!
Dealing with Brother sewing machine problems
Even simple machines can have little issues. Don’t worry! Most Brother sewing machine problems are easy to fix. Here are some common ones:
- Skipped Stitches: The machine is not making a stitch with every needle motion.
- Fix: Check your needle. Is it bent? Is it put in correctly (flat side facing the right way)? Is it the right type for your fabric? Change the needle! This fixes most skipped stitches.
- Fix: Check your threading. Is the top thread in all the guides? Did you lift the presser foot when threading? Is the bobbin in correctly? Re-thread the machine completely (top and bobbin).
- Thread Tangles (“Bird’s Nest”): A big mess of thread on the underside of the fabric.
- Fix: This is almost always a top threading problem. Re-thread the top thread very carefully. Make sure the presser foot was up when you started threading. Make sure the thread is in the take-up lever.
- Fix: Check the bobbin area. Is there lint or stray threads? Is the bobbin installed correctly? Clean the bobbin area.
- Thread Breaking: The top or bottom thread keeps snapping.
- Fix: Is the tension too tight? Check the tension dial setting. Try lowering it slightly.
- Fix: Is the needle dull or bent? changing needle Brother sewing machine often fixes this.
- Fix: Is your thread old or poor quality? Use good quality sewing thread.
- Fix: Is the machine clean? Lint can cause issues. Brother sewing machine cleaning helps.
- Machine Won’t Sew: Nothing happens when you press the pedal.
- Fix: Is the machine plugged in? Is the power switch on?
- Fix: Is the bobbin winder spindle pushed to the side? If it is, the machine is in winding mode, not sewing mode. Push it back.
- Fix: Is fabric caught under the foot?
Your Brother sewing machine manual has a troubleshooting section. Look there first for specific problems with your model.
Brother sewing machine cleaning
Keeping your machine clean helps it run smoothly and prevents many Brother sewing machine problems. Lint and tiny bits of fabric can build up, especially around the bobbin case and feed dogs.
How to do basic Brother sewing machine cleaning:
- Turn Off Machine: Always turn off and unplug the machine before cleaning.
- Remove Needle and Foot: Take off the needle and the presser foot.
- Open Bobbin Area: Remove the bobbin case or the bobbin cover plate and bobbin.
- Use Brush: Use the small brush that came with your machine to gently brush away lint from the bobbin area and the feed dogs. Do NOT use canned air, as this can push lint deeper into the machine.
- Wipe Surfaces: Use a soft, dry cloth to wipe down the outside surfaces of the machine.
- Check Manual: Your Brother sewing machine manual will show you the exact spots to clean and how often. Some machines might need oiling in certain spots, while others are ‘no-oil’ machines. Follow your manual’s advice.
Clean your machine after each project or after several hours of sewing. This simple step goes a long way in keeping your machine happy.
Practice Makes Perfect
You’ve learned about the parts, how to wind and load the bobbin, thread the top, change a needle, pick stitches, and start sewing. You also know how to handle basic Brother sewing machine problems and do basic Brother sewing machine cleaning.
The best way to get comfortable is to practice.
- Sew lines on scrap fabric. Try sewing straight lines, curves, and corners.
- Practice sewing at different speeds.
- Try out the different Brother sewing machine stitches. See what they do.
- Practice backstitching neatly.
Don’t be afraid to make mistakes. Every sewer started somewhere. With your beginner Brother sewing machine and this guide, you have a great start. Refer back to your Brother sewing machine manual often.
Frequently Asked Questions
Here are some quick answers to questions beginners often ask about using their Brother machine.
Q: How often should I clean my Brother machine?
A: It is best to do basic cleaning after each project or every 8-10 hours of sewing time. Clean the bobbin area and feed dogs to remove lint. Check your manual for specific advice.
Q: Why is my thread getting tangled underneath the fabric?
A: This “bird’s nest” usually means the top thread is not threaded correctly. Re-thread the top thread carefully, making sure the presser foot is up when you start and that the thread goes through all the guides, especially the take-up lever.
Q: Do I really need to read the Brother sewing machine manual?
A: Yes, absolutely! The manual is made for your specific model. It shows you where everything is, how to thread it correctly, how to clean it, and how to fix common issues. It’s your most important tool.
Q: What is the best stitch to start with?
A: The straight stitch is the best stitch to start with for basic sewing. Use a medium stitch length.
Q: How do I know when to change my needle?
A: Change your needle if you start getting skipped stitches, if the thread breaks often, if the needle looks bent, or after finishing a project or every 8-10 hours of sewing. A fresh needle makes a big difference.
Q: My machine is making a strange noise. What should I do?
A: First, stop sewing. Check the threading (top and bobbin). Is the needle okay? Is there lint built up? If the noise continues after basic checks and cleaning, refer to your Brother sewing machine problems section in the manual or take it to a service center.
Using your Brother sewing machine is a rewarding skill. Take it one step at a time, be patient with yourself, and enjoy the process of creating!