
What is an old Singer sewing machine? Can you still use one? Who were these machines made for? An old Singer sewing machine is a sewing machine made by the Singer Manufacturing Company, usually before the 1970s or 1980s. Yes, absolutely! Many old Singer machines work just as well, if not better, than modern ones, thanks to their sturdy build. Singer made machines for everyone, from home sewers to professional tailors, building reliable tools that stood the test of time.
Using an old Singer sewing machine is a rewarding experience. These machines are known for being tough and making nice stitches. They have a charm that newer machines often lack. If you have found one or just bought one, this guide will help you get started. We will cover the basics, from setting it up to solving small problems.
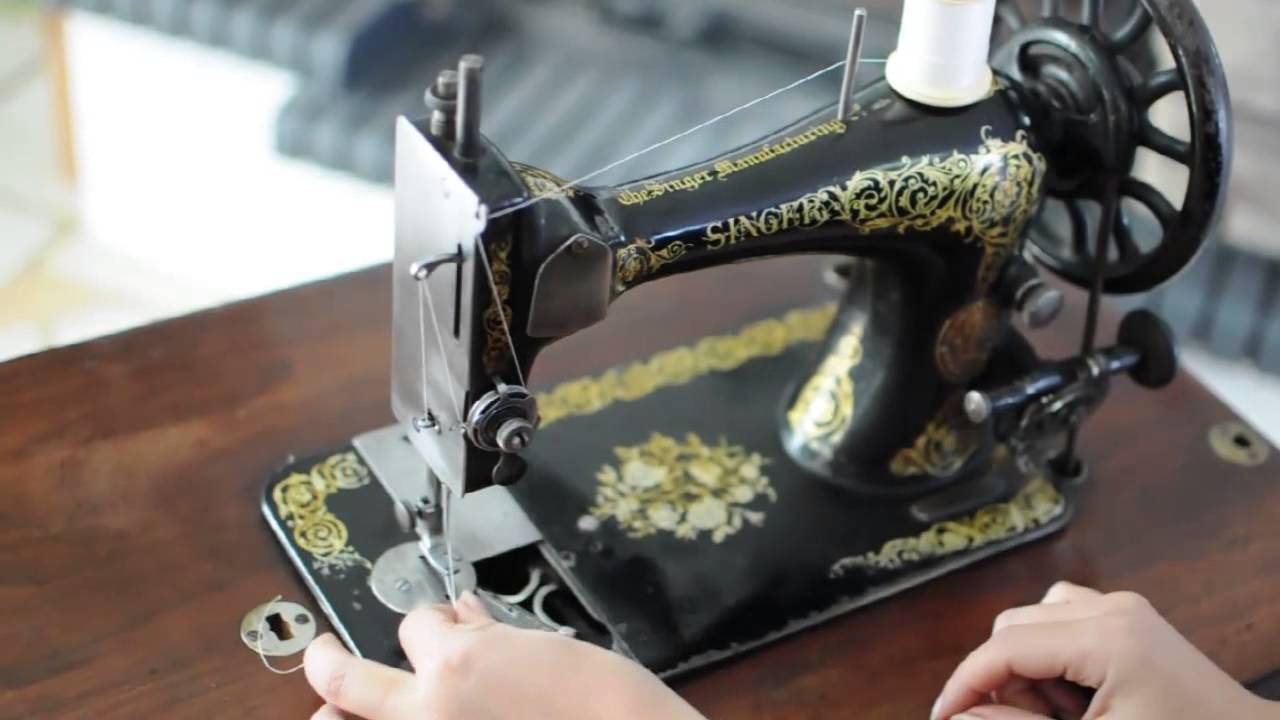
Image Source: i.ytimg.com
Grasping Your Old Singer
Before you start sewing, take some time to look at your machine. Find the main parts. Where does the thread go? Where is the bobbin? Is it hand-crank, electric, or treadle? Knowing your machine helps a lot.
Older Singers can be different depending on the model and when they were made. Some are simple, others have more parts. Don’t worry if it looks a bit complex at first. We will break things down.
Essential First Steps
Before you thread your machine or try to sew, do these simple things. They help make sure your machine is ready and happy.
- Give it a Quick Clean: Dust and old lint can build up. Use a soft brush or a dry cloth to wipe the outside. Get into the cracks if you can. Don’t use water.
- Check the Power: If it’s electric, look at the cord. Is it cracked or damaged? If yes, do not plug it in! Old cords can be unsafe. They may need to be replaced by a pro.
- Turn the Wheel by Hand: Find the handwheel on the side. Turn it towards you slowly. Does it move smoothly? Or does it feel stiff or stuck? Stiffness means it needs cleaning and oiling.
Oiling Vintage Singer Sewing Machine
Oiling is super important for old machines. Think of it like giving it a drink. Moving metal parts need oil to work without rubbing too much. Old oil can dry up or get gummy.
Why Oiling Matters
- Stops parts from wearing out too fast.
- Makes the machine run smooth and quiet.
- Keeps it from seizing up (getting stuck).
Where to Put the Oil
Your machine likely has small holes or spots marked for oil. Look for these. A Singer sewing machine parts diagram old can show you these points if you can find one for your model. Generally, oil needs to go where metal parts rub together.
- Top: Look under the top cover (if it has one). Oil the moving parts there.
- Side: Around the needle bar and presser foot bar.
- Underneath: Tip the machine back or open the bed extension. Oil parts moving below.
- Bobbin Area: Put a tiny drop where the bobbin case moves.
What Kind of Oil?
Use only sewing machine oil. It is light and made for this job. Do not use thick oils like motor oil or cooking oil. They will gum up the machine.
How to Oil
- Use a small amount of oil at each spot. A tiny drop is often enough.
- Turn the handwheel slowly after oiling. This helps the oil spread.
- Sew on a scrap piece of fabric after oiling. This helps soak up extra oil so it doesn’t stain your project.
Replacing Needle Old Singer
A sharp, straight needle is key to good sewing. An old or bent needle can skip stitches, break thread, or damage your fabric.
Checking Your Needle
- Look Closely: Is the tip bent or broken? Is the needle shiny and smooth, or does it look rough?
- Feel It: Gently run your fingertip down the point (away from your finger). Does it feel sharp or blunt? A blunt needle pushes through fabric instead of piercing it.
How to Replace the Needle
Old Singer machines have a needle clamp screw.
- Lower the Needle: Turn the handwheel to bring the needle down a bit, then back up to its highest point.
- Loosen the Screw: Find the screw that holds the needle in place. Use a small screwdriver or the tool that came with the machine to loosen it. You don’t need to take the screw all the way out.
- Remove the Old Needle: Pull the old needle straight down and out.
- Insert the New Needle: Needles for old Singers have a flat side on the shank (the thick top part). This flat side must face the back (away from you) on most models. Check your manual if you have one. Push the new needle up into the clamp as far as it will go.
- Tighten the Screw: Hold the needle in place and tighten the clamp screw. Don’t overtighten it, just snug.
Use the right needle size and type for your fabric. Universal needles are a good start.
Winding Bobbin Vintage Singer
The bobbin holds the bottom thread. You need thread on the bobbin to sew. Vintage Singers have a bobbin winder, usually on the top or side.
Steps to Wind a Bobbin
- Place the Thread: Put your spool of thread on the spool pin.
- Route the Thread: Follow the path for bobbin winding. There’s often a tension disc or guide just for winding. It makes sure the thread is smooth as it winds.
- Put Bobbin on Winder: Place an empty bobbin onto the bobbin winder spindle. Make sure the thread goes into a small hole or under a clip on the bobbin if your bobbin type has one. This helps the winding start neatly.
- Engage the Winder: Push the winder spindle towards the handwheel. This makes the winder turn when the machine runs.
- Release the Sewing Mechanism: Most old Singers have a way to stop the needle from moving while you wind the bobbin. On many, you loosen the handwheel clutch. There’s a small knob in the center of the handwheel. Hold the handwheel edge and turn the inner knob towards you. The handwheel will now turn freely without moving the needle bar.
- Start Winding: If electric, press the foot pedal gently. If treadle, start treadling. If hand crank, turn the crank. Guide the thread a little with your finger if needed so it winds evenly across the bobbin. Don’t let it pile up on one side.
- Stop Winding: Stop when the bobbin is full but not overstuffed. The winder might disengage itself when full.
- Disengage and Tighten: Pull the winder spindle away from the handwheel. If you loosened the clutch, tighten it again by holding the handwheel edge and turning the inner knob away from you.
- Cut the Thread: Cut the thread connecting the bobbin to the spool.
Your bobbin is now ready for sewing.
Threading Old Singer Sewing Machine
Threading seems tricky at first, but it’s a path the thread must follow. Old Singers have a specific way they like to be threaded. It’s often numbered or shown with diagrams on the machine itself.
General Threading Path (May Vary Slightly)
- Spool Pin: Put your thread spool on the pin.
- First Guide: Take the thread through a guide near the spool pin.
- Tension Discs: This is very important. The thread must go firmly between the tension discs. There’s usually a spring or lever involved. Make sure the presser foot is up when you thread the tension discs. This opens them.
- Take-Up Lever: Bring the thread up to the take-up lever. This lever moves up and down as you sew. Make sure the thread goes through the hole or eye of the lever. Turn the handwheel by hand to bring the take-up lever to its highest point; this makes threading the hole easier.
- Guides Down: From the take-up lever, the thread goes down through one or more guides along the needle bar.
- Needle: Thread the needle eye from front to back. Pull the thread tail under the presser foot and towards the back. Leave a tail of a few inches.
Always thread with the presser foot up. This lets the thread sit correctly in the tension discs. If the foot is down, the discs are closed, and the thread won’t get proper tension.
Inserting the Bobbin
The bobbin goes into the bobbin case. How this works depends on your machine type.
- Oscillating Hook (Side Loading): The bobbin case is separate. Put the bobbin in the case. Pull the thread through the slot on the side of the case and under the tension spring. Close the latch on the case. Open the slide plate on the sewing bed and place the bobbin case onto the central pin, making sure the positioning finger fits into the notch on the case. Close the slide plate.
- Rotary Hook (Drop-in Top Loading): Less common on very old Singers, but some later models have this. The bobbin drops directly into a housing under a clear plate on the sewing bed. Follow the guides marked there.
- Vibrating Shuttle (Older Models like 27, 28, 127, 128): This type uses a long, bullet-shaped bobbin and shuttle. The shuttle goes into a carrier. It’s a different process; check your manual or a guide specific to these models.
Bringing Up the Bobbin Thread
Before you can sew, you need the bobbin thread pulled up through the needle plate.
- With the top thread threaded and under the presser foot, hold the tail of the top thread lightly with your left hand.
- Turn the handwheel towards you slowly. Watch the needle go down and come back up. As it comes up, it will catch the bobbin thread, making a small loop.
- Stop when the take-up lever is at its highest point.
- Use your fingers or tweezers to pull the loop of bobbin thread up through the hole in the needle plate.
- Pull both the top and bottom thread tails under the presser foot and towards the back of the machine.
Your machine is now threaded and ready to try sewing.
Singer Sewing Machine Tension Adjustment
Thread tension is how tight the stitches are. It affects how the stitches look on the top and bottom of the fabric. Good tension means the top and bottom threads meet neatly within the fabric layers.
How to Check Tension
Sew a few lines on a scrap of the fabric you will use.
- Look at the Top: If the bobbin thread shows on top, the top tension is too tight, or the bobbin tension is too loose.
- Look at the Bottom: If the top thread shows on the bottom, the top tension is too loose, or the bobbin tension is too tight.
- Perfect Stitch: The stitches look the same on both sides, like a row of small, even knots buried in the fabric.
Adjusting Top Tension
The top tension is controlled by a dial or screw, usually on the front of the machine head.
- Turning the dial/screw to a higher number or clockwise usually makes the tension tighter.
- Turning it to a lower number or counter-clockwise usually makes the tension looser.
Adjust in small steps. Sew another test line after each small change until the stitch looks balanced.
Adjusting Bobbin Tension
Bobbin tension is adjusted on the bobbin case itself. There is a small screw on the bobbin case tension spring.
- Tightening this tiny screw makes the bobbin tension tighter.
- Loosening it makes the bobbin tension looser.
Be very careful with this screw. It’s easy to lose or overtighten. Often, you only need to adjust the top tension. Only change bobbin tension if you are sure it is the problem, or if you are sewing with very different threads top and bottom.
Using Different Machine Types
Singer made many types of machines. The way you power them changes how you sew.
Using a Singer Treadle Sewing Machine
A treadle machine uses your feet to power it. There’s a large wheel under the table, connected by a leather belt to the machine’s handwheel.
- Sit Comfortably: Place your feet on the treadle (the rocking foot plate).
- Start the Wheel: Give the handwheel a turn towards you with your hand to start the machine moving.
- Treadle: Start gently rocking the treadle with your feet. Find a steady rhythm. The key is smooth, even motion. Your feet push the treadle down, which turns the big wheel, which turns the belt, which turns the machine.
- Control Speed: The faster you treadle, the faster the machine sews. Practice to control your speed. It takes a little practice to keep it going smoothly without stopping or going backward.
Treadle machines are quiet and don’t need electricity. They are great for places without power or for a calm sewing experience.
Using an Electric Singer
Electric models have a motor and a foot pedal or knee lever.
- Plug In: Make sure the cord is in good shape before plugging it into the wall.
- Use the Pedal/Lever: Pressing down on the pedal or lever makes the machine sew.
- Control Speed: The harder you press, the faster it goes. Start slowly until you feel comfortable.
Singer Featherweight Operation (Model 221/222)
The Singer Featherweight is a very popular old model. It’s small, portable, and electric. Many of the steps above apply: oiling, needle changing, bobbin winding, and threading are similar to other electric Singers of that era.
- Oiling: Featherweights have specific oiling points marked in their manual. They need regular, light oiling.
- Bobbin: They use a side-loading oscillating hook system with a separate bobbin case.
- Threading: The path is similar to other Singer domestics.
- Speed: Controlled by a foot pedal.
- Key Feature: Its lightweight design and precise stitch quality make it loved by quilters and sewers who travel.
While compact, it sews like a full-size machine.
Troubleshooting Old Singer Sewing Machine Issues
Old machines are tough, but sometimes things go wrong. Here are some common problems and what to check first.
| Problem | What It Looks Like | What to Check First | Simple Fix |
|---|---|---|---|
| Skipped Stitches | Stitches are missing in the line | 1. Is the needle bent or blunt? 2. Is the needle inserted correctly (flat side)? 3. Is the right needle type/size for the fabric? 4. Is the machine threaded correctly? | 1. Replace needle. 2. Reinsert needle correctly. 3. Try a different needle. 4. Rethread the machine carefully. |
| Thread Breaks | Top or bottom thread snaps often | 1. Is the thread old or poor quality? 2. Is the machine threaded correctly? 3. Is the tension too tight? 4. Is the needle damaged? 5. Are there burrs or rough spots on the machine? | 1. Use new, good quality thread. 2. Rethread the machine. 3. Loosen tension slightly. 4. Change needle. 5. Inspect thread path, polish gently if needed. |
| Bobbin Jam (Bird’s Nest) | Big tangled mess of thread under fabric | 1. Is the machine threaded correctly (especially the top)? 2. Was the presser foot down when you started sewing? 3. Is the bobbin wound correctly? 4. Is the bobbin inserted correctly in its case? | 1. Rethread top thread carefully with presser foot UP. 2. Always lower presser foot before starting. 3. Rewind bobbin smoothly. 4. Reinsert bobbin/case correctly. |
| Machine is Stiff/Stuck | Handwheel is hard to turn | 1. Is it oiled recently? 2. Is there old, gummy oil? 3. Is thread caught somewhere? | 1. Oil all points. 2. May need a deep clean and oiling. A drop of kerosene or triflow can help loosen old oil, followed by fresh oil. 3. Check for tangled thread in bobbin area or handwheel. |
| Noisy Machine | Machine rattles or grinds | 1. Does it need oiling? 2. Is something loose? 3. Is the bobbin case or area clean? | 1. Oil all points. 2. Check screws (handwheel knob, needle clamp). 3. Clean lint from bobbin area. |
Most problems on old Singers come from simple things: poor oiling, bad needles, wrong threading, or incorrect tension. Address these basics first.
Finding Manual for Old Singer Sewing Machine
Having a manual for your specific machine is very helpful. It shows the exact threading path, oiling points, and how to use its features.
Where to Look
- Online Archives: Many websites offer free PDF downloads of old Singer manuals. Search for “Singer [Your Model Number] manual PDF”. Model numbers are often on a plate on the machine body.
- Sewing Forums/Groups: Ask in online communities dedicated to vintage sewing machines. Someone might have a copy or know where to find one.
- Etsy/eBay: People sometimes sell physical copies or scans of old manuals.
- Singer Website: Check the official Singer site; they sometimes have archives.
Even a manual for a similar model from the same era can be very useful if you can’t find yours.
Singer Sewing Machine Parts Diagram Old
Finding a parts diagram helps you see how your machine fits together and identify specific components.
Where to Find Diagrams
- Manual: The machine’s original manual often includes diagrams.
- Online: Search for “[Your Singer Model Number] parts diagram”. You can often find diagrams on vintage sewing machine repair sites or forums.
- Service Manuals: Sometimes, service or repair manuals (different from user manuals) are available online. These often have detailed diagrams.
Knowing the names of parts helps when looking up info or asking for help.
Keeping Your Vintage Singer Happy
A little care goes a long way in keeping your old Singer running well for years to come.
- Clean Regularly: Remove lint and dust, especially around the feed dogs (the little teeth that move the fabric) and the bobbin area. A small brush is good for this.
- Oil Often: If you sew a lot, oil your machine regularly, maybe before each big project or every few hours of sewing. If you sew less, oil it before you start after it has been sitting.
- Use Good Thread: Cheap, fuzzy thread creates more lint and can break easily. Quality thread is worth it.
- Cover Your Machine: When not in use, keep it covered to protect it from dust.
Old Singer machines are built to last. With basic care and a little practice, you can enjoy sewing on these classic workhorses. They connect you to a past era of sewing and make beautiful stitches that stand the test of time.
Frequently Asked Questions About Old Singer Sewing Machines
Q: How do I know what model my Singer machine is?
A: Look for a small plate or badge on the machine body. It usually has the model number stamped on it (like 66, 99, 201, 221).
Q: What kind of thread should I use?
A: Use good quality thread meant for sewing machines. Cotton or polyester thread works well for most projects. Avoid very old thread, as it can weaken and break easily.
Q: My machine is electric, but the motor smells or sparks. Is it safe?
A: No. Stop using it right away. This usually means the motor or electrical cord needs repair or replacement. Have a qualified vintage sewing machine technician look at it.
Q: Can I sew thick fabrics on an old Singer?
A: Many old Singers are very strong. They can often sew thicker fabrics like denim or canvas, especially models like the Singer 15 or 201. Make sure you use the right needle size for heavy fabric.
Q: Where can I get parts for my old Singer?
A: Many common parts (needles, bobbins, belts for treadles or motors) are still made. Online shops that sell vintage sewing machine parts are a good source. For rarer parts, you might need to find a parts machine or look on auction sites.
Q: My treadle belt broke. How do I fix it?
A: You can buy new leather treadle belts. They often come with a metal staple or hook. You cut the belt to the right length and join the ends with the staple.
Q: The paint is chipped or looks bad on my machine. Can I restore it?
A: Yes, many people restore the look of old machines. You can clean it carefully, or for more damage, repaint it. There are special paints for this. However, be careful not to get paint in the moving parts.
Q: Is it hard to find someone to repair an old Singer?
A: It can be harder than finding repair for new machines. Look for technicians who specialize in vintage or antique sewing machines. Online forums can often recommend someone in your area.
Q: My machine has attachments. How do I use them?
A: Old Singers came with many useful attachments (like for making buttonholes, gathering fabric, or hemming). Your manual will show how to attach and use them. There are also many videos online demonstrating them.
Using an old Singer is a step back in time to when machines were made to be repaired and last forever. Take it slow, learn about your machine, and enjoy the process. Happy sewing!