
Can you use a sewing awl for leather? Yes, absolutely! A sewing awl is an invaluable tool for anyone working with tough materials like leather, canvas, and heavy fabrics. It’s particularly useful for sewing awl repair, creating strong stitches, and making precise holes. This guide will walk you through how to use a sewing awl, covering everything from choosing the right one to mastering various techniques.
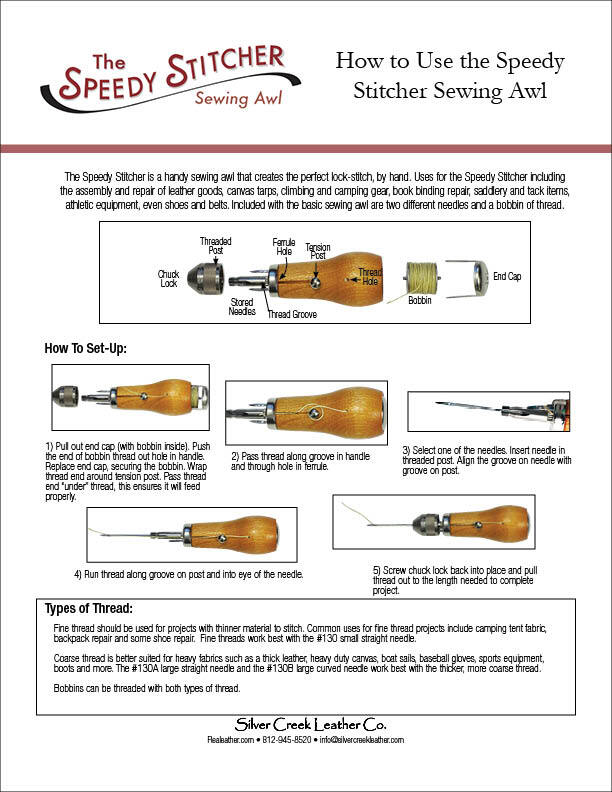
Image Source: realeather.com
What is a Sewing Awl?
A sewing awl is a hand-held tool with a sharp, pointed tip and a handle. Its primary function is to pierce holes through sturdy materials, allowing you to pass a needle and thread through them to create stitches. Think of it as a manual hole punch and stitch guide all in one. It’s a fundamental tool for hand sewing awl projects and is essential for sewing awl repair on items that sewing machines can’t handle.
Types of Sewing Awls
There are a few main types of sewing awls you might encounter:
- Straight Awl: The most basic type, featuring a sharp, pointed tip. This is excellent for piercing holes.
- Compass Awl: Similar to a straight awl but with a bent or curved tip. This shape can be helpful for getting into tighter spots or for creating a specific type of hole.
- Lock Stitch Awl: This type is more complex and often comes as part of a sewing awl kit. It features a rotating needle that can create a lockstitch, similar to what a sewing machine makes. This is fantastic for strong, durable seams, especially in leatherwork.
- Diamond Awl: Designed specifically for awl stitching leather, this awl creates diamond-shaped holes that help the thread lie flat and resist abrasion.
Why Use a Sewing Awl?
Sewing awls offer several advantages, especially when working with challenging materials:
- Strength: They create strong, secure stitches that can withstand significant stress. This is crucial for sewing awl repair on bags, shoes, and other items that get a lot of use.
- Precision: You can control the placement and size of each hole, allowing for very accurate stitching.
- Material Versatility: They excel where sewing machines struggle, such as with thick leather, heavy canvas, upholstery, and even sailcloth. If you’re looking for an awl for canvas or leather sewing awl needs, this is your go-to.
- Portability: A good sewing awl kit is compact and can be carried anywhere, making on-the-go repairs possible.
- Authenticity: For historical crafts or specific aesthetic looks, hand-sewing with an awl provides a unique and authentic finish.
Getting Started: Your Sewing Awl Kit
When you’re starting with a sewing awl, having the right sewing awl kit is beneficial. A good kit typically includes:
- The Awl Tool: The main tool with a handle and a sharp point.
- Needles: Various sizes of needles, often specialized for leather or heavy fabrics. The right sewing awl needle is key.
- Thread: Strong, durable thread like waxed linen or polyester thread is best for most awl projects.
- Storage: A case or container to keep all the components organized and safe.
Choosing the Right Awl
Consider these factors when selecting your sewing awl:
- Material: What will you be sewing? For awl stitching leather, a diamond awl or a lock stitch awl is ideal. For general heavy-duty piercing, a sturdy straight awl works well.
- Handle Comfort: You’ll be using this tool for extended periods, so a comfortable handle is important. Wood, metal, or ergonomic plastic handles are common.
- Needle Type: Some awls have interchangeable needles. Make sure the awl you choose can accommodate the size and type of needle you need for your project. A good sewing awl needle is sharp and strong.
- Kit Contents: If you’re new to this, a comprehensive sewing awl kit provides everything you need to begin.
How to Use a Sewing Awl: A Step-by-Step Guide
Mastering how to use a sewing awl involves a few key steps. Practice makes perfect, especially when you’re learning using a leather awl or an awl for canvas.
Step 1: Prepare Your Material
- Marking: If you need precise hole placement, mark your stitch line with chalk, a fabric pencil, or a scratch awl.
- Securing: Clamp your material to a sturdy surface. This prevents it from moving while you’re piercing holes. A workbench or even a thick book can work in a pinch.
Step 2: Piercing Holes
This is the core of awl stitching guide.
- Positioning: Hold the awl firmly, perpendicular to the material’s surface.
- Piercing: Apply steady pressure and twist the awl. You want to push the sharp tip through the material to create a clean hole.
- For Straight Awls: Simply push and twist.
- For Diamond Awls (Leather): Angle the awl slightly to create the characteristic diamond shape. For consistent stitches, try to keep the angle the same for each hole. This is crucial for awl stitching leather as it dictates the stitch alignment.
- For Lock Stitch Awls: Follow the specific instructions for your tool. These often involve a winding mechanism.
- Spacing: Aim for consistent spacing between holes. If you’re following a marked line, use the previous hole as a guide for the next. A ruler or a specialized stitching groover can help ensure evenness.
Step 3: Threading the Needle
- Choose Thread: Select a strong thread appropriate for your material. Waxed thread is excellent for leather as it’s durable and doesn’t fray.
- Thread the Needle: Thread your chosen sewing awl needle. Many awl needles have a special eye designed for thicker threads.
- Secure the First Stitch: Once you have your holes, begin sewing. Pass the needle through the first two holes, leaving a tail of thread. Tie a knot in the tail and pull it through the first hole so it’s hidden between the layers of material.
Step 4: Stitching
- Passing the Needle: Pass the needle and thread through the holes, creating your stitches. For a strong stitch, you can go back and forth through the same holes or use a saddle stitch, where you pass the needle through each hole from opposite directions. This is a common technique in awl stitching leather.
- Maintaining Tension: Keep consistent tension on the thread as you stitch. Too loose, and your stitches will be weak; too tight, and you might tear the material or the thread.
Step 5: Finishing Off
- Secure the End: When you reach the end of your seam, tie off the thread securely. You can do this with a few knots, pulling them tight against the material.
- Trim Excess: Trim any excess thread close to the knot.
Techniques for Awl Stitching
Different projects might call for different stitching techniques. Here are a few common ones:
Saddle Stitch
This is a robust stitch often used in awl stitching leather. It involves passing the needle through each hole from opposite directions, creating a strong, interlocking stitch.
- Thread both ends of the needle with a single, long piece of thread.
- Pass the needle through the first hole from one side.
- Pull the needle through the second hole from the opposite side.
- Now, pass the needle through the same second hole again, but from the first side.
- Continue this pattern, ensuring you pass the needle through each hole from both directions. This creates a very durable seam.
Running Stitch with an Awl
While often done with just a needle, an awl can help create evenly spaced holes for a running stitch on tough materials.
- Pierce holes at your desired intervals.
- Pass the needle and thread in and out of the holes, creating a simple, dashed line.
Using an Awl for Repairs
Sewing awl repair is one of its most valuable uses.
- Re-stitching: If a seam on a leather bag or heavy jacket has come undone, use the awl to create new holes along the original stitch line or slightly offset from the worn-out holes. Then, re-stitch the seam.
- Reinforcing: You can use an awl to add extra stitches in high-stress areas, like handle attachments or corner reinforcements.
- Patching: For canvas tents or tarps, an awl can help you securely attach patches by creating strong, evenly spaced holes for stitching.
Awl Use and Care
Proper awl use and care will ensure your tool lasts a long time and performs effectively.
Using Your Awl Safely
- Sharpness: Always use a sharp awl. A dull awl requires more force, increasing the risk of slipping and injury.
- Grip: Maintain a firm grip on both the material and the awl.
- Direction: Always pierce away from your body and hands.
- Protection: Consider wearing a thimble or a leather palm guard, especially when working with very tough materials or when using a leather awl extensively.
- Workspace: Work on a stable, non-slip surface.
Caring for Your Sewing Awl
- Cleaning: After each use, wipe the awl clean of any debris. If you’ve been working with leather, a quick wipe with a dry cloth is usually sufficient.
- Sharpening: Over time, the tip might become dull. You can sharpen it using a fine-grit sharpening stone or a metal file. Maintain the original point and bevel.
- Storage: Store your awl in its case or a protective sleeve to prevent damage to the tip and to avoid accidental injury. Keep it away from moisture to prevent rust, especially for metal parts.
- Needle Maintenance: If your awl has interchangeable needles, keep them organized and replace them if they become bent or dull. A good sewing awl needle is essential for clean work.
Projects Perfect for a Sewing Awl
Here are some ideas of what you can create or repair using a sewing awl:
- Leather Goods: Wallets, belts, journal covers, bags, watch straps.
- Canvas Items: Tents, backpacks, tool rolls, heavy-duty tote bags.
- Upholstery: Repairing seams on furniture, creating custom cushions.
- Footwear: Repairing soles, reinforcing seams on boots.
- Outdoor Gear: Sails, awnings, tarps.
Troubleshooting Common Issues
Even with practice, you might encounter some common problems.
| Problem | Cause | Solution |
|---|---|---|
| Awl slips | Not enough pressure, dull tip, material moving | Apply more firm pressure, sharpen the awl, secure material firmly with clamps, or work on a grippier surface. |
| Uneven stitch holes | Inconsistent pressure or angle | Practice maintaining a consistent angle and pressure. Use a marked guide or a stitching chisel for uniform spacing. |
| Thread breaks | Thread is too thin, needle is dull or too small, too much tension | Use a stronger, appropriate thread (like waxed linen or polyester). Ensure your sewing awl needle is sharp and the correct size for the material and thread. Adjust your stitching tension. |
| Material tears | Awl is too large for the material, too much force, holes too close | Use a smaller awl or needle. Reduce the force used. Ensure adequate spacing between stitch holes. Consider a finer sewing awl needle if the material is delicate. |
| Stitching is loose/sloppy | Not enough tension, improper stitch technique | Increase thread tension slightly. Practice the saddle stitch for maximum durability. Ensure you are pulling the thread taut with each stitch. |
| Awl gets stuck | Hitting a hard spot (like a knot in the material), dull tip, wrong angle | Re-position the awl and try a different angle. If the material is very dense, you might need to create a pilot hole with a smaller awl first. Sharpen the awl. |
Frequently Asked Questions (FAQ)
Q1: What is the difference between an awl and a sewing awl?
While the terms are often used interchangeably, “awl” can refer to any sharp, pointed tool used for piercing holes. A “sewing awl” specifically refers to an awl designed for creating stitch holes in sewing, often featuring a comfortable handle and sometimes a built-in needle or mechanism for stitching.
Q2: Can I use a regular awl for sewing leather?
Yes, a basic straight awl can be used for piercing holes in leather before you stitch it by hand with a needle and thread. However, specialized leatherworking awls, like diamond awls or awls designed for awl stitching leather, create better-shaped holes for stitches and are generally preferred for a professional finish.
Q3: How do I keep my stitches even when using a sewing awl?
Even stitches come with practice. You can use a fabric marker or chalk to draw a straight line and mark dots for your stitch holes. Alternatively, some leatherworkers use a stitching groover to create a shallow channel for the stitches, which helps guide both the awl and the needle. Consistency in pressure and angle is key.
Q4: What kind of thread should I use with a sewing awl?
For most applications, especially with tough materials, you’ll want a strong, durable thread. Waxed linen thread is a popular choice for leatherwork because it’s strong, resists fraying, and the wax helps the stitches stay in place and resist moisture. Heavy-duty polyester or nylon thread is also a good option. The thread should be compatible with the eye of your sewing awl needle.
Q5: Is a sewing awl kit worth the investment?
Yes, if you plan on working with leather, canvas, or other heavy materials, a sewing awl kit is a valuable investment. It typically includes the awl tool, appropriate needles, and thread, giving you everything you need to get started with hand sewing awl projects and essential sewing awl repair.
Conclusion
Mastering the sewing awl opens up a world of possibilities for crafting and repair. Whether you’re tackling a detailed leather project, performing essential sewing awl repair, or working with rugged awl for canvas, this versatile tool empowers you to create strong, beautiful, and lasting results. With practice, careful technique, and proper awl use and care, your sewing awl will become an indispensable part of your toolkit. Remember to choose the right sewing awl needle for your material and enjoy the satisfaction of creating with your own hands.