
Your sewing machine keeps unthreading usually because of simple, common problems. The main reasons are wrong threading, issues with the bobbin, a bad needle, wrong tension settings, or dirt build-up. These are often easy to fix once you know what to look for.
Sewing should be fun, not frustrating. A sewing machine that keeps unthreading stops your work and makes you feel like giving up. But don’t worry. This is one of the most common sewing machine problems. Most times, you can fix it yourself. Let’s look at why this happens and how to make it stop.
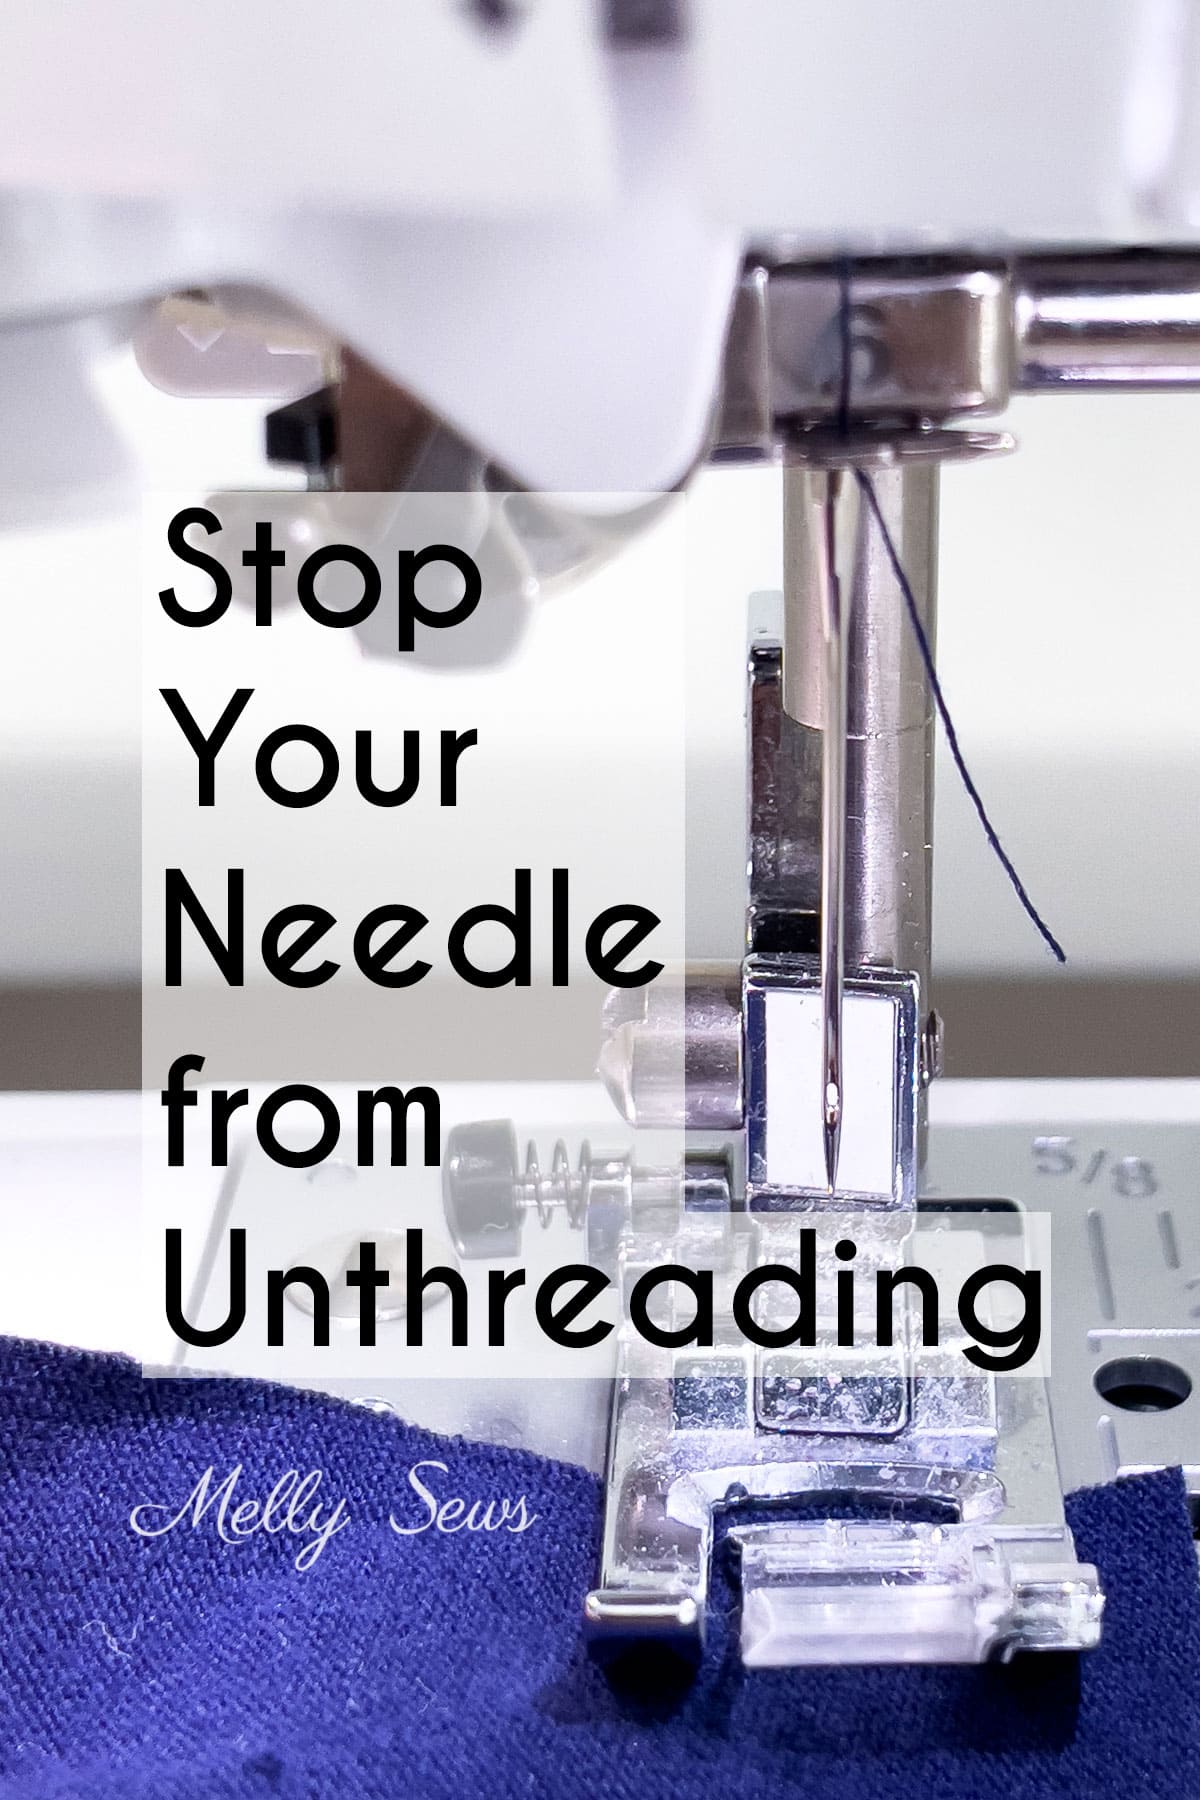
Image Source: mellysews.com
Common Causes for Unthreading
Your sewing machine needs the top thread and the bobbin thread to work together perfectly. If one part of this balance is off, the thread can pull out of the needle. Think of your sewing machine like a tiny factory. If one step is missed or done wrong, the whole process breaks down.
The good news? The fix is often simple. You just need to check the usual suspects.
Threading Troubles
One of the biggest reasons for sewing machine thread breaks and unthreading is how the machine is threaded. If you miss a step or the thread isn’t seated right, it won’t flow freely. This creates too much or too little tension. The thread can then pop out of the needle’s eye when the needle goes up or down.
h5: Incorrect Thread Path
Every sewing machine has a specific path for the top thread. It starts from the spool pin. It goes through guides, tension discs, the take-up lever, and down to the needle. This path makes sure the thread has the right tension and movement.
If your sewing machine is incorrectly threaded, the thread doesn’t follow this exact path. Maybe you skipped a guide. Maybe the thread isn’t fully in the tension discs. Perhaps it’s not hooked onto the take-up lever.
Here’s why missing a guide matters: Guides direct the thread. They keep it in place. Missing one lets the thread wander. This can cause tangles or sudden jerks on the thread. A sudden jerk can easily pull the thread out of the needle.
The tension discs are super important. The thread must sit between them. This is where the upper tension is set. If the thread is not between the discs, it has no tension. It flows too loosely. When the needle goes down, it makes a big loop on the underside of the fabric. When the needle comes back up, that big loop might get pulled tight suddenly. This can cause the thread to snap or pull out of the needle. Make sure the presser foot is up when threading. This opens the tension discs so the thread can slide in easily.
The take-up lever goes up and down with the needle. It pulls up the slack thread after a stitch is made. It’s a crucial part of how a stitch forms. If the thread is not through the eye or hook on the take-up lever, the machine cannot control the thread properly. It won’t pull the thread up at the right time. This leaves too much loose thread. The thread can then unthread when the needle moves.
h5: Skipping Steps
Threading is like following a recipe. You need to do every step in order. Most machines have numbers or diagrams printed on them to show you how to thread a sewing machine. Always follow these guides for your specific machine.
A common mistake is not having the take-up lever at its highest point when you start threading. If the lever is low, you might thread through it. But when you start sewing and it moves up, the thread might pop out of the eye. Always turn the handwheel towards you until the take-up lever is as high as it can go. Then thread the machine.
Also, check that the thread is seated firmly in all guides and hooks. Sometimes thread can feel like it’s in place but isn’t fully secure. Give it a gentle tug after threading to make sure it’s routed right.
h5: Thread Quality Issues
The thread itself can cause problems, including sewing machine thread breaks and unthreading.
- Old Thread: Thread gets weaker over time. Especially cotton thread. It can become dry and brittle. Old thread breaks easily. If it breaks near the needle, the remaining piece in the needle might be too short. It can then easily unthread.
- Cheap Thread: Low-quality thread might not be smooth. It can have slubs (thicker bits) or be inconsistent in thickness. These can catch on guides or in the needle eye. This stops the smooth flow of thread. The thread might snap or pull out.
- Wrong Thread Type: Using thread that is too thick for the needle size or the fabric can also cause issues. The thread doesn’t pass through the fabric easily. This puts stress on the thread and the needle. It can lead to breaking or unthreading.
Using good quality thread meant for machine sewing is important. Store thread away from sunlight and dampness to keep it strong.
Bobbin Box Blues
The bobbin system works with the top thread to form stitches. If something is wrong with the bobbin setup, the stitch won’t form right. This can lead to thread loops on the fabric and, you guessed it, the top thread unthreading. Bobbin issues sewing machine are very common.
h5: The Wrong Bobbin
Not all bobbins are the same!
- Material: Some machines use plastic bobbins. Others use metal bobbins. You must use the type of bobbin made for your machine. Using a metal bobbin in a machine meant for plastic can cause problems with magnets or electronic sensors. It can also affect bobbin tension. Using a plastic bobbin in a machine meant for metal might mean it doesn’t fit right or spins unevenly.
- Size/Shape: Even bobbins of the same material come in different sizes and shapes. A bobbin that is too tall, too short, or has a different dome shape won’t fit or spin right in the bobbin case or area. This stops the thread from coming off smoothly. It can snag and cause the top thread to unthread. Check your machine’s manual to know the exact bobbin type it needs.
h5: Bobbin Inserted Backwards
In most sewing machines, the bobbin needs to be inserted so the thread comes off in a specific direction. Often, this is clockwise or anti-clockwise. There is usually a small diagram on your machine or bobbin case showing the correct direction.
If the bobbin spins the wrong way, the thread does not come off smoothly. It might pull or snag. This disrupts the delicate balance needed to form a stitch. It can cause tension problems and lead to the top thread popping out of the needle. Always check the diagram!
h5: Winding Woes
How you wind the bobbin matters a lot. Poorly wound bobbins are a big cause of bobbin issues sewing machine.
- Uneven Winding: If the thread is piled up on one part of the bobbin, it’s wound unevenly. This makes the bobbin spin with a wobble. The thread won’t come off smoothly. It can snag or pull. This throws off the stitch formation and can cause the top thread to unthread.
- Too Full: If you wind the bobbin until it’s overflowing, the thread can catch on the edges of the bobbin case or the bobbin area. This stops the thread from coming off freely. Snagging happens. Unthreading can follow. Don’t overfill bobbins.
- Too Loose: If the thread is wound too loosely, it can create loops on the bobbin. These loops can catch on each other or the bobbin case. This causes jerky thread flow. The thread might get tangled. This interrupts stitching and can cause unthreading.
Here’s how to wind a bobbin correctly:
1. Place the bobbin on the winder pin.
2. Put the thread spool on its pin.
3. Guide the thread through the bobbin winding thread guide (check your manual for location). This guide helps apply a little tension so the thread winds tightly and evenly.
4. Wrap the thread end around the bobbin a few times and maybe put it through the small hole in the bobbin to secure it.
5. Push the bobbin winder pin over to the winding position.
6. Press the foot pedal. The machine should wind the bobbin fast and evenly.
7. Stop when the bobbin is full but not overflowing. Cut the thread. Push the winder pin back to the sewing position.
Taking care when winding bobbin correctly helps prevent many headaches later.
h5: Lint in the Bobbin Case
Lint, dust, and tiny bits of thread gather everywhere in a sewing machine. The bobbin area is a lint magnet. If there’s too much lint in the bobbin case or the area under the needle plate, it can affect how the bobbin spins. It can also snag the bobbin thread. This causes uneven tension on the lower thread. When the upper and lower thread tensions are not balanced, stitches don’t form right. This can lead to tangles (“nesting”) on the fabric underside and can cause the top thread to pop out. Cleaning this area often is key (clean sewing machine lint).
Needle Nightmares
The needle is the part that pushes the thread through the fabric. Problems with the sewing machine needle can directly cause unthreading.
h5: Bent or Dull Needle
A needle is tiny, but it works hard. It punches through fabric thousands of times a minute. Needles get dull or bent over time.
- Dull Needle: A dull needle doesn’t pierce the fabric cleanly. It pushes fabric fibers instead. This puts stress on the thread as it passes through the fabric and the needle eye. The thread can snag or fray. This weakness can lead to thread breaks or unthreading. You might hear a popping sound when sewing with a dull needle.
- Bent Needle: A bent needle is very bad. As the needle goes up and down, it moves in a very precise path. A bent needle doesn’t follow this path. It can hit the needle plate or the bobbin case. This is dangerous and can break your machine. Even a slight bend can cause the thread loop (that the bobbin thread catches) to form improperly. If the loop is wrong, the bobbin thread can’t catch it, and the stitch fails. The top thread might then unthread.
Always change your needle often. A good rule is after every 8-10 hours of sewing, or at the start of a new project. Needles are cheap. Machine repairs are not.
h5: Incorrectly Inserted Needle
Sewing machine needles have a flat side on the shank (the part that goes into the machine). This flat side must face the back of the machine (on most domestic machines). The needle must also be pushed up as far as it will go into the needle clamp.
If the needle is facing the wrong way or isn’t pushed all the way up, the eye of the needle will not be in the correct position. This means the bobbin hook cannot catch the thread loop at the right time. Stitch formation fails. The thread can then easily slip out of the needle eye.
Always check that the flat side is back and the needle is high up when you change it. Tighten the needle clamp screw firmly.
h5: Wrong Needle for Fabric/Thread
Using the correct needle for sewing machine is very important. Different fabrics and threads need different needles.
- Needle Size: Needles come in different sizes (e.g., 70/10, 80/12, 90/14). Smaller numbers are for fine fabrics (silk, chiffon). Larger numbers are for heavier fabrics (denim, canvas). The needle size also needs to match the thread size roughly. A needle that is too small for the thread or fabric can’t make a clean hole. It puts too much stress on the thread and the needle itself.
- Needle Type: There are different types of needle points. Universal needles work for many woven fabrics. Ballpoint needles are for knits (they push fabric fibers aside instead of cutting them). Sharp needles (Microtex) are for very fine fabrics or precise work. Using a universal needle on knit fabric might cause skipped stitches and thread problems. Using a sharp needle on knit fabric can break the fibers and cause holes.
If the needle point isn’t right for the fabric, it won’t make a good hole. The thread struggles to pass through. This can cause thread breaks or unthreading. Always match your needle type and size to your fabric and thread. Your manual or needle packaging will guide you.
Tension Troubles
Sewing machine tension problems are a major reason for stitch issues and unthreading. Tension is the control on how freely the top thread and the bobbin thread feed through the machine. The two threads must meet in the fabric layers with just the right amount of tension to form a strong, balanced stitch.
h5: Upper Tension Issues
The upper tension is controlled by a dial or buttons on your machine. This controls the flow of the top thread through the tension discs.
- Too Tight: If the upper tension is too tight, the top thread cannot pull the bobbin thread up properly. It puts too much strain on the top thread. This can cause the top thread to break. If it doesn’t break, the strain can cause the thread to pop out of the needle when the needle moves quickly, especially on thick seams or when starting. Too tight tension also makes stitches look flat on the top and maybe loop on the bottom.
- Too Loose: If the upper tension is too loose, the top thread flows too freely. It makes large loops on the underside of the fabric (often called “bird nesting”). When the needle goes down into this mass of loose thread, it can tangle or the thread can easily pull out of the needle eye.
Adjust sewing machine tension carefully. Most machines have a normal range (often around 3-5). Start in the middle. Sew a test seam on a scrap of your fabric. Look at the stitches.
* If loops are on the bottom, the top tension is too loose. Turn the dial up (higher number).
* If loops are on the top, the top tension is too tight. Turn the dial down (lower number number).
* A balanced stitch looks the same on both sides, with the two threads locking neatly in the middle of the fabric layers.
h5: Bobbin Tension Issues
Bobbin tension is usually set at the factory and rarely needs changing. It’s controlled by a small screw on the bobbin case (for drop-in bobbins, the tension is built into the bobbin area). Unless you are an expert or the manual tells you to, it’s best not to touch this screw.
If you suspect bobbin tension is the issue after checking everything else, consult your manual or a repair person. Messing with bobbin tension incorrectly can cause more problems. For drop-in bobbins, make sure the thread is routed correctly through the tension spring in the bobbin area.
The Dirty Truth
Sewing machines work by moving thread and fabric very fast. This creates lint – tiny fibers from the fabric and thread. Lint gathers everywhere. It’s a major cause of sewing machine problems, including unthreading and sewing machine thread breaks.
h5: Lint Build-up in Key Areas
Lint build-up acts like a clog. It stops the smooth movement of thread and parts.
- Bobbin Area: As mentioned, lint here messes with bobbin spin and thread flow.
- Feed Dogs: These teeth move the fabric. Lint packed around them stops them from gripping the fabric well. This can cause stitches to be uneven or fabric to not move. This jerky movement can stress the thread and cause unthreading.
- Tension Discs: Lint between the tension discs stops them from gripping the thread evenly. This causes uneven tension. It can also make the tension too tight.
- Thread Path Guides: Lint can collect in the small hooks and guides the thread passes through. This causes drag on the thread. It stops the thread from flowing smoothly.
Clean sewing machine lint often. Use a small brush (usually came with your machine). Never use canned air inside your machine. It just blows the lint deeper into the machine’s parts, making things worse. Focus on the bobbin area, under the needle plate, the feed dogs, and around the tension discs.
Other Potential Issues
- Stiff or Oiled Joints: Lack of oiling can make machine parts stiff. This creates resistance. The machine might pull harder on the thread. This can lead to unthreading. Check your manual for oiling points and how often to oil.
- Using the Wrong Foot: Using a foot not meant for your stitch or fabric (e.g., a zigzag stitch with a straight stitch foot) can cause the needle to hit the foot. This is dangerous and can bend or break the needle, leading to unthreading.
- Pulling the Fabric: Do not pull the fabric through the machine. The feed dogs move the fabric. Pulling can bend the needle, throw off tension, and cause stitches to jam or unthread. Gently guide the fabric.
Step-by-Step Fixes
When your machine starts unthreading, don’t panic. Go through these steps like a checklist. Start with the easiest things to check.
h4: Check the Basics First
- Is the Machine Plugged In Firmly? (Okay, this won’t cause unthreading, but it’s step 1 for any machine problem!)
- Is the Power On?
- Is the Needle Up? Turn the handwheel towards you until the needle is at its highest point. This is the best position to start checking things.
h4: The Re-Thread and Bobbin Check
- Remove Both Threads: Take out the top thread completely from spool to needle. Remove the bobbin.
- Inspect the Thread: Look closely at your thread spool. Is the thread old? Frayed? Knotty? Try a fresh spool of good quality thread.
- Inspect the Bobbin: Look at your bobbin. Is it the right type for your machine? Is it wound evenly and not too full? Is it loose? If it looks bad, unwind it and wind bobbin correctly on a fresh bobbin.
- Insert Bobbin Correctly: Put the bobbin back in. Check the direction of rotation using the diagram on your machine or manual. Make sure the bobbin thread is routed through the tension spring or slot in the bobbin area/case.
- Re-Thread the Top Thread: Thread the machine slowly and carefully. Follow the numbers or diagram exactly. Make sure the presser foot is up when threading. Make sure the thread clicks fully into the tension discs. Make sure the thread goes through the eye of the take-up lever and down to the needle.
h4: Examine and Change the Needle
- Check the Needle: Look closely at the needle in the machine. Is it bent? Is the tip dull (run your fingernail carefully down the tip, it should feel sharp, not smooth)?
- Replace the Needle: Even if it looks okay, put in a brand new needle. This is the easiest and often most effective fix. Make sure it’s the correct needle for sewing machine based on your fabric.
- Insert Needle Correctly: Make sure the new needle is inserted with the flat side facing the back (on most machines). Push it up as far as it will go into the needle clamp. Tighten the screw firmly.
h4: Give the Machine a Clean Sweep
- Turn Off Power: Always turn off and unplug the machine before cleaning.
- Access Key Areas: Open the bobbin case area. Remove the needle plate (you’ll need a screwdriver, usually included with the machine).
- Brush Away Lint: Use your brush to gently remove all visible lint. Focus on the bobbin area, feed dogs, under the needle plate, and around the tension discs.
- Oil (If Your Machine Needs It): Check your manual. If your machine needs oiling, put a tiny drop in the spots shown in the manual. Do not over-oil.
- Put It Back Together: Reattach the needle plate. Close the bobbin area.
h4: Review Tension Settings
- Check Upper Tension Dial: Make sure the dial hasn’t been bumped to a very high or very low number. Set it back to the middle or the number recommended in your manual for basic stitching (often 3, 4, or 5).
- Check Bobbin Tension: Unless you know what you’re doing and your manual suggests it, leave the bobbin tension screw alone. Ensure the bobbin thread is seated correctly in its tension path.
- Test Sew: Get a scrap piece of the same fabric you were sewing. Thread the machine again carefully. Sew a few lines. Look at the stitches. Adjust sewing machine tension slightly if needed (usually the upper tension dial). Make small changes and test again.
Going through these steps addresses the most common reasons for unthreading: incorrectly threaded sewing machine, bobbin issues sewing machine, sewing machine needle problems, sewing machine tension problems, and needing to clean sewing machine lint. Most of the time, one of these steps will fix the issue.
Stopping Unthreading Before It Starts
Fixing the problem is great, but preventing it is even better. Here are tips to keep your machine stitching smoothly.
- Always Re-thread: If you step away from your machine or change thread colors, get in the habit of unthreading completely and starting fresh. It takes seconds and prevents many issues caused by poor seating.
- Use Quality Supplies: Good thread and the correct needle for sewing machine make a huge difference. Don’t use old, weak thread. Match the needle to your fabric.
- Clean Regularly: Make cleaning your machine a habit. Clean clean sewing machine lint from the bobbin area after each project, or even during a long project. Deep clean under the needle plate often. This prevents clogs.
- Change Needles Often: A sharp, straight needle is vital. Change it for every new project or after 8-10 hours of sewing.
- Check Your Bobbin: Before starting, make sure the bobbin is wound correctly, inserted right, and is the correct type. Winding bobbin correctly saves trouble.
- Start with the Presser Foot Up: Always lift the presser foot when threading the top thread. This opens the tension discs.
- Don’t Pull the Fabric: Let the machine feed the fabric. Guide it gently with your hands.
- Follow the Manual: Your sewing machine manual is your best friend. It shows you how to thread, how to clean, and what bobbins/needles to use. Keep it handy.
When to Get Help
If you have gone through all the steps above and your machine is still unthreading, or if it’s making strange noises, it might be time for professional help. A sewing machine technician can look at internal parts you can’t access. They can fix timing issues or other mechanical problems.
Questions People Ask
h4: Why does my machine sometimes unthread but not always?
This often happens when the thread is almost seated right or a small amount of lint is starting to build up. It might stitch fine on simple parts. Then, on a thick seam or when changing direction, the extra strain or different movement causes the thread to pop out. Going through the re-threading, needle, and cleaning steps usually fixes this.
h4: Can old thread cause my machine to unthread?
Yes, absolutely. Old thread can be weak. It can break easily near the needle. The short piece left might then unthread. Old thread can also be dry or sticky. This stops it from flowing smoothly through the machine’s path.
h4: How often should I clean my sewing machine?
It depends on how much you sew. If you sew often, clean the bobbin area every few projects or after every few hours of sewing. Clean under the needle plate regularly, maybe every 2-3 bobbin changes. Your manual might have a cleaning schedule. Regular light cleaning is better than waiting for lint to cause problems.
By understanding the common issues like sewing machine tension problems, incorrectly threaded sewing machine, bobbin issues sewing machine, sewing machine needle problems, and the need to clean sewing machine lint, you can solve most unthreading issues. Learning how to thread a sewing machine and adjust sewing machine tension correctly, along with winding bobbin correctly, are key skills for happy sewing. Don’t let unthreading stop you! Go through the steps, find the cause, and get back to creating.