
Can I put a needle in my Singer sewing machine easily? Yes, absolutely! With a few simple steps, you can master the art of singer sewing machine needle insertion. This guide will walk you through changing needle singer sewing machine like a pro, ensuring correct needle placement singer every time. We’ll cover everything from choosing the right needle to troubleshooting singer sewing machine needle issues.
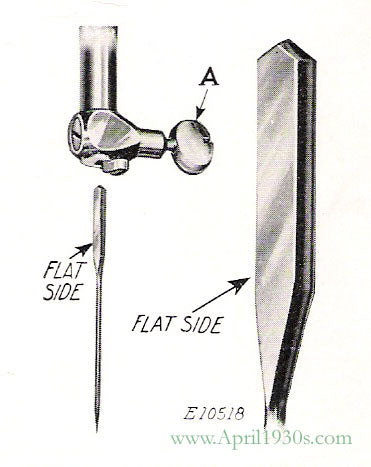
Image Source: cdn.shopify.com
The Importance of Proper Needle Insertion
Putting the needle into your Singer sewing machine correctly is more than just a mechanical step; it’s crucial for a smooth sewing experience and the longevity of your machine. A wrongly inserted needle can lead to skipped stitches, broken threads, damaged fabric, and even bent or broken needles. This can be frustrating and costly. By following the right procedure for singer sewing machine needle insertion, you ensure optimal performance and beautiful stitches.
What Happens When a Needle is Incorrectly Inserted?
- Skipped Stitches: If the needle isn’t fully seated or is in the wrong orientation, it might not properly form a stitch, leading to gaps in your sewing.
- Thread Breakage: The thread’s path is carefully designed. If the needle is not aligned correctly, the thread can snag or fray, causing it to break.
- Fabric Damage: A bent or incorrectly positioned needle can snag or tear delicate fabrics.
- Machine Damage: In severe cases, a misaligned needle can hit other parts of the sewing machine, causing damage to the needle clamp, bobbin case, or even the hook mechanism.
Preparing for Needle Insertion
Before you begin the process of changing needle singer sewing machine, a little preparation goes a long way. This ensures a safe and efficient change.
Gathering Your Supplies
You’ll need a few basic items:
- Your Singer Sewing Machine: Of course!
- The New Sewing Needle: Make sure it’s the correct type and size for your project and machine. We’ll discuss singer sewing machine needle types and singer sewing machine needle size later.
- A Soft Cloth: For wiping down the needle area if needed.
- Optional: Tweezers or Needle-Nose Pliers: Some people find these helpful for gripping the needle, especially if your fingers aren’t as nimble.
Safety First!
Always prioritize safety when working with sewing machines.
- Turn Off the Machine: Before touching anything, ensure your sewing machine is unplugged or switched off. This prevents accidental starts.
- Lower the Presser Foot: Lowering the presser foot can help stabilize the needle area and prevent the needle from falling into the machine.
Step-by-Step Guide to Singer Sewing Machine Needle Insertion
Now, let’s dive into the core of how to put needle in sewing machine singer. These steps are generally applicable to most Singer models, but always consult your machine’s manual if you’re unsure.
Step 1: Accessing the Needle Clamp
- Locate the Needle Clamp: This is the small mechanism that holds the needle in place. It’s usually located at the bottom of the presser foot bar.
- Release the Old Needle:
- Look for a small screw or a lever on the needle clamp.
- If it’s a screw, use a screwdriver (often a flathead, but check your manual) to loosen it. Turn it counter-clockwise. You don’t need to remove the screw completely; just loosen it enough to allow the needle to slide out.
- If it’s a lever, simply push or pull it according to its design to release the needle.
- Carefully Remove the Old Needle: Once loosened, the old needle should slide out easily. If it’s stuck, gently wiggle it. Do not force it.
Step 2: Selecting the Right Needle
Choosing the best needle for Singer sewing machine and the correct singer sewing machine needle size is vital.
Understanding Singer Sewing Machine Needle Types
Different needles are designed for different fabrics and threads. Using the wrong needle is a common cause of sewing problems.
| Needle Type | Primary Use | Key Features |
|---|---|---|
| Universal | All-purpose sewing, lightweight to medium-weight fabrics. | Slightly rounded point, suitable for a wide range of materials. |
| Ballpoint | Knits, stretch fabrics, jersey, lycra. | Rounded point to push fabric fibers apart, preventing runs and holes. |
| Sharp/Microtex | Woven fabrics, silks, microfibers, vinyl, leather (use specific leather needle for heavy leather). | Very sharp point for precise piercing of tightly woven or synthetic fabrics. |
| Denim/Jeans | Denim, canvas, upholstery, other heavy fabrics. | Stronger shaft and a sharper point to penetrate dense materials. |
| Leather | Leather, suede, vinyl, other tough materials. | Chisel point or wedge point to cut through leather without tearing. |
| Embroidery | Decorative stitching, machine embroidery. | Large eye to accommodate thicker embroidery threads, larger scarf to protect thread. |
| Topstitch | Topstitching, quilting, embroidery. | Extra-long “eye” (eye is actually a groove) to reduce friction on thicker threads. |
Determining the Correct Singer Sewing Machine Needle Size
Needle sizes typically range from 60 (very fine) to 120 (heavy duty).
- Finer Needles (60-70): For very delicate fabrics like silk, chiffon, and lightweight synthetics.
- Medium Needles (70-90): For everyday fabrics like cotton, linen, and medium-weight knits. This is a common range for universal needles.
- Heavier Needles (90-120): For heavier fabrics like denim, canvas, and upholstery.
Tip: Always check the thread packaging and fabric recommendations for the best needle size. For example, a fine thread might work best with a smaller needle size.
Step 3: Inserting the New Needle
This is where we focus on singer sewing machine needle insertion and ensuring correct needle placement singer.
- Get Ready: Hold the new needle between your thumb and forefinger.
- Locate the Flat Side: Most sewing machine needles have a flat side on the shank (the part that goes into the clamp). This flat side MUST face the correct direction. For most Singer sewing machines, the flat side of the needle should face the back of the machine (away from you). Always double-check your machine’s manual for specific instructions. This is the most critical part of correct needle placement singer.
- Insert the Needle:
- Slide the needle’s shank upwards into the needle clamp opening.
- Push it up as far as it will go. You should feel it seat firmly against the back of the clamp’s opening.
- Tighten the Needle Clamp Screw:
- Once the needle is fully inserted, carefully tighten the needle clamp screw (turn clockwise).
- Make sure it’s snug, but don’t overtighten, as this can strip the screw or damage the clamp. The needle should be held securely and not wobble.
Step 4: Confirming Correct Placement
After tightening, give the needle a gentle wiggle. It should feel secure and not move independently of the clamp. Also, visually confirm it’s straight and centered in the presser foot opening. This confirms your singer sewing machine needle insertion was successful.
Threading Your Singer Sewing Machine After Needle Insertion
Once the needle is in, the next logical step is threading. If you are changing needle singer sewing machine, you will need to re-thread the machine to ensure the new needle picks up the thread correctly. This is key to how to thread a singer sewing machine needle.
General Threading Steps
While specific threading paths vary by Singer model, the general principles remain the same:
- Raise the Presser Foot: Always start with the presser foot UP. This opens the tension discs, allowing the thread to pass through them correctly.
- Follow the Thread Path: Your Singer machine has numbered or diagrammed thread guides. Follow these precisely.
- Pass the thread over the spool pin.
- Guide the thread through the upper thread guides.
- Go through the tension discs (ensure it’s threaded between them).
- Pass through the take-up lever (a crucial step for stitch formation).
- Continue down through the lower thread guides.
- Thread the Needle: Now, with the thread in hand, approach the needle.
- How to thread a Singer sewing machine needle: The eye of the needle is small. For most modern Singer machines, the thread should be passed from front to back through the needle’s eye. Some older or specialized machines might have a side-threading needle eye.
- Tip: Trim the end of your thread cleanly. You can also slightly moisten the thread end or use a threader tool if your machine has one or if you find it difficult.
- Bring Up the Bobbin Thread:
- Hold the upper thread tail loosely in your left hand.
- Turn the machine’s handwheel TOWARDS you (counter-clockwise) to bring the needle down and then up again. This action will loop the upper thread around the bobbin thread and pull the bobbin thread loop up through the needle plate.
- Use your fingers or tweezers to pull the bobbin thread loop completely through.
- Position Threads: Place both the upper and bobbin thread tails under the presser foot and to the back of the machine.
Importance of Re-threading After Needle Change
Inserting a new needle singer requires re-threading because the new needle’s eye and shaft might interact slightly differently with the thread. Proper threading ensures the thread engages correctly with the needle’s groove and scarf, which is essential for the hook mechanism to catch the thread loop and form a stitch.
Choosing the Best Needle for Your Singer Sewing Machine
Selecting the best needle for Singer sewing machine involves considering your fabric and thread. The singer sewing machine needle guide in your manual is invaluable here.
Factors to Consider:
- Fabric Type: As detailed in the needle types table, this is the primary driver.
- Thread Type: Heavy threads may need larger eye needles (like topstitch needles) or larger needle sizes. Silk threads might work best with fine needles.
- Project: Are you piecing, quilting, or embellishing? Each might benefit from a specific needle.
Common Needle Recommendations for Singer Machines:
- For general sewing with cotton: A Universal needle in size 80/12 is a good starting point.
- For knits: A Ballpoint needle in size 70/10 or 80/12 is ideal.
- For denim: A Denim/Jeans needle in size 90/14 or 100/16 is recommended.
Troubleshooting Singer Sewing Machine Needle Issues
Even with careful singer sewing machine needle insertion, you might encounter problems. Here’s how to approach common troubleshooting singer sewing machine needle issues.
Common Problems and Solutions:
| Problem | Possible Cause | Solution |
|---|---|---|
| Skipped Stitches | Dull or bent needle. Incorrect needle type for fabric. Needle inserted incorrectly. Threading error. | Change the needle to a new, sharp one. Ensure it’s the correct type and size. Verify correct needle placement singer (flat side to the back). Re-thread the machine, ensuring the presser foot is UP and thread is in the tension discs. |
| Thread Breaking | Sharp burr on needle. Needle inserted too far or not far enough. Thread snagging. Tension too tight. Thread spool is tangled. | Change the needle. Check singer sewing machine needle insertion depth and security. Check thread path for snags. Adjust tension. Ensure spool is seated properly and thread unwinds freely. |
| Fabric Puckering/Wavy Stitches | Needle too large for fabric. Tension too tight. Wrong needle type. | Use a finer needle. Loosen the upper tension. Ensure you’re using the correct needle type (e.g., Microtex for fine wovens). |
| Needle Breaking | Needle is bent or dull. Wrong needle type for fabric. Machine is “out of time” (needle and hook are misaligned internally). Forcing fabric through the machine. | Change the needle. Use the correct needle for the fabric. If it persists, the machine may need professional servicing to check timing. Avoid pulling or pushing fabric forcefully. |
| Needle Won’t Go In | Obstruction in the needle clamp. Wrong needle type (shank too thick). | Check for lint or debris in the clamp. Ensure you are using a sewing machine needle designed for your machine. |
| Needle Vibrating | Needle not fully seated in clamp. Clamp screw is loose. | Re-seat the needle and tighten the clamp screw securely. |
When to Seek Professional Help
If you’ve tried changing the needle, re-threading, and checked basic settings, and still experience persistent problems, especially needle breaking or the machine making unusual noises, it might be time to contact a qualified sewing machine repair technician. The machine’s timing might be off, which requires specialized knowledge and tools to fix.
Frequently Asked Questions (FAQ)
Q1: How often should I change my Singer sewing machine needle?
A1: It’s a good practice to change your needle every 6-8 hours of sewing time, or every new project, whichever comes first. Needles can become dull and damaged without visible signs, leading to sewing problems.
Q2: Can I use a Brother or Janome needle in my Singer sewing machine?
A2: Generally, yes. Most home sewing machines use the same universal needle system (like 130/705 H). However, always check your Singer manual to confirm the correct shank type. Using the wrong shank type can cause damage.
Q3: My Singer sewing machine needle keeps going in crooked. What am I doing wrong?
A3: This usually means the needle isn’t fully seated in the clamp or the clamp screw is loose. Ensure you push the needle all the way up into the clamp opening before tightening the screw securely. Also, confirm the flat side of the needle is correctly oriented.
Q4: What does the number on a Singer sewing machine needle mean?
A4: The numbers indicate the needle’s size. For example, an 80/12 needle is size 80 in the metric system and size 12 in the US/Imperial system. Smaller numbers indicate finer needles, while larger numbers indicate coarser needles.
Q5: Is it okay to force the needle into the clamp?
A5: No, never force the needle. If it’s not sliding in easily, there might be an obstruction, or you might be trying to insert it the wrong way. Check for debris in the clamp and ensure the flat side of the needle is oriented correctly.
Q6: My machine is skipping stitches, but I just changed the needle. What else could it be?
A6: If you’ve just inserted a new needle and are still getting skipped stitches, double-check that you followed the singer sewing machine needle insertion steps precisely. Ensure the presser foot is down when sewing, and re-thread the machine entirely, making sure the thread is properly seated in the tension discs and take-up lever. If the problem persists, the machine’s timing may need adjustment by a professional.
By following this comprehensive guide, you should feel confident in how to put needle in sewing machine Singer. Remember, a well-maintained machine with the correct needle is the foundation of successful sewing!