
A sewing awl is a versatile tool that punches holes for hand sewing, particularly useful in leathercraft. Can you use a sewing awl for leather stitching? Yes, a sewing awl is essential for creating neat and strong stitches in leather. What is the best way to use a sewing awl? The best way involves practicing proper technique to create consistent holes and ensure strong leather stitching.
The world of leathercraft is a journey of creation and restoration. Whether you’re crafting a sturdy wallet, a supple bag, or breathing new life into well-loved leather goods, certain tools are indispensable. Among these, the humble yet powerful sewing awl stands out. This tool is your key to achieving beautiful and durable hand stitching, a hallmark of quality craftsmanship in leather.
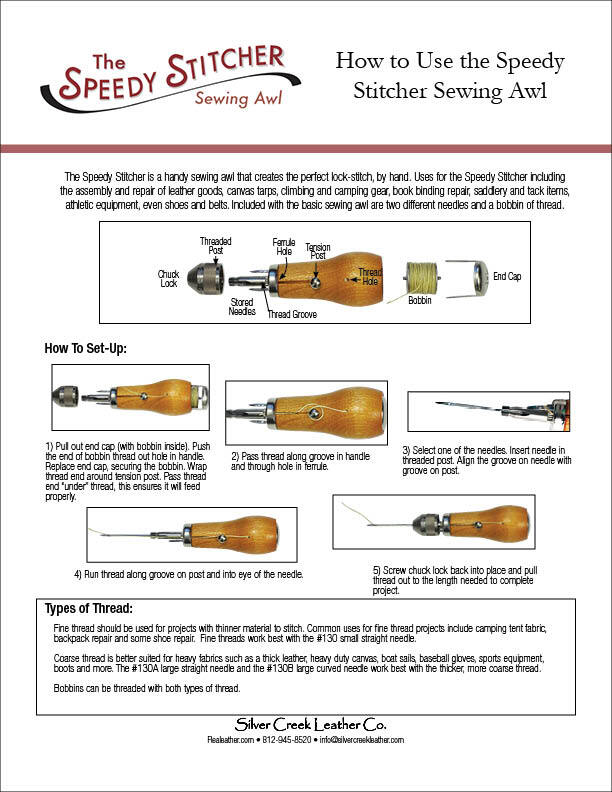
Image Source: realeather.com
Fathoming the Sewing Awl: What It Is and Why It Matters
An awl tool is essentially a pointed instrument used for making holes in various materials. In leatherworking, the sewing awl is specifically designed to pierce leather cleanly, preparing it for hand sewing. This is crucial because leather is much thicker and tougher than fabric, making it difficult, if not impossible, to push a sewing needle through without assistance. The awl creates a pilot hole that guides the needle, ensuring your stitches are straight, even, and strong.
The history of awls dates back thousands of years. Early humans used sharpened bone, wood, or stone to pierce hides for making clothing and shelters. Over time, these tools evolved, with metal awls becoming common. In leathercraft, the awl has remained a fundamental tool, adapted for precision and efficiency.
Types of Awls for Leatherwork
While the basic function remains the same, there are a few variations of awls you might encounter in leathercraft:
- Scratch Awl: This is the simplest form, with a sharp point used for marking or making small starter holes. It’s not ideal for stitching but can be a precursor.
- Sewing Awl: This is the star of our discussion. It typically has a longer, narrower shaft and a sharp, often diamond-shaped or triangular point. It’s designed to create holes suitable for passing a sewing needle and thread through.
- Revolving Awl: This type features interchangeable bits or needles at the end, allowing you to switch between different hole sizes or styles. It’s convenient but sometimes less robust than a dedicated sewing awl.
For serious leather stitching, a dedicated sewing awl is the preferred choice. It offers the best balance of precision, durability, and ease of use for hand sewing leather projects.
The Art of Leather Stitching with an Awl
Hand sewing leather, often referred to as hand stitching leather, is a rewarding process that yields incredibly strong and aesthetically pleasing results. The sewing awl is your first step in this meticulous craft.
Preparing Your Leather for Stitching
Before you even think about threading a sewing needle, your leather needs to be ready.
- Mark Your Stitching Line: Use a scratch awl, a groover, or a wing divider to mark a straight line where your stitches will go. This line acts as a guide.
- Punching Holes: This is where the sewing awl shines. You’ll be creating a series of holes along your marked line. The spacing of these holes is critical for the final look and strength of your stitches.
The Technique: Step-by-Step Awl Usage
Using a sewing awl effectively requires a bit of practice, but once you grasp the technique, you’ll be making consistent holes with ease.
Step 1: Holding the Awl
- Grip the awl handle firmly but not tensely. Your grip should allow for controlled pressure and movement. Imagine holding a large pen or a small hammer.
- The shaft of the awl should be relatively perpendicular to the leather surface for most stitches, especially when aiming for harness stitching.
Step 2: Positioning the Awl
- Place the point of the awl on your marked stitching line.
- Ensure the awl is positioned at the desired angle for your stitch. For a traditional saddle stitch or harness stitching, you want the awl to pierce the leather at an angle that will correspond to the angle of your stitch on the surface. This is key to achieving a clean, angled stitch line.
Step 3: Applying Pressure
- Apply steady, firm downward pressure. You’re not trying to hammer the awl through the leather.
- As you apply pressure, gently rock or twist the awl slightly. This helps the sharp point to cut through the leather fibers rather than just pushing them aside. This rocking motion is what makes punching holes so effective with a sharp awl.
- You want to feel the awl break through the surface of the leather.
Step 4: Creating the Hole
- Once the awl point has pierced the leather, push it completely through the material.
- If you are stitching two layers of leather together, ensure the awl passes through both layers.
- Withdraw the awl cleanly.
Step 5: Spacing Your Holes
- The distance between each hole determines the stitch length and the overall appearance.
- A common spacing is 3-5 millimeters, but this can vary based on the project and desired aesthetic.
- Use a stitching chisel or a stitching groover to help maintain consistent spacing between awl punches. These tools often have multiple prongs that mark or cut consistent distances.
Achieving Consistent Stitch Lines
Consistency is the hallmark of professional leather stitching. Here’s how to ensure your awl punches are uniform:
- Practice on Scraps: Before working on your main project, practice punching holes on scrap pieces of the same leather. This helps you get a feel for the pressure needed and the spacing.
- Use a Gauge: Employ a stitching gauge or a ruler to measure the distance between each punch.
- Stitching Chisels: For very precise and consistently spaced holes, consider using stitching chisels. These tools have multiple sharp teeth that you strike with a mallet. They punch several holes at once, ensuring perfect alignment and spacing. However, the awl is still used to guide the needle through these pre-cut slits.
The Role of the Awl in Different Stitching Techniques
The sewing awl is not just about making holes; it’s about making the right holes for the stitch you intend to use.
Harness Stitching
Harness stitching, also known as saddle stitching, is renowned for its strength and beauty. It’s a double-needle, lockstitch that looks the same on both sides. The sewing awl plays a crucial role in creating the angled holes that allow the two needles to pass through each other in the center.
- Angle of Punch: When performing harness stitching, you’ll typically angle your awl from one side, then from the other, creating a small, consistent slit.
- Needle Passage: This angled slit is designed so that when you thread your sewing needle through, the needle emerges at the correct angle to meet the other needle. The result is a tight, interlocking stitch.
- Leather Repair: This technique is particularly effective for repairing leather goods that experience a lot of stress, like bags or straps, because the lockstitch is very durable.
Saddle Stitching
This is essentially the same as harness stitching. The awl is used to create those angled pilot holes that give the saddle stitch its signature look and strength.
Other Stitching Styles
Even for simpler stitches, the awl provides a reliable way to guide your sewing needle. It ensures that the needle enters and exits the leather at predictable points, leading to neater stitches.
Troubleshooting Common Awl Issues
Even with practice, you might encounter a few hiccups. Here are some common problems and how to solve them:
Awl Not Piercing Leather
- Reason: Leather is too thick or tough, or the awl isn’t sharp enough.
- Solution:
- Ensure your awl is sharp. You can hone it with a fine-grit sharpening stone.
- Apply more steady, consistent pressure.
- Try a slight rocking or twisting motion as you press down.
- If using a stitching chisel, ensure you are striking it firmly with a mallet.
Inconsistent Hole Spacing
- Reason: Lack of a guide or inconsistent pressure when marking.
- Solution:
- Use a stitching groover or gauge to mark your stitch line and spacing.
- Practice maintaining consistent distance between punches.
- Consider using a stitching chisel for perfectly uniform spacing.
Awl Pushing Leather Instead of Piercing
- Reason: The awl tip might be dull, or you’re not using a cutting or twisting motion.
- Solution:
- Sharpen your awl tip. A dull tip will deform the leather.
- Incorporate a slight twist or rock of the awl as you apply pressure. This helps the awl’s sharp edges cut through the fibers.
Awl Breaking Through the Wrong Spot
- Reason: Poorly marked stitch line or not holding the awl perpendicular to the intended stitch angle.
- Solution:
- Be precise when marking your stitching line.
- Pay attention to the angle of the awl as you punch. For saddle stitching, this angle is critical for the final stitch appearance.
Tips for Effective Leather Repair with an Awl
Repairing leather goods often involves replicating existing stitch lines or creating new ones to reinforce worn areas. The sewing awl is indispensable for this.
Reinforcing Seams
When the stitching on a beloved leather item starts to fray or break, you can often reinforce it using your awl and a strong thread.
- Identify the Stitch Line: Carefully examine the existing stitching.
- Punch New Holes: Use your sewing awl to punch new holes alongside or slightly within the old ones. This can be tricky, as you don’t want to widen the existing holes too much. If the leather is already weakened, you might need to punch new holes a millimeter or two away from the original path.
- Hand Sew: Thread your sewing needle with strong upholstery thread or a waxed linen thread, and carefully hand sew through the new holes.
Patching and Reinforcement
For tears or worn areas, patching might be necessary.
- Prepare the Patch: Cut a leather patch to size.
- Position the Patch: Place the patch over the damaged area.
- Punch Through Both Layers: Use your awl to punch holes through both the original leather and the patch, following a consistent stitch line around the perimeter of the patch.
- Sew: Stitch the patch securely in place. This type of repair is crucial for extending the life of leathercraft items.
Re-stitching Straps and Handles
Straps and handles on bags and luggage often bear significant weight.
- Remove Old Stitching: Carefully unpick the old, broken stitches.
- Prepare for New Holes: If the original holes are too damaged, use your awl to punch new, clean holes at a slightly offset position.
- Secure Attachment: Punch holes through the strap and the main body of the item, then stitch them together firmly. The awl ensures these new holes are ready for a strong thread.
Essential Accessories for Awl Stitching
While the awl is the primary tool, a few accessories make the process smoother and the results better.
Waxed Thread
Leather thread is often waxed to provide strength, durability, and a clean finish. The wax helps the thread slide through the leather more easily and protects it from abrasion.
Sewing Needles
You’ll need strong, blunt-tipped needles designed for leatherwork. These needles have a large eye for threading thick waxed thread and a sharp point to pass through the holes made by the awl. A common type is a harness needle or a glover’s needle.
Stitching Chisels and Pricking Irons
These tools create evenly spaced marks or slits in the leather, which your awl then pierces. They are invaluable for achieving professional-looking, consistent stitch lines.
Mallet
If you opt for stitching chisels, a mallet is necessary to strike them and drive them through the leather.
Awl Wax or Beeswax
This can be used to further wax your thread for smoother stitching and to help seal the stitch holes.
Measuring Tools
A ruler or a stitching gauge is helpful for marking your stitching lines and ensuring consistent spacing between awl punches.
Choosing the Right Awl for Your Needs
The “best” awl can depend on your specific leathercraft projects and preferences.
Material of the Awl Point
- Steel: Most common and durable. Look for hardened steel for longevity.
- Tungsten Carbide: Extremely hard and sharp, but more brittle. Can be more expensive.
Awl Shaft Length and Thickness
- Length: A longer shaft provides more leverage, which can be helpful for thicker leathers.
- Thickness: A thinner shaft creates finer holes, suitable for delicate work. A slightly thicker shaft might be better for heavier leathers or when using thicker threads.
Handle Comfort
An ergonomic handle can make a big difference if you’re doing a lot of hand sewing. Wood, rubber, or molded plastic handles are common.
Safety First: Using Your Awl with Care
- Sharp Point: Always treat your awl with respect. The point is sharp and can cause injury.
- Controlled Pressure: Avoid sudden, jerky movements. Apply steady, controlled pressure.
- Stable Surface: Work on a stable, flat surface.
- Keep Away from Fingers: Ensure your fingers are out of the path of the awl when punching.
- Store Safely: Keep your awl in a protective sheath or a designated tool organizer when not in use.
Frequently Asked Questions (FAQ)
Q1: How do I sharpen a sewing awl?
A1: You can sharpen a sewing awl using a fine-grit sharpening stone or a diamond file. Gently draw the awl’s point across the stone at the original bevel angle, rotating it to maintain the point. It doesn’t need to be razor-sharp like a knife, but a clean, sharp point will pierce leather much more effectively.
Q2: What kind of thread should I use with an awl?
A2: For leather stitching, waxed thread is highly recommended. This includes waxed linen thread, artificial sinew, or specialized synthetic leather threads. The wax provides strength, lubricates the thread, and helps to seal the stitch.
Q3: Can I use a sewing awl on thick upholstery leather?
A3: Yes, but it might require more force or a more robust awl. For very thick leathers, consider an awl with a longer shaft for leverage, or use a stitching chisel and mallet combination for easier hole creation.
Q4: What is the difference between an awl and a stitching chisel?
A4: An awl is a single-pointed tool used to punch individual holes. A stitching chisel (or pricking iron) has multiple teeth that are struck with a mallet to create several evenly spaced holes or slits simultaneously. The awl is often used to finalize the piercing of holes started by a chisel.
Q5: How do I achieve a consistent stitch length when using an awl?
A5: Consistent stitch length comes from consistent spacing between your awl punches. Use a stitching groover or a stitching gauge to mark your stitch line and the distance between holes. Practice your punching technique to ensure each hole is made at the same depth and angle.
Q6: Can an awl be used for any type of leather repair?
A6: An awl is primarily used for creating holes for sewing during leather repair. It’s essential for stitching patches, reinforcing seams, or re-attaching components on leather goods. It’s not used for filling holes or smoothing surfaces, but it’s the first step in most sewing-related repairs.
Q7: What is the purpose of waxing the thread?
A7: Waxing the thread serves several purposes: it strengthens the thread, makes it more resistant to abrasion, lubricates it to pass through the leather more easily, and helps to seal the stitch holes, adding to the overall durability and water resistance of the seam.
By mastering the use of the sewing awl, you unlock a world of possibilities in leathercraft and repair. It’s a tool that connects you directly to the material, allowing for precise work that results in beautiful, lasting creations. Happy stitching!