
Image Source: i.ytimg.com
Step-by-Step: How To Place A Bobbin In A Singer Sewing Machine
So, how do you place a bobbin in a Singer sewing machine? It’s a straightforward process, and with these steps, you’ll be sewing in no time! We’ll guide you through each stage, from preparing your bobbin to ensuring it’s correctly seated for a perfect stitch.
Singer sewing machines are renowned for their durability and ease of use. Whether you’re a seasoned seamster or just beginning your sewing journey, knowing how to properly load your bobbin is fundamental to achieving professional-looking results. A misplaced or incorrectly threaded bobbin can lead to skipped stitches, tangled thread, or even damage to your machine. This comprehensive guide will walk you through the entire process of Singer bobbin placement, ensuring your sewing machine is ready for action. We’ll cover everything from preparing the bobbin itself through the Singer bobbin winding process, to the actual Singer bobbin loading, and finally, how to thread the bobbin Singer correctly.
Preparing Your Bobbin
Before you can place a bobbin in your Singer sewing machine, you need to ensure it’s wound correctly. The Singer bobbin winding process is a key step.
Winding the Bobbin
Winding a bobbin is the first crucial step before you can even think about placing it in the machine. It’s a simple process, but attention to detail ensures a smooth sewing experience.
- Select the Correct Bobbin: Ensure you are using the correct bobbin for your specific Singer sewing machine model. Singer machines often use specific types of bobbins, and using the wrong one can cause sewing problems. Check your machine’s manual if you’re unsure.
- Thread the Bobbin:
- Place the bobbin onto the bobbin winder spindle. You’ll usually find this spindle located near the top of your machine.
- Take the end of your sewing thread from the spool.
- Guide the thread through the small hole at the end of the bobbin.
- Pull a few inches of thread through this hole.
- Secure the thread with a piece of tape or by holding it firmly.
- Engage the Bobbin Winder:
- Most Singer machines have a bobbin winder clutch. You’ll need to disengage the machine’s needle from the sewing process to engage the bobbin winder. This is often done by pushing the bobbin winder spindle to the left or right, or by pulling it outwards.
- Ensure the thread path for the bobbin winder is correctly set up according to your machine’s manual. This usually involves guiding the thread through a tension disc specifically for bobbin winding.
- Begin Winding:
- Hold the end of the thread firmly for the first few rotations to prevent it from unraveling.
- Start the machine at a moderate speed. The bobbin will begin to wind.
- As the bobbin fills, it will usually slow down automatically due to a mechanism that stops the winding when the bobbin is full. Alternatively, you may need to stop the machine manually once the bobbin is full.
- Cut the Thread: Once the bobbin is wound, cut the thread. Remove the wound bobbin from the spindle. Trim any excess thread from the bobbin.
Checking Your Wound Bobbin
A well-wound bobbin is essential for good stitches. Here’s what to look for:
- Even Winding: The thread should be wound evenly across the bobbin, without any loose loops or uneven tension.
- Fullness: The bobbin should be filled sufficiently, but not overfilled to the point where thread is spilling off. Overfilling can cause tangles.
- Thread Tension: The thread should be snug against the bobbin, not too tight (which can distort the bobbin) or too loose.
Loading the Bobbin into the Singer Sewing Machine
Now that your bobbin is wound, it’s time for the actual Singer bobbin placement. The process varies slightly depending on whether your Singer machine has a front-loading bobbin or a top-loading bobbin system.
Singer Machines with Front-Loading Bobbins
Many older and some newer Singer models feature a front-loading bobbin system. This involves a removable bobbin case.
- Locate the Bobbin Area: Open the cover plate that is typically located below the needle plate. This will reveal the shuttle or bobbin case area.
- Remove the Bobbin Case (if applicable): Some Singer machines have a removable bobbin case that holds the bobbin. If yours does, carefully slide it out.
- Place the Bobbin into the Bobbin Case:
- Take your wound bobbin.
- Notice the small slot or hole on the side of the bobbin case.
- Thread the end of the bobbin thread through this slot or hole.
- Pull a few inches of thread through the slot.
- Crucially, check the direction the thread should come off the bobbin. Most Singer machines require the bobbin to be placed so the thread unwinds in a counter-clockwise direction when viewed from the top. Your machine’s manual will specify this. The Singer bobbin holder is designed to accommodate this direction.
- Insert the Bobbin Case (with bobbin) back into the Machine:
- Align the bobbin case with the notch or groove in the shuttle mechanism of the sewing machine.
- Gently slide the bobbin case back into place. You should feel it click or settle into position.
- Ensure the bobbin case is seated correctly. If it’s not properly aligned, the machine won’t stitch correctly.
- Bring Up the Bobbin Thread:
- Hold the upper thread from your spool with one hand.
- Turn the machine’s handwheel towards you (in a single motion) to lower and then raise the needle.
- As the needle rises, it will catch the bobbin thread and pull a loop of it up through the bobbin area.
- Use your fingers or tweezers to pull this loop of bobbin thread up through the needle plate opening.
- Pull both the upper thread and the bobbin thread a few inches towards the back of the machine. This is a critical part of Singer bobbin loading.
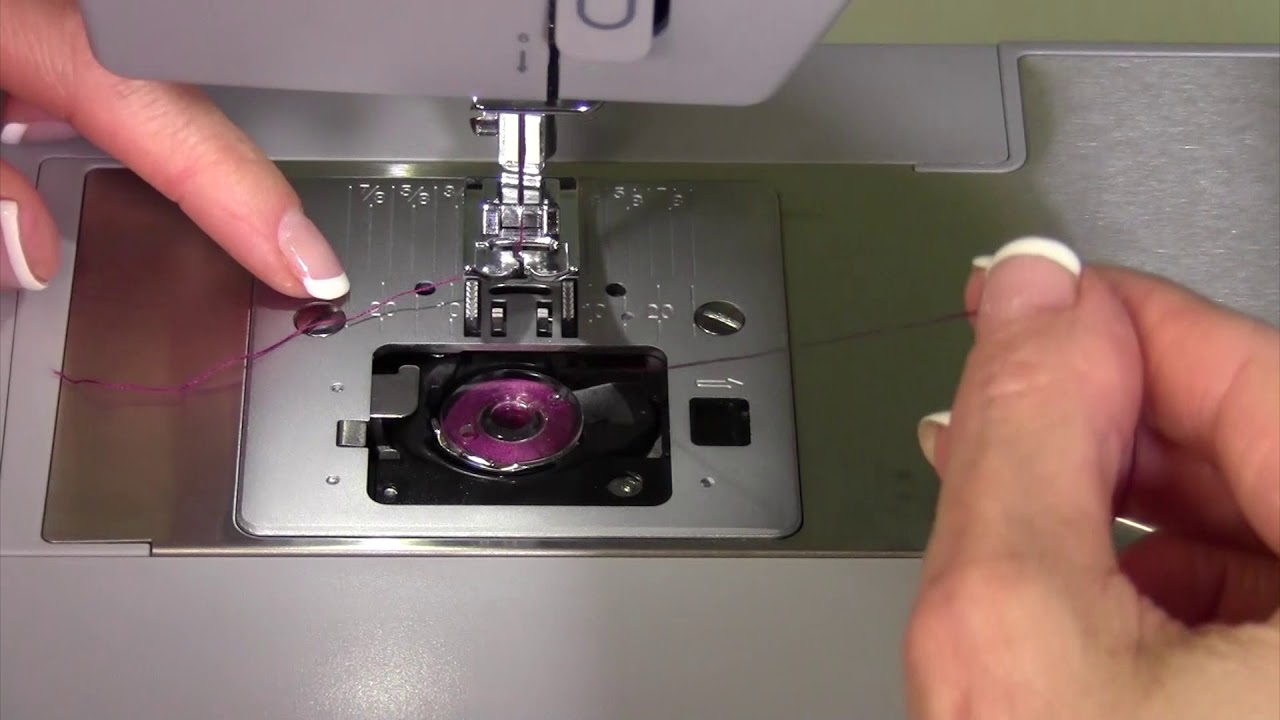
Singer Machines with Top-Loading (Drop-In) Bobbins
Modern Singer sewing machines often feature a convenient top-loading or “drop-in” bobbin system. This eliminates the need for a separate bobbin case.
- Locate the Bobbin Area: Remove the needle plate (the metal plate under the presser foot) or the accessory tray, depending on your machine model. This will expose the bobbin housing, which is usually a clear plastic cover.
- Remove the Bobbin Cover: Lift off the clear plastic bobbin cover.
- Place the Bobbin into the Bobbin Housing:
- Take your wound bobbin.
- Look for the guides or channels in the bobbin housing where the thread needs to be routed.
- Place the bobbin into the housing. Again, pay close attention to the direction of the thread. For most Singer drop-in systems, the bobbin should be placed so the thread unwinds in a clockwise direction when viewed from the top. This is different from front-loading systems. The Singer bobbin holder within the drop-in system dictates this.
- Thread the end of the bobbin thread through the small slot or notch provided in the bobbin housing.
- Pull a few inches of thread through this slot.
- Replace the Bobbin Cover: Place the clear plastic bobbin cover back over the bobbin housing.
- Bring Up the Bobbin Thread:
- Hold the upper thread from your spool with one hand.
- Turn the machine’s handwheel towards you in a single, smooth motion. This lowers the needle into the bobbin area and then brings it back up.
- As the needle rises, it will catch the bobbin thread and pull a loop of it up through the needle plate opening.
- Gently pull this loop of bobbin thread up.
- Pull both the upper thread and the bobbin thread a few inches towards the back of the machine, placing them under the presser foot. This is how you complete the sewing bobbin installation for drop-in systems.
Important Considerations for Singer Bobbin Placement
Correct Singer bobbin placement is more than just putting the bobbin in the right spot. Here are some essential tips for successful sewing bobbin installation.
Thread Direction is Key
The most common error when placing a bobbin in a Singer sewing machine is incorrect thread direction.
- Front-Loading Systems: Bobbin thread usually unwinds counter-clockwise.
- Top-Loading (Drop-In) Systems: Bobbin thread usually unwinds clockwise.
Why does this matter? The bobbin mechanism, whether it’s a case or a housing, is designed to engage with the thread unwinding in a specific direction. If it’s wrong, the tension won’t be set correctly, leading to skipped stitches, loops on the underside of your fabric, or thread breakage.
The Role of the Bobbin Case Tension Screw
For Singer machines with front-loading bobbins, the bobbin case itself often has a small tension screw. This screw adjusts the tension of the bobbin thread.
- Too Loose: If your stitches look loopy on the top of the fabric, the bobbin thread tension might be too loose. You may need to slightly tighten this screw (a small turn clockwise).
- Too Tight: If the thread breaks easily or you’re getting very tight stitches on the underside of the fabric, the bobbin thread tension might be too tight. You may need to slightly loosen this screw (a small turn counter-clockwise).
Always make tiny adjustments and test your stitching. It’s better to adjust gradually. For drop-in systems, the tension is typically adjusted by the machine’s stitch tension dial.
Checking the Singer Sewing Bobbin Correctly
After placing the bobbin and bringing up the thread, give a gentle tug on both threads. They should pull smoothly without any snagging or excessive resistance.
Changing Bobbin Singer Machines: When and How
You’ll need to change the bobbin when the thread runs out.
- When to Change: As you sew, keep an eye on your bobbin thread. Most machines have a small indicator, or you’ll simply notice the thread getting low. It’s best to change it before it runs out completely to avoid interrupting your sewing mid-project.
- Process: Simply follow the steps outlined above for placing a bobbin. If your bobbin is nearly empty, you might need to carefully unthread the remaining bit of thread before placing a new, wound bobbin.
Troubleshooting Common Bobbin Issues
Even with careful placement, you might encounter some problems. Here are solutions to common issues:
Skipped Stitches
- Cause: Incorrect bobbin thread direction, bobbin wound unevenly, bobbin case not seated correctly, lint in the bobbin area, or the wrong needle for the fabric.
- Solution: Double-check thread direction and bobbin placement. Clean the bobbin area. Try re-winding the bobbin. Ensure the needle is correctly inserted and not bent.
Thread Bunching or Nesting Under the Fabric
- Cause: Upper thread tension is too loose, bobbin thread tension is too tight, or the bobbin thread wasn’t pulled up correctly before starting to sew.
- Solution: Adjust upper thread tension (usually by turning the dial towards a higher number). If using a front-loading system, slightly loosen the bobbin case tension. Ensure you’ve correctly brought up the bobbin thread.
Thread Breaking
- Cause: Bobbin thread tension is too tight, the bobbin isn’t wound smoothly, there’s a burr on the needle plate or bobbin case, or the needle is damaged.
- Solution: Check bobbin tension. Re-wind the bobbin. Inspect the needle plate and bobbin area for any rough spots and smooth them if necessary. Ensure you’re using the correct needle and that it’s not bent or dull.
Keeping Your Singer Bobbin Holder Clean
Regular maintenance is key to smooth sewing. The bobbin area, including the Singer bobbin holder (whether it’s part of a case or the drop-in housing), can accumulate lint and thread debris.
- Cleaning Frequency: After every few sewing projects or whenever you notice a buildup of lint.
- How to Clean:
- Turn off your sewing machine.
- Remove the needle plate and bobbin.
- Use a small brush (often provided with your machine) to sweep away lint and thread fragments from the bobbin area.
- A pair of tweezers can be helpful for removing stubborn threads.
- You can also use a can of compressed air to blow out any hidden dust.
- Avoid using too much oil in the bobbin area, as it can attract lint.
FAQ: Frequently Asked Questions About Singer Bobbin Placement
Q1: What if my Singer bobbin doesn’t seem to fit?
A1: Ensure you are using the correct bobbin for your specific Singer sewing machine model. Different models use different sizes and types of bobbins. Check your machine’s manual.
Q2: Can I sew with a partially wound bobbin?
A2: While you can start sewing with a partially wound bobbin, it’s generally not recommended. Uneven winding can lead to inconsistent tension and skipped stitches. It’s best to wind a full bobbin for optimal results.
Q3: How do I know if I’m using the correct thread tension for my Singer bobbin?
A3: When sewing, a good stitch will have the upper and lower threads meeting evenly in the middle of the fabric layers. If you see loops on the top, the bobbin tension might be too loose or upper tension too tight. If you see loops on the bottom, the upper tension might be too loose or bobbin tension too tight.
Q4: My Singer sewing machine is making a strange noise when I sew after placing the bobbin. What could be wrong?
A4: A strange noise often indicates that the bobbin or bobbin case is not seated correctly, or there might be an obstruction in the bobbin area. Ensure the bobbin is properly placed and that the area is free of lint and thread.
Q5: How do I wind a bobbin for different types of thread on my Singer machine?
A5: The Singer bobbin winding process is generally the same regardless of thread type, but you might need to adjust the bobbin winder tension slightly for very thick or very fine threads. Always use the appropriate needle for your thread type as well.
By following these detailed steps and tips, you’ll master the art of placing a bobbin in your Singer sewing machine, ensuring smooth, professional stitches every time. Happy sewing!