
Can I use a Brother sewing machine if I’ve never sewn before? Yes, you absolutely can! Brother sewing machines are fantastic for beginners. They are designed with user-friendliness in mind, offering intuitive controls and helpful features that make learning to sew a joy. This guide will walk you through everything you need to know to get started on your sewing journey with a Brother machine.
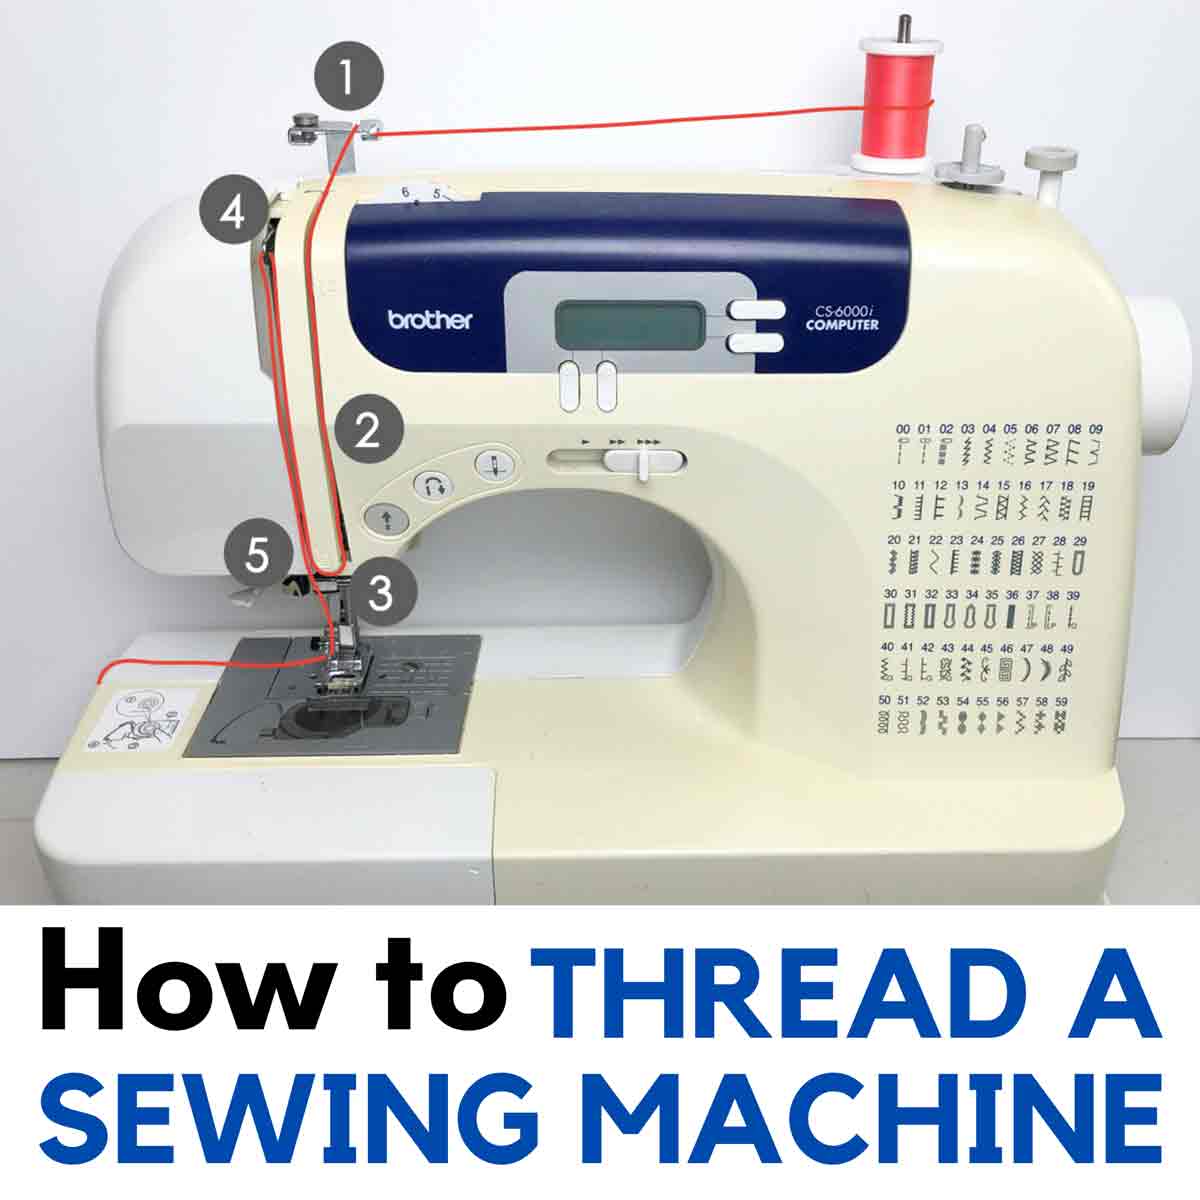
Image Source: mindymakes.com
Getting Started: Brother Sewing Machine Basics
Embarking on your sewing adventure with a Brother sewing machine is exciting! These machines are known for their reliability and ease of use, making them perfect for anyone just starting out. We’ll cover the Brother sewing machine basics, from identifying the key parts to setting up your machine for its first project.
Essential Brother Sewing Machine Parts
Before you start sewing, it’s important to recognize the main components of your Brother sewing machine. Knowing these parts will help you navigate your machine and its functions with confidence.
- Needle: This is where the magic happens! The needle pierces the fabric, carrying the upper thread through to create stitches.
- Presser Foot: This piece holds the fabric down against the feed dogs. Different presser feet are available for specific tasks.
- Feed Dogs: These are the small, toothed metal pieces under the presser foot. They move the fabric forward as you sew.
- Bobbin: This small spool holds the lower thread. It works with the needle to form stitches.
- Bobbin Case/Winder: This holds the bobbin and allows you to wind new thread onto it.
- Handwheel: Located on the side, this lets you manually move the needle up and down. Always turn it towards you.
- Stitch Selector Dial: This lets you choose the type of stitch you want to use.
- Tension Dial: This controls how tight or loose your stitches are.
- Reverse Lever/Button: This allows you to sew backward, which is useful for locking stitches at the beginning and end of seams.
- Power Switch: Turns the machine on and off.
- Foot Pedal: Controls the speed of the sewing machine.
Brother Sewing Machine Setup
Proper Brother sewing machine setup is crucial for a smooth sewing experience. Follow these steps to get your machine ready:
-
Unpacking and Placement:
- Carefully remove your Brother sewing machine from its packaging.
- Place it on a stable, flat surface, like a sewing table or a sturdy desk. Ensure there’s enough space around it for fabric.
- Remove any protective coverings or tape.
-
Connecting Power:
- Locate the power cord and the foot pedal.
- Plug the power cord into the designated port on the back or side of the machine.
- Plug the other end into a wall outlet.
- Connect the foot pedal to its port on the machine.
-
Turning On the Machine:
- Find the power switch, usually located on the side or back of the machine.
- Flip it to the “ON” position.
- The machine’s lights should come on, and you might hear a faint hum.
-
Getting Familiar with Controls:
- Take a moment to identify the main dials and buttons mentioned in the “Essential Parts” section.
- Consult your Brother sewing machine manual for specific details on your model.
Threading a Brother Sewing Machine: A Step-by-Step Guide
Threading a Brother sewing machine might seem daunting at first, but it’s a straightforward process once you know the steps. Always ensure the presser foot is up and the needle is in its highest position before you begin.
Winding the Bobbin
- Prepare the Bobbin: Place a bobbin onto the bobbin winder spindle. Make sure the thread is coming from the spool in the correct direction.
- Thread the Bobbin Winder: Guide the thread through the bobbin winder thread guide, then through the hole in the bobbin from the inside out.
- Engage the Winder: Push the bobbin winder spindle to the right. Some machines have a small switch to disengage the needle.
- Start Winding: Gently press the foot pedal. Hold the thread tail until a few wraps are secured, then trim the excess.
- Stop Winding: Wind until the bobbin is full. Most Brother machines have an auto-stop feature. Push the spindle back to release the bobbin.
- Cut the Thread: Cut the thread from the spool.
Threading the Machine
- Thread the Spool Pin: Place your spool of thread on the spool pin. Secure it with a spool cap.
- Follow the Thread Guides: Look for the numbered thread guides on your machine. Your Brother sewing machine manual will show the exact path. Generally, you’ll:
- Guide the thread down the first set of guides.
- Loop up and around the tension discs (this is crucial for proper stitching).
- Go back down through the take-up lever.
- Continue down through more guides.
- Thread the Needle: Guide the thread through the eye of the needle. Many Brother machines have a built-in needle threader. If not, you’ll do it manually, often from front to back.
- Bring Up the Bobbin Thread:
- Hold the upper thread tail loosely.
- Turn the handwheel towards you to lower the needle, catching the bobbin thread.
- As the needle comes back up, the loop of the bobbin thread will appear.
- Use your fingers or a seam ripper to catch this loop and pull it through. You should now have both the upper and bobbin threads coming up from beneath the needle plate.
- Position Threads: Pull both thread tails back and place them under the presser foot, to the left of the needle.
Mastering Your First Stitches: Brother Sewing Machine Stitches
Your Brother sewing machine likely comes with a variety of stitches, but for beginner Brother sewing, focusing on a few key ones is best.
Understanding Basic Stitches
- Straight Stitch: This is your workhorse stitch for most seams. It’s essential for garment construction and general sewing.
- Settings: Typically selected with a stitch selector dial. Ensure it’s set to a straight stitch with a medium length (around 2.0-2.5mm).
- Zigzag Stitch: This stitch is versatile. It can be used for finishing raw edges to prevent fraying, sewing stretch fabrics, and decorative purposes.
- Settings: You can often adjust the width and length of the zigzag. A medium width and short length are good for edge finishing.
Selecting and Adjusting Stitches
- Choosing a Stitch: Turn the stitch selector dial to your desired stitch.
- Adjusting Stitch Length: Use the stitch length dial or buttons to change the stitch density.
- Adjusting Stitch Width: For zigzag stitches, use the stitch width dial or buttons.
Practicing Stitches
Before working on a project, it’s a great idea to practice your stitches.
- Materials: Use scrap pieces of fabric, preferably the type you’ll be using for your project.
- Technique:
- Place the fabric under the presser foot.
- Lower the presser foot.
- Ensure you have about 4-6 inches of thread tails at the back.
- Hold the foot pedal gently to start sewing.
- Guide the fabric with your hands; don’t push or pull it. Let the feed dogs do the work.
- Practice sewing straight lines, corners, and curves.
- Use the reverse lever at the beginning and end of seams to secure your stitches.
Basic Sewing Techniques on a Brother Machine
Once you’re comfortable threading and stitching, you can explore fundamental basic sewing techniques Brother machines excel at.
Sewing a Straight Seam
- Prepare Fabric: Ensure your fabric pieces are aligned correctly, right sides together or wrong sides together, depending on your project.
- Position Fabric: Place the fabric under the presser foot, aligning the edge with the desired seam allowance guide on the needle plate.
- Start Sewing: Lower the presser foot. Sew a few stitches forward, then use the reverse lever to sew a few stitches backward to reinforce the seam. Release the reverse lever and continue sewing forward.
- Maintain Seam Allowance: Use the seam allowance guides on the needle plate to keep your stitch line consistent.
- End Sewing: When you reach the end of the seam, sew a few stitches forward, then reverse a few stitches to lock the seam.
- Lift Presser Foot: Raise the presser foot and pull the fabric away.
- Cut Threads: Use the thread cutters on your machine or scissors to trim the excess threads.
Finishing Raw Edges
Raw edges can unravel over time. Finishing them not only makes your project look neater but also adds durability.
- Using the Zigzag Stitch:
- Select the zigzag stitch.
- Place the fabric edge so that the left swing of the zigzag stitch falls just off the edge of the fabric, and the right swing stitches onto the fabric.
- Sew along the raw edge.
- Using a Serger (if applicable): If your Brother machine is a serger or you have one, it can trim and finish edges in one go.
Turning Corners
- Sew to the Corner: Sew up to the corner point.
- Stop with Needle Down: Stop sewing with the needle in the fabric, exactly at the corner point.
- Lift Presser Foot: Raise the presser foot.
- Pivot Fabric: Carefully pivot the fabric around the needle so that your next sewing line is at the desired angle.
- Lower Presser Foot: Lower the presser foot again.
- Continue Sewing: Continue sewing along the new direction.
Using Different Presser Feet
Brother machines often come with multiple presser feet for various tasks. Your Brother sewing machine manual will detail which foot to use for what. Common ones include:
- All-Purpose Foot: For general sewing.
- Zipper Foot: Helps you sew close to zippers.
- Buttonhole Foot: Essential for creating buttonholes.
- Button Sewing Foot: Aids in attaching buttons.
To change a presser foot:
- Raise Presser Foot: Lift the presser foot to its highest position.
- Remove Old Foot: There’s usually a presser foot holder that attaches to the needle bar. Loosen a screw or press a release lever to detach the old foot.
- Attach New Foot: Position the new foot and secure it to the presser foot holder.
- Lower Presser Foot: Lower the presser foot to its lowest position.
Maintaining Your Brother Sewing Machine
Regular Brother sewing machine maintenance will keep your machine running smoothly for years to come.
Cleaning Your Machine
Dust and lint can accumulate inside your machine, affecting its performance.
- Unplug the Machine: Always ensure the machine is unplugged before cleaning.
- Remove Needle and Bobbin: Take out the needle and the bobbin.
- Clean the Bobbin Area:
- Open the bobbin cover.
- Remove the bobbin case.
- Use a small brush (often provided with your machine) or a lint brush to sweep away lint and dust from the bobbin housing and the feed dogs.
- Clean the Needle Plate Area: Remove the needle plate (refer to your manual if unsure how) and clean any lint or thread buildup underneath.
- Wipe Down Exterior: Use a soft, dry cloth to wipe down the exterior of the machine. You can use a slightly damp cloth for stubborn spots, but ensure no water gets into the internal mechanisms.
Oiling Your Machine
Some Brother machines require occasional oiling, while others are self-lubricating. Check your Brother sewing machine manual to see if your model needs oil and where to apply it.
- Use Only Machine Oil: Never use WD-40 or other household lubricants.
- Apply Sparingly: A small drop in designated spots is usually sufficient.
- Wipe Excess: Wipe away any excess oil.
Replacing the Needle
Needles can become dull or bent, leading to skipped stitches or fabric damage.
- When to Replace: Replace your needle after every 8-10 hours of sewing, or immediately if it bends, dulls, or causes stitching problems.
- How to Replace:
- Unplug the machine.
- Raise the needle to its highest position using the handwheel.
- Loosen the needle clamp screw.
- Remove the old needle.
- Insert the new needle, ensuring the flat side of the shank faces the back of the machine.
- Push the needle up as far as it will go into the needle clamp.
- Tighten the needle clamp screw securely.
- Plug the machine back in and re-thread it.
General Care Tips
- Store Properly: Keep your machine covered when not in use to protect it from dust.
- Avoid Force: Never force the fabric or the handwheel. If you encounter resistance, stop and check for thread jams or fabric issues.
- Professional Servicing: Consider having your machine professionally serviced every 1-2 years, especially if you use it frequently.
Troubleshooting Common Issues
Even with the best care, you might encounter minor issues. Here’s a guide to Brother sewing machine troubleshooting.
Skipped Stitches
- Problem: The needle is missing some stitches, leaving gaps in the seam.
- Possible Causes:
- Incorrectly threaded machine (especially the bobbin).
- Bent or dull needle.
- Wrong type of needle for the fabric.
- Needle inserted incorrectly.
- Thread tension too loose.
- Solutions:
- Re-thread the entire machine, ensuring proper threading of both upper and bobbin threads.
- Replace the needle with a new, sharp one, ensuring it’s the correct type for your fabric.
- Check that the needle is inserted correctly with the flat side facing the back.
- Adjust the thread tension dial (try increasing it slightly).
Thread Breaking
- Problem: The upper or bobbin thread snaps during sewing.
- Possible Causes:
- Incorrect threading.
- Needle is too small for the thread.
- Thread is old or poor quality.
- Burr on the needle plate or hook.
- Presser foot pressure is too high.
- Thread is tangled or caught.
- Solutions:
- Re-thread the machine, ensuring smooth thread path.
- Use a larger needle if using thicker thread.
- Try a different brand or spool of thread.
- Check for rough spots on metal parts and smooth them with a needle file if necessary (carefully!).
- Consult your manual about adjusting presser foot pressure.
- Ensure threads are not tangled and that the bobbin is wound correctly.
Fabric Puckering
- Problem: The fabric bunches up or puckers around the stitches.
- Possible Causes:
- Thread tension is too tight.
- Needle is too large for the fabric.
- Stitch length is too short.
- Pulling or pushing the fabric while sewing.
- Solutions:
- Loosen the upper thread tension.
- Use a smaller needle.
- Increase the stitch length.
- Let the machine feed the fabric without assistance.
Bird’s Nest (Thread Nesting Underneath)
- Problem: A tangled mess of thread forms underneath the fabric.
- Possible Causes:
- Improper threading of the upper thread (most common).
- Bobbin not seated correctly.
- Needle eye too large for the thread.
- Solutions:
- Crucially, re-thread the entire machine. Make sure the presser foot is UP when threading the upper thread, and the thread is properly seated in the tension discs and take-up lever.
- Ensure the bobbin is correctly inserted and wound.
- Check that the needle eye is appropriate for your thread.
Exploring Your Brother Sewing Machine Manual
Your Brother sewing machine manual is your best friend. It’s a treasure trove of information specific to your model.
- Detailed Diagrams: Most manuals include clear diagrams of every part and step.
- Specific Instructions: It will detail how to thread, wind bobbins, select stitches, and use all accessories for your specific machine.
- Troubleshooting Section: A dedicated section in the manual often provides solutions for common problems.
- Maintenance Schedule: It will recommend cleaning and oiling frequencies.
Pro Tip: Keep your manual in a safe, accessible place. If you’ve misplaced yours, you can usually find a PDF version on the official Brother website by searching for your machine’s model number.
Frequently Asked Questions (FAQ)
Here are some common questions beginner Brother sewing machine users often ask:
Q1: What is the best Brother sewing machine for a complete beginner?
A1: Brother offers several excellent beginner models. The CS100, LS17, and ST371HD are often recommended for their user-friendly features, built-in stitches, and affordability. Always check reviews for the specific model you’re considering.
Q2: Can I sew denim on a Brother sewing machine?
A2: Yes, many Brother sewing machines can handle denim, especially those with “Heavy Duty” in their name or model number (like the ST371HD). You’ll need to use a strong, sharp needle (like a denim needle, size 90/14 or 100/16) and potentially a longer stitch length. Always test on a scrap piece of denim first.
Q3: How often should I clean my Brother sewing machine?
A3: It’s best to clean the bobbin area and feed dogs after every project or at least once a month if you sew regularly. A more thorough cleaning and oiling (if needed) might be required every 6-12 months, depending on usage.
Q4: Why is my thread bunching up underneath?
A4: This is most often caused by incorrect upper threading. Ensure the presser foot is UP when threading the upper thread so the thread is properly seated in the tension discs. Re-thread the entire machine carefully.
Q5: Where can I find a replacement Brother sewing machine manual for my model?
A5: You can usually download a PDF version of your Brother sewing machine manual from the official Brother USA website or your local Brother support site by entering your machine’s model number.
Embarking on your sewing journey with a Brother sewing machine is a rewarding experience. By familiarizing yourself with the Brother sewing machine basics, proper threading a Brother sewing machine techniques, and essential basic sewing techniques Brother machines offer, you’ll be creating wonderful projects in no time. Happy sewing!