
Can you embroider without a hoop? Yes, you can, but an embroidery hoop makes the process much easier and helps create neater stitches. This guide is designed for the absolute embroidery beginner, walking you through everything you need to know to start your stitching journey. We’ll cover the essential embroidery supplies, basic embroidery techniques, and how to get started with your first embroidery patterns.
Embroidery is a beautiful craft that transforms simple fabric into works of art using needle and thread. It’s a relaxing hobby that can be as simple or as complex as you make it. Whether you want to personalize clothing, create decorative wall hangings, or embellish home decor, embroidery offers endless creative possibilities.
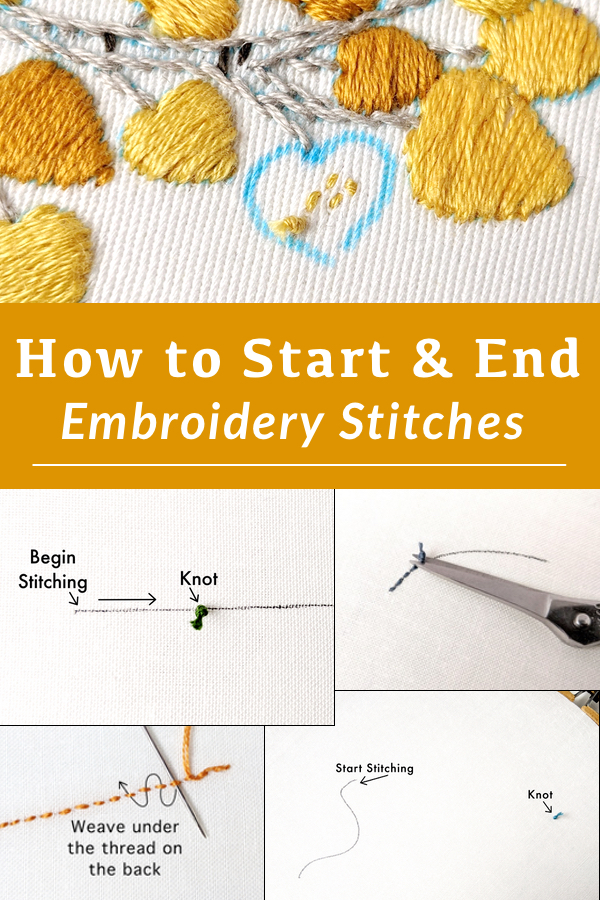
Image Source: www.wanderingthreadsembroidery.com
Gathering Your Embroidery Supplies
To begin your embroidery adventure, you’ll need a few key embroidery supplies. Think of these as your artist’s palette and tools. Having the right materials will make your learning process smoother and more enjoyable.
Essential Embroidery Needs
- Embroidery Hoop: This is crucial for keeping your fabric taut while you stitch. Without it, your stitches can become loose and uneven. Hoops come in various sizes, usually made of wood or plastic. Wooden hoops offer a classic feel, while plastic ones are often more affordable and durable.
- Embroidery Needles: These are not your average sewing needles. Embroidery needles have a larger eye to easily thread thicker embroidery thread and a blunt tip to glide through fabric without snagging or piercing. Different needle sizes are suitable for different types of fabric and thread. For beginners, a medium-sized needle with a sharp point is a good starting point.
- Embroidery Thread (Floss): The most common type of embroidery thread is called embroidery floss. It’s usually made of cotton and comes in many colors. Embroidery floss is typically made up of six strands that can be separated. For most beginner projects, you’ll use one to three strands.
- Embroidery Fabric: While you can embroider on many types of fabric, some are better for beginners. Embroidery fabric should be tightly woven and sturdy enough to hold stitches without pulling. Cotton, linen, and even some synthetic blends work well. Aida cloth is popular for cross-stitch but can also be used for other embroidery. For general embroidery, cotton linen blends are excellent.
- Embroidery Patterns: You can find countless embroidery patterns online, in craft stores, or in books. These patterns guide you on where to stitch and what colors to use. Many beginner patterns are simple outlines or small motifs.
- Scissors: A small, sharp pair of scissors is essential for cutting thread. Fabric scissors are best, but small embroidery scissors are ideal for precision.
- Transfer Paper/Pen: To get your pattern onto the fabric, you’ll need a way to transfer it. Water-soluble pens or heat-erasable pens are excellent choices. You can also use carbon transfer paper.
Choosing Your First Embroidery Hoop
The embroidery hoop is your foundational tool. It holds the fabric taut, allowing you to make clean, even stitches.
Types of Hoops:
| Hoop Type | Material | Pros | Cons | Best For |
|---|---|---|---|---|
| Wooden | Wood | Classic look, good grip, durable | Can warp if wet, sometimes splits | All types of embroidery, traditionalists |
| Plastic | Plastic | Lightweight, smooth, inexpensive | Can be slippery, may crack over time | Beginners, practice projects, travel |
| Q-Snap | Plastic | Easy to adjust, no screws, snaps on | Can leave marks if too tight | Beginners who find screwing difficult |
| Magnetic | Plastic/Metal | No screws, easy to use, holds fabric well | Can be expensive, fabric may slip | Those with hand pain or arthritis |
For your first project, a simple wooden or plastic hoop in a 6-8 inch diameter is perfect.
Selecting the Right Embroidery Thread
Embroidery floss is the heart of your embroidery. It comes in a vast spectrum of colors and is made of multiple strands.
Embroidery Floss Basics:
- Material: Most embroidery floss is 100% cotton.
- Strands: A standard skein of embroidery floss has six strands.
- Usage: You can use all six strands for bold stitches, or separate them for finer details. For most beginner embroidery stitches, using 2-3 strands is ideal.
- Brands: DMC and Anchor are two of the most popular and widely available brands.
How to Separate Embroidery Floss:
- Pull out the desired number of strands from the skein.
- Hold the chosen strands firmly at one end.
- Gently twist the strands you are not pulling and slowly pull the desired number of strands out from the main group. Be patient, as twisting the floss can make it easier to pull out neatly.
Picking Your First Embroidery Fabric
The embroidery fabric you choose affects how your stitches look and feel.
Beginner-Friendly Fabrics:
- Cotton: Breathable, easy to work with, and widely available.
- Linen Blends: Offer a lovely drape and texture, often with a slightly looser weave that’s easy to stitch through.
- Monk’s Cloth: A very loose weave, good for larger embroidery projects or punch needle.
- Aida Cloth: Primarily used for cross-stitch, but its even weave can work for simple embroidery.
For starting out, a tightly woven cotton or a cotton-linen blend in a light color is recommended. This allows you to see your stitches clearly and transfer patterns easily.
Basic Embroidery Techniques for Beginners
Now that you have your embroidery supplies, let’s dive into some fundamental embroidery techniques. Mastering these will give you a solid foundation for any project.
Preparing Your Fabric and Hoop
- Pre-wash (Optional but Recommended): Wash and dry your fabric to prevent shrinkage after you’ve finished your embroidery. This also removes any sizing or chemicals from the fabric.
- Iron Your Fabric: Press your fabric to remove wrinkles. This will make it easier to transfer your pattern and create neat stitches.
- Place Fabric in Hoop:
- Loosen the screw on your embroidery hoop.
- Separate the two rings. Place the inner ring on a flat surface.
- Lay your fabric over the inner ring, centering your design area.
- Place the outer ring over the inner ring and fabric.
- Press down on the outer ring until it snaps into place.
- Gently pull the edges of the fabric to tighten it. It should be taut like a drum.
- Tighten the screw on the hoop.
- Trim any excess fabric if it gets in your way, leaving about an inch around the hoop.
Transferring Your Embroidery Patterns
There are several ways to get your chosen embroidery patterns onto your fabric:
- Water-Soluble Pen/Marker: Draw your pattern directly onto the fabric. This ink washes away with water.
- Heat-Erasable Pen: Similar to water-soluble pens, but the lines disappear with heat (like from an iron).
- Carbon Transfer Paper: Place the transfer paper carbon-side down onto your fabric, then place your printed pattern on top. Trace the pattern with a ballpoint pen or stylus. This transfers the design in a graphite line.
- Lightbox Method: Place your printed pattern on a lightbox or a bright window. Lay your fabric over it and trace the design with a water-soluble or heat-erasable pen.
Threading Your Embroidery Needle
- Separate Floss: Decide how many strands of embroidery floss you want to use (2-3 is good for beginners).
- Cut Thread: Cut a manageable length of floss (about 18-24 inches). Longer threads can tangle and knot easily.
- Thread the Needle: Fold the strands in half and pass the loop through the eye of your embroidery needle. This creates a double thread with a loop at the end.
- Secure the Thread: You can either use a knot at the end of your thread (see below) or simply leave a tail and start stitching. For beginners, leaving a tail and holding it as you start is often easier.
Starting and Ending Your Thread
- Starting with a Knot:
- After threading your needle and leaving a short tail (about 2-3 inches), make a loop with the tail.
- Bring your needle through the loop multiple times to create a knot.
- Pass your needle through the back of the fabric where you want to start, close to where the knot is, and pull gently until the knot catches.
- Starting Without a Knot (Waste Knot Method):
- Thread your needle, leaving a longer tail (about 4-5 inches).
- On the front of your fabric, about an inch away from where you want to start stitching, make a large knot (like a surgeon’s knot, looping the thread several times). This is your “waste knot.”
- Bring your needle up through the fabric where you want to start your first stitch.
- As you stitch, work over the tail of the thread on the back.
- Once you’ve stitched over the tail, go back to the waste knot, untie it, and trim the tail close to the fabric.
- Ending Your Thread:
- When you run out of thread or finish a section, bring your needle to the back of the fabric.
- Pass your needle under a few existing stitches on the back of the fabric to secure the thread.
- Trim the excess thread close to the fabric.
Common Embroidery Stitches for Beginners
The world of embroidery stitches is vast, but learning a few basic ones will get you far. These stitches form the building blocks of most embroidery designs.
The Backstitch
The backstitch is a versatile stitch that creates a solid line, similar to machine sewing. It’s great for outlines and lettering.
- Bring your needle up at point A.
- Insert your needle down at point B.
- Bring your needle up again at point C, which is the same space where you brought your needle up at point A.
- Insert your needle down at point D (where you made your first stitch).
- Continue this process, bringing your needle up at the end of the last stitch and down at the beginning of the stitch before it.
The Satin Stitch
The satin stitch creates a smooth, solid fill for shapes. It’s made of parallel stitches that lie close together.
- Bring your needle up at one edge of the area you want to fill.
- Insert your needle down at the opposite edge, as close as possible to where you came up.
- Bring your needle up again right next to the first stitch, on the same side.
- Insert your needle down right next to the previous stitch on the opposite side.
- Continue filling the area with parallel stitches, ensuring they are evenly spaced and cover the fabric completely.
The Running Stitch
The running stitch is the simplest stitch. It creates a dashed line and is often used for simple outlines or gathering fabric.
- Bring your needle up at point A.
- Insert your needle down at point B.
- Bring your needle up again at point C, leaving a small gap between B and C.
- Continue making stitches and gaps, creating a dashed line.
The French Knot
The French knot is a small, textured knot used for details like eyes, berries, or accents.
- Bring your needle up at point A.
- Wrap the working thread around the needle two times (for a standard French knot). Hold the tail of the thread taut with your non-dominant hand.
- Bring your needle down very close to where you came up at point A, but not exactly the same hole.
- Pull the needle through, keeping tension on the thread. The wraps will tighten around the needle and form a knot against the fabric.
The Chain Stitch
The chain stitch creates a series of looped stitches that resemble a chain. It’s good for outlines and filling larger areas.
- Bring your needle up at point A.
- Insert your needle back down at point A, but only bring it up again a short distance away at point B, keeping the loop of thread you just made around your needle.
- Pull the needle through. You will have a loop with a stitch securing it.
- Bring your needle up at point C (where you came up at point B).
- Insert your needle back down at point B, keeping the loop of thread around your needle.
- Bring your needle up at point D, and continue the process.
Getting Started with Your First Embroidery Project
As an embroidery beginner, it’s best to start with a simple project. This will help you build confidence and practice your embroidery techniques.
Choosing a Simple Embroidery Pattern
Look for embroidery patterns that feature:
- Minimal Stitches: Patterns that use only a few basic stitches (like backstitch and satin stitch) are ideal.
- Small Size: A small design will be less intimidating and quicker to complete.
- Clear Outlines: Patterns with bold, clear lines are easier to trace and follow.
- Few Colors: Limiting the number of thread colors will simplify the process.
Many online resources offer free beginner embroidery patterns. Search for “beginner embroidery patterns free” to find a wealth of options.
Your First Project Ideas
- A Simple Flower: Use backstitch for the stem and petals, and French knots for the center.
- A Monogram: Practice your backstitch by creating your initial.
- A Small Fruit or Vegetable: Fill shapes with satin stitch.
- A Geometric Design: Simple shapes like stars or hearts can be filled with satin stitch or outlined with backstitch.
A Step-by-Step Example: A Simple Star
Let’s walk through creating a simple star using backstitch.
- Prepare: Get your hoop, fabric, a simple star pattern, transfer method, embroidery needle, and yellow or gold embroidery floss.
- Transfer: Transfer the star pattern onto your fabric using your preferred method.
- Thread Needle: Thread your needle with 2 strands of embroidery floss.
- Start Stitching: Bring your needle up at one point of the star on the back of the fabric.
- Backstitch: Bring the needle up at the point where the first stitch should end, and then insert it down at the starting point. Continue this motion, creating a solid line for each arm of the star. Ensure your stitches are relatively even in length.
- Complete: Once all arms of the star are stitched, secure your thread on the back and trim.
Tips for Embroidery Success
- Good Lighting: Stitch in a well-lit area to see your fabric and threads clearly.
- Comfortable Posture: Sit comfortably to avoid strain.
- Practice Patience: Embroidery takes time. Don’t rush. Enjoy the process.
- Keep Your Fabric Taut: Re-tighten your hoop if the fabric loosens.
- Don’t Pull Too Tightly: This can distort the fabric and stitches.
- Inspect Your Work: Periodically check the front and back of your embroidery.
- Learn New Stitches: As you gain confidence, explore more embroidery stitches!
Frequently Asked Questions (FAQ)
Q1: What is the best embroidery floss for beginners?
A1: For beginners, 100% cotton embroidery floss from brands like DMC or Anchor is excellent. It’s easy to work with, readily available, and comes in a huge color range. Using 2-3 strands is generally recommended for most beginner stitches.
Q2: Can I use regular sewing thread for embroidery?
A2: While you can use sewing thread for very fine embroidery or specific effects, embroidery floss is designed for this craft. It’s thicker, comes in more colors, and is easier to handle for most embroidery techniques. Regular sewing thread might break more easily and won’t provide the same coverage or texture.
Q3: How many strands of embroidery floss should I use?
A3: This depends on the desired effect and the stitch. For most common embroidery stitches like backstitch and satin stitch, using 2-3 strands of embroidery floss is ideal for a good balance of coverage and detail. For finer work or outlining, you might use 1 strand. For bolder stitches or filling larger areas quickly, you might use 4-6 strands.
Q4: What is the difference between embroidery and cross-stitch?
A4: Both are needlecrafts that use thread to create designs on fabric, but they differ in technique and outcome. Cross-stitch uses only one type of stitch, the cross stitch, forming an X shape. It’s typically done on Aida cloth with an even weave, creating a pixelated effect. Embroidery uses a wide variety of embroidery stitches, allowing for more detailed and fluid designs on various fabrics.
Q5: How do I prevent my embroidery thread from tangling?
A5: Several tips can help:
* Cut shorter lengths of floss (18-24 inches).
* Separate your strands gently and re-twist them slightly as you work.
* Don’t overfill your needle.
* When you take a break, let your needle hang freely from the fabric to prevent tangles.
* Use a thread conditioner if you find your floss is particularly prone to tangling.
Q6: Where can I find embroidery patterns?
A6: You can find embroidery patterns in many places:
* Online: Websites like Etsy, Pinterest, and specialized embroidery blogs offer thousands of free and paid patterns.
* Craft Stores: Needlework and craft stores sell embroidery pattern kits and individual patterns.
* Books and Magazines: Many publications are dedicated to embroidery and feature patterns.
* Social Media: Instagram and Facebook embroidery communities often share patterns or links to them.
Embarking on your embroidery beginner journey is an exciting step. With your embroidery supplies gathered and a few basic embroidery stitches in hand, you’re ready to create something beautiful. Remember to be patient with yourself, enjoy the process, and don’t be afraid to experiment. Happy stitching!