
How do I thread a Brother sewing machine? Threading a Brother sewing machine is a fundamental skill that every sewer needs to master. It’s a straightforward process once you know the steps. This guide will walk you through the entire threading process, from the upper thread to the bobbin, ensuring you can get sewing with confidence.
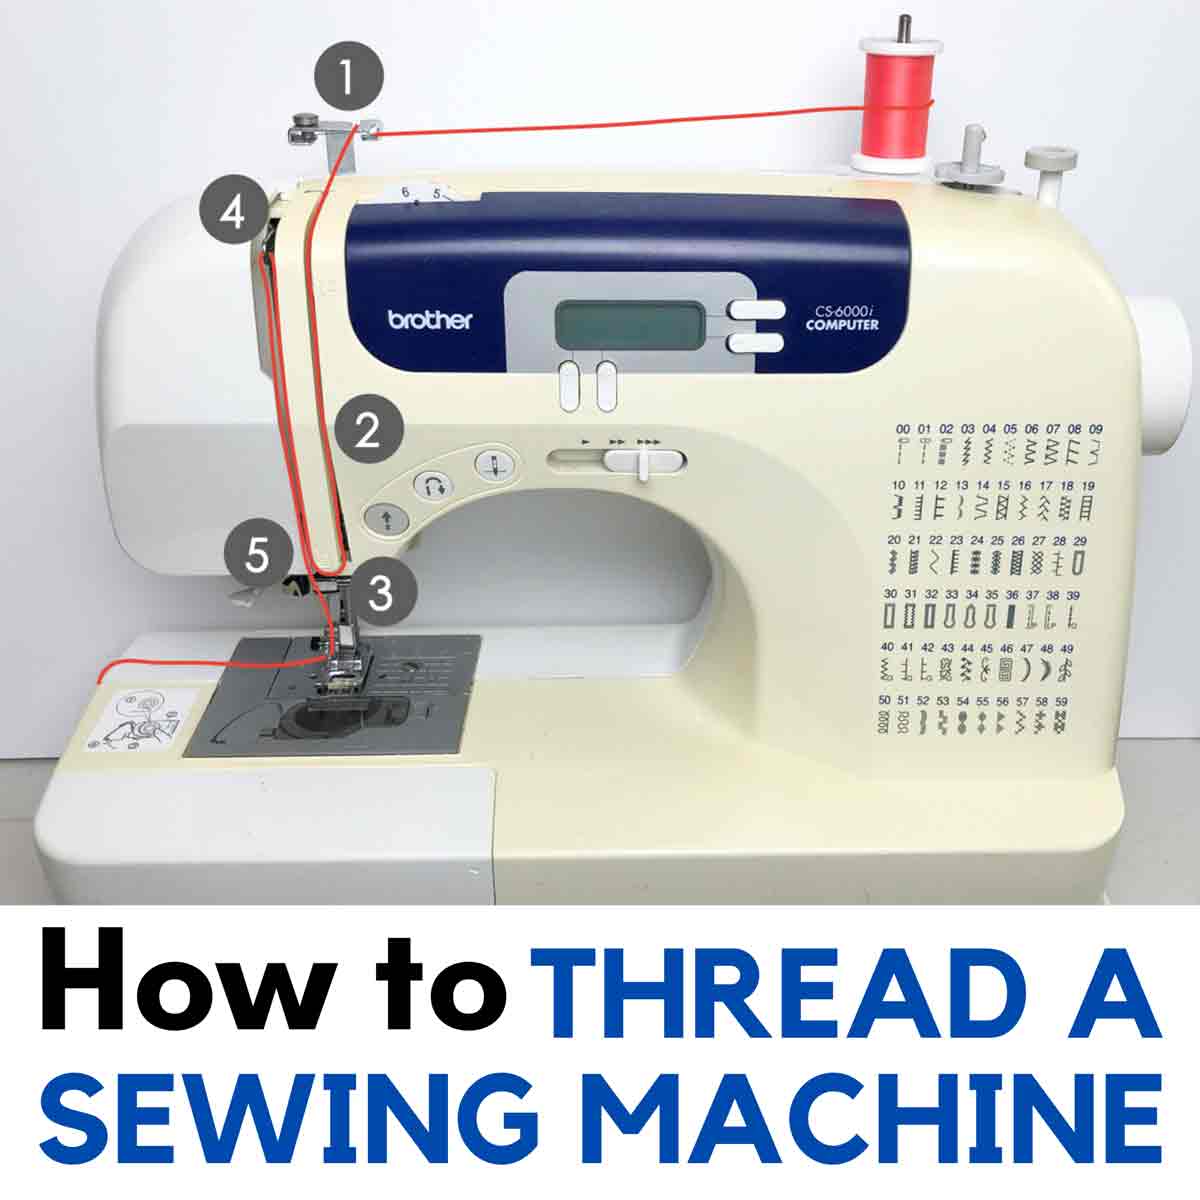
Image Source: mindymakes.com
Preparing for Threading
Before you begin threading your Brother sewing machine, there are a few essential preparations to make. Ensuring your machine is ready will prevent common issues and make the entire process smoother.
Gathering Your Supplies
You’ll need a few things to thread your machine correctly:
- Your Brother Sewing Machine: Make sure it’s plugged in and the power is on, but the foot pedal isn’t being pressed.
- Thread Spool: Use good quality thread that matches your project.
- Bobbin: Ensure it’s wound with the correct color and type of thread.
- Sewing Machine Needles: Make sure you have the correct size and type of needle installed.
- Scissors or Thread Snips: For cutting the thread.
- Your Brother Sewing Machine Manual: This is your best friend! While this guide is comprehensive, your specific model’s manual will have precise diagrams and instructions.
Setting Up Your Machine
Proper setup is crucial for successful threading.
- Raise the Presser Foot: Always lift the presser foot to its highest position. This opens the tension discs, allowing the thread to pass through smoothly.
- Turn the Handwheel Towards You: Rotate the handwheel towards you (counter-clockwise) to bring the needle up to its highest position. This ensures the upper thread path is clear.
- Remove Old Thread: If there’s old thread on the needle or in the tension discs, remove it completely. This prevents tangles and incorrect tension.
Threading the Upper Thread
The upper thread is what creates the stitches on top of your fabric. Following the correct Brother sewing machine upper thread path is vital. Most Brother sewing machines have numbered diagrams on the machine itself to guide you.
Step 1: Place the Thread Spool
- Locate the spool pin on your Brother sewing machine. It’s usually at the top of the machine, often near the back.
- Place the spool of thread onto the spool pin. Ensure the thread is unwinding from the front of the spool.
- Some machines have a spool cap. If yours does, place it on the spool to help keep it stable.
Step 2: Threading the Bobbin Winder (if winding)
If you need to wind a bobbin, this step comes before threading the needle. We’ll cover Brother sewing machine bobbin winding in detail later. For now, assume your bobbin is wound.
Step 3: Following the Upper Thread Path
This is where the numbered guides on your machine come into play. The exact path can vary slightly between models, so always refer to your Brother sewing machine manual threading instructions and the diagrams on your machine. Generally, the path involves these key points:
- From the Spool Pin: Bring the thread down from the spool pin.
- Around the First Thread Guide: Pass the thread around the first thread guide near the spool pin.
- Through the Tension Discs: This is a critical step. Lower the thread into the gap between the two tension discs. Make sure the thread is between the discs, not just looping around the outside.
- Up and Around the Take-Up Lever: Bring the thread up and then down through the eye of the take-up lever. This lever is usually a “U” or “L” shaped metal piece that moves up and down. Ensure the thread goes through the hook or slot on the lever.
- Down the Left Side: Guide the thread down the left side of the machine, often passing through a few more thread guides.
- Through the Lower Thread Guide: There’s usually a guide located near the needle clamp.
- Through the Needle Eye: This is the final and most delicate step. You will thread the needle from front to back for most manual threading. Some Brother models have an automatic needle threader.
Step 4: Threading the Needle
- Manual Threading: Hold the thread with your left hand. With your right hand, guide the end of the thread through the eye of the needle from front to back. Pull about 4-6 inches of thread through the eye.
- Automatic Needle Threader: If your Brother sewing machine has an automatic needle threader, follow its specific instructions. Typically, you’ll bring the thread to a small hook, press a lever, and the machine will push the thread through the needle eye. This is a lifesaver for those with vision or dexterity challenges.
Brother Sewing Machine Bobbin Winding
Before you can thread the lower Brother sewing machine lower thread path, you need a wound bobbin. Brother sewing machine bobbin winding is usually a simple process.
Step 1: Prepare the Bobbin
- Place a new, empty bobbin onto the bobbin winder spindle. It usually snaps into place.
- Insert the end of your spool thread through the small hole in the bobbin.
- Hold the very end of the thread taut.
Step 2: Engage the Bobbin Winder
- To engage the bobbin winder, you often need to push the bobbin winder spindle to the side, away from the needle. Some machines have a clutch mechanism you need to disengage. Check your manual!
- When engaged, the sewing machine’s needle will stop moving, and only the bobbin winder will operate.
Step 3: Start Winding
- Gently press the foot pedal. The bobbin will start to wind.
- As the bobbin starts to fill, guide the thread evenly across its surface.
- Once a few layers are wound, you can cut the thread tail close to the bobbin with your scissors.
- Continue winding until the bobbin is full. Most machines will automatically stop winding, or you’ll notice the thread winding more thinly towards the end.
Step 4: Disengage and Trim
- Once wound, disengage the bobbin winder spindle by pulling it back to its original position.
- Cut the thread to remove the bobbin.
Threading the Bobbin into the Machine
Now that you have a wound bobbin, it’s time to insert it correctly. This sets up the Brother sewing machine lower thread path.
For Front-Loading Bobbin Cases
Many Brother machines have a front-loading bobbin case, often accessed by removing a small plate under the needle area.
- Open the Bobbin Cover: Remove the accessory tray (if applicable) and lift off the needle plate.
- Insert the Bobbin: Place the wound bobbin into the bobbin case. Make sure the thread is coming off the top of the bobbin in the correct direction. Typically, for front-loading bobbins, the thread should unwind counter-clockwise (like a “P”). Your Brother sewing machine manual threading will show the exact direction.
- Pull the Thread: Guide the thread through the small slit in the bobbin case, and then pull it under the tension spring.
- Leave a Tail: Leave about 4-6 inches of thread hanging out.
- Replace the Needle Plate: Put the needle plate back on securely.
For Top-Loading (Drop-in) Bobbin Cases
Many modern Brother machines feature a drop-in bobbin system, which is generally easier.
- Open the Cover: Lift off the accessory tray and remove the bobbin cover plate.
- Insert the Bobbin: Place the wound bobbin into the bobbin case. The thread should typically be unwinding counter-clockwise (like a “P”), but check your machine’s specific diagram.
- Guide the Thread: Guide the thread through the notch or slit in the bobbin case. This usually involves pulling the thread under a small tension spring.
- Leave a Tail: Leave about 4-6 inches of thread hanging out.
- Replace the Cover: Replace the bobbin cover plate.
Bringing Up the Bobbin Thread
After threading the upper thread and inserting the bobbin, you need to bring the bobbin thread up to meet the upper thread.
- Hold the Upper Thread: Gently hold the tail of the upper thread with your left hand.
- Turn the Handwheel: Slowly turn the handwheel towards you (counter-clockwise). This will lower the needle, catch the bobbin thread, and bring it up through the bobbin case.
- Catch the Loop: As the needle rises, it will carry a loop of the bobbin thread with it. Use your fingers or tweezers to gently pull this loop out and up.
- Pull Through: Pull about 4-6 inches of bobbin thread through the needle plate opening.
- Position the Threads: Place both the upper thread tail and the bobbin thread tail behind the presser foot and under the needle.
Congratulations! Your Brother sewing machine is now threaded!
Using a Brother Sewing Machine Threading Diagram
Most Brother sewing machines are designed with user-friendliness in mind, and this extends to their threading guides. A Brother sewing machine threading diagram is a series of numbered arrows and lines printed directly onto the machine’s body.
These diagrams are invaluable for both initial threading and re-threading. They visually represent the Brother sewing machine upper thread path and often the bobbin threading path as well.
- Locate the Diagrams: They are usually found on the front or side panels of the machine, clearly marked with numbers corresponding to the steps.
- Follow the Numbers: Start with the thread at the spool pin and follow the numbered path precisely.
- Pay Attention to Details: Notice the direction of the arrows – do they indicate going up, down, left, or right? Where do they guide you to loop the thread (e.g., around tension discs, through the take-up lever)?
If you’re ever unsure, the Brother sewing machine manual threading section will have a detailed diagram and step-by-step written instructions.
Brother Sewing Machine Thread Tension
Proper Brother sewing machine thread tension is crucial for creating neat, strong stitches. Tension is controlled by the discs that grip the upper thread.
- Balanced Tension: The goal is for the upper thread and bobbin thread to interlock perfectly in the middle of your fabric layers. You shouldn’t see the bobbin thread on the top of the fabric, nor the upper thread on the bottom.
- Adjusting Tension: Most Brother machines have a dial, usually numbered, that controls upper thread tension. Lower numbers mean looser tension, and higher numbers mean tighter tension.
- Test Swatches: Always sew a test sample on a scrap of your project fabric when you start a new project or change thread types. Adjust the tension dial slightly until the stitches look balanced.
- Bobbin Tension: Bobbin tension is usually factory-set and rarely needs adjustment unless you encounter persistent problems. Tampering with bobbin tension can be tricky; consult your manual if you suspect an issue.
Common Tension Issues and Solutions
| Problem | Cause | Solution |
|---|---|---|
| Loops of thread on the bottom of the fabric | Upper thread tension is too loose. | Increase the upper thread tension dial setting by one or two numbers. |
| Loops of thread on the top of the fabric | Upper thread tension is too tight, or bobbin tension is too loose. | Decrease the upper thread tension dial setting by one or two numbers. If that doesn’t work, there might be a bobbin tension issue (consult manual for adjustment, or check bobbin threading). |
| Thread breaking repeatedly | Tension too tight, wrong needle, needle bent/dull, or threading error. | Check threading path, ensure correct needle type/size, ensure needle is inserted correctly and all the way up, check tension dial (try loosening). |
| Skipped stitches | Wrong needle, dull/bent needle, needle inserted incorrectly, or lint buildup. | Ensure correct needle type/size for fabric and thread. Insert needle fully and correctly (flat side to the back usually). Clean lint from tension discs and bobbin area. |
Common Brother Sewing Machine Threading Problems and Solutions
Even with clear instructions, beginners can encounter issues. Here are some common Brother sewing machine threading problems and how to fix them.
Problem: Thread Won’t Go Through Needle Eye
- Cause: Needle is inserted incorrectly, needle eye is blocked, needle is bent, or thread end is frayed.
- Solution: Ensure the needle is inserted all the way up and oriented correctly (check your manual for flat side placement). Use a clean, sharp needle. Trim frayed thread ends with sharp scissors. Try the automatic needle threader if available.
Problem: Thread Breaks Frequently
- Cause: Thread tension is too high, needle is blunt or bent, needle is not the correct type for the fabric, or the threading path is incorrect.
- Solution: Loosen the upper thread tension. Replace the needle with a new, sharp one of the appropriate size and type. Re-thread the machine, paying close attention to the Brother sewing machine upper thread path and ensuring the presser foot is up. Check for burrs on the needle plate or presser foot.
Problem: Loops of Thread Underneath the Fabric
- Cause: Upper thread tension is too loose.
- Solution: Increase the upper thread tension by a small increment (e.g., 1-2 numbers on the dial). Re-thread the machine completely, ensuring the presser foot is up to seat the thread correctly in the tension discs.
Problem: Loops of Thread on Top of the Fabric
- Cause: Upper thread tension is too tight, or bobbin thread tension is too loose.
- Solution: Decrease the upper thread tension by a small increment. If this doesn’t resolve it, check the bobbin threading and ensure it’s correctly seated in the case and the thread is properly guided through the tension spring.
Problem: Bobbin Thread Won’t Come Up
- Cause: Bobbin is inserted incorrectly, thread is not caught by the needle, or the presser foot is down.
- Solution: Ensure the bobbin is inserted in the correct direction and the thread is pulled through the notch/spring. Make sure the presser foot is UP when threading the upper thread and bringing up the bobbin thread. Turn the handwheel towards you to bring up the bobbin thread.
Problem: Uneven Stitches or Bird’s Nests (Tangled Thread)
- Cause: Incorrect threading, lint buildup in the bobbin area or tension discs, or improper tension settings.
- Solution: Re-thread the entire machine. Clean out any lint from the bobbin case and the tension disc areas using a small brush or compressed air. Ensure your Brother sewing machine thread tension is balanced.
Threading a Brother Serger
While this guide focuses on standard Brother sewing machines, it’s worth noting that threading Brother serger machines is a different, more complex process. Sergers have multiple threads (typically 3, 4, or 5) and a different threading sequence involving loopers and differential feed mechanisms.
If you are learning to thread a Brother serger, always refer to your specific serger manual. The sequence of threading the lower loopers, upper looper, and needles is critical and often color-coded. Threading a serger correctly is essential for it to function properly and create professional-looking seams.
Conclusion
Mastering Brother sewing machine threading is a gateway to enjoying all the creative possibilities your machine offers. By following these step-by-step instructions, paying attention to your machine’s specific diagrams, and practicing, you’ll become proficient quickly. Remember that patience and a good manual are your best allies. Happy sewing!
Frequently Asked Questions (FAQ)
Q1: Do I need to remove the presser foot when threading my Brother sewing machine?
A: No, you do not need to remove the presser foot. However, you must raise the presser foot to its highest position before threading the upper thread. This opens the tension discs, allowing the thread to pass through correctly.
Q2: What is the correct way to thread the needle on my Brother sewing machine?
A: For most Brother sewing machines, you thread the needle from front to back when manually threading. If your machine has an automatic needle threader, follow its specific mechanism.
Q3: My Brother sewing machine is skipping stitches. What could be wrong?
A: Skipped stitches can be caused by several factors: the needle might be blunt, bent, or the wrong type/size for your fabric and thread. Ensure the needle is inserted correctly and all the way up. Lint buildup in the bobbin area or tension discs can also cause this. Re-threading the machine and cleaning it are good first steps.
Q4: How do I know if the thread tension on my Brother sewing machine is correct?
A: The best way to check your Brother sewing machine thread tension is to sew a test sample on a piece of your project fabric. Look at the stitches on both sides of the fabric. You want to see the threads interlocking neatly in the middle of the fabric, with no visible loops of thread on either side. Adjust the tension dial slightly until the stitches are balanced.
Q5: Can I use any brand of thread with my Brother sewing machine?
A: While you can use most brands of thread, it’s best to use good quality thread. Cheap or old thread can be weak, prone to breaking, and may cause lint buildup. Always match the thread weight and type to your fabric and sewing project.
Q6: My Brother sewing machine is making a mess of threads underneath. What is happening?
A: This is often referred to as a “bird’s nest” and usually indicates a problem with the upper thread tension being too loose, or the machine not being threaded correctly, especially with the presser foot down. Ensure you thread the machine with the presser foot UP. Re-thread carefully, and if the problem persists, check the upper thread tension.
Q7: Is threading a Brother serger the same as threading a Brother sewing machine?
A: No, threading Brother serger machines is significantly more complex. Sergers have multiple threads and loopers that must be threaded in a specific order, often color-coded. Always consult your serger’s manual for the correct threading procedure.