
You want to put an embroidery pattern onto fabric. How do you do it? You can do this in many ways. Common embroidery transfer methods include tracing, using iron-on patterns, water-soluble stabilizers, or special pens. Each method works best for different fabrics and designs. This guide will show you how to use each one easily.
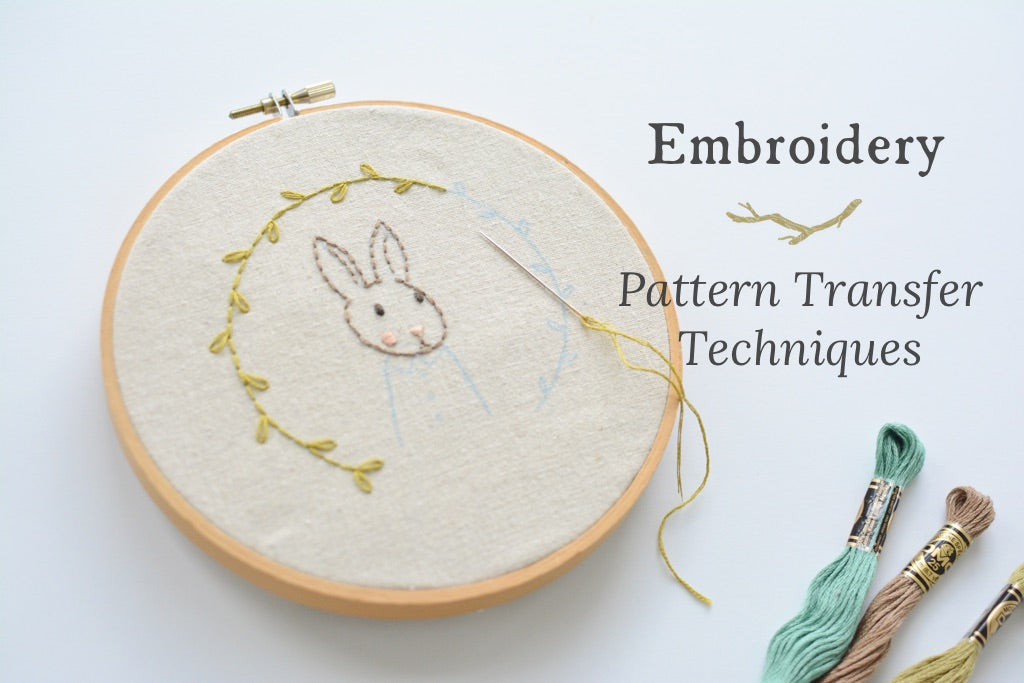
Image Source: www.twigandtale.com
Picking the Best Way to Transfer
Choosing the right way to move your pattern is very important. Think about your fabric. Is it light or dark? Is it thick or thin? Also, think about your design. Is it simple or full of small details? Will you stitch over all the lines? Do you need the marks to disappear later? Knowing these things helps you pick the best method for your project.
Getting Ready: Your Pattern and Fabric
Before you start, gather your tools. Make sure your pattern is ready. Prepare your fabric too. This makes the transfer easier and more accurate.
Readying Your Design
First, make sure your pattern is the right size. Print it or draw it clearly. If you are tracing, use a dark marker so you can see the lines well. If you plan to use a heat transfer method, remember to reverse your image. It will flip back when you press it onto the fabric. Test your pattern size by holding it over your fabric. See how it looks.
Prepping Your Fabric
It is often good to wash and iron your fabric before you start. This is called “pre-washing.” Fabrics can shrink when washed. If you do not pre-wash, your finished embroidery might change size after its first wash. Ironing your fabric makes it smooth. Smooth fabric is easier to draw on. It helps your design go on flat and straight. Make sure the fabric is completely dry before you try to transfer any design.
Tracing Methods: The Direct Approach
Tracing is a simple way to get your design onto fabric. It is a good choice for light-colored fabrics. You put your design under the fabric. Then you draw over the lines.
Tracing Basics
This method uses light. You place your pattern down first. Put your fabric on top. A light source under both lets you see the lines. You can then draw these lines onto your fabric. This is one of the most common tracing embroidery designs techniques.
Using a Light Source
A light box for embroidery tracing is a great tool for this. It is a flat box with a light inside. You put your pattern on top of the light box. Then you put your fabric on top of your pattern. The light shines through both. You can see your pattern clearly through the fabric. You then just draw over the lines with a fabric pen. If you do not have a light box, a sunny window works too. Just tape your pattern to the window. Then tape your fabric over the pattern. The sun shines through, letting you trace.
Tracing with Fabric Marking Pens
When you trace, you need the right tool. Temporary fabric marking pens are perfect for this. These pens have special ink. The ink will disappear later. There are a few types:
- Water-erasable pens: These pens use ink that washes away with water. Just a damp cloth or a quick rinse removes the lines.
- Air-erasable pens: The ink from these pens disappears on its own over time. How fast it fades depends on the pen and how humid the air is. They are good if you plan to stitch quickly.
- Heat-erasable pens (like Frixion pens): These pens use ink that disappears with heat. An iron or even rubbing the fabric can make the lines vanish.
Frixion Pen Embroidery Transfer
Frixion pen embroidery transfer is very popular. These pens are easy to find. They write smoothly. The ink disappears when you iron it. But be careful. Sometimes, the marks can reappear if the fabric gets very cold. Always test a Frixion pen on a scrap piece of your fabric first. Make sure the ink vanishes completely. Check that it does not leave a faint mark, or “ghost” line. This is especially true on certain fabric colors or types.
Heat-Based Transfer Methods
Some methods use heat to move the design. These are often quicker. They are good for designs you want to put on fabric many times.
Iron-On Magic
Iron-on embroidery patterns are pre-made designs. They come printed on special paper. This paper has a heat-sensitive ink. You place the paper design-side down on your fabric. Then you press it with a hot iron. The heat makes the ink move from the paper to your fabric.
How to Use Iron-On Patterns:
- Cut your design: Trim around the pattern. Leave some paper around the edges.
- Heat your iron: Set your iron to a medium or cotton setting. Make sure there is no steam.
- Place the pattern: Put the pattern face down on your fabric.
- Press: Press the hot iron firmly over the design. Move it slowly for about 10-20 seconds. Do not slide the iron. Just lift and press.
- Peel: Let the paper cool for a moment. Then carefully peel it off. Your design should be on the fabric.
Pros of Iron-On Patterns:
* They are fast.
* They give clear, clean lines.
* Good for repeating designs.
Cons of Iron-On Patterns:
* The lines are usually permanent. They do not wash away. Make sure you stitch over them completely.
* They do not work well on very dark fabrics. The ink might not show up.
* You often get only one or a few uses from each pattern.
Heat Transfer Pens for Fabric
Heat transfer pens for fabric are like small versions of iron-on patterns. You draw your design onto regular paper with one of these pens. Then you iron that paper onto your fabric. The ink transfers.
How to Use Heat Transfer Pens:
- Draw your design: On a piece of tracing paper or thin printer paper, draw your design with the heat transfer pen. Remember to draw it backward (mirror image). It will flip when transferred.
- Heat your iron: Set your iron to a medium-hot setting. No steam.
- Place the paper: Put the paper design-side down on your fabric.
- Press: Press firmly with the hot iron. Hold it for 10-30 seconds. Do not slide.
- Peel: Carefully lift the paper. Your design should be on the fabric.
Tips for Heat Transfer Pens:
* Always test on a scrap of fabric first.
* Use light pressure when drawing with the pen. Too much pressure can make the lines too thick.
* These pens often leave a permanent mark. Make sure you will cover all the lines with your stitches.
* These work best on light to medium-colored fabrics.
Water-Soluble and Disappearing Methods
These methods are great because the transfer marks go away. This means no leftover lines on your finished work. They are very popular for detailed designs or when you want a clean finish.
Water Soluble Stabilizer Embroidery Power
Water soluble stabilizer embroidery is a fantastic method. A stabilizer is a material that gives your fabric more body. Water soluble stabilizers are special. They dissolve completely in water after you are done stitching. This means no marks are left behind.
How to Use Water Soluble Stabilizer:
- Choose your stabilizer: There are different types. Some are like fabric sheets. Others are sticky-back sheets. Some are thin and film-like.
- Transfer your design to the stabilizer:
- Trace: Place the stabilizer over your pattern. Use a permanent marker or a water-erasable pen to trace the design onto the stabilizer.
- Print: Some water soluble stabilizers are printable embroidery transfers. You can print your design directly onto them using an inkjet printer. This is very accurate.
- Attach to fabric:
- Hoop with fabric: If it is a fabric-like stabilizer, put it on top of your fabric. Then put both into your embroidery hoop.
- Stick-on: If it is a sticky-back stabilizer, peel off the backing. Stick it firmly onto your fabric.
- Baste/Pin: You can also lightly baste (sew with large, loose stitches) the stabilizer to your fabric edges.
- Stitch: Stitch your design right through the stabilizer and your fabric. The stabilizer holds your fabric steady. It also makes fine lines easier to stitch.
- Wash away: When you are done stitching, soak the finished piece in water. The stabilizer will dissolve completely. You might need to rinse it a few times. Let it dry flat.
Why Water Soluble Stabilizer is Great:
* Good for dark fabrics: You can see your design clearly, no matter the fabric color.
* Great for detailed designs: The stabilizer keeps the fabric from puckering. It also makes very small stitches easier.
* No marks left: The best part is that all the lines disappear.
* Good for delicate fabrics: It supports delicate fabrics during stitching.
Temporary Fabric Marking Pens Revisited
We talked about temporary fabric marking pens for tracing. They are worth mentioning again as a standalone method for temporary marks.
- Water-erasable pens: As mentioned, these pens’ marks wash away with water. They are good for lines that you might not stitch over completely. Or for designs that need a lot of guide marks.
- Air-erasable pens: These pens are handy for quick projects. The marks disappear on their own after a few hours or days. This means you do not have to wash your fabric later. Be sure to finish your stitching before the marks vanish!
Always test these pens on a small, hidden part of your fabric first. Make sure the ink disappears fully. Also, check that it does not leave a stain or shadow.
Advanced and Specialized Methods
Some methods are a bit less common but work very well for specific needs.
Dressmaker’s Carbon Paper for Embroidery
Dressmaker’s carbon paper embroidery is a clever way to transfer designs. It is not like office carbon paper. This carbon paper is specially made for fabric. It comes in different colors, like white, blue, and yellow. This lets you choose a color that shows up well on your fabric.
How to Use Dressmaker’s Carbon Paper:
- Place the carbon paper: Put the carbon paper colored-side down on your fabric.
- Place your pattern: Put your paper pattern on top of the carbon paper. Tape it down if you need to.
- Trace: Use a stylus, a dull pencil, or a tracing wheel to firmly draw over your design lines. The pressure transfers the carbon color onto your fabric.
- Lift carefully: Gently lift the pattern and then the carbon paper. Your design should be on the fabric.
Tips for Carbon Paper:
* Test first: Always test on a scrap of your fabric. Make sure the lines show up well and do not smudge too easily. Some carbon marks can be hard to remove if not stitched over.
* Use a firm surface: Work on a hard, flat surface.
* Light pressure: Use enough pressure to transfer the line, but not so much that you make a deep groove in your fabric.
* Different colors: Use white carbon paper for dark fabrics. Use blue or yellow for light fabrics.
Printable Embroidery Transfers
We touched on printable embroidery transfers with water-soluble stabilizer. But there are other types too. These are sheets of special paper or fabric that you can print your design onto using a home printer.
Types of Printable Transfers:
- Printable Iron-On Transfers: You print your design onto this paper. Then you iron it onto your fabric. The paper usually peels away, leaving the design. Some are for light fabrics, some for dark.
- Printable Sticky Fabric Sheets: These are sheets of fabric with a sticky back. You print on the fabric side. Then you peel off the paper backing and stick the design onto your main fabric. You stitch through it. After stitching, you can often peel the fabric sheet away. Or sometimes you cut around your finished design.
- Printable Water-Soluble Fabric: This is the water soluble stabilizer mentioned earlier. You print directly onto it. Stitch. Then wash away.
Why Printable Transfers are Good:
* Accuracy: You get a very exact copy of your digital design.
* Ease: No hand tracing needed. Just print and apply.
* Great for text or complex designs: Perfect for intricate details or fonts that are hard to draw by hand.
Choosing the Right Method for Your Project
With so many embroidery transfer methods, how do you pick? Think about these things:
- Your Fabric Color:
- Light fabrics: Most methods work. Tracing with a light box, iron-on patterns, heat transfer pens, or water-soluble stabilizers are all good. Dark dressmaker’s carbon paper works too.
- Dark fabrics: Water-soluble stabilizer (especially printable), white dressmaker’s carbon paper, or tracing with a bright light box and a light-colored pen (like a white gel pen) are best. Iron-on and heat transfer pens usually won’t show.
- Your Fabric Type:
- Delicate fabrics (silk, sheer): Water-soluble stabilizer is ideal. It supports the fabric and washes away without rubbing. Avoid methods that need a lot of heat or pressure.
- Sturdy fabrics (cotton, linen): Most methods work fine.
- Complexity of Your Design:
- Simple designs (few lines): Tracing with a pen, or dressmaker’s carbon paper.
- Complex designs (many details, text): Printable water-soluble stabilizer or printable iron-on transfers are excellent for accuracy. Tracing with a light box is also good if you have a steady hand.
- Permanence of Mark:
- Want marks to disappear: Water-soluble stabilizer, water-erasable pens, air-erasable pens, Frixion pens.
- Marks can stay (you’ll stitch over them): Iron-on patterns, heat transfer pens, dressmaker’s carbon paper (test first for complete coverage).
- Your Skill Level and Time:
- Beginner/Quick: Iron-on patterns, tracing with a light box and pen.
- More experience/Time: Water-soluble stabilizer, printable transfers, dressmaker’s carbon paper.
Here is a quick comparison table:
| Method | Best Fabric Color | Mark Permanence | Design Complexity | Pros | Cons |
|---|---|---|---|---|---|
| Tracing with Light Box & Pen | Light to Medium | Disappears (water/air/heat) | Medium to High | Simple, cheap, versatile pens | Can be tiring for complex designs, Frixion pens may reappear |
| Iron-On Patterns | Light to Medium | Permanent | Low to Medium | Fast, clear lines, good for repeated use | Lines are permanent, less useful on dark fabrics |
| Heat Transfer Pens | Light to Medium | Permanent | Low to Medium | Clear lines, custom designs | Lines are permanent, requires mirror image, test before use |
| Water Soluble Stabilizer | Any (especially Dark) | Disappears (water) | High | No marks left, supports fabric, great for detail and dark fabric | Requires washing, might not stick well to some fabrics |
| Dressmaker’s Carbon Paper | Any (use different colors) | Can be permanent | Medium | No light needed, good for different fabrics | Can smudge, requires firm pressure, test removal on scrap |
| Printable Transfers (various) | Varies by type | Varies by type | Very High | Very accurate, easy for complex designs, text | Can be costly, requires a printer, may leave residue depending on type |
Tips for a Smooth Transfer
No matter which method you pick, these tips will help you get the best results:
- Always Test First: This is the golden rule. Test your chosen method on a small, hidden piece of your exact fabric. This shows you if the lines show up, if they erase properly, and if they stain.
- Work on a Flat, Hard Surface: This helps ensure your lines are crisp and even.
- Use Light Pressure: Whether tracing or using carbon paper, a light touch is usually enough. Too much pressure can stretch your fabric or make lines too thick.
- Keep Fabric Taut: If you are using a hoop, make sure the fabric is tight in it. This prevents stretching and crooked designs.
- Work in Good Light: Good lighting helps you see your lines clearly. This makes tracing or transferring more accurate.
- Keep Your Workspace Clean: Ink and fabric dust can smudge your design.
- Do Not Stretch the Fabric: While transferring, try not to pull or stretch your fabric. This can distort your design.
- Stitch Soon: If using temporary pens, try to stitch your design soon after transferring. This avoids the marks fading or becoming harder to remove.
Frequently Asked Questions (FAQ)
Can I use regular paper for my embroidery patterns?
Yes, you can use regular paper to draw or print your pattern. Then you can trace it onto your fabric using a light box or carbon paper. However, you cannot directly iron or stick regular paper onto your fabric for transfer. You need special transfer papers or stabilizers for those methods.
Do I need special pens for transferring designs?
It is highly recommended to use pens made for fabric. Regular pens or pencils can leave permanent marks that are hard or impossible to remove. Fabric marking pens are designed to disappear or wash away. Always test them on a scrap of your fabric first.
How long do temporary fabric marks last?
It depends on the pen. Water-erasable pens stay until you wet them. Air-erasable pens disappear in a few hours to a few days, depending on humidity and air exposure. Heat-erasable pens (like Frixion) disappear with heat but can sometimes reappear if the fabric gets very cold. Always check the pen’s instructions.
What if I make a mistake when transferring my design?
If you use a temporary marking pen, you can usually erase or wash away the mistake. If you use a heat-erasable pen, you can iron it away. For iron-on patterns or heat transfer pens that leave permanent marks, mistakes are harder to fix. This is why testing on a scrap piece of fabric is so important. If you make a mistake with a permanent mark, you might need to try to cover it with stitches or start over on a new piece of fabric.
Can I reuse iron-on embroidery patterns?
Most iron-on patterns can be used a few times. The lines will get lighter with each use. You usually get the best, clearest transfer on the first use. After a few uses, the design might be too faint to follow.
Transferring an embroidery pattern to fabric is the first step to bringing your design to life. By choosing the right method and taking your time, you will set yourself up for a beautiful and successful stitching project. Happy embroidering!