
How does embroidery machines work? These clever machines make pictures and patterns on fabric using thread. They do this by moving a needle up and down very fast. At the same time, the machine moves the fabric back and forth and side to side. This lets the needle put stitches exactly where they need to go to make the design. A computer tells the machine exactly how and where to move everything. This whole process needs special parts working together, like the needle, the bobbin, and the frame holding the fabric.
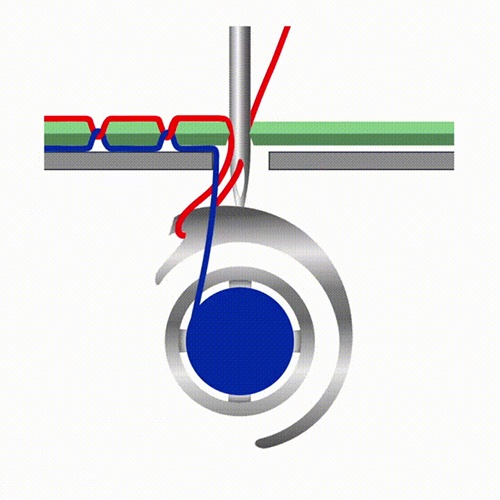
Image Source: blog.hatchembroidery.com
Grasping the Basics of Machine Embroidery
Think of an embroidery machine like a super fast artist. Instead of paint, it uses thread. Instead of a brush, it uses a needle. And instead of a canvas, it uses fabric. The artist doesn’t draw freehand. A computer guides the hand, telling it every tiny movement.
The machine follows a set plan. This plan is a design made on a computer. The machine reads this plan. Then it uses its parts to put the stitches onto the fabric. It can make very detailed pictures. It can use many colors of thread. It does this much faster and more evenly than a person sewing by hand.
Comprehending Embroidery Machine Parts
An embroidery machine has many important pieces. Each part does a special job. All the parts must work together. If one part does not work right, the stitches might look wrong. Let’s look at some key parts.
The Needle: The Stitch Maker
The embroidery machine needle is like the main tool. It pushes the thread through the fabric. It has a sharp point to go through fabric easily. Near the point, it has a hole called an eye. The thread goes through this eye. The needle also has a groove. This groove helps protect the thread as the needle goes down.
Needles come in different sizes. A larger needle makes a bigger hole. A smaller needle makes a smaller hole. You pick the needle size based on:
- The fabric you are using.
- The type of thread you are using.
- The design itself.
Using the wrong needle can break threads. It can hurt the fabric. It can also make stitches look bad. The machine moves the needle up and down very fast. This fast movement is key to making stitches quickly.
The Bobbin: The Under Thread
The bobbin in embroidery machine holds the bottom thread. This thread is also called the under thread. The needle brings the top thread down through the fabric. Under the fabric, a hook grabs a loop of the top thread. This hook wraps the top thread loop around the bobbin thread. This action locks the stitch in place.
The bobbin thread is often thinner than the top thread. It might be a different color. Or it might match the fabric color. Keeping the bobbin wound correctly is important. If the bobbin thread runs out, the machine stops stitching. If the bobbin is not put in right, the stitches on the back of the fabric will look messy.
The Embroidery Machine Hoop: Holding the Fabric Still
The embroidery machine hoop holds the fabric tight and flat. It keeps the fabric from moving while the machine stitches. This is very important. If the fabric moves even a little bit, the design will be wrong.
A hoop is usually two rings. One ring goes under the fabric. The other ring goes on top. They press together to grip the fabric. The hoop attaches to the machine. The machine moves the hoop. This moving hoop carries the fabric under the needle. This lets the needle stitch in all the right places to make the pattern.
Hoops come in many sizes and shapes. You choose a hoop that is big enough for your design. But it should not be too big for the machine.
The Thread Tension Embroidery Machine
Thread tension is how tight the threads are pulled. Both the top thread and the bobbin thread have tension. The tension needs to be just right.
- If the top thread is too tight, it pulls the bobbin thread up. You will see the bobbin thread on the top of the fabric.
- If the bobbin thread is too tight, it pulls the top thread down. You will see loops on the bottom of the fabric.
- If the tension is perfect, the stitches look smooth on top. The bobbin thread just shows as small dots where the threads meet in the middle of the fabric layers.
Machines have ways to adjust the tension. Getting the tension right is often key to good-looking embroidery. It can take practice to learn how to set it correctly for different threads and fabrics.
Other Important Components
Besides these, other parts are vital:
- The Arm: This is the part that holds the needle mechanism. It reaches over the fabric.
- The Bed: This is the flat part under the arm. The hoop sits above this. The bobbin case is usually under the bed.
- The Pantograph or X-Y Frame: This is the part that the hoop attaches to. It moves the hoop left-right (X direction) and front-back (Y direction). This movement is very precise. It is what lets the machine stitch complex shapes. In home machines, this is often just the moving hoop carriage assembly.
- The Motor: Machines have motors. Motors make the needle go up and down. Motors also move the pantograph/hoop.
- The Computer/Control Panel: This is the brains of the machine. It reads the design file. It tells the motors where and when to move. It controls the needle speed. It might show you the design. You use it to choose designs and settings.
Interpreting the Machine Embroidery Process
How does a design go from an idea to stitches on fabric? It follows a set process. This process has several steps.
Step 1: Creating the Design File (Digitizing)
The first step is making the design file. This is called digitizing for machine embroidery. Embroidery machines don’t just read pictures. They need a special file. This file tells the machine:
- Where to put each stitch.
- What type of stitch to use (like a straight line or a fill stitch).
- The order to stitch things.
- When to change colors.
- When to cut the thread.
You use special embroidery machine software on a computer to create this file. The software lets you turn artwork or text into an embroidery design. It is not like drawing a picture. You are telling the machine the path for the needle. Good digitizing is very important for a good end result. Poor digitizing can make even a good machine stitch poorly.
Step 2: Loading the Design
Once you have the design file, you need to get it into the embroidery machine. Most modern machines use a USB stick. You save the file onto the USB. Then you plug the USB into the machine. The machine reads the file from the USB. Some machines can connect directly to a computer.
Step 3: Preparing the Machine and Fabric
This step has a few parts:
- Hooping the Fabric: Put the fabric tightly in the right size hoop. Often, you need a piece of stabilizer too. Stabilizer is a material placed under or on top of the fabric. It helps the fabric stay flat and firm. It stops the stitches from pulling the fabric out of shape.
- Putting in the Bobbin: Make sure the bobbin has enough thread. Put it correctly into the bobbin case. Place the bobbin case in the machine.
- Threading the Top Thread: Put a spool of the first color thread on the machine. Follow the thread guides. Thread the machine’s path. Put the thread through the embroidery machine needle.
Step 4: Starting the Machine
With the fabric hooped and everything threaded, you place the hoop onto the machine’s moving arm (pantograph). The machine checks that the hoop is in place. You choose the design on the control panel. You tell the machine to start.
Step 5: The Machine Stitches
This is where the magic happens. The computer controlled embroidery system takes over. The machine starts moving the hoop. It starts moving the needle up and down.
- The needle goes down through the fabric.
- It makes a loop of the top thread under the fabric.
- The hook grabs this loop.
- The hook pulls the loop around the bobbin thread.
- The needle pulls the top thread back up.
- This makes one stitch.
The machine repeats this thousands of times. It follows the path set in the design file. It moves the hoop very precisely between each stitch.
Step 6: Changing Colors
If the design has more than one color, the machine will stop. It stops when it finishes all the stitches for one color. It will usually ask you to change the thread. You cut off the old thread. You thread the new color. Then you tell the machine to keep going. It will stitch the next part of the design with the new color.
Step 7: Finishing
When the machine finishes all the stitches in the design, it stops. You take the hoop off the machine. You take the fabric out of the hoop. Then you trim extra threads. You remove the stabilizer. You might press the design to make it flat. The design is now finished on the fabric.
Fathoming How Embroidery Stitches Are Made
Let’s look closer at how one single stitch is formed. This is the core of how embroidery stitches are made. It’s a bit like a tiny dance between the top thread and the bobbin thread, helped by the needle and a hook.
- Needle Goes Down: The embroidery machine needle, holding the top thread, pushes down through the fabric.
- Loop Forms: As the needle starts to come back up, it creates a small loop of the top thread just under the fabric. This loop is on the back side of the needle.
- Hook Catches Loop: A small hook (often a rotating hook or a side-moving hook) passes by the needle. This hook is perfectly timed to grab the loop of the top thread.
- Loop Goes Around Bobbin: The hook pulls the loop of top thread wider. It carries this loop around the bobbin case, which holds the bobbin in embroidery machine. This action wraps the top thread loop around the stationary bobbin thread.
- Stitch Pulls Tight: As the needle pulls the rest of the top thread up through the fabric, the loop that went around the bobbin thread tightens. This cinches the bobbin thread within the loop, locking the two threads together in the fabric. This makes one stitch.
This happens many, many times every second. The machine’s computer tells the hook and the needle to move at just the right time. It also tells the hoop exactly where to be for each stitch.
Deciphering Computer Controlled Embroidery
Modern embroidery is all about computer control. Computer controlled embroidery is what makes complex designs possible. The machine is not just moving randomly. It is following a precise set of instructions.
The design file (made with embroidery machine software) is the instruction manual. The machine’s computer reads this file. The file is made of many commands. Commands like:
- “Move the hoop 10 steps right.”
- “Move the hoop 5 steps forward.”
- “Make the needle go down.”
- “Cut the thread.”
- “Stop, wait for color change.”
The computer sends signals to small motors. These motors move the needle bar up and down. They move the pantograph/hoop assembly. They might also control other things like thread cutting.
Because a computer does this, the machine is very accurate. It can put stitches exactly where the digitizer planned them. This allows for smooth curves, perfect circles, and detailed shapes that would be very hard to do by hand. The computer also keeps track of where it is in the design. If you stop the machine, it knows where to start again.
Comprehending Embroidery Machine Software
Embroidery machine software is essential for creating the digital design files. This is where digitizing for machine embroidery happens. The software is a bridge between a picture or idea and the machine’s instructions.
Different software programs exist. Some are simple. Some are very complex and expensive. They let you:
- Import images (like JPEGs or PNGs).
- Turn artwork into stitches automatically (this is often okay but not perfect).
- Manually place stitches and define areas for fills, outlines, etc. (this gives the best results).
- Choose stitch types (like satin stitches for outlines, fill stitches for areas).
- Set stitch directions and density.
- Add text using built-in fonts.
- Resize designs.
- Change colors.
- Add commands for thread trims or stops.
Learning to use embroidery software well takes time and practice. Good digitizing considers the fabric type, the thread type, and how stitches will lay down. It’s an art and a skill. The software saves the design in a specific file format that the machine can read (like .DST, .PES, .JEF, etc.).
Navigating Common Issues: Thread Tension, Bobbin, Needle
Even with great equipment, problems can happen. Often, issues trace back to thread tension, the bobbin, or the needle.
Problems with Thread Tension
- Loops on Top: Top thread tension is too loose or bobbin tension is too tight. Check if the top thread is threaded correctly. Check if the bobbin thread is coming out smoothly from the bobbin case.
- Loops on Bottom: Bobbin tension is too loose or top tension is too tight. Check if the bobbin is wound evenly. Check if the bobbin thread is threaded correctly in its case.
- Thread Breaks: Tension might be too tight, or the thread path might be blocked. Also, could be a bad needle or old thread.
Problems with the Bobbin in Embroidery Machine
- Messy Stitches on Back (Bird’s Nest): Bobbin tension is off, or the top thread is not threaded correctly. Sometimes caused by starting too fast or the fabric not being hooped tight enough.
- Bobbin Thread Runs Out Too Fast: The design might be very dense, using a lot of thread. Or the bobbin wasn’t full to start. Or the bobbin thread is much thicker than it should be.
- Bobbin Case Issues: Make sure the bobbin is put into the case the right way. The thread should come off the bobbin in the correct direction for the case.
Problems with the Embroidery Machine Needle
- Thread Breaking: The needle might be bent, dull, or the wrong size for the thread or fabric. A bent needle can hit the hook or the plate, causing big problems.
- Skipped Stitches: Often a needle issue. The needle might be put in wrong (turned the wrong way). Or it could be bent. Or the wrong type of needle for the job.
- Damaging Fabric: A needle that is too large or too dull can leave big holes or tear delicate fabric.
Checking these three areas first solves many embroidery problems.
Exploring Different Embroidery Machines
Embroidery machines come in different types.
- Home Embroidery Machines: These are for hobbyists or small home businesses. They usually have one needle. You have to change the thread manually for color changes. They have a limited sewing area based on the hoop size.
- Commercial/Multi-Needle Embroidery Machines: These are for businesses that do a lot of embroidery. They have many needles (4, 6, 10, 16, or more). Each needle can be pre-threaded with a different color. The machine automatically switches between needles for color changes. This makes them much faster for multi-color designs. They often have larger embroidery areas.
- Industrial Embroidery Machines: These are large, heavy-duty machines. They are built for constant use in factories. They can have many heads, each with multiple needles, to stitch the same design on many items at once.
The core process of how they make a stitch is the same. The main differences are speed, number of needles, embroidery area size, and how much they can handle.
The Importance of Fabric and Stabilizer
We talked about hooping the fabric and using stabilizer. This is crucial for good results. The machine pulls and pushes the fabric with the needle. If the fabric is not held tight and supported, it will stretch, pucker, or move.
- Fabric: Choose fabric that is suitable for embroidery. Thinner fabrics might need more support. Thicker fabrics need stronger needles.
- Stabilizer: Stabilizer gives the fabric body. It stops the stitches from pulling the fabric out of shape. There are different types:
- Cut-away: Stays with the fabric permanently. Good for stretchy fabrics.
- Tear-away: You tear it away after stitching. Good for stable fabrics.
- Wash-away: Dissolves in water. Good for delicate fabrics or towels where you don’t want stabilizer to show.
- Heat-away: Melts away with heat.
Using the right combination of fabric, hoop, and stabilizer for the design is key to getting a flat, smooth result with no puckering.
Bringing It All Together: The Stitch Cycle in Motion
Imagine the machine running. The computer sends signals.
- The hoop is moved to the exact spot for the next stitch.
- The needle motor pushes the embroidery machine needle down.
- The needle goes through the fabric layers (fabric, stabilizer).
- Underneath, the hook waits.
- As the needle lifts slightly, a loop forms.
- The hook spins (or moves across) to catch the loop.
- The hook carries the loop around the bobbin in embroidery machine, which is sitting in its case.
- The top thread wraps around the bobbin thread.
- The needle pulls the rest of the top thread up.
- The loop tightens, pulling the bobbin thread up slightly to meet the top thread in the middle of the fabric.
- One stitch is complete.
This action happens maybe 600 to 1000 times per minute or even faster on some machines. The computer keeps sending new coordinates for the hoop. It keeps track of which stitch it is making in the design file. It knows when to stop for a thread change. This continuous cycle of movement and stitch formation, all guided by the embroidery machine software file, is the core of how these amazing machines work.
The entire machine embroidery process, from digitizing on a computer to hooping fabric and watching the machine stitch, is a blend of art and technology. Understanding how the embroidery machine parts function and work together, especially the interaction between the needle, bobbin, and hoop, is key to successful stitching. Keeping the thread tension embroidery machine setting correct is also vital. It’s a complex system simplified by computer controlled embroidery, allowing people to create beautiful stitched designs with speed and precision.
Frequently Asked Questions
How long does it take for an embroidery machine to make a design?
It depends on the design size and stitch count. More stitches take longer. A simple small logo might take a few minutes. A large, dense design could take an hour or more. The machine’s speed also matters.
Can I use regular sewing thread in an embroidery machine?
Yes, but it’s often not the best choice. Embroidery thread is usually stronger and has a nicer sheen than regular sewing thread. Regular thread can break more often at high machine speeds. Bobbin thread for embroidery is usually thinner than regular sewing thread.
What is machine embroidery software used for?
It’s used to create or edit the digital design files that the embroidery machine reads. You tell the computer where to put stitches, what type, and what color. This is also called digitizing for machine embroidery.
Why are my stitches looping on the back of my fabric?
This is often called a “bird’s nest.” It usually means the top thread was not threaded correctly or the thread tension embroidery machine is too loose on top. It can also happen if the bobbin is not in right or the fabric is not hooped tightly enough.
Do I need special fabric for machine embroidery?
Not always, but some fabrics are easier than others. Stable, non-stretchy fabrics work well. Stretchy or very thin fabrics need the right type of stabilizer to get good results.
What does a bobbin in embroidery machine do?
It holds the under thread (bottom thread). The top thread loops around the bobbin thread under the fabric to lock each stitch in place.
Why did my embroidery machine needle break?
It could be bent from hitting the hoop or bobbin case. It might be dull. The thread tension might be too tight. It could be the wrong size or type for the fabric or design density.
What is an embroidery machine hoop for?
The embroidery machine hoop holds the fabric tight and flat. It connects to the moving part of the machine (pantograph). The machine moves the hoop to position the fabric for each stitch. This keeps the fabric from shifting while stitching.