
Knowing how to fill a bobbin is a key part of using any sewing machine, including a Singer. It’s one of the first things you learn, and thankfully, it is quite simple. Can you fill a bobbin without using the machine? Some external winders exist, but most people use the built-in Singer sewing machine bobbin winder. This part of your machine is made specifically for quickly and neatly winding thread on bobbins. We will walk through the easy steps to get your bobbin ready for sewing.
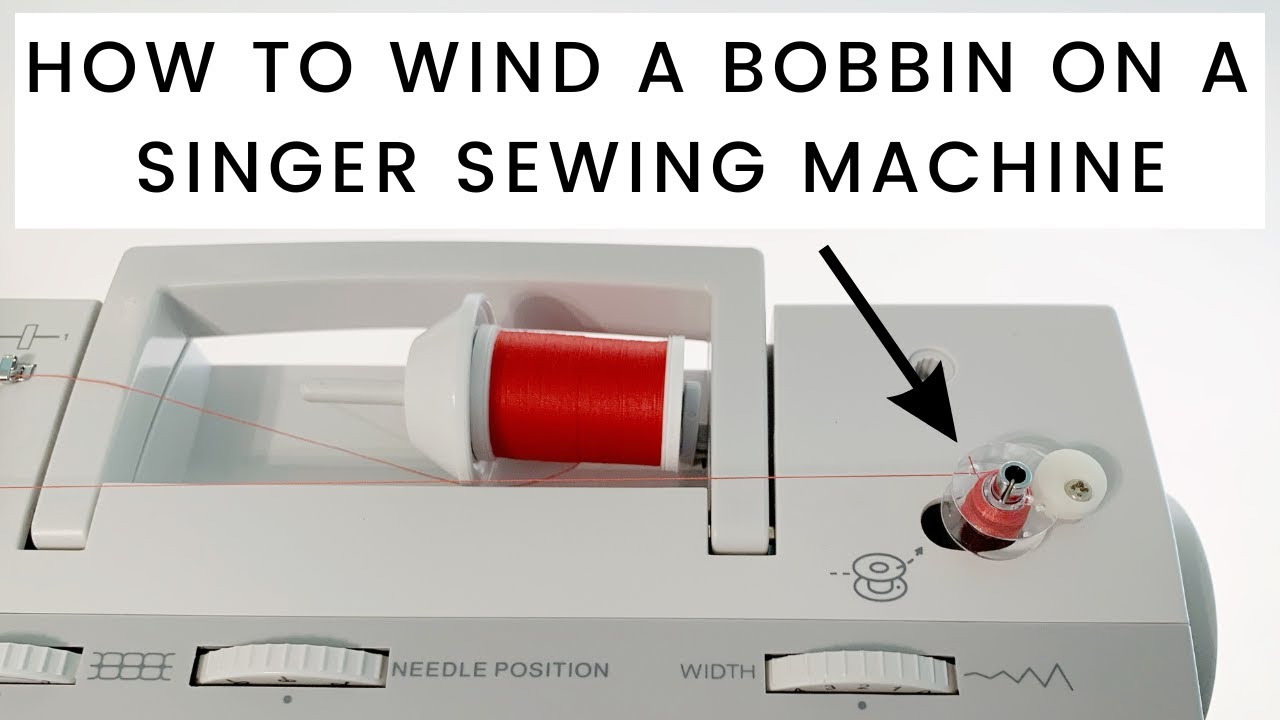
Image Source: i.ytimg.com
Getting Ready to Wind a Bobbin
Before you even touch the bobbin winder, you need to get your sewing machine and supplies ready. This makes the whole process go smoothly and helps avoid simple mistakes. Think of it like gathering your ingredients before you start cooking.
Prepare Your Work Area
- Clear Space: Make sure the area around your sewing machine is clean and clear. You need space to move the thread and the bobbin without things getting in the way.
- Good Light: Good light helps you see the thread path clearly. This is important for making sure you put the thread in the right spots.
- Have Supplies Ready: Get your thread spool and the bobbin you want to fill. Make sure you are using the right size and type of bobbin for your specific Singer machine. Using the wrong bobbin is a common bobbin winder problems Singer users might face.
Choose Your Thread and Bobbin
- Matching Thread: Pick the spool of thread you want to use. Use the same type and weight of thread in your bobbin as you use for the upper thread. This helps create nice, balanced stitches.
- Right Bobbin: Singer machines often use specific types of bobbins. Common types include Class 15 and Class 66. Look in your sewing machine manual to see which type you need. A bobbin that is too tall, too short, or has the wrong shape can cause trouble with the winder or even damage your machine. The right bobbin fits perfectly on the Singer sewing machine bobbin winder spindle.
Check Your Machine Settings
- Machine On: Turn on your sewing machine.
- Needle Up: It is a good idea to raise the needle to its highest point. This is often done by turning the handwheel towards you.
- Disengage Needle Bar: Most Singer machines have a way to stop the needle from moving while the bobbin winder works. This is super important for safety and preventing broken needles!
- What does this mean? You need to stop the part that moves the needle.
- How do you do it? On many Singer machines, you loosen a small clutch knob in the center of the handwheel. You turn it towards you (counter-clockwise). You only need to loosen it a little bit.
- Why do you do this? When the clutch is loose, the motor power goes only to the bobbin winder, not the needle.
- Check your manual: Always look at your Singer manual. It will show exactly where this knob is and which way to turn it on your specific model. Some newer electronic machines might have a button or a different way to do this, sometimes it happens automatically when you engage the bobbin winder.
The Path of the Thread: Where It Goes
Before you can start winding thread on bobbin, the thread needs to follow a specific path from the spool to the bobbin winder. This path usually includes some guides and a tension disc. Following the correct path is a key part of how to thread bobbin winder.
Placing the Singer Sewing Machine Thread Spool
- Spool Pin: Find the spool pin on your Singer sewing machine. This is where the Singer sewing machine thread spool sits.
- Most machines have a vertical pin on top.
- Some might have a horizontal pin.
- Put Spool On: Place the thread spool onto the spool pin.
- Spool Cap (Optional but Recommended): If your machine came with a spool cap (a small plastic disc), put it on the spool pin after the thread spool. This keeps the thread from jumping off the pin, especially if the spool spins fast. Make sure the cap is the right size for your spool.
Guiding the Thread
The thread does not go straight from the spool to the bobbin. It needs to pass through guides that help keep it in place and direct it correctly. This is part of the Singer bobbin winding guide shown in your manual or on the machine itself.
- First Thread Guide: Find the first thread guide. This is often a hook or a loop near the spool pin. Guide the thread through it.
- The Bobbin Tension Disc: This is a very important part of how to wind thread onto bobbin Singer. Find the bobbin tension disc Singer. It’s usually a small set of metal discs or a guide specifically for bobbin winding tension.
- Why is it needed? It puts a little bit of pull or tension on the thread as it winds onto the bobbin. This tension is needed so the thread winds tightly and evenly. If there is no tension, the thread will wind loosely and make a messy bobbin. A messy bobbin can cause problems with your stitches later.
- How to thread it: Wrap the thread around or through the bobbin tension disc(s) as shown in your manual or on the machine’s markings. There might be an arrow showing the direction to wrap.
- Make sure it’s seated: Pull the thread slightly to make sure it is sitting down inside the tension discs correctly. You should feel a slight pull.
Following the Bobbin Winding Guide
Look at your sewing machine. It might have a little diagram or numbers showing the exact path the thread needs to take for bobbin winding. This is your Singer bobbin winding guide. Follow it carefully. The path is often different from the path you use for threading the upper needle.
Putting the Bobbin on the Spindle
Now that the thread is coming from the spool and through the tension guide, it’s time to get the bobbin ready for filling. This involves placing bobbin on spindle.
Finding the Bobbin Winder Spindle
- Where Is It? The bobbin winder assembly is usually located on the top or front of your Singer sewing machine. It has a small metal pin or spindle that sticks up. This is the part the empty bobbin sits on.
- The Bobbin Winder Itself: The whole setup might include the spindle and a small lever or mechanism that you slide to engage the winder. This whole unit is the Singer sewing machine bobbin winder.
Preparing the Bobbin
- Find the Small Hole: Look at your empty bobbin. There is usually a small hole (or sometimes two) on the top edge or side.
- Thread the Hole: Take the end of the thread that you guided through the tension disc. Push the end of this thread through one of the small holes on your bobbin from the inside to the outside. Pull about 3 to 4 inches of thread through. This helps the thread catch and start winding smoothly.
Placing the Bobbin on the Spindle
- Orient the Bobbin: Make sure the bobbin is oriented correctly. The side with the thread coming out of the hole should generally face up or towards you, depending on the machine design.
- Push Onto Spindle: Place the bobbin firmly onto the Singer sewing machine bobbin winder spindle. Push it down until it sits snugly. The spindle might have a spring or a clip to hold it in place.
- Engage the Winder: This is a crucial step. You need to move the bobbin winder assembly (with the bobbin on the spindle) into the winding position.
- How to Engage: There is usually a lever or the whole spindle unit slides. Push the bobbin winder towards the right (or in the direction shown by an arrow on your machine). You might hear a soft click when it locks into place. This engages the mechanism that will spin the bobbin when the machine motor runs.
- Check Manual: Again, your manual is the best guide here. It will show exactly how to engage the bobbin winder on your specific Singer model.
- What Happens When Engaged? When engaged, the bobbin on the spindle sits against a rubber wheel or part of the machine that spins when the motor runs.
Starting to Wind the Bobbin
Now everything is set up. The thread is on the spool, through the guides, through the tension disc, threaded into the bobbin, and the bobbin is placed and engaged on the winder spindle. You are ready to start the sewing machine bobbin filling instructions.
Holding the Thread Tail
- Keep It Taut: Hold the end of the thread that you pulled through the bobbin hole. Hold it pointing upwards and slightly away from the bobbin. Keeping a little tension on this tail helps the first few wraps of thread wind neatly around the bobbin.
- About 3-4 Inches: You only need to hold about 3 to 4 inches of the thread tail.
Starting the Winding
- Press the Foot Pedal: Gently press the foot pedal of your sewing machine. The bobbin winder spindle will start to spin.
- Watch the First Wraps: As the bobbin spins, the thread will start winding thread on bobbin. Watch the first few wraps carefully.
- Wind Over the Tail: The goal is to quickly wind thread over the thread tail that you are holding. After the bobbin spins a few times and the thread tail is caught under the newly wound thread, you can stop holding the tail.
- Trim the Tail: Once the thread tail is held securely by the wound thread, stop the machine. Carefully snip off the excess thread tail that you were holding. Cut it close to the bobbin, but be careful not to cut the thread leading from the spool.
Winding the Rest of the Bobbin
- Resume Winding: Start pressing the foot pedal again.
- Control the Speed: You can control how fast the bobbin fills by how hard you press the foot pedal. Start slowly, and once you see the thread is winding smoothly, you can press harder to speed it up.
- Let the Winder Work: The Singer sewing machine bobbin winder is designed to distribute the thread evenly across the bobbin. You usually do not need to guide the thread back and forth with your hand, although on some older or simpler machines, you might have to gently guide it slightly to help it wind evenly. Most modern Singer winders do this automatically.
- Watch It Fill: Keep an eye on the bobbin as it fills. The thread should be winding on smoothly and evenly from side to side. This is the main part of the sewing machine bobbin filling instructions.
Knowing When It’s Full
- Automatic Stop: Many Singer bobbin winders have an automatic stop feature. As the bobbin fills and gets larger, the thread pushes against a lever or sensor. When the bobbin reaches the correct fullness, this lever moves, and the bobbin winder automatically disengages or stops spinning. This prevents you from overfilling the bobbin.
- Why Not Overfill? An overfilled bobbin will not fit correctly into the bobbin case or shuttle area of your machine. It can cause jams, tangled thread, and even timing problems.
- Manual Stop: If your machine does not have an automatic stop, you need to watch the bobbin and stop winding when it is nearly full. Stop when the thread gets close to the edge of the bobbin flange (the outer disc). Do not let it pile up higher than the edge.
Finishing and Removing the Bobbin
Once the bobbin is full (either stopped automatically or stopped by you), you are almost done with how to wind thread onto bobbin Singer.
Stopping the Machine
- Release Pedal: Take your foot off the pedal to stop the motor.
Disengaging the Winder
- Slide Back: Slide the bobbin winder assembly (the part the bobbin is on) back to its original, non-winding position. This is usually sliding it to the left. You might hear another soft click. This connects the motor power back to the needle mechanism.
- Tighten Clutch (If You Loosened It): If you loosened the clutch knob in the handwheel at the beginning, remember to tighten it again now. Turn it away from you (clockwise) until it is finger-tight. If you do not tighten this, your needle will not move when you press the foot pedal for sewing!
Cutting the Thread
- Use Thread Cutter: Many machines have a small thread cutter built into the bobbin winder area or on the side of the machine. Pull the thread taut between the spool and the filled bobbin and slide it into the cutter.
- Use Scissors: If there is no cutter, use sharp scissors to snip the thread, leaving enough thread coming from the spool to easily thread the machine next time.
Removing the Filled Bobbin
- Lift Off Spindle: Simply lift the filled bobbin straight up off the spindle.
- Check the Wind: Look at your newly filled bobbin. The thread should be wound on smoothly and evenly across the width of the bobbin. It should not be lumpy or piled up on one side. An evenly wound bobbin is key to good stitch formation.
Interpreting How the Winder Works
It helps to know a little bit about the parts involved in the Singer sewing machine bobbin winder. This helps you understand why you do certain steps and makes troubleshooting easier.
The Spool Pin
- Purpose: Holds the Singer sewing machine thread spool.
- Importance: Needs to be positioned correctly for the thread to unwind smoothly without tangling.
Thread Guides
- Purpose: Direct the thread along the correct path from the spool to the tension disc and then to the bobbin winder.
- Importance: Keeps the thread from flopping around and ensures it goes through the tension correctly.
The Bobbin Tension Disc
- Purpose: Puts slight tension on the thread as it is being wound onto the bobbin.
- Importance: Ensures the thread winds on tightly and evenly. Without tension, the bobbin would be wound loosely, leading to poor stitches or birds’ nests (tangled thread) under your fabric. This is a critical part of the Singer bobbin winding guide path.
The Bobbin Winder Spindle
- Purpose: Holds the empty bobbin.
- Importance: It spins rapidly when engaged, causing the bobbin to spin and collect thread. Placing bobbin on spindle correctly ensures it spins true and doesn’t wobble.
The Engagement Mechanism
- Purpose: Moves the bobbin and spindle into position so they touch the drive wheel (or engage the motor directly), allowing the bobbin to spin.
- Importance: Connects the bobbin winder to the machine’s motor power when you want to wind a bobbin and disconnects it when you are done.
The Automatic Stop (If Applicable)
- Purpose: Detects when the bobbin is full and stops the winding process.
- Importance: Prevents overfilling, which can cause machine problems.
Addressing Common Bobbin Winder Problems Singer
Even though bobbin winding is simple, sometimes things go wrong. Here are some common bobbin winder problems Singer users might face and how to fix them.
Problem: Thread Winds Unevenly
- Looks Like: Thread is piled up on one side of the bobbin, or it looks loose and messy.
- Possible Causes:
- Incorrect Threading: The thread did not go through the bobbin tension disc Singer correctly, or it skipped a guide. The tension is too loose.
- Bobbin Not Seated: The bobbin is not pushed down all the way onto the spindle, or it’s the wrong size bobbin.
- Winder Not Engaged: The bobbin winder wasn’t fully pushed into the winding position.
- Guiding by Hand (If Not Needed): On automatic winders, trying to guide the thread can actually make it uneven.
- Fixes:
- Re-thread the bobbin winder path carefully. Make sure the thread snaps into the tension disc.
- Remove the bobbin and push it firmly back onto the spindle. Check your manual to ensure you are using the correct bobbin type.
- Make sure the bobbin winder is clicked or slid fully into the winding position.
- For automatic winders, let the machine distribute the thread itself.
Problem: Thread Breaks While Winding
- Looks Like: The thread snaps partway through winding.
- Possible Causes:
- Too Much Tension: The tension disc has too much pressure, or the thread is caught somewhere.
- Thread Caught: The thread is snagged on the spool, the spool pin, or a guide.
- Old/Bad Thread: The thread is old, brittle, or poor quality.
- Winding Too Fast: Winding at a very high speed, especially with delicate thread.
- Bobbin Edge: The thread is catching on a rough edge of the bobbin or spindle.
- Fixes:
- Check the tension disc. Make sure the thread is smooth there. Check your manual if you can adjust bobbin winding tension (some machines allow this).
- Check the entire thread path from the spool. Make sure the spool unwinds easily.
- Try new, good-quality thread.
- Wind the bobbin at a slower speed.
- Inspect the bobbin and spindle for rough spots. Discard damaged bobbins.
Problem: Bobbin Winder Won’t Engage or Spin
- Looks Like: You slide the winder over, but the bobbin doesn’t spin when you press the pedal, or the needle still moves.
- Possible Causes:
- Clutch Not Loosened (If Applicable): If your machine has a handwheel clutch, you forgot to loosen it. The power is still going to the needle mechanism.
- Winder Not Fully Engaged: The bobbin winder wasn’t pushed over far enough to connect with the drive mechanism.
- Mechanical Problem: The rubber ring that drives the winder is worn out, or there’s another internal issue.
- Fixes:
- Loosen the handwheel clutch knob (turn towards you). Remember to tighten it after winding!
- Make sure the bobbin winder assembly is slid completely into the winding position.
- If the above don’t work, the machine might need service. A worn drive ring is a common issue that a technician can fix easily.
Problem: Bobbin Overfills and Keeps Winding
- Looks Like: Thread is piling up higher than the sides of the bobbin, or it keeps spinning even when very full.
- Possible Causes:
- Automatic Stop Failure: If your machine has an automatic stop, it’s not working correctly. It might be stuck, dirty, or broken.
- Wrong Bobbin: Using a bobbin that is too small or shaped incorrectly for the winder’s stop mechanism.
- Fixes:
- Watch the bobbin and stop manually when it looks full but not overflowing.
- Check the automatic stop lever/sensor area for lint or obstructions. Clean it gently.
- Ensure you are using the correct type and size of bobbin recommended for your Singer machine.
- If the automatic stop is broken, it may need repair.
Problem: Thread Won’t Catch on Bobbin
- Looks Like: The bobbin spins, but the thread doesn’t wrap around it.
- Possible Causes:
- Forgot to Thread Hole: You didn’t put the thread end through the small hole in the bobbin.
- Thread Tail Not Held: You didn’t hold the thread tail for the first few turns.
- Fixes:
- Stop the machine. Take the bobbin off. Thread the end of the thread through one of the small holes in the bobbin (from inside to out). Put the bobbin back on the spindle. Hold the thread tail up and start again.
- Make sure you hold that thread tail for the first few turns until it is caught under the new thread wraps.
Tips for Perfect Bobbin Winding Every Time
Follow these simple tips to get the best results when winding thread on bobbin on your Singer machine.
- Use Correct Bobbins: Always use the type of bobbin made for your specific Singer model. This is perhaps the most important tip to avoid bobbin winder problems Singer.
- Follow the Thread Path: Pay close attention to the Singer bobbin winding guide (diagrams) on your machine or in the manual. The thread path for winding is often different from regular threading.
- Use the Tension Disc: Make sure the thread is properly seated in the bobbin tension disc Singer. This is vital for even winding.
- Start Slowly: Begin winding at a slow speed to ensure the thread catches on the bobbin correctly and the first layers wind smoothly.
- Don’t Overfill: Stop winding when the bobbin is full, either automatically or manually. Overfilling causes problems.
- Wind Only When Needed: Don’t wind a bobbin with old thread or a color you rarely use “just in case”. Wind bobbins with the thread you plan to sew with soon.
- Keep It Clean: Periodically clean the bobbin winder area, especially the tension disc, from lint and thread bits. This helps the mechanism work smoothly.
Grasping Why Proper Bobbin Winding Matters
It might seem like a small thing, but a well-wound bobbin is really important for successful sewing.
- Even Stitches: An evenly wound bobbin lets the thread feed smoothly off the bobbin and through the machine’s tension system. This results in balanced, even stitches on both the top and bottom of your fabric.
- Fewer Thread Breaks: Thread that is wound on too loosely can snag or twist as it comes off the bobbin, leading to thread breaks. If it’s wound too tightly without proper tension control, that can also cause issues.
- No Birds’ Nests: Loose or unevenly wound bobbins are a major cause of “birds’ nests” – tangled masses of thread on the underside of your fabric. This happens when the bobbin thread isn’t feeding correctly.
- Machine Health: Using the right bobbin and winding it correctly prevents damage to the bobbin case, shuttle, and the bobbin winder mechanism itself. Overfilled bobbins can actually strain machine parts.
Examining Bobbin Types for Singer Machines
Singer has used different bobbin types over the years. Using the right one is non-negotiable.
| Bobbin Type | Common Appearance | Fits Many Machines From… | Notes |
|---|---|---|---|
| Class 15 | Flat on both sides | Mid-20th Century to Present | Very common. Often clear plastic or metal. |
| Class 66 | Domed or slightly rounded on one side | Older Machines | Distinct shape. Usually metal, sometimes clear or colored plastic. |
| Class 9113 | Plastic, specific shape for some models | Some newer machines | Less common than 15 or 66. Check your manual. |
| Other | Various | Specific models | Some modern computerized machines use unique bobbins. |
How to know which one you need? Look in your machine’s manual. It will clearly state the bobbin type. If you don’t have the manual, look up your specific Singer model online. Using the wrong bobbin will likely cause bobbin winder problems Singer users will quickly notice.
Step-by-Step Actions for Filling a Bobbin
Here is a quick list of the actions for sewing machine bobbin filling instructions on most Singer machines:
- Turn on the machine.
- Place your Singer sewing machine thread spool on the spool pin. Use a spool cap if you have one.
- Guide the thread through the first thread guide near the spool.
- Wrap the thread around or through the bobbin tension disc Singer. Follow the machine’s path diagram.
- Thread the end of the thread through a small hole on your empty bobbin (inside to outside).
- Place the bobbin onto the Singer sewing machine bobbin winder spindle. Push it down firmly. This is the action of placing bobbin on spindle.
- Slide the bobbin winder assembly into the winding position (often to the right).
- If your machine has a handwheel clutch, loosen it now (turn towards you).
- Hold the thread tail (3-4 inches) pointing up.
- Gently press the foot pedal to start the bobbin spinning and winding thread on bobbin.
- Let the thread wind over the tail for a few turns. Stop the machine and trim the thread tail close to the bobbin.
- Resume winding, controlling speed with the pedal. Watch the bobbin fill evenly. This is how to wind thread onto bobbin Singer.
- Stop winding when the bobbin is full (either automatic stop engages or you stop manually before it overflows).
- Release the foot pedal.
- Slide the bobbin winder back to its non-winding position (often to the left).
- If you loosened the clutch knob, tighten it now (turn away from you).
- Cut the thread connecting the spool to the bobbin using the cutter or scissors.
- Lift the filled bobbin off the spindle.
- Admire your neat, full bobbin!
These are the basic sewing machine bobbin filling instructions for most Singer models.
Caring for Your Bobbin Winder
Keeping your Singer sewing machine bobbin winder clean helps it work well.
- Remove Lint: Lint and small bits of thread can build up around the spindle, the tension discs, and the engagement mechanism. Use a small brush or a vacuum cleaner attachment to gently remove this debris regularly.
- Check Drive Wheel: If your winder uses a rubber wheel to spin the bobbin, check it for wear or flat spots. A worn wheel might not spin the bobbin correctly, leading to uneven winding or the winder not working. This might require a technician to replace.
- Keep it Lubricated (If Your Manual Says So): Some older machines might require a drop of sewing machine oil on the bobbin winder spindle occasionally. Check your manual! Do not oil parts that are not meant to be oiled, especially on newer electronic machines.
Proper care prevents many bobbin winder problems Singer owners encounter.
Frequently Asked Questions (FAQ)
Q: What is the little hole on the bobbin for?
A: The small hole is where you thread the end of your thread through before you start winding. This helps the thread catch onto the bobbin for the first few turns.
Q: Why does my bobbin winder keep stopping?
A: If it stops when the bobbin is full, the automatic stop is working. If it stops before it’s full, check if the winder is fully engaged, if the thread is breaking, or if the bobbin is seated correctly. Check your manual for specific bobbin winder problems Singer models might have.
Q: Do I need to hold the thread while winding?
A: You only need to hold the thread tail for the very first few turns until the new thread wraps over and catches it. After that, you can trim the tail and let the machine wind.
Q: Why is my bobbin winding loosely?
A: The most common reason for loose winding is that the thread is not correctly going through the bobbin tension disc Singer. Make sure it’s threaded correctly there.
Q: Can I fill a metal bobbin on a machine that uses plastic bobbins?
A: No. You must use the correct type and size of bobbin for your specific machine. Using the wrong bobbin can cause problems with the winder, tension, and stitch quality, and may even damage the machine. Always use the bobbin type listed in your Singer manual.
Q: My needle moves when I’m winding a bobbin. Is that okay?
A: No, the needle should not move when winding a bobbin on most Singer machines. This means the handwheel clutch is not disengaged correctly. Stop immediately, loosen the clutch knob in the center of the handwheel (turn towards you), and then restart winding. Remember to tighten it again before sewing.
Conclusion
Learning how to wind thread onto bobbin Singer machines is a simple but essential skill for anyone who sews. By following the easy steps – setting up your machine, guiding the thread through the Singer bobbin winding guide including the crucial bobbin tension disc Singer, placing bobbin on spindle, and starting the winding process correctly – you can ensure your bobbins are filled neatly every time. Proper winding prevents stitch problems and keeps your machine happy. If you run into bobbin winder problems Singer, check the thread path, the bobbin type, and make sure the winder is engaged fully. With a little practice, filling a bobbin will become second nature, letting you get to the fun part: sewing!