
Sewing is a great skill. Your sewing machine needs two threads to sew. One thread comes from the needle. The other thread comes from the bobbin. A bobbin is a small spool that holds thread. You need to fill the bobbin with thread before you can sew. This guide will show you how to fill a bobbin on a Singer sewing machine. It is easy when you know the steps. What is a Singer bobbin winder? A Singer bobbin winder is a part on your machine. It helps you wrap thread onto an empty bobbin quickly and neatly. It stops the bobbin when it is full. Can I use any thread on my bobbin? Yes, you should use the same kind of thread on your bobbin as you use in your needle. This helps your stitches look good and strong.
Filling the bobbin is a basic sewing skill. It is the first step before you start stitching. A well-filled bobbin makes your machine work better. Let’s learn how to do it.
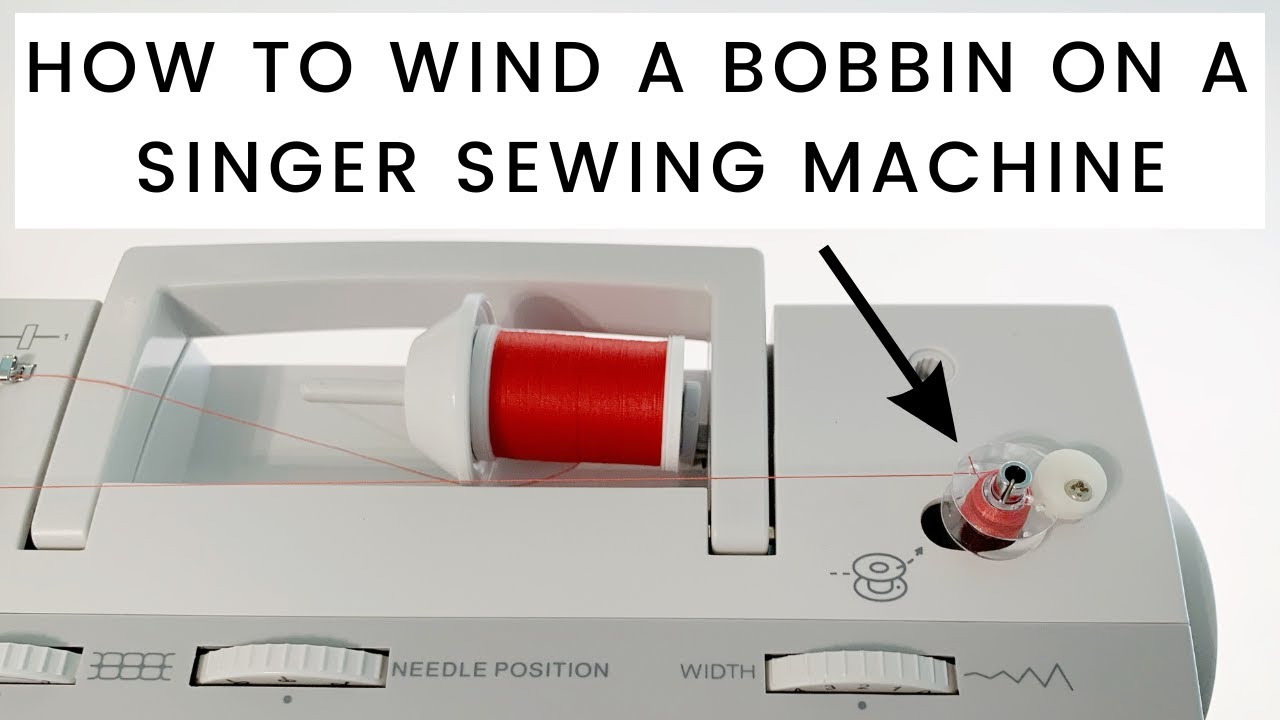
Image Source: i.ytimg.com
Getting Ready to Wind
Before you start filling the bobbin, get your things ready. You need your Singer sewing machine, an empty bobbin, and the thread you want to use. Make sure your machine is plugged in and turned on.
Why Proper Winding Matters
Filling your bobbin the right way is important. If the thread is too loose or too tight, your stitches will not look good. They might break. If the thread is not wrapped evenly, it can cause problems when sewing. The machine might skip stitches. Or the thread might get tangled inside the machine.
Winding thread on bobbin correctly helps your sewing machine make nice, even stitches. It helps the machine feed the thread smoothly from the bobbin case.
Parts You Need to Know
Your Singer machine has special parts for winding the bobbin. It is good to know what they are called and what they do.
Knowing Your Machine Parts
Let’s look at the parts you will use.
Singer Bobbin Winder
This is the main part for winding thread. It usually has a small metal or plastic pin. The bobbin sits on this pin. The winder often moves. You push it towards the right (or sometimes left) to make it work. Pushing it the other way stops it.
Bobbin Winding Spindle
This is the small pin that sticks up from the Singer bobbin winder part. The empty bobbin is pushed onto this bobbin winding spindle. It spins very fast to wrap the thread.
Singer Sewing Machine Tension Disc
There is a special part that helps guide the thread. It puts a little bit of pull or tension on the thread as it wraps onto the bobbin. This helps the thread wrap smoothly and evenly. Without this Singer sewing machine tension disc, the thread would wind on loose and messy. Find this disc on your machine. It might look like two small metal plates close together. The thread goes between them.
Handwheel on Singer Machine
The handwheel is a large wheel on the side of your sewing machine. You can turn it with your hand. It moves the needle up and down. When you wind a bobbin, you usually need to stop the needle from moving. You do this by loosening the handwheel. On most Singer machines, you turn the inner part of the handwheel towards you (counter-clockwise) to make it loose. This disconnects the needle so it doesn’t go up and down while the bobbin winder spins. Remember to tighten it again after winding the bobbin. Turn the inner part away from you (clockwise).
Step-by-Step Winding Process
Here is how to fill a bobbin on Singer sewing machine. Follow these steps carefully.
Step 1: Place the Bobbin
Take your empty bobbin. It is important to use a bobbin that is right for your Singer machine. Singer machines usually use specific types of bobbins. Using the wrong size or type can cause problems. If you are not sure, check your machine’s manual or look at the bobbin that came with your machine.
Push the empty bobbin onto the bobbin winding spindle. Make sure it goes all the way down. It should fit snugly.
Step 2: Thread the Winder
Now, take the thread you want to wind. Find the thread spool pin on your machine. This is where you put the spool of thread. Place the spool of thread on the spool pin. Make sure the thread comes off the spool the right way. For most threads, it should come off the front or top of the spool. Check your manual if you are not sure.
Next, guide the thread. Your machine has a path for the thread to follow to get to the bobbin winder. This path usually starts near the spool pin. The thread will go through some guides. Then, it will go around or through the Singer sewing machine tension disc. This disc adds a little pull to the thread. This pull makes sure the thread winds tightly and evenly on the bobbin. Make sure the thread goes firmly into the tension disc. It should go between the two parts of the disc.
After the tension disc, the thread goes to the bobbin. Look for a small guide near the bobbin winder. Thread goes through this guide. This guide helps the thread wind evenly across the bobbin.
Now, take the end of the thread. Put it through one of the small holes on the top edge of the bobbin. Most bobbins have a few small holes. Push the thread through one hole from the inside of the bobbin to the outside. Pull about three or four inches of thread through the hole.
Step 3: Engage the Winder
With the thread through the bobbin hole, hold the tail end of the thread. Push the Singer bobbin winder towards the right. You will hear a click. This means the winder is ready to work. The bobbin winding spindle is now connected to the machine’s motor.
Remember the handwheel? Now is the time to loosen it. Find the handwheel on the side. It has an outer part and sometimes an inner part. You need to turn the inner part. Turn the inner part of the handwheel towards you (counter-clockwise). This stops the needle bar from moving. This is important. You don’t want the needle going up and down very fast while the bobbin winds.
Step 4: Start Winding Thread on Bobbin
Hold onto the end of the thread that you pulled through the bobbin hole. This tail end needs to be held for the first few wraps.
Now, gently push the foot pedal. The machine motor will start. The bobbin winding spindle will spin. The bobbin will turn quickly. The thread will start wrapping around the bobbin.
Let the bobbin turn a few times. Watch the thread wrap around the middle of the bobbin. The tail end of the thread you were holding will get caught under the new wraps. After the bobbin has turned a few times and trapped the thread end, you can stop holding the tail. It is now held securely by the thread on the bobbin.
Cut off the small thread tail that was sticking out of the hole. You don’t want this sticking out when you sew. Cut it close to the bobbin surface.
Now, press the foot pedal again. The machine will keep spinning the bobbin. The thread will start filling up the bobbin. The guide near the winder helps the thread lay smoothly side to side on the bobbin.
Keep winding. Watch the bobbin fill up. It should fill evenly from one side to the other. The Singer bobbin winder has a stop mechanism. When the bobbin gets full, it will push against a lever or part on the winder. This makes the winder move slightly away from the spinning wheel. It stops the bobbin from spinning.
Step 5: Stop Winding
When the bobbin is full, the winder should stop automatically. If it doesn’t stop right when it looks full, stop pressing the foot pedal yourself. The bobbin is full when the thread reaches close to the edge of the bobbin. Do not overfill the bobbin. Overfilling can make the thread tight and cause problems later.
Once the bobbin has stopped spinning, take your foot off the pedal.
Step 6: Cut the Thread
The bobbin is full. The winder has stopped. The thread is still connected to the spool on your machine. There is a thread that goes from the spool, through the guides, and onto the full bobbin.
Cut this thread. Many machines have a small thread cutter built-in near the bobbin winder. Or you can use scissors. Cut the thread connecting the spool to the full bobbin.
Now, slide the Singer bobbin winder back to its resting place (usually to the left). This disengages it from the motor. Take the full bobbin off the bobbin winding spindle.
You have a full bobbin ready to use!
Remember to tighten the handwheel on Singer machine again. Turn the inner part away from you (clockwise). This connects the needle back to the motor so you can sew.
Checking the Wound Bobbin
After you wind a bobbin, it is a good idea to look at it. A good bobbin is important for good sewing.
How to Check for Even Winding
Look at the thread on the bobbin. Does it look smooth? Is it piled up more on one side than the other? Does it go all the way across the bobbin from edge to edge?
A properly wound bobbin has thread that is wrapped smoothly and evenly. The thread should go back and forth across the bobbin. It should not be lumpy or have dips. The thread should fill the bobbin almost to the edge, but not over the edge.
What Uneven Bobbin Winding Looks Like
Uneven bobbin winding happens when the thread does not wrap smoothly from side to side.
Signs of uneven bobbin winding:
* The thread piles up on just one side of the bobbin.
* The thread is higher in the middle than on the sides.
* The thread is lower in the middle, making a dip.
* The thread spills over the edges of the bobbin.
Uneven winding can cause problems when you sew. The thread might not come off the bobbin smoothly. This can cause tight stitches, broken thread, or tangles under your fabric (called bird’s nests).
If your bobbin is unevenly wound, it is best to unwind it and try again. It might mean there is a problem with the threading path or the tension disc.
Troubleshooting Bobbin Winding Problems
Sometimes, winding a bobbin doesn’t go perfectly. Here are some common problems and what to do. This is about troubleshooting bobbin winding.
Common Issues and Fixes
Let’s look at things that can go wrong and how to fix them.
Thread Breaking
If the thread breaks while winding:
* Check the threading path: Make sure the thread is going through all the guides correctly.
* Check the tension disc: Is the thread going between the Singer sewing machine tension disc plates? If it is just wrapped around the outside, the tension might be too high, causing breaks. If the tension is too low, the thread might wind loose and then get tangled and break.
* Check the thread: Is the thread old or weak? Try using new thread.
* Check the bobbin: Is the bobbin damaged? A crack or rough spot can snag the thread.
Loose or Tight Winding
- Loose winding: If the thread is loose on the bobbin, it wasn’t threaded through the Singer sewing machine tension disc correctly. Make sure the thread is snapped firmly between the tension disc plates. The tension disc adds the needed pull.
- Tight winding: If the thread is too tight, the tension disc might be dirty or set too high (if adjustable). Clean the tension disc area. Make sure thread is not wrapped around anything else it shouldn’t be. Check if the thread feels hard like a rock on the bobbin. It should be firm, but not squashed tight.
Uneven Bobbin Winding
As we talked about, uneven winding is common.
* Check the threading path: Is the thread going through the small guide right before the bobbin? This guide helps lay the thread evenly side-to-side. If the thread is not in this guide, it will pile up in one spot.
* Check the bobbin: Is the bobbin sitting straight on the bobbin winding spindle? If it’s wobbly, it can cause uneven winding.
* Check the winder mechanism: Is the Singer bobbin winder moving smoothly? If it’s sticky or bent, it might not move enough to help the thread wind evenly. Sometimes lint or dirt gets in the winder mechanism.
Bobbin Not Filling Up
If the bobbin winding spindle spins, but the thread doesn’t wrap onto the bobbin:
* Is the thread through the bobbin hole? Remember, you need to thread it through one of the small holes on the bobbin edge first to get it started.
* Is the winder engaged? Make sure you have pushed the Singer bobbin winder over to the right (or winding position).
* Is the handwheel loose? If you forgot to loosen the inner handwheel, the needle might be moving, but the bobbin winder might not be getting full power to spin the bobbin firmly. The outer handwheel might be spinning, but the bobbin winding spindle might not be connected fully.
Let’s put some common issues in a table for quick help.
| Problem | What it looks like | Possible Reason | How to Fix It |
|---|---|---|---|
| Thread Breaks | Thread snaps while winding | Too much tension, weak thread, snag | Check tension disc, use new thread, check thread path/bobbin for snags |
| Loose Winding | Thread is soft and loose on bobbin | Not enough tension | Make sure thread is between Singer sewing machine tension disc plates |
| Tight Winding | Thread is hard on bobbin, almost bulging | Too much tension | Check tension disc for dirt, ensure thread isn’t caught elsewhere |
| Uneven Winding | Thread piles up on one side or middle | Not using thread guide, bobbin wobbly, winder problem | Use the thread guide before bobbin, check bobbin fit, clean winder area |
| Bobbin Not Winding | Spindle spins but bobbin doesn’t fill | Thread not started in bobbin hole, winder not engaged | Thread through bobbin hole first, push Singer bobbin winder over |
| Needle Moves While Winding | Needle goes up/down fast while winding bobbin | Handwheel not loosened | Loosen inner handwheel on Singer machine (turn towards you) |
| Winder Doesn’t Stop | Bobbin keeps spinning when full, thread spills off | Automatic stop mechanism not working or overfilled | Stop machine manually, check winder mechanism area for dirt, don’t overfill |
Loading the Bobbin After Winding
Now you have a perfectly wound bobbin! The next step is loading a bobbin into your machine so you can start sewing. Singer machines have different ways to load the bobbin. It depends on if your machine is top-loading or front-loading.
Inserting Bobbin in Bobbin Case (for top-loading)
Many newer Singer machines are top-loading. The bobbin goes right into a spot under a clear cover plate on the sewing surface.
- Take off the clear cover plate.
- Look at your full bobbin. See which way the thread comes off the bobbin. There might be a picture on your machine showing the correct direction. For most top-loading machines, the thread should come off the bobbin in a specific direction (often counter-clockwise, but check your machine).
- Drop the bobbin into the bobbin case area. Make sure it is facing the right way so the thread comes off in the correct direction.
- Find the thread path in the bobbin case area. There is usually a small slit or guide the thread needs to go through. Pull the thread into this guide. It might click into place. This sets the bobbin tension for sewing.
- Pull about 6 inches of thread out.
- Put the clear cover plate back on.
Inserting Bobbin in Bobbin Case (for front-loading)
Some older Singer machines, or certain models, are front-loading. The bobbin goes into a metal bobbin case, and then the case goes into a shuttle area in the front of the machine.
- Get your full bobbin and the metal bobbin case.
- Open the cover on the front of your machine to see the shuttle area.
- Hold the metal bobbin case. Look for a small slit or opening on the side. There is also a little pigtail-like spring area.
- Place the full bobbin into the metal bobbin case. The thread needs to come off the bobbin so it goes into the slit on the bobbin case. The direction of the thread coming off the bobbin matters here too. Check your manual. Usually, the thread comes off the bobbin clockwise when you hold the bobbin case.
- Pull the thread through the slit on the bobbin case. Then pull it under the little spring area. This is where the bobbin tension is set for front-loading machines.
- Pull about 4-6 inches of thread out of the bobbin case.
- Hold the bobbin case by the latch (a small hinged part). Open the latch.
- Slide the bobbin case into the shuttle area in the machine. It should click into place. Make sure it is seated correctly.
- Close the latch on the bobbin case.
- Close the cover on the front of the machine.
No matter which type of bobbin loading your machine has, you now have a full bobbin loaded and ready. This step of inserting bobbin in bobbin case is just as important as the winding step.
Care for Your Bobbin Winder
Your Singer bobbin winder needs a little care sometimes. Lint and dust from thread can build up around the bobbin winding spindle and the winder mechanism. This can make it sticky or stop it from working right.
Every now and then, use a small brush to clean around the bobbin winding spindle and the area where the winder moves. Check the Singer sewing machine tension disc used for winding too. Lint can get packed in there. Use a brush or a piece of thread to ‘floss’ between the tension plates. Keeping these parts clean helps the thread wind smoothly and evenly every time.
Conclusion
Learning how to fill bobbin on Singer sewing machine is a basic but vital skill for anyone who sews. It sets the stage for successful stitching. By following the steps to wind thread on bobbin correctly, using the Singer bobbin winder and tension disc, and engaging the handwheel on Singer machine correctly, you can ensure your bobbins are wound neatly. Knowing how to spot and fix uneven bobbin winding and other troubleshooting bobbin winding issues saves you time and frustration. Finally, properly inserting bobbin in bobbin case or loading a bobbin prepares your machine for sewing. Take your time with each bobbin, and you’ll be ready to sew smoothly.
Frequently Asked Questions (FAQ)
Q: How do I know which bobbin to use for my Singer machine?
A: Singer machines are made to work with specific bobbin types. Look in your machine’s manual. It will tell you the correct bobbin class or size. Using the wrong bobbin can cause machine problems. If you don’t have a manual, look at a bobbin that came with the machine or search online for your specific Singer model number.
Q: My bobbin winder doesn’t stop when it’s full. What’s wrong?
A: This could be because the automatic stop mechanism is dirty or bent. Look around the Singer bobbin winder for lint build-up. Clean the area. If it still doesn’t stop, the part that senses the full bobbin might need adjustment or repair. You will need to stop the winding manually when the bobbin looks full to avoid overfilling.
Q: The thread is winding loosely on the bobbin. How do I fix this?
A: Loose winding usually means the thread is not going through the Singer sewing machine tension disc correctly. Make sure the thread is pulled firmly between the two metal plates of the tension disc used for winding. The tension disc puts the right amount of pull on the thread as it winds.
Q: Why is my needle moving up and down when I wind the bobbin?
A: You forgot to disengage the needle bar. You do this by loosening the handwheel on Singer machine. Find the handwheel on the side of the machine. Turn the inner part of the handwheel towards you (counter-clockwise) before you start winding. Remember to tighten it again after you finish winding.
Q: My bobbin winds okay, but it’s higher on one side (uneven bobbin winding). What causes this?
A: Uneven bobbin winding is often caused by the thread not going through the small guide wire or hook right before it reaches the bobbin winding spindle. This guide helps distribute the thread evenly. Make sure your thread is correctly routed through this last guide before the bobbin.
Q: Can I fill a bobbin by hand?
A: You could, but it is very hard to get the thread wound evenly and with the right tension by hand. The machine’s bobbin winder is designed to do this quickly and correctly. Hand-wound bobbins often cause sewing problems. It is best to use the machine’s winder.
Q: How full should I make the bobbin?
A: Fill it until the thread is almost level with the edge of the bobbin. Do not let the thread pile up over the edges. Overfilling can cause thread jams or tension problems when sewing. The automatic stop on the Singer bobbin winder helps prevent overfilling.
Q: My Singer bobbin winder is noisy. Is this normal?
A: A little noise is normal as parts spin fast. But if it’s a new, loud grinding or squeaking noise, it might need cleaning or a drop of oil if your manual suggests oiling that part. Check your manual for oiling points. Lint build-up can also cause noise.
Q: Do I need to remove the bobbin from the machine before winding a new one?
A: Yes, you can’t wind a new bobbin while the old one is still in the bobbin case in the machine. The thread comes from the spool on top of the machine for winding. The old bobbin is for sewing with the thread from the new bobbin you will put in later.
Q: How does the Singer sewing machine tension disc help with bobbin winding?
A: The tension disc applies a little bit of resistance or pull to the thread as it wraps onto the bobbin. This tension is needed to make the thread wind tightly and smoothly onto the bobbin instead of loosely or in loops. Proper tension during winding prevents issues like bird’s nests later.
Sewing is a great skill. Your sewing machine needs two threads to sew. One thread comes from the needle. The other thread comes from the bobbin. A bobbin is a small spool that holds thread. You need to fill the bobbin with thread before you can sew. This guide will show you how to fill a bobbin on a Singer sewing machine. It is easy when you know the steps. What is a Singer bobbin winder? A Singer bobbin winder is a part on your machine. It helps you wrap thread onto an empty bobbin quickly and neatly. It stops the bobbin when it is full. Can I use any thread on my bobbin? Yes, you should use the same kind of thread on your bobbin as you use in your needle. This helps your stitches look good and strong.
Filling the bobbin is a basic sewing skill. It is the first step before you start stitching. A well-filled bobbin makes your machine work better. Let’s learn how to do it.
Getting Ready to Wind
Before you start filling the bobbin, get your things ready. You need your Singer sewing machine, an empty bobbin, and the thread you want to use. Make sure your machine is plugged in and turned on.
Why Proper Winding Matters
Filling your bobbin the right way is important. If the thread is too loose or too tight, your stitches will not look good. They might break. If the thread is not wrapped evenly, it can cause problems when sewing. The machine might skip stitches. Or the thread might get tangled inside the machine.
Winding thread on bobbin correctly helps your sewing machine make nice, even stitches. It helps the machine feed the thread smoothly from the bobbin case.
Parts You Need to Know
Your Singer machine has special parts for winding the bobbin. It is good to know what they are called and what they do.
Knowing Your Machine Parts
Let’s look at the parts you will use.
Singer Bobbin Winder
This is the main part for winding thread. It usually has a small metal or plastic pin. The bobbin sits on this pin. The winder often moves. You push it towards the right (or sometimes left) to make it work. Pushing it the other way stops it.
Bobbin Winding Spindle
This is the small pin that sticks up from the Singer bobbin winder part. The empty bobbin is pushed onto this bobbin winding spindle. It spins very fast to wrap the thread.
Singer Sewing Machine Tension Disc
There is a special part that helps guide the thread. It puts a little bit of pull or tension on the thread as it wraps onto the bobbin. This helps the thread wrap smoothly and evenly. Without this Singer sewing machine tension disc, the thread would wind on loose and messy. Find this disc on your machine. It might look like two small metal plates close together. The thread goes between them.
Handwheel on Singer Machine
The handwheel is a large wheel on the side of your sewing machine. You can turn it with your hand. It moves the needle up and down. When you wind a bobbin, you usually need to stop the needle from moving. You do this by loosening the handwheel. On most Singer machines, you turn the inner part of the handwheel towards you (counter-clockwise) to make it loose. This disconnects the needle so it doesn’t go up and down while the bobbin winder spins. Remember to tighten it again after winding the bobbin. Turn the inner part away from you (clockwise).
Step-by-Step Winding Process
Here is how to fill a bobbin on Singer sewing machine. Follow these steps carefully.
Step 1: Place the Bobbin
Take your empty bobbin. It is important to use a bobbin that is right for your Singer machine. Singer machines usually use specific types of bobbins. Using the wrong size or type can cause problems. If you are not sure, check your machine’s manual or look at the bobbin that came with your machine.
Push the empty bobbin onto the bobbin winding spindle. Make sure it goes all the way down. It should fit snugly.
Step 2: Thread the Winder
Now, take the thread you want to wind. Find the thread spool pin on your machine. This is where you put the spool of thread. Place the spool of thread on the spool pin. Make sure the thread comes off the spool the right way. For most threads, it should come off the front or top of the spool. Check your manual if you are not sure.
Next, guide the thread. Your machine has a path for the thread to follow to get to the bobbin winder. This path usually starts near the spool pin. The thread will go through some guides. Then, it will go around or through the Singer sewing machine tension disc. This disc adds a little pull to the thread. This pull makes sure the thread winds tightly and evenly on the bobbin. Make sure the thread goes firmly into the tension disc. It should go between the two parts of the disc.
After the tension disc, the thread goes to the bobbin. Look for a small guide near the bobbin winder. Thread goes through this guide. This guide helps the thread wind evenly across the bobbin.
Now, take the end of the thread. Put it through one of the small holes on the top edge of the bobbin. Most bobbins have a few small holes. Push the thread through one hole from the inside of the bobbin to the outside. Pull about three or four inches of thread through the hole.
Step 3: Engage the Winder
With the thread through the bobbin hole, hold the tail end of the thread. Push the Singer bobbin winder towards the right. You will hear a click. This means the winder is ready to work. The bobbin winding spindle is now connected to the machine’s motor.
Remember the handwheel? Now is the time to loosen it. Find the handwheel on the side. It has an outer part and sometimes an inner part. You need to turn the inner part. Turn the inner part of the handwheel towards you (counter-clockwise). This stops the needle bar from moving. This is important. You don’t want the needle going up and down very fast while the bobbin winds.
Step 4: Start Winding Thread on Bobbin
Hold onto the end of the thread that you pulled through the bobbin hole. This tail end needs to be held for the first few wraps.
Now, gently push the foot pedal. The machine motor will start. The bobbin winding spindle will spin. The bobbin will turn quickly. The thread will start wrapping around the bobbin.
Let the bobbin turn a few times. Watch the thread wrap around the middle of the bobbin. The tail end of the thread you were holding will get caught under the new wraps. After the bobbin has turned a few times and trapped the thread end, you can stop holding the tail. It is now held securely by the thread on the bobbin.
Cut off the small thread tail that was sticking out of the hole. You don’t want this sticking out when you sew. Cut it close to the bobbin surface.
Now, press the foot pedal again. The machine will keep spinning the bobbin. The thread will start filling up the bobbin. The guide near the winder helps the thread lay smoothly side to side on the bobbin.
Keep winding. Watch the bobbin fill up. It should fill evenly from one side to the other. The Singer bobbin winder has a stop mechanism. When the bobbin gets full, it will push against a lever or part on the winder. This makes the winder move slightly away from the spinning wheel. It stops the bobbin from spinning.
Step 5: Stop Winding
When the bobbin is full, the winder should stop automatically. If it doesn’t stop right when it looks full, stop pressing the foot pedal yourself. The bobbin is full when the thread reaches close to the edge of the bobbin. Do not overfill the bobbin. Overfilling can make the thread tight and cause problems later.
Once the bobbin has stopped spinning, take your foot off the pedal.
Step 6: Cut the Thread
The bobbin is full. The winder has stopped. The thread is still connected to the spool on your machine. There is a thread that goes from the spool, through the guides, and onto the full bobbin.
Cut this thread. Many machines have a small thread cutter built-in near the bobbin winder. Or you can use scissors. Cut the thread connecting the spool to the full bobbin.
Now, slide the Singer bobbin winder back to its resting place (usually to the left). This disengages it from the motor. Take the full bobbin off the bobbin winding spindle.
You have a full bobbin ready to use!
Remember to tighten the handwheel on Singer machine again. Turn the inner part away from you (clockwise). This connects the needle back to the motor so you can sew.
Checking the Wound Bobbin
After you wind a bobbin, it is a good idea to look at it. A good bobbin is important for good sewing.
How to Check for Even Winding
Look at the thread on the bobbin. Does it look smooth? Is it piled up more on one side than the other? Does it go all the way across the bobbin from edge to edge?
A properly wound bobbin has thread that is wrapped smoothly and evenly. The thread should go back and forth across the bobbin. It should not be lumpy or have dips. The thread should fill the bobbin almost to the edge, but not over the edge.
What Uneven Bobbin Winding Looks Like
Uneven bobbin winding happens when the thread does not wrap smoothly from side to side.
Signs of uneven bobbin winding:
* The thread piles up on just one side of the bobbin.
* The thread is higher in the middle than on the sides.
* The thread is lower in the middle, making a dip.
* The thread spills over the edges of the bobbin.
Uneven winding can cause problems when you sew. The thread might not come off the bobbin smoothly. This can cause tight stitches, broken thread, or tangles under your fabric (called bird’s nests).
If your bobbin is unevenly wound, it is best to unwind it and try again. It might mean there is a problem with the threading path or the tension disc.
Troubleshooting Bobbin Winding Problems
Sometimes, winding a bobbin doesn’t go perfectly. Here are some common problems and what to do. This is about troubleshooting bobbin winding.
Common Issues and Fixes
Let’s look at things that can go wrong and how to fix them.
Thread Breaking
If the thread breaks while winding:
* Check the threading path: Make sure the thread is going through all the guides correctly.
* Check the tension disc: Is the thread going between the Singer sewing machine tension disc plates? If it is just wrapped around the outside, the tension might be too high, causing breaks. If the tension is too low, the thread might wind loose and then get tangled and break.
* Check the thread: Is the thread old or weak? Try using new thread.
* Check the bobbin: Is the bobbin damaged? A crack or rough spot can snag the thread.
Loose or Tight Winding
- Loose winding: If the thread is loose on the bobbin, it wasn’t threaded through the Singer sewing machine tension disc correctly. Make sure the thread is snapped firmly between the tension disc plates. The tension disc adds the needed pull.
- Tight winding: If the thread is too tight, the tension disc might be dirty or set too high (if adjustable). Clean the tension disc area. Make sure thread is not wrapped around anything else it shouldn’t be. Check if the thread feels hard like a rock on the bobbin. It should be firm, but not squashed tight.
Uneven Bobbin Winding
As we talked about, uneven winding is common.
* Check the threading path: Is the thread going through the small guide right before the bobbin? This guide helps lay the thread evenly side-to-side. If the thread is not in this guide, it will pile up in one spot.
* Check the bobbin: Is the bobbin sitting straight on the bobbin winding spindle? If it’s wobbly, it can cause uneven winding.
* Check the winder mechanism: Is the Singer bobbin winder moving smoothly? If it’s sticky or bent, it might not move enough to help the thread wind evenly. Sometimes lint or dirt gets in the winder mechanism.
Bobbin Not Filling Up
If the bobbin winding spindle spins, but the thread doesn’t wrap onto the bobbin:
* Is the thread through the bobbin hole? Remember, you need to thread it through one of the small holes on the bobbin edge first to get it started.
* Is the winder engaged? Make sure you have pushed the Singer bobbin winder over to the right (or winding position).
* Is the handwheel loose? If you forgot to loosen the inner handwheel, the needle might be moving, but the bobbin winder might not be getting full power to spin the bobbin firmly. The outer handwheel might be spinning, but the bobbin winding spindle might not be connected fully.
Let’s put some common issues in a table for quick help.
| Problem | What it looks like | Possible Reason | How to Fix It |
|---|---|---|---|
| Thread Breaks | Thread snaps while winding | Too much tension, weak thread, snag | Check tension disc, use new thread, check thread path/bobbin for snags |
| Loose Winding | Thread is soft and loose on bobbin | Not enough tension | Make sure thread is between Singer sewing machine tension disc plates |
| Tight Winding | Thread is hard on bobbin, almost bulging | Too much tension | Check tension disc for dirt, ensure thread isn’t caught elsewhere |
| Uneven Winding | Thread piles up on one side or middle | Not using thread guide, bobbin wobbly, winder problem | Use the thread guide before bobbin, check bobbin fit, clean winder area |
| Bobbin Not Winding | Spindle spins but bobbin doesn’t fill | Thread not started in bobbin hole, winder not engaged | Thread through bobbin hole first, push Singer bobbin winder over |
| Needle Moves While Winding | Needle goes up/down fast while winding bobbin | Handwheel not loosened | Loosen inner handwheel on Singer machine (turn towards you) |
| Winder Doesn’t Stop | Bobbin keeps spinning when full, thread spills off | Automatic stop mechanism not working or overfilled | Stop machine manually, check winder mechanism area for dirt, don’t overfill |
Loading the Bobbin After Winding
Now you have a perfectly wound bobbin! The next step is loading a bobbin into your machine so you can start sewing. Singer machines have different ways to load the bobbin. It depends on if your machine is top-loading or front-loading.
Inserting Bobbin in Bobbin Case (for top-loading)
Many newer Singer machines are top-loading. The bobbin goes right into a spot under a clear cover plate on the sewing surface.
- Take off the clear cover plate.
- Look at your full bobbin. See which way the thread comes off the bobbin. There might be a picture on your machine showing the correct direction. For most top-loading machines, the thread should come off the bobbin in a specific direction (often counter-clockwise, but check your machine).
- Drop the bobbin into the bobbin case area. Make sure it is facing the right way so the thread comes off in the correct direction.
- Find the thread path in the bobbin case area. There is usually a small slit or guide the thread needs to go through. Pull the thread into this guide. It might click into place. This sets the bobbin tension for sewing.
- Pull about 6 inches of thread out.
- Put the clear cover plate back on.
Inserting Bobbin in Bobbin Case (for front-loading)
Some older Singer machines, or certain models, are front-loading. The bobbin goes into a metal bobbin case, and then the case goes into a shuttle area in the front of the machine.
- Get your full bobbin and the metal bobbin case.
- Open the cover on the front of your machine to see the shuttle area.
- Hold the metal bobbin case. Look for a small slit or opening on the side. There is also a little pigtail-like spring area.
- Place the full bobbin into the metal bobbin case. The thread needs to come off the bobbin so it goes into the slit on the bobbin case. The direction of the thread coming off the bobbin matters here too. Check your manual. Usually, the thread comes off the bobbin clockwise when you hold the bobbin case.
- Pull the thread through the slit on the bobbin case. Then pull it under the little spring area. This is where the bobbin tension is set for front-loading machines.
- Pull about 4-6 inches of thread out of the bobbin case.
- Hold the bobbin case by the latch (a small hinged part). Open the latch.
- Slide the bobbin case into the shuttle area in the machine. It should click into place. Make sure it is seated correctly.
- Close the latch on the bobbin case.
- Close the cover on the front of the machine.
No matter which type of bobbin loading your machine has, you now have a full bobbin loaded and ready. This step of inserting bobbin in bobbin case is just as important as the winding step.
Care for Your Bobbin Winder
Your Singer bobbin winder needs a little care sometimes. Lint and dust from thread can build up around the bobbin winding spindle and the winder mechanism. This can make it sticky or stop it from working right.
Every now and then, use a small brush to clean around the bobbin winding spindle and the area where the winder moves. Check the Singer sewing machine tension disc used for winding too. Lint can get packed in there. Use a brush or a piece of thread to ‘floss’ between the tension plates. Keeping these parts clean helps the thread wind smoothly and evenly every time.
Conclusion
Learning how to fill bobbin on Singer sewing machine is a basic but vital skill for anyone who sews. It sets the stage for successful stitching. By following the steps to wind thread on bobbin correctly, using the Singer bobbin winder and tension disc, and engaging the handwheel on Singer machine correctly, you can ensure your bobbins are wound neatly. Knowing how to spot and fix uneven bobbin winding and other troubleshooting bobbin winding issues saves you time and frustration. Finally, properly inserting bobbin in bobbin case or loading a bobbin prepares your machine for sewing. Take your time with each bobbin, and you’ll be ready to sew smoothly.
Frequently Asked Questions (FAQ)
Q: How do I know which bobbin to use for my Singer machine?
A: Singer machines are made to work with specific bobbin types. Look in your machine’s manual. It will tell you the correct bobbin class or size. Using the wrong bobbin can cause machine problems. If you don’t have a manual, look at a bobbin that came with the machine or search online for your specific Singer model number.
Q: My bobbin winder doesn’t stop when it’s full. What’s wrong?
A: This could be because the automatic stop mechanism is dirty or bent. Look around the Singer bobbin winder for lint build-up. Clean the area. If it still doesn’t stop, the part that senses the full bobbin might need adjustment or repair. You will need to stop the winding manually when the bobbin looks full to avoid overfilling.
Q: The thread is winding loosely on the bobbin. How do I fix this?
A: Loose winding usually means the thread is not going through the Singer sewing machine tension disc correctly. Make sure the thread is pulled firmly between the two metal plates of the tension disc used for winding. The tension disc puts the right amount of pull on the thread as it winds.
Q: Why is my needle moving up and down when I wind the bobbin?
A: You forgot to disengage the needle bar. You do this by loosening the handwheel on Singer machine. Find the handwheel on the side of the machine. Turn the inner part of the handwheel towards you (counter-clockwise) before you start winding. Remember to tighten it again after you finish winding.
Q: My bobbin winds okay, but it’s higher on one side (uneven bobbin winding). What causes this?
A: Uneven bobbin winding is often caused by the thread not going through the small guide wire or hook right before it reaches the bobbin winding spindle. This guide helps distribute the thread evenly. Make sure your thread is correctly routed through this last guide before the bobbin.
Q: Can I fill a bobbin by hand?
A: You could, but it is very hard to get the thread wound evenly and with the right tension by hand. The machine’s bobbin winder is designed to do this quickly and correctly. Hand-wound bobbins often cause sewing problems. It is best to use the machine’s winder.
Q: How full should I make the bobbin?
A: Fill it until the thread is almost level with the edge of the bobbin. Do not let the thread pile up over the edges. Overfilling can cause thread jams or tension problems when sewing. The automatic stop on the Singer bobbin winder helps prevent overfilling.
Q: My Singer bobbin winder is noisy. Is this normal?
A: A little noise is normal as parts spin fast. But if it’s a new, loud grinding or squeaking noise, it might need cleaning or a drop of oil if your manual suggests oiling that part. Check your manual for oiling points. Lint build-up can also cause noise.
Q: Do I need to remove the bobbin from the machine before winding a new one?
A: Yes, you can’t wind a new bobbin while the old one is still in the bobbin case in the machine. The thread comes from the spool on top of the machine for winding. The old bobbin is for sewing with the thread from the new bobbin you will put in later.
Q: How does the Singer sewing machine tension disc help with bobbin winding?
A: The tension disc applies a little bit of resistance or pull to the thread as it wraps onto the bobbin. This tension is needed to make the thread wind tightly and smoothly onto the bobbin instead of loosely or in loops. Proper tension during winding prevents issues like bird’s nests later.