
Yes, you absolutely can add belt loops to pants without sewing! You don’t need a needle or thread to make your pants fit better or look just the way you want. There are simple tricks and handy products you can use to put belt loops on your favorite pants, even jeans, without sewing a single stitch. This guide will show you how to add belt loops to pants without sewing, using different no sew belt loop methods that are easy and work well.
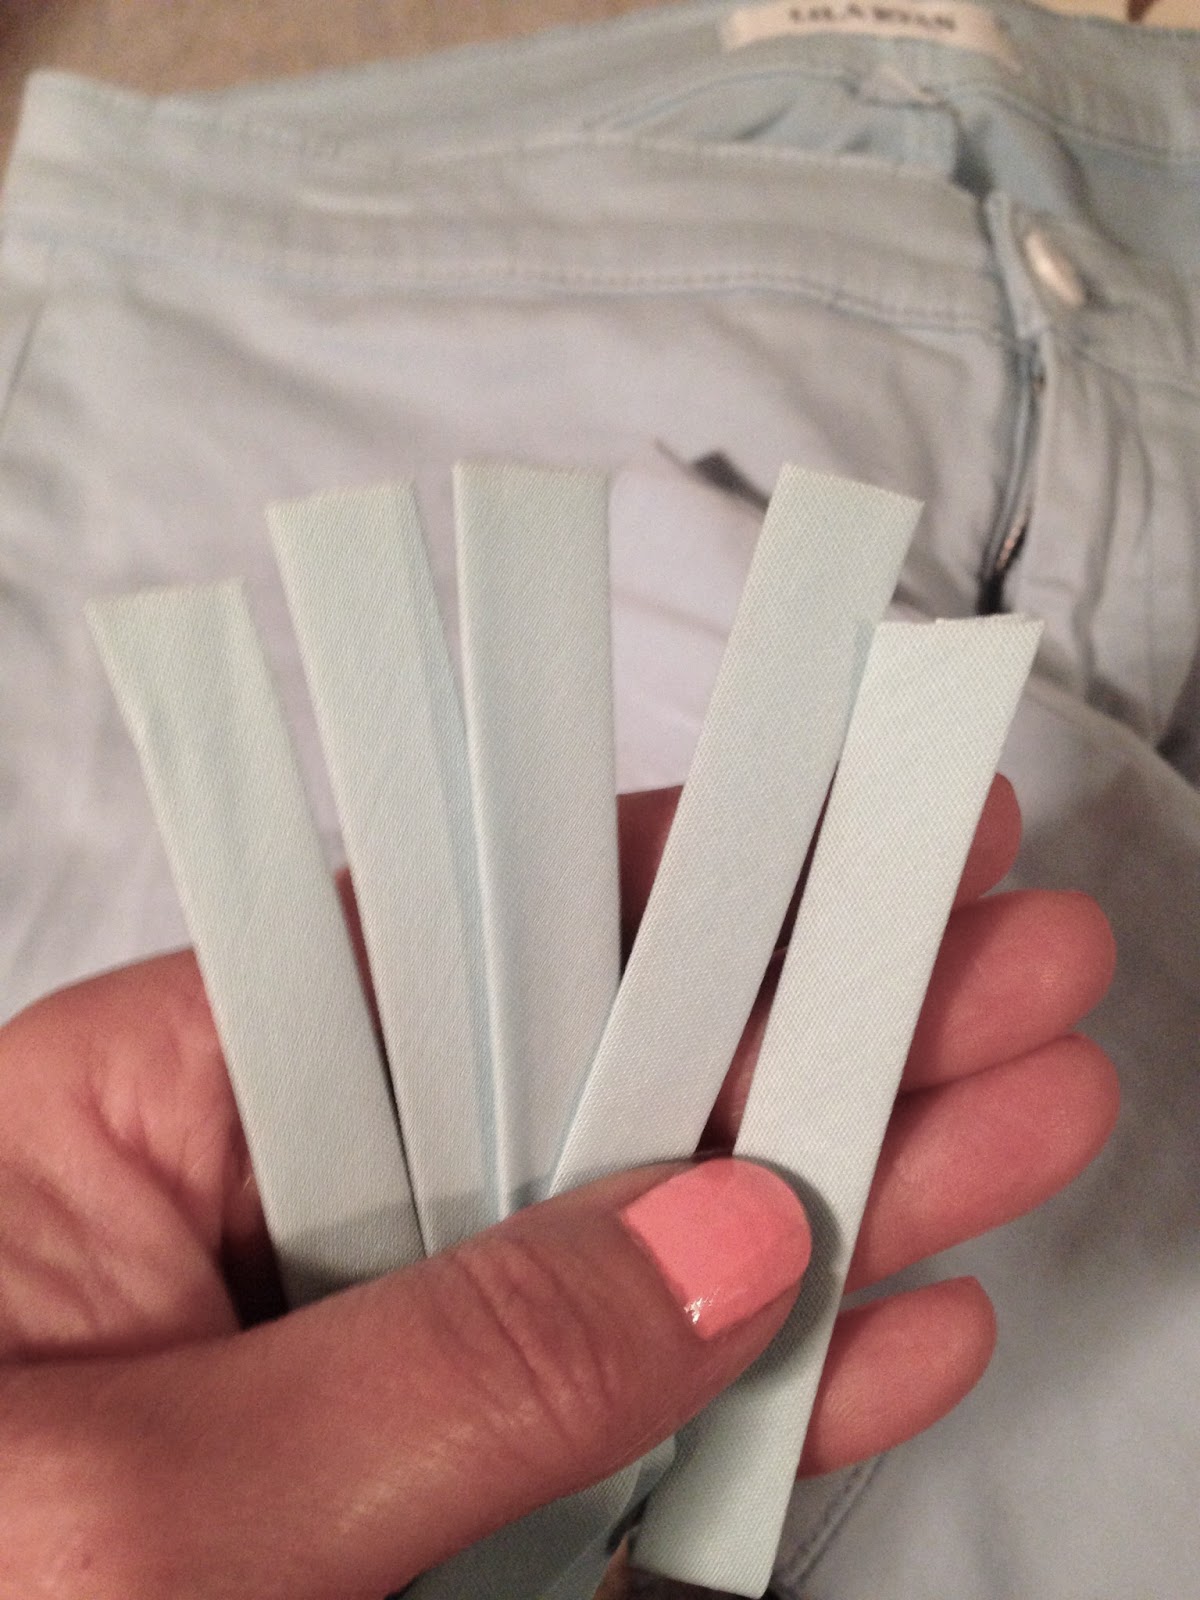
Image Source: blogger.googleusercontent.com
Why Choose No-Sew?
Maybe your pants didn’t come with belt loops. Or maybe the old loops broke. Sewing belt loops can seem hard if you don’t sew a lot. It needs special stitches and tools. No-sew ways are fast and easy. They let you change your clothes without learning sewing skills. It’s a good choice for quick fixes or trying new looks.
Getting Ready: Your No-Sew Toolkit
Before you start adding belt loops, get your supplies ready. What you need depends on the no sew belt loop methods you pick.
Items You Might Need:
- Pants you want to add loops to.
- Fabric for the new loops (match your pants or choose a fun color).
- Scissors.
- Ruler or measuring tape.
- Fabric marker or chalk (washes away).
- One of these no-sew sticking things:
- Fabric glue
- Iron-on adhesive tape or fabric fusion tape for clothing
- Special clips or pins (for temporary fixes)
- Iron and ironing board (if using iron-on tape).
- Pressing cloth (if using iron-on tape).
- Heavy books or clamps (to hold glue fixes).
- Wax paper (to stop glue from sticking where you don’t want it).
Choosing Loop Fabric:
Use fabric that is strong. It should be strong enough to hold a belt. Denim works well for jeans. Canvas or twill are also good. Make sure the fabric doesn’t stretch too much. Match the color, or pick a color that pops!
Making Your No-Sew Loops
You need the belt loops before you can put them on the pants. You can make them without stitching too. This shows how to make belt loops without stitching, using no-sew supplies.
Steps for Making No-Sew Loops:
h5 Cutting the Fabric
- Cut strips of your fabric. Make them about 1 inch to 1.5 inches wide. Make them longer than you think you need. Maybe 5-6 inches long for each loop.
- You will need 5 to 7 loops usually. Cut enough strips.
h5 Folding the Strips
- Take one strip.
- Fold one long edge to the center.
- Fold the other long edge to the center. Now the raw edges are hidden inside.
- Fold the strip in half lengthwise again. This makes a clean strip about 1/4 inch wide.
h5 Sticking the Folds (No Stitching Here!)
This is where the no-sew part comes in. You need to hold those folds shut.
- Using Fabric Glue: Put a thin line of fabric glue for belt loops along the inside of one fold before you fold it to the center. Then fold. Put glue on the other fold and fold it. Let it dry a little. Then fold the whole strip in half again. You can add a tiny bit more glue inside this last fold to hold it tight. Press it flat and let it dry fully. Use the best permanent fabric glue for clothes you can find.
- Using Iron-On Tape: Cut thin strips of iron-on adhesive tape. Put a strip inside one fold. Fold it over. Press with an iron (use a pressing cloth). Put another strip inside the second fold. Fold it over. Press again. Then put a strip inside the final fold and fold the whole strip in half. Press one last time. This uses fabric fusion tape for clothing to make strong loops.
h5 Cutting Loops to Size
Once your strips are made and stuck tight, cut them into smaller loop pieces. A typical belt loop is about 3-4 inches long. Measure your favorite pants’ loops if you have them. Cut your strips to that length. You should have 5 to 7 short loop pieces ready to go. These are your DIY no sew belt loops.
Adding the Loops: No Needle, No Thread
Now you have your loops. It’s time to attach belt loops without needle and thread. We will look at the main no sew belt loop methods: glue and iron-on tape.
Method 1: Using Fabric Glue
Fabric glue is great for attaching things without sewing. You need a strong glue that stays soft after it dries. Look for glue that says “permanent” and is for fabric. This method is good for many types of pants, including adding belt loops to jeans without sewing.
h4 How to Attach Loops with Glue
h5 Getting Ready
- Lay your pants flat. Find where you want the belt loops to go. Usually, there are two in the front, two on the sides, and one or two in the back.
- Use your fabric marker or chalk to mark the spots. Mark where the top and bottom of each loop will sit. A belt loop usually attaches to the waistband at the top and the main pant fabric below the waistband seam.
- Make sure the loops are spaced evenly. Use a ruler to check the distance between marks.
h5 Applying the Glue
- Pick up one of your prepared no-sew loops.
- Put a small amount of fabric glue for belt loops on one end of the loop. Just put it on the back side that will touch the pants. Don’t use too much! Too much glue can make the fabric hard or show through.
- Place that glued end onto your marked spot on the waistband. Press it down firmly.
- Put a small amount of glue on the other end of the loop. This end will attach below the waistband seam.
- Bring the loop down so it makes a loop shape. Place the second glued end onto the marked spot below the waistband. Press down firmly.
- Make sure the loop is straight.
h5 Securing and Drying
- Once a loop is glued in place, you need to hold it still while the glue dries.
- Put a piece of wax paper under the loop, inside the pants, if you can. This stops glue from sticking the front and back of the pants together.
- Put something heavy on the loop area. Heavy books, clips, or even clothes pins can work. This pressure helps the glue stick well.
- Let the glue dry completely. Check the glue bottle for drying time. It might take several hours, or even a full day, to be really strong. Don’t move the loop or the pants while it’s drying.
- Repeat for all the loops.
h5 Checking the Bond
After the glue is totally dry, gently test each loop. Give it a little tug. It should feel strongly attached. If a part didn’t stick well, you can lift it slightly and add a tiny bit more glue, then press and dry again.
Using the best permanent fabric glue for clothes is key for this method to last.
Method 2: Using Iron-On Options
Iron-on adhesive, like iron on belt loop tape or fabric fusion tape for clothing, uses heat to stick fabric together. It’s often easier than glue for some people because there’s less mess. It can make a very strong bond, especially on fabrics like denim, making it good for adding belt loops to jeans without sewing.
h4 How to Attach Loops with Iron-On Tape
h5 Getting Ready
- Lay your pants flat and mark where you want the loops, just like with the glue method. Mark the top and bottom spots for each loop.
- Heat up your iron to the setting needed for your fabric and the iron-on tape you are using. Always test a small piece first.
- Have your pressing cloth ready.
h5 Cutting the Tape
- Cut small pieces of your iron-on tape. You need pieces that will fit under the ends of your belt loop.
- Cut two pieces for each loop. Each piece should be roughly the same size as the area where the loop end touches the pant fabric.
h5 Applying the Tape and Ironing
- Take one of your prepared no-sew loops.
- Place a cut piece of iron-on tape on the marked spot on the waistband where the top of the loop will go. The tape usually has a paper backing; peel it off if needed.
- Place one end of your belt loop on top of the iron-on tape piece.
- Cover the area with your pressing cloth.
- Press down firmly with the hot iron. Follow the tape instructions for how long to hold the iron there (usually 10-20 seconds). Don’t move the iron around. Just press.
- Lift the iron and pressing cloth. Let the area cool a little.
- Now, bring the loop down to form the loop shape.
- Place another cut piece of iron-on tape on the marked spot below the waistband where the bottom of the loop will go.
- Place the other end of your belt loop on top of this second tape piece.
- Cover with the pressing cloth.
- Press down firmly with the hot iron again, following instructions.
- Lift the iron and cloth. Let it cool completely.
h5 Checking the Bond
Once the area is cool, gently pull on the loop. It should be stuck fast. If it’s loose, try pressing with the iron again. Make sure you used enough heat and time.
Iron-on tape methods offer a clean way to attach belt loops without needle and thread. Using iron on belt loop tape can speed up the process if you have many loops to add.
Method 3: Temporary Belt Loop Solutions
Sometimes you don’t need a permanent fix. Maybe you just need loops for one special event or while you wait to sew them on later. Temporary belt loop solutions are great for this. They don’t use glue or heat.
h4 Different Temporary Fixes
h5 Clip-On Loops
You can buy or make small clips. These clips attach to your waistband. You can then thread your belt through the clips instead of loops. These are easy to put on and take off.
h5 Safety Pins
For a very quick fix, you can use strong safety pins. Pin them to your waistband in the right spots. Then slide your belt through the pinned gaps. This is not as strong or nice-looking as other methods, but it works in a pinch. Be careful not to prick yourself!
h5 Fabric Wraps
You can cut strips of fabric. Wrap them around your waistband and secure them with strong fashion tape or small clips from the inside. Your belt goes through these fabric wraps.
h5 When to Use Temporary Methods
Use these methods when:
* You need a quick, easy solution.
* You don’t want to put anything permanent on your pants.
* The pants fabric is delicate and might be harmed by glue or heat.
* You are just trying out where you want loops before making them permanent.
These methods are simple ways to attach belt loops without needle and thread for a short time.
Adding Belt Loops to Different Fabrics
Adding belt loops to jeans without sewing is very common. Denim handles glue and iron-on methods well because it is a strong, stable fabric.
For thinner fabrics like cotton twill or linen, be more careful.
* With glue: Use even less glue. Too much will soak through and look bad.
* With iron-on tape: Use a lower heat setting if possible. Test on a hidden spot first. Thin fabrics can scorch easily. Also, sometimes the tape might show through as a stiff line.
For stretchy fabrics, no-sew methods can be tricky. The stretch can make the glue or tape break free. It’s often better to sew loops on stretchy pants if you can. If you must go no-sew on stretch, use a fabric glue made for stretchy materials and don’t pull on the loops too much when wearing.
Tips for Success
h4 Making Them Last
- Always clean the pant area first. Wash and dry your pants (without fabric softener) before adding loops. Glue and tape stick best to clean fabric.
- Follow the product instructions exactly. Drying times for glue and heat settings for iron-on tape are important for a strong hold.
- Test on a scrap of fabric or a hidden spot first. This helps you see how the glue or tape will work with your specific pant fabric.
- Use enough glue or tape, but not too much. Just enough to cover the area where the loop touches the pants.
h4 Placing Loops Right
- Look at other pants you own. Where are the belt loops placed? This is a good guide.
- The two front loops are usually near where the front pockets end.
- The back loops are often over the back seams or darts.
- Space them out evenly around your waist.
- Make sure they are at the right height. The top should be at or just above the waistband edge. The bottom should be below the waistband seam.
Caring for Your No-Sew Loops
Once your loops are on, how do you care for them?
h4 Washing
- Wait at least 24-72 hours after adding loops (especially with glue) before washing the pants. This gives the adhesive time to fully cure.
- Wash in cold water.
- Use a gentle cycle.
- Turn the pants inside out. This protects the loops from rubbing against the washing machine drum or other clothes.
- Avoid using harsh chemicals or bleach.
h4 Drying
- Air drying is best for pants with no-sew loops. High heat in a dryer can weaken some glues and iron-on tapes.
- If you must use a dryer, use a low heat setting.
h4 Wearing
- Be mindful when putting on or taking off your belt. Don’t yank hard on the loops.
- No-sew loops might not be as strong as sewn ones, especially if you put a lot of weight on your belt (like carrying tools). Use common sense about how much stress you put on them.
Pros and Cons of No-Sew Methods
h4 The Good Parts:
- Easy: Anyone can do it. No special skills needed.
- Fast: Much quicker than learning to sew and stitching loops on.
- No Special Tools: You likely have scissors and an iron already. Glue and tape are easy to find.
- Changeable: If you use temporary methods, you can remove the loops easily.
h4 The Not-So-Good Parts:
- Strength: No-sew loops may not be as strong as sewn ones, especially under heavy stress.
- Durability: They might not last through as many washes and wears as sewn loops.
- Appearance: Sometimes glue can make the fabric stiff, or iron-on tape lines might show.
- Fabric Limits: Some fabrics don’t work well with glue or heat.
Comparing No-Sew Options
Here is a look at the main no sew belt loop methods:
| Feature | Fabric Glue Method | Iron-On Method | Temporary Methods |
|---|---|---|---|
| How it Sticks | Liquid adhesive dries and hardens | Heat melts tape, sticks when cool | Clips, pins, wraps, tape |
| Strength (Permanent) | Can be very strong if done right | Can be very strong if done right | Less strong, meant for short term |
| Durability | Good, but heat/washing can weaken some | Good, but heat/washing can weaken some | Low, needs re-doing or might fail |
| Messiness | Can be messy if not careful | Generally cleaner | Cleanest, no residue left on pants |
| Drying/Setting Time | Can take many hours to fully set | Cools and sets in minutes | Instant |
| Best For | Many fabrics, careful work needed | Fabrics that handle heat well (like denim) | Quick fixes, testing placement |
| Look & Feel | Can make fabric stiff if too much used | Can leave a stiff line, might show through | Can look less finished or obvious |
| How to Make Loops | Glue folds shut | Iron-on tape holds folds shut | Not usually used for loop making |
Solving Problems
What if your no-sew loops don’t stick or come loose?
h4 Common Issues and Fixes:
- Loop Fell Off:
- Why: Not enough adhesive, didn’t press long enough, didn’t let it dry completely, used the wrong type of glue/tape, fabric wasn’t clean.
- Fix: Clean the area. Re-apply the adhesive (glue or iron-on tape). Use enough pressure. Let it dry fully this time. Make sure the adhesive is right for your fabric.
- Fabric Feels Stiff Around the Loop:
- Why: Too much fabric glue was used, or the glue soaked through.
- Fix: This is hard to fix once dry. For glue, sometimes soaking the area in warm water (if safe for the fabric and glue) can help soften it, but it might also loosen the loop. In the future, use less glue. Iron-on tape usually doesn’t have this issue unless it’s very thick or applied poorly.
- Iron-On Tape Not Sticking:
- Why: Iron not hot enough, didn’t press long enough, not enough pressure, tape is old, fabric isn’t suitable.
- Fix: Check your iron’s heat. Press longer. Press more firmly. Use a pressing cloth. Make sure the tape hasn’t expired. Test a small piece first next time.
- Loop Looks Crooked:
- Why: Didn’t mark the spots carefully, loop shifted while drying/cooling.
- Fix: If the adhesive isn’t totally set, you might be able to gently reposition it. If it’s dry, you’ll have to remove it and start over. Removing glue or iron-on tape without damaging the fabric can be tricky. Sometimes gentle heat (for iron-on) or specific removers are needed, but these can also harm the pants. Be careful when placing the loops the first time!
Getting Good Results
Attaching belt loops without needle and thread takes a little care. Measure twice, apply adhesive once! Give glue plenty of time to dry. Use the right heat for iron-on methods. Test your products on scrap fabric. By taking your time and following these steps, you can successfully add belt loops to jeans without sewing, or to any pants, and make them fit and look just right.
FAQ: Questions People Ask
h4 Can you really put belt loops on without sewing?
Yes! You can use special fabric glues or iron-on tapes that create a strong bond between the belt loop material and your pants without needing any stitches.
h4 What is the best way to attach belt loops without stitching?
The “best” way depends on your needs and the fabric. Fabric glue offers flexibility on different materials but needs long drying time. Iron-on tape is fast and clean, especially good for sturdy fabrics like denim. Temporary solutions like clips are best for short-term use.
h4 Will no-sew belt loops last a long time?
Permanent fabric glues and quality iron-on tapes can create very durable bonds. They can last through many wears and washes if applied correctly and cared for properly (like washing in cold water and air drying). However, they might not be as strong as traditionally sewn loops, especially under heavy strain.
h4 Is fabric glue strong enough for belt loops on jeans?
Yes, many permanent fabric glues are strong enough for denim. When adding belt loops to jeans without sewing, choose a glue specifically made for heavy fabrics and make sure it’s marked as permanent. Proper application and drying time are key for strength.
h4 Can I use regular glue?
No, you need glue made for fabric. Regular craft glues or paper glues will likely wash out, peel off, or become brittle and break. Use a glue designed to be flexible and permanent on clothing. The best permanent fabric glue for clothes will state this on the bottle.
h4 How do I make the loops themselves without sewing?
You can make the fabric strips for the loops by folding the edges inward and using fabric glue or iron-on tape to hold the folds down permanently before cutting the strips to loop length. This is how to make belt loops without stitching at all.
h4 Where should I place the belt loops?
Look at other pants you own for common placement spots. Usually, they are placed evenly around the waist: two near the front pockets, two on the sides, and one or two in the back, often over seams.
h4 Can I remove no-sew belt loops later?
Removing fabric glue or iron-on tape can be difficult without damaging the fabric, especially if it’s a permanent bond. Temporary methods like clips are easy to remove. If you might want to remove them later, temporary fixes or practicing sewing might be better options.