
Making designs for a machine to stitch is fun! It’s how you put your own pictures and ideas onto fabric. You can make custom clothes, gifts, and more. To do this, you need special tools. The main tool is a computer program called embroidery digitizing software. This software helps you convert image to embroidery design. It changes pictures or drawings into stitches that your machine can read. This whole process is called digitize embroidery designs.
Embroidery machines need special files. These are machine embroidery file formats. You use the software to create these files. Learning to make designs takes a little time. But it’s easy once you know the steps. This guide will walk you through it. You will learn about the embroidery digitizing process. You will also see how to use the software. Soon, you can start creating custom embroidery designs yourself.
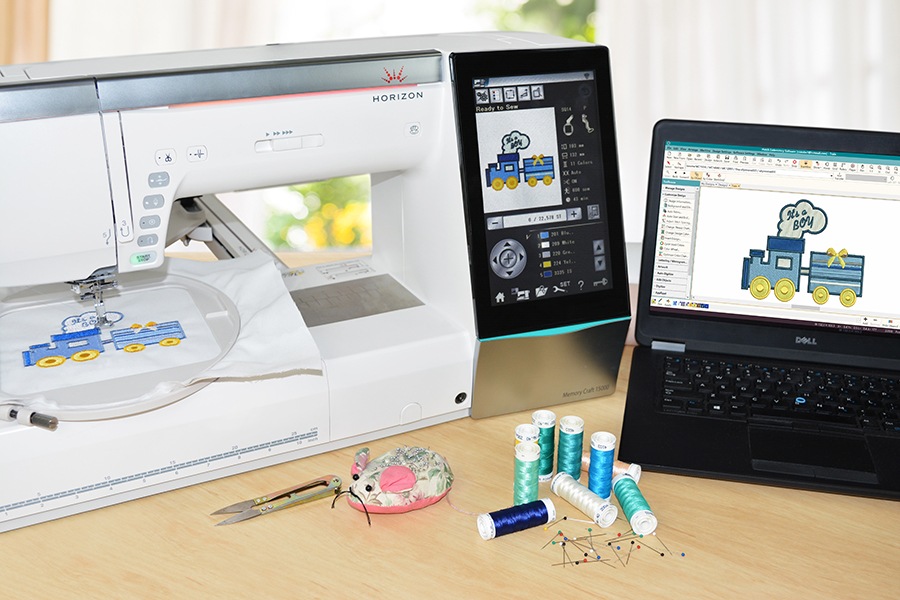
Image Source: blog.hatchembroidery.com
What is Machine Embroidery Design?
Machine embroidery is stitching pictures or patterns onto fabric. A computer-controlled machine does the stitching. But the machine doesn’t just stitch any picture. It needs a special set of instructions. These instructions tell the machine exactly where to put each stitch. It tells the machine what color thread to use. It also says how long each stitch should be.
A machine embroidery design is this set of instructions. It’s a digital file. This file guides the machine’s needle. It moves the fabric at the right time. This way, the design comes to life on the fabric. Think of it like a set of coded directions for a robot.
Why Make Your Own Designs?
Why not just buy designs? Buying designs is great. There are many beautiful ones. But making your own gives you freedom. You can make exactly what you want.
- Put your child’s drawing on a shirt.
- Add your business logo to hats.
- Create unique gifts.
- Design patterns that fit your project perfectly.
Making your own designs makes your projects truly special. It lets your creativity flow.
The Main Tool: Embroidery Digitizing Software
You need special software to make machine embroidery designs. This software is key. It lets you draw or load pictures. Then it helps you turn those pictures into stitches. This is the core of the embroidery digitizing process.
There are many kinds of embroidery digitizing software. Some are simple and good for beginners. Others are complex and used by pros. Finding the best embroidery software depends on your needs. It also depends on your budget. Some software programs offer free trials. This lets you test them before buying.
What does this software do? It lets you:
- Draw shapes and lines.
- Bring in pictures (like JPG, PNG, etc.).
- Choose different stitch types.
- Change colors.
- Resize designs.
- Add text in many fonts.
- Save the design in the right format for your machine.
Learning to use the software is a big part of making designs. Many software companies offer embroidery design software tutorials. These help you learn the tools and steps.
Deciphering the Embroidery Digitizing Process
Making a design for machine embroidery is called digitizing. It’s not just saving a picture as an embroidery file. That won’t work. You have to tell the software where the stitches go. You choose the stitch types. You set the order of stitching.
Here are the basic steps in the embroidery digitizing process:
- Start with Artwork: Get the picture or design you want to stitch. This can be a drawing, a logo, clip art, or text. Make sure the picture is clear. A good picture makes digitizing easier.
- Load into Software: Open your embroidery digitizing software. Load the artwork file into the program.
- Plan the Design: Look at your picture. Think about how it will stitch out. What parts stitch first? What colors are needed? What stitches will look best?
- Digitize the Shapes: Use the software tools to trace or create shapes on top of your artwork. For each shape, you tell the software what kind of stitches to use. You also set the direction of the stitches. This is the main part of creating custom embroidery designs.
- Add Details: Put in small parts like eyes, text, or outlines. Again, pick the right stitches.
- Set Stitch Order: Decide which parts stitch before others. This is important. You don’t want stitches for one part covering up stitches for another.
- Choose Colors: Assign thread colors to each part of the design.
- Check and Edit: Look closely at the design in the software. Does it look right? Are the stitches too long or too short? Are there too many stitches? You can make changes now. This step is very important.
- Save and Export: Save your design in the software’s format. Then, save it again in the format your embroidery machine uses. This is called exporting embroidery designs.
This process takes practice. The more you do it, the better you get.
Grasping How to Convert Image to Embroidery Design
Many people want to take a picture and make it an embroidery design. Can you just click a button and have it done? Not really. Converting image to embroidery design is not fully automatic.
Some software programs have tools that can help. They might suggest stitches based on the image colors and shapes. But you almost always have to do manual work. You have to guide the software. You need to tell it where stitches should go.
Think of it like this: A photo is made of tiny dots of color (pixels). An embroidery design is made of stitches. Stitches are lines. You can’t just swap dots for lines directly. You have to interpret the image. You need to decide how lines of stitches will show the picture.
Here’s how you typically convert image to embroidery design using software:
- Import the Image: Bring your JPG, PNG, or other image file into the embroidery digitizing software.
- Resize and Position: Make the image the size you want the final embroidery to be. Place it where you need it on the virtual hoop.
- Trace or Outline: Use the software’s tools to draw lines and shapes over the main parts of the image. This is like tracing the picture. Some software has automatic tracing tools. But these often need cleaning up. Manual tracing gives you more control.
- Apply Stitches: Select a traced shape or line. Then pick an embroidery stitch type (like fill, satin, or run). The software will generate stitches inside or along that shape. You often need to set the stitch direction. This helps shape the look of the area.
- Refine and Detail: Work on smaller areas. Add outlines, highlights, or texture using different stitches.
- Delete Image: Once you have traced and added stitches to all parts, you hide or delete the original image layer. You are left with just the stitches.
- Final Checks: Look at the stitch view. Check for gaps, overlaps, or areas that won’t stitch well. Edit the stitch types or directions as needed.
It’s important to start with a simple, clear image. Pictures with high contrast and few colors are easier to digitize. Detailed photos with many colors and shades are very hard or impossible to fully automate. They require a lot of manual work.
Surveying Embroidery Stitches Types
Different stitches create different looks and fills. Knowing embroidery stitches types is key to good design. The software lets you choose from many. Here are some common ones:
- Run Stitch (or Walk Stitch): This is a simple straight line. It’s used for outlines, fine details, and travel paths (moving from one area to another without jumping thread). You can have single, double, or triple run stitches for thicker lines.
- Use For: Outlines, small details, connecting areas.
- Satin Stitch: This stitch is a series of zig-zag stitches placed very close together. They form a smooth, solid column. It’s great for text, borders, and narrow shapes. The stitches go back and forth across the shape.
- Use For: Letters, borders, narrow shapes, shiny effect.
- Fill Stitch (or Tatami Stitch): This stitch fills larger areas with rows of stitches. The stitches are placed close together but usually in a pattern (like rows or curves). It’s used for filling large shapes like leaves or backgrounds. There are many patterns possible.
- Use For: Large areas, backgrounds, shapes needing solid fill.
- Complex Fill: A type of fill stitch for shapes with holes inside, like a donut or a letter “O”. The software figures out how to stitch around the holes automatically.
- Step Stitch (or Graduated Fill): Stitches of different lengths are used to create shading or texture. Less common for basic designs.
- Appliqué: Not a stitch type itself, but a method. The software creates guide stitches for placing fabric shapes. Then it adds a border stitch (often satin) to hold the fabric down.
- Use For: Adding fabric pieces to a design.
- Puff Embroidery: Uses foam underlay and dense satin stitches to make areas stand up from the fabric.
- Use For: Raised text or shapes.
Choosing the right stitch makes a big difference. A large area filled with satin stitch would be too dense and hard. A thin line made of fill stitch wouldn’t look right. The embroidery digitizing software lets you select and change these stitches easily.
Planning Your Design Before Digitizing
Before you even open the software, do some planning. This makes the embroidery digitizing process much smoother.
- What is the design for? (Shirt, hat, towel, quilt?)
- What size will it be? The size affects the stitch types and density needed. Small designs need simpler stitches.
- What fabric will you use? Some fabrics need more stitches or different backing (stabilizer).
- How many colors? More colors mean more thread changes.
- Is the artwork clear? Blurry or complex images are hard to digitize well. Simplify the image if needed.
A clear plan helps you make good choices in the software. It saves time and fixes problems before they happen.
Step-by-Step: Creating Custom Embroidery Designs
Let’s break down the steps for creating custom embroidery designs from scratch or from an image.
H4: Starting from an Image (Converting Image to Embroidery Design)
- Import Image: Open your embroidery digitizing software. Go to File > Import Image (or similar). Select your picture.
- Set Size: Use the software’s tools to set the design size. Make sure it fits in your hoop.
- Trace Main Shapes: Select a digitizing tool (often called ‘complex fill’, ‘satin column’, or ‘run’). Click points around the main shapes in your image to trace them.
- For large areas (like a body of an animal), use a fill stitch tool. Click around the outline.
- For narrow areas (like legs or letters), use a satin stitch tool. Click along the edges.
- For outlines, use a run stitch tool. Click along the line.
- Set Stitch Properties: After tracing a shape, the software makes stitches. You need to check the settings:
- Stitch Type: Is it fill, satin, or run? Change if needed.
- Stitch Direction/Angle: For fill and satin stitches, set the angle the stitches lay at. This adds shape and texture.
- Density: How close are the stitches? Lower density means fewer stitches (lighter). Higher density means more stitches (denser, heavier).
- Underlay: Stitches hidden beneath the top stitches. They help stabilize the fabric and make the top stitches stand better. Turn these on for most shapes.
- Repeat for All Parts: Trace and apply stitches to every part of the image. Work from the back layers to the front layers. For example, digitize the body of an animal before the legs or head if the body is behind them.
- Add Details and Outlines: Use run stitch or narrow satin stitch for eyes, mouths, whiskers, or outlines around shapes.
- Assign Colors: Click on each stitched object and choose a thread color. The software usually has color charts that match thread brands.
- Arrange Stitch Order: Look at the ‘stitch sequence’ or ‘object manager’ in your software. This shows the order parts will stitch. Drag and drop objects to change the order. Stitch large fills first, then smaller parts, then outlines. Stitch background elements before foreground ones.
- Add Trims and Jumps: The software often adds ‘jump’ stitches (thread carries from one area to another). Tell the software when to ‘trim’ the thread automatically after a section finishes.
- Review Stitch Data: Look at the total stitch count. Is it very high? Maybe the density is too high. Look at the design preview in different views (like ‘true view’ and ‘stitch view’).
H4: Starting from Scratch (Original Design)
- New Design: Open your embroidery digitizing software. Start a new blank design.
- Draw or Use Tools: Use the software’s drawing tools (pen, line, circle, rectangle) to create your shape. Or use built-in shapes and text tools.
- Apply Stitches: Select a shape you drew. Choose a stitch type (fill, satin, run). The software will create stitches for that shape.
- Set Stitch Properties: Adjust stitch angle, density, and underlay just like when working from an image.
- Repeat and Build: Add more shapes and text. Apply stitches. Build up your design piece by piece.
- Add Details: Add outlines, details, or texture.
- Assign Colors: Pick thread colors for each part.
- Arrange Stitch Order: Set the order parts will stitch in.
- Add Trims and Jumps: Manage thread trims.
- Review: Check stitch count and appearance.
Tip: Start simple. Digitize basic shapes or text first. Then move to more complex pictures. Practice is key! Embroidery design software tutorials are very helpful here. Look for tutorials specific to your software.
The Role of Machine Embroidery File Formats
Your embroidery machine can only read certain types of files. These are the machine embroidery file formats. The embroidery digitizing software saves your design in these formats. If you save in the wrong format, your machine won’t see the design.
Different machine brands use different formats. Some common ones are:
- .DST: (Tajima) Very common, supported by many machines. Holds stitch commands but no color info or design image.
- .PES: (Brother, Babylock, Bernina) Popular format, holds stitch data, colors, and sometimes image info.
- .JEF: (Janome) Used by Janome machines.
- .EXP: (Melco, Bernina) Another common format, similar to DST.
- .VP3 / .VIP: (Pfaff, Husqvarna/Viking) Newer formats with more design info.
- .XXX: (Singer) Used by Singer machines.
There are many others! When you finish digitizing, you need to exporting embroidery designs into the correct format for your machine. Your software will have an “Export” or “Save As” option. You pick the format from a list.
Always know your machine’s format! You can usually find this in your machine’s manual.
Exporting Embroidery Designs: Getting It Ready for Stitching
Once your design is ready in the software, you need to get it to your machine. This is the exporting embroidery designs step.
- Save Your Working File: First, save the design in your software’s own format (e.g., .EMB for Wilcom, .ART for Bernina, .CND for Pulse, etc.). This lets you open and edit the design later. This file is not for your machine.
- Export for Machine: Go to File > Export, Save As, or Produce Stitch File.
- Choose Format: Select the machine embroidery file format that your machine reads (e.g., .PES, .DST, .JEF).
- Choose Location: Select where to save the file (USB drive, computer folder).
- Save: Click Save.
Now you have a file your machine can use. You usually put this file onto a USB flash drive. Then you put the USB drive into your embroidery machine. Your machine can then load the design and stitch it out.
Before stitching, it’s wise to do a ‘test stitch’ on a scrap piece of fabric. This lets you see how the design stitches. You can check for errors, loose stitches, or issues before stitching on your final item. If there are problems, you go back to your embroidery digitizing software, make changes, and export again.
Finding the Best Embroidery Software
What is the best embroidery software? There is no single answer. It depends on:
- Your Skill Level: Beginners need simpler software. Pros need powerful features.
- Your Needs: Do you need to create complex logos? Simple text? Applique? Some software is better for certain tasks.
- Your Budget: Software ranges from free (with limited features) to thousands of dollars.
- Your Computer: Software has minimum computer requirements.
Here are some popular options (mentioning names helps readers research):
- Brother PE-Design: Good for Brother machines, many features, can be complex.
- Bernina Embroidery Software: Powerful, often comes with higher-end Bernina machines, professional level.
- Embrilliance: Known for being user-friendly, works with many machine types, uses modules you can add. StitchArtist is their digitizing module.
- Wilcom Hatch: Made by a leading professional software company (Wilcom), aimed at hobbyists, very capable.
- Pulse Microsystems: Professional level software used by large embroidery businesses.
- Ink/Stitch: A free, open-source plugin for the free drawing program Inkscape. Has a learning curve but is very powerful for being free.
How to choose?
- Read reviews.
- Watch embroidery design software tutorials for different programs on YouTube.
- See if they offer a free trial. Try it out!
- Check if the software supports your machine’s file format.
- Think about available support and tutorials.
Don’t feel pressured to buy the most expensive software first. Start with something that fits your budget and is easy to learn. You can always upgrade later.
Tips for Better Digitizing
Making good designs takes practice. Here are some tips:
- Start Simple: Don’t try to digitize a photo of a crowd for your first project. Start with simple shapes or text.
- Use Good Artwork: A clear, high-resolution image makes a big difference when you convert image to embroidery design. Avoid blurry pictures. Simplify complex logos before importing.
- Minimize Color Changes: Each color change stops the machine. This takes time. Try to group elements by color where possible.
- Limit Jump Stitches: Long jump stitches can leave loose threads on the back. Plan your stitch order to reduce these. Use the software’s tools to add trims.
- Consider Fabric and Stabilizer: The fabric you stitch on affects how the design looks. Stretchy fabrics, towels, or thin fabrics need the right stabilizer (backing). Your digitizing might need tweaks based on the fabric (e.g., slightly higher density for puffy fabrics).
- Push and Pull Compensation: Stitches can slightly pull or push fabric. This can cause gaps or overlaps, especially with fill stitches next to outlines. Good software has settings to adjust for this. Learn how to use them.
- Test Stitch! Seriously, stitch the design on scrap fabric first. It’s the best way to find problems.
The Importance of Stitch Order
We touched on this, but it’s worth repeating. Stitch order matters a lot in the embroidery digitizing process.
- Build Layers: Stitch background elements first, then middle layers, then foreground elements.
- Fill Before Outlines: Stitch large fill areas before stitching outlines around them. If you stitch the outline first, the fill stitches might push outside the line or leave gaps.
- Consider Text: Stitch text last if it’s on top of a fill or other design element. Stitch text before an outline if the outline goes around the text block.
- Minimize Jumps: Arrange objects so the machine moves to the next stitching area with a short jump.
Most embroidery digitizing software has a visual timeline or object list. You can drag objects up or down to change their stitch order. Watch the stitching simulation in the software to see the order and how threads will travel.
How Stitch Density Works
Stitch density is how close the stitches are.
- High Density: Stitches are packed close together. This makes a solid, heavy fill. Good for bold letters or shapes. Can make the design stiff or pucker the fabric if too high.
- Low Density: Stitches are spaced further apart. This creates a lighter fill. Good for adding texture, shading, or for stitching on delicate fabrics where you don’t want too much density.
The default density in software is usually okay. But you might need to change it. For example:
- Stitching on fleece? You might need slightly higher density or a different underlay to keep stitches from sinking.
- Stitching on a light cotton? Default density is probably fine.
- Want a sketch-like fill? Lower the density.
Adjusting density is part of refining your design in the embroidery digitizing software.
Interpreting Embroidery Design Software Tutorials
When you are learning to use embroidery digitizing software, tutorials are your friend. Look for embroidery design software tutorials provided by the software maker. Also, check YouTube. Many users make helpful videos.
When watching or reading tutorials:
- Use Your Software: Have the software open. Follow along with the tutorial steps. Pause the video often.
- Start with Basics: Look for tutorials on tracing, using fill stitch, using satin stitch, adding text, and saving files.
- Practice: Don’t just watch. Do the steps yourself multiple times.
- Use Help Files: Most software has a built-in help guide. This is good for looking up specific tools.
Learning software takes time. Be patient with yourself. Every time you use the software, you learn something new.
Table: Common Machine Embroidery File Formats
| Format | Common Machine Brands | Info Stored | Notes |
|---|---|---|---|
| .DST | Tajima, many others | Stitch data, basic commands | Very widely compatible, no color info. |
| .PES | Brother, Babylock, Bernina (some) | Stitch data, colors, sometimes image | Popular for home machines. |
| .JEF | Janome | Stitch data, colors, sometimes image | Specific to Janome. |
| .EXP | Melco, Bernina (some) | Stitch data, basic commands | Also quite common. |
| .VP3 | Pfaff, Husqvarna/Viking (newer) | Stitch data, colors, design info | Good for newer Pfaff/Viking machines. |
| .XXX | Singer | Stitch data, colors | Specific to Singer. |
Always check your machine’s manual to confirm which format(s) it reads. Your embroidery digitizing software must be able to export to this format.
Avoiding Common Digitizing Mistakes
New digitizers often make similar errors. Knowing them helps you avoid them.
- Too Dense: Adding too many stitches. This can make the design hard, heavy, and cause fabric puckering.
- Too Many Jumps/Trims: Leads to lots of little threads on the back. Plan stitch order better.
- Wrong Stitch Type: Using a fill stitch for a thin line or satin for a huge area. Choose stitches based on the shape size and desired look.
- Poor Underlay: Not using underlay, or using the wrong type. Underlay is crucial for good results.
- Not Planning Stitch Order: Causes inefficient stitching and potential layering problems.
- Ignoring Fabric: Not thinking about how the design will stitch on the actual fabric.
- No Test Stitch: Skipping the test stitch means you find out about problems on your final project.
Take your time in the embroidery digitizing process. Use the software’s tools to check stitch length, density, and order.
The Path to Becoming a Good Digitizer
Becoming skilled at creating custom embroidery designs takes practice.
- Learn Your Software: Spend time with your embroidery digitizing software. Do the tutorials. Try every tool.
- Start Simple: Work on basic shapes and text. Digitize clip art.
- Experiment: Try different stitch types, densities, and angles. See what they do.
- Test Stitch: Stitch out every design you make on scrap fabric. See the results. Note problems. Go back and edit the design. This is the most important learning step.
- Look at Other Designs: Examine how bought designs are made. Look at the stitches, density, and order (most software lets you open common formats to see stitches, even if you can’t edit perfectly).
- Join Groups: Connect with other machine embroiderers online. Share your work, ask questions.
Digitizing is both technical and artistic. You learn the tools, then you develop an eye for how stitches translate artwork.
FAQ Section
Q: Can I turn any picture into an embroidery design automatically?
A: No, not fully automatically. While some software has auto-digitizing tools, they usually need a lot of manual editing to make a good stitch file. Complex images require tracing and manual stitch placement. You still need embroidery digitizing software and to understand the embroidery digitizing process.
Q: Do I need expensive software?
A: Not to start. There are good entry-level and even free options (like Ink/Stitch). The best embroidery software for you depends on your needs and budget. You can create great designs with less expensive software if you learn it well.
Q: What are the most important stitch types to learn first?
A: Learn run stitch (for outlines), satin stitch (for narrow columns and text), and fill stitch (for large areas). These three cover most basic designs and are fundamental to creating custom embroidery designs.
Q: How do I know which file format my machine uses?
A: Check your machine’s user manual. It will list the compatible machine embroidery file formats. Your embroidery digitizing software must be able to save in this format when exporting embroidery designs.
Q: My design looks different when stitched than on the screen. Why?
A: Fabric type, stabilizer, thread tension, and digitizing issues (like density or push/pull compensation) can all affect the final look. Always do a test stitch. If it doesn’t look right, go back to your embroidery digitizing software and adjust the design. Stitch direction and density are common areas to adjust.
Q: How long does it take to learn to digitize?
A: It varies for everyone. Learning the software tools can take a few weeks with regular practice. Becoming skilled at making good designs takes months or even years of practice and test stitching. Start simple and build your skills. Use embroidery design software tutorials to guide you.
Creating your own designs for machine embroidery is a rewarding skill. It combines art and technology. With the right embroidery digitizing software, a little patience, and practice following the embroidery digitizing process, you can bring your unique ideas to life in stitch. Happy stitching!