
What is applique embroidery? Applique embroidery is a craft where you sew smaller pieces of fabric onto a larger piece. You cut shapes from fabric and attach them to a background fabric. Then, you often add stitches around the edges of the shapes. This makes pretty pictures or designs on things like quilts, clothes, or bags. Can I do it easily? Yes! Applique is fun and easy to learn. You don’t need fancy tools to start.
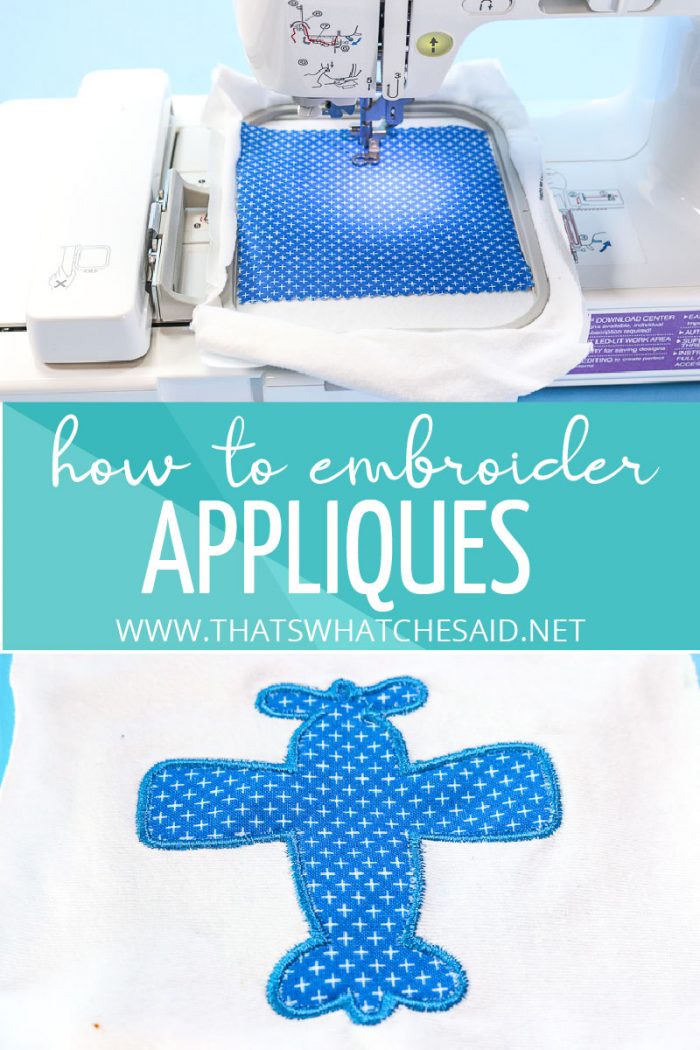
Image Source: www.thatswhatchesaid.net
What Applique Embroidery Is All About
Applique comes from a French word. It means “to apply” or “to lay on.” That is just what you do! You take one piece of fabric and put it on top of another. You cut the top fabric into a shape. It could be a circle, a heart, an animal, or anything! Then you stick or sew that shape onto a bigger piece of fabric.
Think of it like adding patches, but you make the patches yourself. You can use bright colors or fun patterns for the shapes. The background fabric can be simple or patterned too.
People use applique on many things.
* Quilts: To make pictures or blocks.
* Clothes: To add designs to shirts, skirts, or jackets.
* Home items: To decorate pillows, wall hangings, or table runners.
* Bags and totes: To add fun details.
It is a great way to use small pieces of fabric you have left over. It adds texture and interest to your projects.
Why Try Applique Embroidery?
There are many good reasons to learn this craft.
* It is creative: You can make any design you can think of. Draw your own shapes or use simple ones.
* It uses fabric scraps: Have small pieces of fabric you love but don’t know what to do with? Applique is perfect!
* It adds dimension: The fabric shapes lift up a little from the background. This makes your work look more interesting.
* It fixes things: You can use applique to cover a stain or a hole in fabric.
* It is fun: It is a nice way to relax and make something beautiful.
* You can use different stitches: You can sew the edges down with simple stitches or fancy ones.
Getting Your Stuff Ready
Before you start, you need some basic things. You might have most of these already.
- Fabric: You need fabric for the background. You also need smaller pieces for your applique shapes. Choose fabrics that don’t stretch too much. Cotton fabrics work well.
- Scissors: Small, sharp scissors are best for cutting out your shapes cleanly. Fabric scissors are important so they stay sharp for fabric only.
- Needles: If sewing by hand, you need hand sewing needles. If using a machine, you need machine needles that are good for the fabric type.
- Thread: Pick thread that matches or contrasts with your fabric shapes. You will need thread for sewing the shapes down and maybe for adding embroidery stitches.
- Pins: To hold fabric pieces in place.
- Iron and Ironing Board: Useful for making fabric flat and for some methods like fusible applique.
- Marking Tool: A fabric pen or chalk to trace your patterns.
- Applique Patterns: You can draw your own, print designs from the internet, or buy patterns.
Different Ways to Do Applique
There are a few main ways to do applique. Some are fast, and some take more time. The method you pick depends on the look you want and how you want to sew the edges.
We will look at popular methods:
* Fusible Applique (using heat-activated glue)
* Raw Edge Applique (leaving the edges as they are)
* Needle Turn Applique (turning the edges under as you sew by hand)
* Reverse Applique (cutting away fabric from the top layer)
And ways to finish the edges:
* Satin Stitch Applique
* Buttonhole Stitch Applique
* Using other Embroidery Stitches for Applique
Let’s go through them.
Making Sense of Fusible Applique
This is a fast way to do applique. You use a special paper or web with glue on it. This glue melts when you iron it. It sticks your applique shape to the background fabric.
How to do Fusible Applique:
- Choose your design: Pick the shape you want to use.
- Get your fusible web: This material looks like paper on one side and a bit rough or web-like on the other. It has heat-activated glue.
- Trace the pattern: Trace your design onto the paper side of the fusible web. If your design needs to face a certain way (like letters), remember to trace it backward (mirrored).
- Rough cut the fusible web: Cut around your traced shape, leaving about a quarter-inch border around the lines. Don’t cut right on the line yet.
- Iron the web to your fabric: Put the rough, web side of the fusible material onto the back of your applique fabric. Iron it according to the product instructions. The heat melts the glue a little, sticking it to the fabric.
- Cut out the shape: Now, cut out your fabric shape exactly on the line you traced on the paper.
- Peel off the paper backing: Carefully pull the paper layer off the back of your fabric shape. You will see the glue now.
- Place on background fabric: Put your fabric shape where you want it on your background fabric.
- Iron to stick: Iron the applique shape onto the background fabric. The heat melts the glue again, sticking the shape firmly in place. Now it won’t move while you sew.
- Sew the edges: Even though the glue holds the shape, you must stitch around the edges. This makes it permanent and looks nice. You can use a straight stitch, zigzag, satin stitch, or buttonhole stitch. This is the Machine applique technique often used with fusible web. You can also use Hand applique method by stitching around the edges with small stitches.
Pros of Fusible Applique:
* Fast to prepare shapes.
* Shapes stay put for stitching.
* Good for detailed shapes.
Cons of Fusible Applique:
* Can make fabric feel a bit stiff.
* Edges might feel a little hard.
* Less traditional look than needle turn.
Details on Raw Edge Applique
Raw edge applique is one of the simplest methods. You cut out your fabric shape and stick it or pin it onto the background fabric. Then you sew around the edges. The “raw edge” means you leave the cut edge of the fabric as it is. You don’t turn it under.
How to do Raw Edge Applique:
- Choose your design: Pick your shape.
- Cut out the shape: Cut your applique shape directly from your chosen fabric. No need to add extra fabric for turning under. Cut exactly on your drawn line (drawn on the front or back).
- Position the shape: Place the cut fabric shape on your background fabric.
- Hold in place: You can use pins, temporary fabric glue, or fusible web (cut to the exact size of the shape this time) to hold the shape still.
- Sew the edges: Sew around the edges of the shape. You can use a machine or sew by hand. A straight stitch, zigzag stitch, or free-motion stitching works well. The stitching stops the fabric edge from fraying too much, or you let it fray a little for a rustic look.
Pros of Raw Edge Applique:
* Very quick and easy.
* Uses less fabric preparation.
* Can give a modern or rustic look depending on stitching.
Cons of Raw Edge Applique:
* Edges will fray over time, especially with washing.
* May not be suitable for items that need to be very durable and washed often unless heavily stitched.
Comparing Raw Edge and Other Methods
- Raw Edge vs. Fusible Applique: Fusible uses heat-activated glue first, then you stitch. Raw edge puts the fabric shape down directly and stitches. Fusible keeps edges neat; raw edge edges can fray.
- Raw Edge vs. Needle Turn: Needle turn hides the raw edge by folding it under as you sew by hand. This gives a very smooth, clean edge. Raw edge leaves the cut edge showing. Needle turn takes much more time and skill.
Grasping Satin Stitch Applique
Satin stitch is a way to sew down the edge of an applique shape. It is a series of close-together zigzag stitches. These stitches cover the raw edge of the fabric completely. It gives a smooth, shiny, raised line around your design.
How to do Satin Stitch Applique (Machine Technique):
- Prepare your shape: Use fusible web to stick your shape down firmly. This is important because the satin stitch is dense. It can pull the fabric if it is not stuck down.
- Add Applique Stabilizer: Place stabilizer under your background fabric. This is key for satin stitch. The dense stitches can make fabric pucker or wrinkle without it. A tear-away or cut-away stabilizer works well.
- Set up your machine: Use a zigzag stitch. Set the stitch length to be very short (almost 0). Set the stitch width to be wide enough to cover the raw edge of your applique fabric. Practice on a scrap first.
- Sew the edge: Start sewing along the edge of your applique shape. One side of the zigzag stitch should go just off the edge of the applique shape, and the other side should land on the background fabric. Keep your stitches close and even. Go slowly around curves.
Satin stitch gives a classic, finished look. It seals the edge so it won’t fray at all.
Fathoming Buttonhole Stitch Applique
The buttonhole stitch (also called blanket stitch) is another popular way to finish applique edges. It is a series of loops along the edge. It can be done by hand or machine. It gives a more rustic, handmade look than satin stitch.
How to do Buttonhole Stitch Applique (Hand Method):
- Prepare your shape: Pin or use temporary glue to hold your applique shape on the background. For a neat edge, you might turn the edge under slightly as you sew (like needle turn) or use fusible web.
- Thread your needle: Use embroidery floss or strong thread.
- Stitch the edge: Bring your needle up from the back of the background fabric near the edge of the applique shape. Make a stitch forward along the edge. Before pulling the thread tight, loop the thread around the needle. Pull the needle through the loop. This makes a small loop of thread at the edge. Keep making these stitches evenly along the edge. The short bar of the stitch goes over the edge, and the loop runs along the edge.
How to do Buttonhole Stitch Applique (Machine Technique):
- Prepare your shape: Use fusible web or pins to hold the shape.
- Add Applique Stabilizer: Use stabilizer under your fabric, especially if the fabric is thin or stretchy.
- Set up your machine: Select the buttonhole or blanket stitch setting. Adjust the stitch length and width to fit your design.
- Sew the edge: Sew along the edge of your shape. The machine makes the loops and bars of the stitch for you. Make sure the stitch covers the raw edge of the applique fabric.
Buttonhole stitch is sturdy and decorative. It is great for items that get a lot of use.
A Deep Dive into Hand Applique Method
Hand applique is the traditional way to sew fabric shapes onto a background. It takes more time than machine applique, but many people find it relaxing. The main type of hand applique that hides the raw edge is called Needle Turn Applique.
How to do Needle Turn Applique:
- Prepare your pattern and fabric: Trace your applique shape onto the right side of your fabric using a removable marking tool. Cut out the shape, leaving about a quarter-inch seam allowance all around the traced line. This is the part you will turn under.
- Position the shape: Place the fabric shape (right side up) onto your background fabric. Pin it in place.
- Start sewing: Thread a needle with thread that matches your applique fabric. Make a knot at the end. Bring the needle up from the back of the background fabric, just outside the edge of your applique shape.
- Turn the edge: Use the tip of your needle to turn the raw edge of the applique fabric under along your traced line. Turn just a small bit at a time (about an inch).
- Sew the edge: Make a small stitch. Push the needle into the background fabric right next to where the folded edge meets it. Bring the needle up through the folded edge of the applique shape, just a tiny bit (maybe 1/8 inch) from where you went down. This stitch should catch the turned-under edge and attach it to the background. The stitches should be small and almost invisible from the front.
- Keep going: Turn under the next small section of the raw edge with your needle and make another small stitch. Continue this turning and stitching process all the way around your shape. Go slow around curves and points.
Hand applique makes the edge look soft and part of the fabric. It is a beautiful way to sew applique.
Exploring Machine Applique Technique
Machine applique is faster than hand applique. You use your sewing machine to sew down the edges of your fabric shapes. You can use many different stitches on your machine.
Basic Machine Applique Steps:
- Prepare your shape: Use fusible web (cut to the shape size or slightly bigger and trimmed after fusing) or a temporary glue stick to hold your applique shape onto the background fabric. Pins can work for large, simple shapes, but glue or fusible web is better for curves and smaller pieces.
- Add Applique Stabilizer: Put stabilizer under your background fabric. This is often needed for machine applique, especially if you use dense stitches like satin stitch or if your fabric is thin. Stabilizer helps prevent the fabric from pulling or puckering as you sew.
- Choose your stitch: Pick a stitch on your machine. Common choices are:
- Straight Stitch: Sew right on or just inside the edge. The edge might fray a little. Good for raw edge applique.
- Zigzag Stitch: A simple way to cover the edge and prevent fraying. Adjust width and length.
- Satin Stitch: Very close zigzags that cover the edge completely.
- Buttonhole/Blanket Stitch: Gives a decorative edge.
- Free Motion Stitching: Lower the feed dogs on your machine and move the fabric freely under the needle to draw with thread around the shape.
- Set up your machine: Put the right foot on your machine for the stitch you chose (e.g., an open-toe foot for visibility, an applique foot). Adjust stitch settings.
- Sew the edge: Start sewing slowly around the edge of your applique shape. Guide the fabric carefully. For zigzag or satin stitch, make sure the stitch goes over the edge of the applique fabric and onto the background fabric.
Machine applique is strong and quick. It is great for large projects or items that need to be very durable.
Readying Your Fabric
Proper Applique fabric preparation helps make your project look its best.
- Pre-wash fabric: It is a good idea to wash all your fabrics before you start. This removes any sizing or chemicals. It also lets the fabric shrink if it is going to. Washing prevents your finished project from puckering unevenly later.
- Press fabric: Iron all your fabrics flat and smooth. Wrinkles can make it hard to trace patterns accurately and sew smoothly.
- Cutting Shapes: Cut carefully! Sharp scissors make a big difference. For hand applique (needle turn), remember to leave a little extra fabric (seam allowance) around your traced line. For fusible or raw edge, cut right on the line.
Picking and Using Applique Patterns
Applique patterns are the shapes you will cut out of fabric.
- Sources: You can find patterns in craft books, magazines, online, or you can draw your own. Simple shapes are great for beginners.
- Tracing: Trace your pattern onto the back of your applique fabric (for fusible) or the front/back for other methods, depending on how you cut. Use a marking tool that will disappear later (like heat-away or water-soluble pens) or is on the back.
- Size: Think about the size of your shapes related to your background. Don’t make them too big or too small for the space.
- Placing Patterns: Before you sew, lay out all your cut applique patterns on your background fabric. Move them around until you like how they look. Take a picture with your phone to remember the layout. Then, attach them using your chosen method (pins, glue, fusible).
Selecting Applique Stabilizer
What is applique stabilizer? It is a material you put under your background fabric when machine sewing. It helps support the fabric, especially when you are sewing dense stitches like satin stitch. It stops the fabric from stretching, pulling, or puckering.
Types of Applique Stabilizer:
- Tear-Away Stabilizer: This is like stiff paper. You stitch through it and the fabric. When done, you can tear it away from the back. Good for woven fabrics and designs where you don’t need permanent support.
- Cut-Away Stabilizer: This is softer, more like fabric. You stitch through it, and then you cut away the extra around your design. You leave the stabilizer under the stitches. Good for knit fabrics, dense stitches, and projects that will be washed often. It gives lasting support.
- Wash-Away Stabilizer: This dissolves in water. You can use it on top of your fabric as well as underneath. Useful for fuzzy fabrics or when you want absolutely no stabilizer left.
When to Use Stabilizer:
- Almost always for machine applique, especially with satin stitch or dense fills.
- When using lightweight or stretchy background fabrics.
- When your design has lots of stitches close together.
Choosing the right stabilizer helps your machine applique look smooth and professional.
Stitching the Edges
Embroidery stitches for applique are the stitches you use to sew the fabric shape onto the background. They hold the shape down and cover or finish the edge.
Besides the machine stitches like zigzag, satin stitch, and buttonhole stitch, you can use hand embroidery stitches.
- Whip Stitch: A simple hand stitch. Go over the edge of the applique and catch the background fabric. It is quick but might show the raw edge slightly if not turned under.
- Blind Hem Stitch: A hand stitch that is almost invisible from the front. Requires turning the edge under (like needle turn).
- Running Stitch: A simple in-and-out stitch. Can be used for raw edge applique, letting the edge fray slightly.
- Decorative Stitches: Many embroidery stitches can be used to outline or go around your applique shapes, adding decoration. Examples include:
- Chain Stitch
- Feather Stitch
- Straight Stitch (often used for machine raw edge)
- Zigzag Stitch (often used for machine)
- Satin Stitch (machine or hand)
- Buttonhole/Blanket Stitch (machine or hand)
The stitch you choose affects the look and durability of your applique. Simple stitches are good for practice.
Your First Applique Project: A Simple Guide
Let’s put it all together with a simple raw edge machine applique heart.
Materials:
- Background fabric (about 8×8 inches)
- Red fabric scrap for the heart
- Small heart applique pattern
- Fabric marking pen
- Scissors
- Pins or temporary fabric glue
- Sewing machine
- Thread
- Optional: Tear-away applique stabilizer
Steps:
- Prep fabrics: Wash and iron your background and heart fabrics.
- Get the pattern: Print or draw a small heart shape.
- Cut the heart: Place your heart pattern on your red fabric. Trace around it with the fabric pen. Cut the heart shape out right on the line. This is your raw edge shape.
- Place the heart: Put the red heart shape onto the center of your background fabric.
- Hold it down: Use a few pins to hold the heart in place. Or, put a few dots of temporary fabric glue on the back of the heart and stick it down.
- Add stabilizer (optional but good): Place a piece of tear-away stabilizer under your background fabric, right where the heart is.
- Set up machine: Thread your machine with thread that matches or looks nice with the red heart. Select a zigzag stitch. Set the stitch length quite short (around 0.5 to 1). Set the stitch width wide enough to go over the edge of the heart (maybe 2-3). Practice on a scrap.
- Start sewing: Put your fabric under the machine foot. Lower the needle right at the edge of the heart. Start sewing slowly around the edge of the heart. Keep the needle moving so one side of the zigzag goes over the edge of the heart and the other side lands on the background fabric.
- Sew all around: Sew all the way around the heart shape, guiding the fabric gently. When you get back to where you started, sew a few stitches over your first ones to lock the stitch.
- Finish up: Take the fabric out of the machine. Cut your threads. If you used tear-away stabilizer, gently tear it away from the back. Your raw edge applique heart is done!
This project uses basic machine applique technique. You can try different stitches or switch to hand sewing after practicing this.
Advice for Great Applique
- Practice Cutting: Cutting smooth, clean shapes is key. Practice on scrap fabric first.
- Use Sharp Tools: Sharp scissors and needles make everything easier.
- Go Slow: Especially when sewing around curves or points. Speed comes with practice.
- Press Often: Ironing helps your fabric lie flat and makes edges neat.
- Test Stitches: If using a machine, test your stitch settings on a scrap of your actual fabrics layered with stabilizer before sewing on your real project.
- Think About Fabric: Some fabrics are easier to work with than others. Cotton is a good start. Very thin, thick, or stretchy fabrics can be tricky.
- Consider Contrast: Use fabrics that show up well against each other. This makes your applique design pop.
Wrapping Up Applique Skills
Learning how to applique embroidery opens up many creative doors. You can personalize gifts, make unique clothes, or add beautiful details to quilts and home decor. Whether you prefer the speed of machine applique technique with fusible web or the careful stitches of the Hand applique method, there is a way for everyone to enjoy this craft.
Remember the key steps: Applique fabric preparation, choosing good Applique patterns, using Applique stabilizer when needed, and picking the right Embroidery stitches for applique. Start simple, practice, and have fun applying your fabric shapes to make something wonderful!
Frequently Asked Questions About Applique
Q: Do I have to sew down fusible applique?
A: Yes, you really should sew down fusible applique. The glue holds the fabric in place for stitching, but it might not hold forever or through washing. Sewing makes the applique permanent and gives a finished look.
Q: Can I wash applique?
A: Yes, you can wash projects with applique. How you wash depends on the method used. Hand applique and machine applique with dense stitches like satin or buttonhole are usually very durable. Raw edge applique might fray more with washing, which might be the look you want. Always pre-wash fabrics to prevent problems later.
Q: What is the easiest way to start applique?
A: Fusible applique using a simple shape and sewing the edges with a machine zigzag stitch is one of the easiest ways to start. Raw edge applique is also very simple for beginners.
Q: How do I choose the right thread color?
A: You can choose thread that matches your applique fabric so the stitches blend in. Or you can choose a contrasting color to make the stitches a design element themselves.
Q: Do I need a special sewing machine for machine applique?
A: No, most modern sewing machines have a zigzag stitch, which is all you need for basic machine applique. Machines with more decorative stitches offer more options, but they are not required to start.
Q: What if my applique fabric is very thin or frays a lot?
A: For thin or fraying fabrics, using a dense stitch like satin stitch or buttonhole stitch is a good idea. You will definitely need Applique stabilizer underneath to keep the fabric smooth. Hand applique with the needle turn method can also work well for controlling edges on fabrics that fray.