
Basting in sewing is like using temporary glue made of thread. It holds pieces of fabric together for a short time, just until you sew the final stitches. Think of it as a stand-in for pins or permanent stitches. This temporary stitching in sewing helps you check the fit or hold tricky parts in place before you commit with your sewing machine.
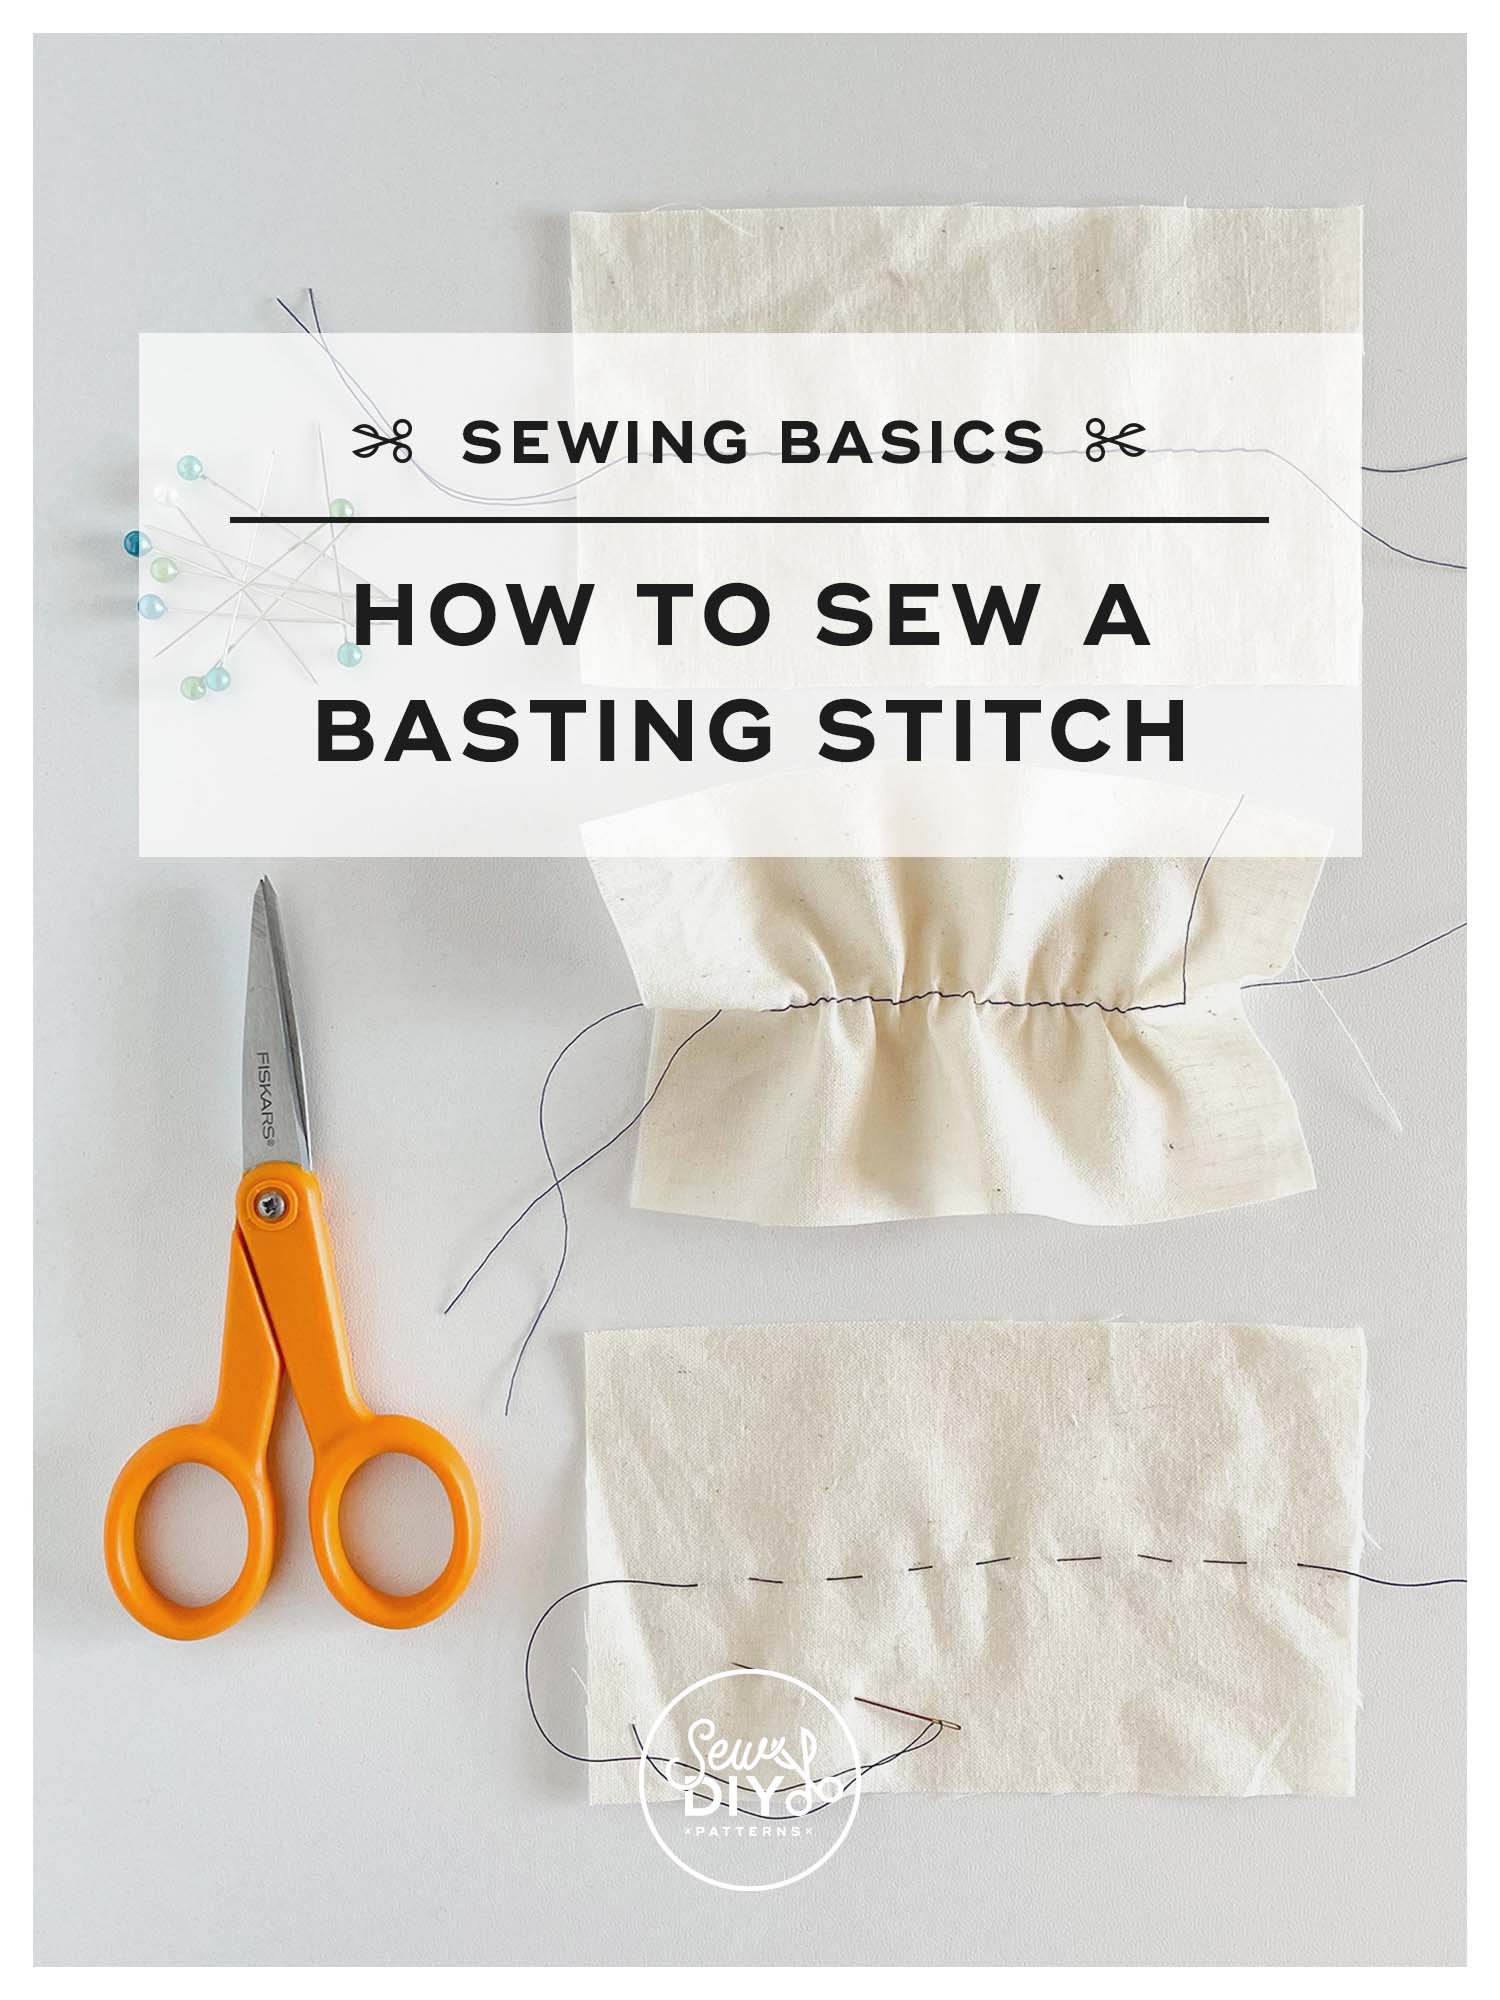
Image Source: images.squarespace-cdn.com
The Core Idea Behind Basting
Sewing needs things to stay still. Most times, we use pins. But pins can move, fall out, or push fabric around, especially on curves or fine materials. This is where basting comes in. It uses simple, loose stitches to hold fabric firmly but gently.
The purpose of basting stitches is simple: to keep layers of fabric from shifting while you sew them together permanently. It’s a safety step that helps you get things right. It lets you fit clothes on a body, place zippers just so, or line up tricky patterns before making the final seam.
Grasping Why Basting Matters
Why take the extra step to baste? It saves you time and frustration later. Imagine sewing a long zipper without holding it perfectly straight first. It could end up wavy! Or trying to sew a smooth curve on a collar. Basting helps you control the fabric.
Here are some reasons basting is a good idea:
- Holding tricky fabrics: Silky or slippery fabrics are hard to pin. They slide around. Basting holds them better.
- Sewing curves and corners: Basting lets you ease fabric around curves smoothly. Pins can poke out or distort the shape.
- Fitting clothes: When making clothes, you often sew seams loosely to try them on. This is a form of basting. You check the fit, then sew the real seams.
- Attaching zippers: Basting keeps a zipper perfectly straight and lined up while you sew it in place.
- Setting in sleeves: Sleeves need to fit smoothly into the armhole. Basting helps distribute the fabric evenly.
- Working with multiple layers: Quilting or tailoring often involves many layers. Basting holds them all together before final stitching.
- Checking pattern matching: If you need stripes or checks to line up across a seam, baste first to check before sewing for good.
Basting is a crucial skill for better results, especially with projects that need to fit well or look neat.
Basting vs Pinning Fabric
This is a big question for beginners. Both pins and basting hold fabric. So why use basting?
Here’s a simple comparison:
| Feature | Pins | Basting Stitches |
|---|---|---|
| Hold Type | Poke through fabric layers | Thread passes through layers |
| Fabric Movement | Fabric can still shift between pins | Holds fabric more securely along the line |
| Good For | Straight seams, holding patterns | Curves, slippery fabrics, fitting, zippers, set-in sleeves, multiple layers |
| Removal | Quick, just pull them out | Takes a little more time to snip & pull |
| Distortion | Can distort delicate or fine fabrics | Less likely to distort if stitches are loose |
| Visibility | Easy to see | Easier to see if using contrast basting thread for sewing |
While pins are fast for simple straight seams, basting offers more control for tricky parts. It’s like using many tiny, flexible clamps instead of a few stiff ones. Basting is temporary. You take the stitches out after sewing the permanent seam. Basting vs pinning fabric often comes down to the job. For easy straight seams, pins are fine. For anything needing more care, basting is better.
Different Forms of Basting Stitches
There are two main ways to baste: by hand or by machine. Each has its place.
Hand Basting vs Machine Basting
- Hand Basting: You use a needle and thread. It’s slower but gives you the most control. Great for curves, fitting, and delicate fabrics.
- Machine Basting: You use your sewing machine with a very long stitch. It’s much faster but less flexible for curves or fitting. Good for straight seams or large areas like quilting layers.
We will look at both methods in detail. Knowing when to use hand basting vs machine basting helps you choose the best tool for the job.
Hand Basting: Your Control Method
Hand basting uses a needle and thread. It is very flexible and lets you work right next to a sewing line, even on shapes that are not straight.
The Basic Hand Basting Stitch
The main stitch used for hand basting is a simple running stitch for basting. It’s the most basic sewing stitch you can do. You just pass the needle in and out of the fabric.
The key difference for basting is the stitch length. Hand basting uses long stitches in sewing. These stitches are much bigger than your normal hand or machine sewing stitches. Why long stitches? Because they are quick to sew and, more importantly, quick to remove! A typical basting stitch might be 1/4 inch to 1/2 inch (about 6mm to 12mm) long, sometimes even longer.
What Thread to Use?
You can use regular sewing thread for basting. But it’s often best to use basting thread for sewing. This thread is usually a bit weaker than normal thread. This makes it easy to break and pull out later.
Also, it’s a great idea to use a thread color that is very different from your fabric color. This helps you see the basting stitches clearly so you don’t sew over them with your permanent stitches, and so you can easily find and remove them later. Contrasting thread is key for how to remove basting threads easily.
Step-by-Step: Hand Basting
Here are the simple steps to hand baste:
-
Get Ready:
- Thread a hand sewing needle with a single strand of basting thread for sewing.
- Cut a length of thread that is easy to handle, maybe about 18-24 inches (45-60 cm). Too long and it tangles.
- You can tie a knot at the end of the thread, or not. Sometimes a knot is used for security. Other times, leaving it unknotted makes how to remove basting threads even faster. If you don’t knot, leave a tail about 2 inches long at the start.
-
Start Stitching:
- Bring the needle up from the wrong side of the fabric to the right side. If using a knot, the knot will be on the wrong side. If not using a knot, leave the thread tail on the wrong side.
- Move the needle along the line you want to baste.
- Insert the needle back down through the fabric.
- Bring the needle back up a bit further along the line. This makes one stitch on top and one stitch underneath.
- Make these stitches quite large – remember, they are long stitches in sewing. Aim for something like 1/2 inch (12mm) or even bigger depending on what you’re basting.
- Keep your stitches fairly even in length.
-
Continue Along the Line:
- Keep making these long, simple stitches. Pass the needle down, then up, along the line. This is your basic running stitch for basting.
- Try to keep the fabric flat as you go. Don’t pull the thread too tight. Basting should hold the fabric gently, not gather it.
-
Finishing the Basting Line:
- When you reach the end of the section you need to baste, you can either:
- Take a couple of tiny backstitches right on top of each other to secure the thread.
- Or, just leave a tail of thread about 2 inches long on the wrong side, like you did at the start if you didn’t use a knot. Leaving tails makes removal easier.
- When you reach the end of the section you need to baste, you can either:
-
Check Your Work:
- Look at your basting line. Is it holding the fabric neatly? Is it following the line you need?
- If you are basting a seam for fitting, you can try the garment on (carefully!). The basting lets you see if the fit is right before sewing the permanent seam.
Hand basting is very good for specific tasks like easing a sleeve head into an armhole, attaching facings that need to lie flat, or temporarily holding pleats or gathers in place. It gives you fine control right where you need it. The purpose of basting stitches done by hand is often about precision and checking fit or placement before the final sew.
Machine Basting: Your Fast Method
Machine basting is much faster than hand basting. It’s great for holding larger areas or longer, straighter seams where you don’t need super fine control.
Setting Up Your Machine
Machine basting uses your sewing machine but with special settings:
- Set Stitch Length: This is the most important step. Set your machine to the longest stitch length possible. On many machines, this might be 4mm or 5mm, sometimes even longer. Check your machine’s manual. These are your long stitches in sewing by machine.
- Reduce Thread Tension (Optional but Recommended): Lower your upper thread tension slightly. This makes the stitches even easier to pull out later. Test on a scrap first to see how it looks.
- No Backstitching!: Do not backstitch at the start or end of your basting line. You want to be able to pull the threads out easily. Just leave thread tails.
Step-by-Step: Machine Basting
Here’s how to baste using your sewing machine:
-
Get Ready:
- Make sure your machine has thread (any color that contrasts with your fabric is best for visibility and how to remove basting threads).
- Set your machine for the longest stitch length.
- Lower the thread tension a bit if you can.
-
Place Your Fabric:
- Put your fabric layers together, lining up the edges or marks where you need to baste.
- You can still use a few pins to hold things before you start, but you’ll take them out as you sew the basting line.
-
Start Sewing:
- Place the fabric under the presser foot at the start of your basting line.
- Lower the presser foot.
- Begin sewing forward. Do not backstitch.
- Guide the fabric carefully along the line you need to baste. Keep your stitches straight if needed, or follow the curve.
- Remove any pins just before they reach the needle.
-
Continue Sewing:
- Keep sewing with the long stitches in sewing.
- Don’t pull or push the fabric too hard. Let the machine feed it through.
- Make sure the fabric layers stay lined up as you go.
-
Finishing the Basting Line:
- When you reach the end, stop sewing.
- Lift the needle and the presser foot.
- Pull the fabric away from the machine, leaving long thread tails (4-6 inches or 10-15 cm). Do not backstitch.
-
Check Your Work:
- Look at your machine basting line. Is it in the right place? Is it holding the fabric together along the line you needed?
- Because these are long stitches, the line won’t be super strong, but it should hold the fabric well enough for the next step, like sewing the permanent seam.
Machine basting is perfect for holding large panels together, basting quilting layers, or quickly securing long straight seams before serging or final stitching. It’s a fast way to achieve the purpose of basting stitches for many basic tasks.
When is it Time to Baste Fabric?
It’s smart to baste fabric in certain situations. It’s not needed for every seam, but for key parts of your project, it’s a real help.
Here’s a list of times when to baste fabric:
- Zippers: Baste the fabric edges before sewing the zipper tape. This keeps the zipper straight and centered.
- Set-in Sleeves: Baste the sleeve cap into the armhole. This lets you ease the fabric smoothly and check the fit before sewing the final seam.
- Collars and Cuffs: Baste layers together around curves or corners before trimming and turning.
- Waistbands: Baste the waistband to the garment body to check the fit and hang before the final stitch.
- Pleats and Gathers: Baste across the top of pleats or gathers to hold them neatly in place before sewing them into a seam.
- Facings and Linings: Baste edges of facings or linings to the main fabric temporarily, especially around necklines or armholes, to keep them aligned.
- Delicate or Slippery Fabrics: Anything like silk, satin, or chiffon benefits hugely from basting because pins can snag or slide out.
- Matching Patterns: If your fabric has stripes or checks you need to line up across a seam, baste the seam first to make sure they match perfectly.
- Fitting Garments: When making clothes that need to fit a body, baste the main seams (like side seams or shoulder seams) with long stitches. You can try the garment on, adjust the fit, and then sew the permanent seams based on the adjusted basting line.
- Quilting Layers: Baste the quilt top, batting, and backing together before machine quilting. This holds the three layers so they don’t shift. Machine basting is common here.
- Tailoring: Tailored garments often use extensive basting for structure and fitting checks.
Knowing when to baste fabric comes with practice. If a part feels tricky, or if getting the placement exactly right is important, basting is likely a good choice. It’s a temporary stitch, so if it’s wrong, it’s easy to take out!
Basting Thread for Sewing: More Than Just Any Thread
We mentioned basting thread for sewing earlier. While you can use regular thread, using specific basting thread or a fine, contrasting regular thread is better.
- Visibility: Using a bright, contrasting color makes the stitches easy to see against your fabric. This stops you from accidentally sewing over them with your main stitch. It also makes how to remove basting threads simple – you can easily spot the thread you need to pull out.
- Strength: Dedicated basting thread is often weaker or more loosely spun than regular sewing thread. This is a good thing! It breaks more easily when you need to remove it, reducing the risk of damaging your fabric when pulling. If using regular thread, choose a fine one.
- Material: Some basting threads are made of cotton or a cotton blend. These are less likely to leave marks on your fabric compared to strong synthetics if the basting stays in for a little while.
Keep a spool of brightly colored, maybe slightly weaker, thread on hand just for basting. It’s a small thing that makes the temporary stitching in sewing much more effective and easier to remove.
How to Remove Basting Threads
Once you’ve sewn your permanent seam, the temporary stitching in sewing (the basting stitches) is no longer needed. You need to take them out.
Because basting uses long stitches in sewing and often weaker or contrasting thread, removing it is usually easy.
Here’s how to remove basting threads:
- Find the Thread Ends: Look for the thread tails at the start or end of your basting line. If you didn’t knot, you’ll have tails. If you knotted, you might need to snip near the knot.
- Snip One End: Use small scissors or a seam ripper to carefully snip the thread close to the fabric at one end of the basting line. Make sure you only snip the basting thread, not your fabric or the permanent seam!
- Pull the Thread: Go to the other end of the basting line. Gently pull the thread tail. The long stitches should pull out smoothly.
- Troubleshooting:
- If the thread doesn’t pull easily, it might be caught in your permanent stitches. Check carefully.
- If the basting stitches were very short or tight, or if you used strong thread, you might need to snip the basting thread every few inches (or every few stitches) along the line before pulling. This breaks it up and makes it easier to remove without pulling too hard on your fabric or permanent stitches.
- Be extra careful when removing basting from delicate fabrics. Snip more often to avoid stress on the fabric.
- Make sure you remove all the basting stitches. They can affect how the fabric hangs or feels.
Removing basting should be quick and simple. The long stitches in sewing are designed for this easy removal. Using suitable basting thread for sewing makes it even easier.
Exploring the Range: Types of Basting Stitches
While the basic running stitch for basting is the most common, there are a few ways to hand baste depending on what you need the stitches to do. These are all forms of temporary stitching in sewing.
Here are a few types of basting stitches:
-
Even Basting: This is the standard type. Stitches and the spaces between them are roughly the same length (like 1/2 inch stitch, 1/2 inch space). This is the basic running stitch for basting described earlier. It holds fabric flat and prevents shifting.
- Use For: Holding seams for fitting, aligning layers on straight or gentle curves.
-
Uneven Basting: Stitches on the top side are much longer than the spaces on the back side (like a 1-inch stitch on top, 1/4 inch space on the back). You load several long stitches onto the needle before pulling it through. This is faster than even basting.
- Use For: Quickly holding large sections together, like quilting layers, or marking lines. Less precise than even basting.
-
Diagonal Basting (or Tailor’s Basting): Stitches are made diagonally across the fabric layers. On the back, they look like small horizontal stitches, and on the front, they are long diagonal stitches. These stitches are worked in rows. They are very effective at holding fabric layers firmly together without shifting or rippling, especially on larger pieces like jacket fronts or collars.
- Use For: Tailoring, holding interfacing or lining to main fabric, preventing bias fabric from stretching. This is a stronger type of temporary hold.
-
Thread Tracing (or Tailor’s Tacks): Not exactly a stitch line, but a way to mark points or lines using looped thread. You take a small stitch, leave a loop, take another small stitch nearby, leave another loop, then snip between the loops. When you pull the fabric layers apart slightly, you snip the threads between the layers. This leaves little tufts of thread on both pieces of fabric, marking the same point.
- Use For: Marking dart points, pocket placements, pleat lines, buttonholes, or other pattern marks onto fabric without using chalk or pens that might disappear or stain.
Each of these types of basting stitches has a slightly different purpose of basting stitches. Even and uneven basting are for holding seam lines. Diagonal basting is for holding larger areas flat. Thread tracing is for marking points. Learning these helps you choose the right temporary hold for the job.
Practical Tips for Better Basting
- Use the right thread: As discussed, contrasting, slightly weaker thread is best. This is your basting thread for sewing.
- Don’t pull tight: Basting stitches should be loose enough to be easily removed and not distort the fabric.
- Stitch length matters: Use long stitches in sewing. This is key for easy removal. Shorter stitches are harder to take out.
- Check your work: After basting, look at the seam or area. Does it lie flat? Are edges aligned? If you’re basting for fit, try it on. Make adjustments before sewing the permanent seam. That’s the main purpose of basting stitches!
- Machine settings for speed: When machine basting, ensure your stitch length is the maximum setting. Lowering tension helps removal. Remember, no backstitching.
- Remove completely: Make sure all basting threads are removed after sewing the permanent seam. Leftover basting can affect the look and feel of the finished item. How to remove basting threads efficiently is part of the skill.
- Basting vs pinning fabric decision: Think about the fabric and the seam type. Slippery fabric, curves, or fitting needs often point to basting being better than just pins.
Mastering basting adds a lot to your sewing skills. It helps you get cleaner, more accurate results, especially on tricky projects. It’s a key part of getting a professional finish on your handmade items. The temporary stitching in sewing gives you a chance to check and fix before it’s too late.
When to Baste Fabric: Recap and Expansion
Let’s revisit when to baste fabric with a little more detail. Choosing to baste is often about reducing risk and ensuring accuracy on parts that are hard to undo or adjust later.
- Fitting: Basting is essential for fitting garments. You sew the main seams (like side seams) using hand basting or long machine stitches. You try the garment on. If it’s too tight or loose, you adjust the basting line. Then you sew the final seam right next to the adjusted basting. The original basting is then removed. This saves you from sewing, ripping, and re-sewing permanent stitches multiple times.
- Setting Zippers: Basting is a very common way to put in zippers neatly. You baste the seam closed where the zipper will go, press it open, lay the zipper on top, and baste the zipper tape in place. Then you sew the permanent zipper stitch lines right next to the basting. The basting holding the seam closed is then removed, opening up the zipper area perfectly.
- Easing Fabric: When one piece of fabric is slightly bigger than the other piece it’s being sewn to (like a sleeve cap into an armhole), you need to “ease” the fullness of the larger piece to fit the smaller one without creating gathers or puckers. Basting helps control this easing. You baste two rows of stitches along the edge of the larger piece, pull the threads to gather slightly, distribute the gathers evenly, then baste the eased edge to the smaller piece before sewing the final seam.
- Working with Sheer or Fine Fabrics: Pins can leave holes or snags in delicate fabrics like chiffon, lace, or fine silk. They can also make these slippery fabrics shift more. Basting provides a gentle, continuous hold along the seam line, which is far better for these materials.
- Quilting: For machine quilting, you need to hold the three layers (top, batting, backing) together across the whole surface. While spray basting exists, traditional basting involves sewing long lines across the quilt sandwich. Machine basting is often used for speed on larger quilts. Hand basting is used by some for smaller quilts or specific control.
- Tailoring Techniques: In classic tailoring, hand basting is used extensively. It helps shape lapels, attach linings, hold interfacings, and prepare seams for pressing and final stitching. Diagonal basting is often seen in tailoring to hold large sections firmly.
So, when to baste fabric really depends on the complexity of the task and the nature of the fabric. If in doubt, a quick basting line is easy insurance against mistakes. It is the ultimate temporary stitching in sewing.
Hand Basting vs Machine Basting: Which to Choose?
Deciding between hand basting vs machine basting depends on your project needs and what you prefer.
-
Choose Hand Basting When:
- You need precise control over curves or corners.
- You are fitting a garment on a person or dress form.
- Working with very delicate or slippery fabrics where machine feet might cause issues.
- Sewing areas with a lot of detail or easing, like sleeve caps.
- You prefer a quiet, portable method.
- The section to baste is short.
-
Choose Machine Basting When:
- You need to hold long, relatively straight seams.
- You are basting large areas, like quilting layers.
- Speed is more important than fine control.
- Working with stable fabrics that don’t shift much.
- Basting along edges that will be trimmed away later.
Often, a project will use both types. You might machine baste long side seams for a quick check, then hand baste the neckline facing or sleeve cap for better control. The key is understanding the strengths of hand basting vs machine basting and choosing the method that will make the next step (the permanent stitching) easiest and most accurate.
Reviewing the Running Stitch for Basting
Let’s look again at the running stitch for basting. It’s deceptively simple. It’s just going in and out of the fabric. But making it effective for basting comes down to two things:
- Length: It uses long stitches in sewing. These long stitches make it fast to sew and very easy to remove. They provide enough hold for temporary purposes without being hard to undo.
- Looseness: The thread is not pulled tight. A loose stitch allows the fabric to lie naturally and prevents puckering. It also makes the thread easy to slide out when removed.
This simple running stitch for basting is the foundation of most hand basting. It’s a fundamental skill for any sewer to know.
Bringing It All Together
Basting is a foundational technique in sewing. It is temporary stitching in sewing that serves a vital purpose of basting stitches: holding fabric securely for fitting, precision, and control before applying permanent stitches.
You have learned about the types of basting stitches (hand vs machine, even, uneven, diagonal, thread tracing). You’ve seen when to baste fabric for best results, using specific basting thread for sewing for visibility and easy removal. You understand the difference between basting vs pinning fabric and when to choose one over the other. And you know how to remove basting threads carefully after your final seam is sewn.
Using long stitches in sewing, whether by hand with a running stitch for basting or by machine, is what defines basting. It’s an easy skill to pick up but one that makes a big difference in the quality of your finished sewing projects.
Don’t skip the basting step when your project calls for it. It might seem like extra work, but it will save you time, stress, and seam ripping in the long run! Practice hand basting to get a feel for it, and use machine basting for speed when appropriate. Happy sewing!
Frequently Asked Questions (FAQ)
Here are some common questions beginners ask about basting:
Q: Is basting always necessary?
A: No, basting is not needed for every seam. Simple, straight seams on stable fabric often only need pins. Basting is best used for areas that need more control, accuracy, fitting, or on tricky fabrics.
Q: Can I use regular thread for basting?
A: Yes, you can. However, using a dedicated basting thread for sewing or a finer, contrasting regular thread is often better. It’s easier to see and easier to break for removal.
Q: What’s the main difference between basting and regular stitches?
A: Basting stitches are temporary and use long stitches in sewing. Regular stitches are permanent, much shorter, and are designed to hold fabric together strongly forever.
Q: How long should basting stitches be?
A: For hand basting, stitches are often 1/4 inch to 1/2 inch (6-12mm) or more. For machine basting, use the longest stitch length your machine has. The goal is long stitches for easy removal.
Q: Will basting stitches show on the outside of my finished item?
A: No, basting stitches are temporary stitching in sewing. You remove them after you sew the permanent seam.
Q: Is it hard to remove basting threads?
A: If you use long stitches in sewing and suitable thread, removing basting is usually quite easy. You typically just snip one end and pull. Sometimes you might need to snip every few inches if the stitches were too short or tight. Knowing how to remove basting threads properly is key.
Q: When should I choose hand basting over machine basting?
A: Choose hand basting for more control, especially on curves, for fitting, delicate fabrics, or detailed areas like sleeve heads. Choose machine basting for speed on long, straight seams or large areas like quilts. This relates to hand basting vs machine basting.
Q: Can I baste instead of pinning?
A: Yes, basting is often a better way to hold fabric than pinning, especially for tricky tasks. It offers a more continuous and secure hold. The choice between basting vs pinning fabric depends on the specific sewing task.
Q: What is the main purpose of basting?
A: The primary purpose of basting stitches is to hold fabric layers or sections together temporarily and accurately before the final permanent stitching is done. This allows for checking placement, fit, and alignment.