
Image Source: www.wanderingthreadsembroidery.com
Secrets to How To End Embroidery Stitches Cleanly
Ending your stitches the right way is key to a great finished embroidery piece. It helps your work last a long time and look neat. If you do cross stitch, knowing how to end cross stitch thread cleanly is very important for a tidy back. This post will show you simple ways to finish your work neatly.
Why a Clean Back Matters
A neat back on your embroidery is more than just looking good. It is part of finishing embroidery stitches correctly. A clean back means fewer bumps. This helps the fabric lie flat. It looks better if your work will be seen from both sides. This is true for things like ornaments or banners. A tidy back also makes framing easier. Plus, properly Securing embroidery thread stops your stitches from coming undone. Avoiding knots on embroidery back is a big part of keeping it neat and strong. Knots can make bumps. They can also snag on things.
Grasping the Basic Idea of Ending
Think of ending your thread as the last step in a stitch line. You have used up your thread, or you are done with a color. Now you need to stop using that thread. You must make sure it stays put. You do this on the back side of your fabric. The goal is to hide the thread end. You also want to make it secure. You do not want it to show through the front. You do not want it to loosen later. There are a few main ways to do this. We will look at them. Each way helps with Hiding embroidery thread ends well.
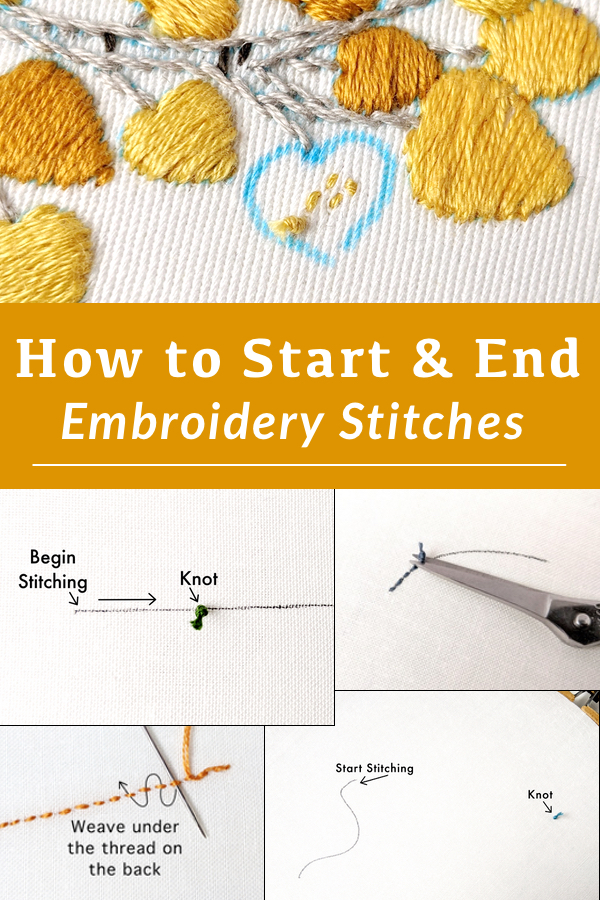
Method One: Weaving in Your Thread
This is a very common way to end your thread. It is neat and strong. You Weave in embroidery thread through stitches you already made. You do this on the back of your fabric. This method works well for most stitches. It is often used in cross stitch and other counted thread work. It is good for keeping the Embroidery back finish smooth.
How to Weave in Thread
Follow these simple steps to weave in your thread:
- Step 1: Flip your fabric. Turn your work over. The back should face you.
- Step 2: Look at your stitches. Find the stitches you just made. Or find stitches of the same color nearby.
- Step 3: Put your needle through stitches. Slide your needle under several nearby stitches. Do this on the back. Push the needle through the loops of these stitches. Aim for about 1 inch or 2 cm of stitches. You can go under 4-6 stitches.
- Step 4: Pull the thread through. Pull your thread gently. The end of the thread should go under the stitches. It should lie flat against the fabric.
- Step 5: Go back the other way (optional but good). For more security, turn your needle around. Push it back under some of the same stitches. Go the other way. This makes the thread loop back on itself.
- Step 6: Pull the thread tight. Pull gently again. Make sure the thread is hidden under the stitches.
- Step 7: Cut the extra thread. Use sharp scissors. Cut the thread close to the fabric. Be careful not to cut the fabric or your stitches. The end should be hidden.
Why Weaving is Effective
Weaving works because the new thread is held down by the stitches already there. It spreads out the stress. There is no single point of tension like a knot. This makes the finish strong. It also keeps the back flat. This method is key for Avoiding knots on embroidery back. It is a good way to start and stop thread for many kinds of embroidery.
Tips for Weaving
- Use a needle that is easy to get under the stitches. A tapestry needle with a blunt tip is often good for counted work.
- Make sure you are going under stitches of the same color. This helps Hiding embroidery thread ends even better.
- Do not pull too hard. If you pull too hard, the stitches on the front might look tight or pulled.
- For very thin fabrics, you might need to go under more stitches. Or you might need to go back and forth more than once.
- If your thread is very short, it can be tricky. Try to plan ahead. Leave enough thread to weave in.
Method Two: Burying Your Thread
Bury thread embroidery is a bit like weaving. But instead of going under completed stitches, you go into the fabric layers themselves. Or you go into the back side of stitches that have a good thickness. This method is often used for things like satin stitch or areas with many stitches close together. It is another good way of Securing embroidery thread without using knots.
How to Bury Thread
Here is how you can bury your thread end:
- Step 1: Turn your work. Look at the back of your fabric.
- Step 2: Find a place with coverage. Look for an area with dense stitches. Or find a spot where the thread can go between fabric layers. This is often used with certain types of stitches that build up on the fabric surface.
- Step 3: Push the needle into the stitch mass or fabric. Slide your needle into the back of dense stitches. Or slide it just between the two layers of the fabric threads if possible. Do not go through to the front.
- Step 4: Guide the needle through. Push the needle along for about 1 inch (2-3 cm) inside the stitches or fabric layers. Keep it on the back side.
- Step 5: Pull the thread through. Pull the thread gently. The end should disappear into the stitch mass or fabric.
- Step 6: Cut the extra thread. Cut the thread close to where it comes out. The end should be hidden inside.
When Burying is Useful
Burying is great for areas with solid fill. Think of satin stitch leaves or filled shapes. The thread can hide easily within the thickness of these stitches. It is also useful on fabrics where weaving under single stitches is hard. It provides a very clean look on the back. It helps with Hiding embroidery thread ends really well in thick areas. It is another strategy for a smooth Embroidery back finish.
Burying vs. Weaving
Weaving typically goes under existing stitch legs or crosses on the back. Burying often goes into the body of thicker stitches or the weave of the fabric itself. Both aim to hide the thread. Both avoid knots. Burying might be slightly less secure than weaving back and forth unless done in a very dense area.
Method Three: Securing on the Back with Small Stitches
Sometimes, weaving or burying is not easy. Maybe you are at the edge of your stitching. Or maybe the back has large gaps. In these cases, you can use small stitches to Tie off embroidery thread. This is still better than a big knot that sticks out.
How to Use Small Securing Stitches
Follow these steps for securing with small stitches:
- Step 1: Go to the back. Flip your fabric over.
- Step 2: Find a nearby stitch leg. Put your needle under a single strand or stitch leg on the back. Keep it close to where your thread comes out.
- Step 3: Pull most of the thread through. Pull your thread through, but leave a small loop. Do not pull it all the way tight yet.
- Step 4: Put your needle through the loop. Take your needle and pass it through the loop you just made.
- Step 5: Pull gently. Pull the thread tight. This makes a tiny knot or loop around the stitch leg. It is small and flat.
- Step 6: Repeat (optional). For more strength, you can do this again on the same stitch leg or a nearby one.
- Step 7: Hide the end. Now, use one of the other methods. Either weave the remaining thread tail through nearby stitches or bury it. This second step is important for real security and Hiding embroidery thread ends. Just the small knot is often not enough on its own to prevent unraveling over time.
- Step 8: Cut the thread. Cut the extra thread close to the fabric after you have hidden the tail.
When to Use Small Securing Stitches
Use this method when you need a little extra hold before weaving or burying. It is good at the very start or end of a thread run where there are not many stitches to weave under yet. It helps Securing embroidery thread firmly. It is still a way of Avoiding knots on embroidery back, or at least avoiding bulky ones. The goal is a very small, flat knot or tie-off, followed by hiding the tail. Simply Knotting embroidery floss end without hiding the tail is usually not recommended for quality work.
Knotting: When It’s Okay (Rarely) and Why to Avoid It
Many embroidery guides say “never knot.” This is usually good advice for the back of your work. Big knots make bumps. They can snag. They can show through thin fabric. They make the Embroidery back finish messy. They are not a good way of Hiding embroidery thread ends.
However, there are tiny exceptions or times you might hear about Knotting embroidery floss end.
- Starting: Sometimes, a small waste knot is used on the front to start. You stitch over the tail, then cut the knot off later. This leaves no knot on the back. This is different from ending with a knot on the back.
- Very specific stitches: Some stitches, like French knots on the surface, use a knot at the end on the back. But these are usually small knots tied very close to the fabric. They are often on designs where the back doesn’t matter much.
- Emergencies: If you have very little thread left and cannot weave or bury, a tiny knot might be the only way to stop it from unraveling right away. But this is a last resort.
Why Avoiding Knots is Best for Ending
For most standard embroidery and cross stitch:
* Knots are bulky. They create bumps.
* They can come undone more easily than woven or buried threads, especially after washing.
* They make your back look messy.
* They can pull on the fabric.
So, while you can Tie off embroidery thread with a knot, it is almost always better to use weaving, burying, or a small securing stitch followed by weaving/burying. This is key for a good Embroidery back finish and for Securing embroidery thread reliably.
Finishing Embroidery Stitches Neatly: Specific Tips
Beyond the main methods, here are more tips for clean endings:
- Use Enough Thread: Try not to run out of thread suddenly. Plan your stitching so you have enough thread to end properly (at least 2-3 inches). This makes weaving or burying much easier.
- Match Thread and Fabric: Consider the fabric type. On loose weaves, you might need to weave through more stitches or try burying in a denser area. On tight weaves, burying might be harder, making weaving the better choice.
- Match Thread Colors: Always weave or bury thread ends under stitches of the same color. This is the best way for Hiding embroidery thread ends completely. If you are ending a light thread near dark stitches, find a way to get back to area of light stitches to hide it.
- Check the Front: As you weave or bury, quickly check the front of your work. Make sure the needle is not showing through. Make sure the thread end is not creating a shadow or bump on the front.
- Cut Close, But Carefully: Use sharp, small scissors. Cut the thread tail very close to the fabric after securing it. But be careful not to nick your fabric or the stitches you just secured the thread under.
- Ending on the Edge: If you end near the fabric edge, weave your thread under stitches parallel to the edge. You can also weave it into the fabric edge itself before finishing the edge (like hemming).
- Ending Metallic or Tricky Threads: Some threads, like metallics, can be slippery. They might not weave as easily. You might need to use the small securing stitch method first to really hold them before weaving or burying. Or weave through a slightly longer path of stitches.
How to End Cross Stitch Thread Cleanly
Ending cross stitch thread is a perfect example of using the weaving method. Cross stitch makes neat rows of X’s on the front and mostly straight lines on the back. These straight lines (the back of the stitch legs) are perfect places to Weave in embroidery thread.
Ending Cross Stitch Thread: Step-by-Step
- Step 1: Finish your last half or full cross stitch. Bring your needle to the back of the fabric.
- Step 2: Turn your work over. Look for the straight bars of thread on the back of the nearby stitches.
- Step 3: Slide your needle under 4-6 of these straight bars. Go in one direction.
- Step 4: Pull your thread through gently. It should lie flat under the bars.
- Step 5 (Optional but recommended): Turn your needle around. Slide it back under 3-4 of the same bars you just went under. This locks the thread in place better.
- Step 6: Pull gently. Make sure the thread is hidden.
- Step 7: Cut the thread end close to the fabric.
This method is the standard for How to end cross stitch thread because it provides a smooth, secure finish. It is the best way for Avoiding knots on embroidery back in cross stitch. It helps achieve that clean Embroidery back finish that is often desired in cross stitch pieces.
Comparing the Main Ending Methods
Here is a quick look at the main ways to end threads:
| Method | How it Works | Best For | Back Finish | Security | Ease of Use | Notes |
|---|---|---|---|---|---|---|
| Weaving In | Goes under existing stitch legs on the back. | Cross stitch, backstitch, lines, most stitches. | Very Clean | High | Easy | Standard method, great for counted work. |
| Burying | Goes inside dense stitches or fabric layers. | Satin stitch, fill stitches, areas with bulk. | Very Clean | High (in dense areas) | Medium | Good for hiding ends in solid areas. |
| Small Securing Stitch | Tiny loop/knot around one back stitch leg. | Starting/ending near edges, slippery threads. | Mostly Clean | Medium (needs hiding tail) | Medium | Often used before weaving/burying the tail. |
| Knotting (Simple Knot) | Tying a regular knot on the back. | Rarely recommended for standard embroidery. | Messy/Bulky | Low | Easy (but bad) | Avoid if possible for quality work. |
This table shows that weaving and burying are the go-to methods for a clean, strong finish. They help with Securing embroidery thread without the problems of big knots. They are key for a great Embroidery back finish and Hiding embroidery thread ends.
The Importance of Thread Tension
Getting your thread tension right when stitching helps with ending, too. If your stitches are too loose, there might not be tight enough loops on the back to weave under. If they are too tight, it might be hard to get your needle under the back stitches without pulling the front. Keep your tension even while stitching. This makes the back stitches ready for you to Weave in embroidery thread easily.
Avoiding Common Mistakes
- Ending too soon: Don’t try to end a thread when you only have an inch left. You need enough tail to work with.
- Pulling too hard: This can distort your fabric or pull the front stitches.
- Not hiding the tail enough: Cutting the thread right after a small securing stitch isn’t enough. You must still weave or bury the tail.
- Weaving/Burying through the front: Always check the front to make sure your needle and thread aren’t showing.
- Weaving through too few stitches: Going under only 1-2 stitches is not secure enough. Go under more.
- Using a knot on the back: As discussed, avoid this for a clean finish. Focus on weaving or burying.
By avoiding these mistakes, your Finishing embroidery stitches will look much better and last longer. You will be much better at Avoiding knots on embroidery back and Hiding embroidery thread ends.
Advanced Tips for Hiding Thread Ends
For truly expert Hiding embroidery thread ends, consider these:
- Splitting the thread: Sometimes, on the back, you can carefully split the strands of a thread you are weaving under. Push your needle between the plies of the thread itself. This can help lock the new thread in place even more securely and makes it almost invisible on the back.
- Changing direction: When weaving, weave a short distance in one direction, then change direction and weave back. This is much more secure than just going one way.
- Using the fabric weave: On some fabrics (like linen), you can sometimes slide your needle along the path of a single fabric thread for a short distance. This can bury the thread very well, especially if the thread color matches the fabric slightly.
- Planning ends in dense areas: As you stitch, try to finish your threads in areas where you know you will be stitching more densely soon, or where you have already stitched densely. These areas are perfect for weaving or burying.
These techniques take practice but lead to a truly flawless Embroidery back finish. They make your Securing embroidery thread techniques top-notch.
How Practice Helps
Learning how to end embroidery stitches cleanly takes a little practice. Try the different methods. See which one works best for your fabric and your stitches. Practice weaving in threads of different lengths. Practice Bury thread embroidery in different types of stitches. The more you practice, the easier it will become. You will learn how much thread to leave. You will learn how many stitches to go under. You will get better at Hiding embroidery thread ends quickly and neatly. Soon, Securing embroidery thread will be automatic. You will master Avoiding knots on embroidery back. Your Finishing embroidery stitches will be perfect every time.
Frequently Asked Questions
h4 Is it okay to use a knot to start my embroidery thread?
Many embroiderers use a “waste knot” to start. You make a knot a few inches away from where you start stitching on the front. You make your first few stitches over the thread tail on the back. Then, you cut off the knot on the front. This leaves no knot on the back, which is good for the Embroidery back finish. You can also start by weaving your thread under stitches you have already made (if adding to an existing piece).
h4 My thread tail is too short to weave in. What do I do?
This is tricky! Try using a needle threader to help get the short thread into the needle eye. If it’s really short, you might need to use the small securing stitch method around a back stitch leg multiple times right at the fabric surface. Cut the thread as close as possible. It might not be as secure as weaving, but it is better than the stitch unraveling. Try to avoid this by leaving enough thread.
h4 Will washing my embroidery make the thread ends come undone?
If you used a good method like weaving or burying, washing should not make the ends come undone. These methods are designed to hold up. If you used a big knot, it is more likely to loosen or snag in the wash. Proper Securing embroidery thread is important for fabric care.
h4 How much thread should I leave to end properly?
Aim for at least 2 to 3 inches (about 5-8 cm) of thread when you are ready to end. This gives you enough length to easily thread your needle and weave it through several stitches on the back.
h4 Can I just run the thread under the fabric without going under stitches?
On some very dense fabrics, you might be able to run the thread between the fabric layers. This is a type of burying thread embroidery. However, on most standard embroidery fabrics, it is more secure and easier to run the thread under existing stitches on the back (weaving) or into the bulk of dense stitches. Just running it through loose fabric threads might not hold well.
h4 Does how I end my thread matter for framing?
Yes, it does! A clean Embroidery back finish with no bumps from knots helps the piece lie flat when you frame it. Bumps can make the fabric press unevenly against the glass or backing.
h4 Is Hiding embroidery thread ends only about looks?
No. While looks are part of it (especially a clean back), the main reason is security. Hiding the ends by weaving or burying locks the thread in place. This prevents your stitches from unraveling over time or with use.
h4 How do I end a single stitch or a very small area?
This can be hard. If it is just one or two stitches, you might need to use the small securing stitch method around the back leg of the stitch. Tie it off carefully, make the knot very small, and trim closely. If you can add even one or two more stitches nearby, it gives you more to weave under.
Conclusion
Finishing your embroidery stitches with care is just as important as making the stitches themselves. By using methods like weaving in threads or burying them, you create a strong, clean back. You avoid messy knots. This makes your work look better and last longer. Practice these simple techniques. Soon, Securing embroidery thread will be second nature. You will have beautiful finished pieces every time. Mastering How to end cross stitch thread and other embroidery stitches properly is a key step in becoming a skilled needleworker. Your clean Embroidery back finish will be a sign of your craft.