
How do you finish an embroidery stitch? You finish an embroidery stitch by securing the thread on the back of your fabric. This keeps your work from coming undone. It is a key part of securing embroidery stitches. This post will show you simple ways to do this. You will learn different ways of ending thread in embroidery. We will talk about tying off embroidery floss and how to make your stitches last. Finishing your work well on the back is just as important as the stitches you make on the front.
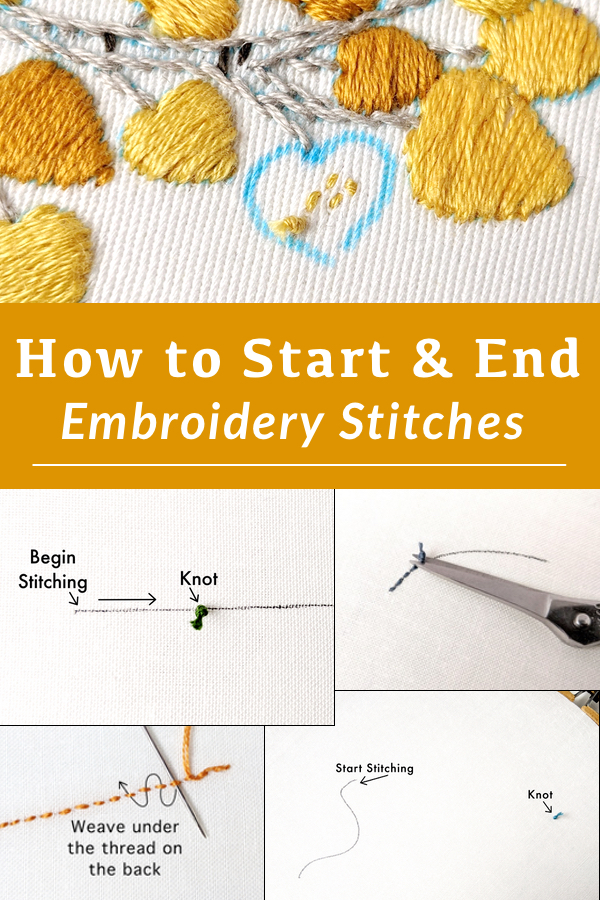
Image Source: www.wanderingthreadsembroidery.com
Why Finish Your Stitches Well?
Finishing stitches right is very important. If you do not finish them well, your stitches can come loose. This is like a button coming off a shirt. Your beautiful work can start to fall apart. Preventing embroidery unraveling is the main reason to finish securely.
Also, a tidy back makes your work look better. If you plan to frame or use your embroidery, a neat back matters. It shows you took care with your project from start to finish. Finishing embroidery on the back neatly is a sign of good craftsmanship.
Think about it this way. The front is the picture everyone sees. The back is the foundation. A strong foundation makes the picture last. Securing embroidery stitches makes your work strong.
Basic Ideas for Ending Thread
Most ways to end thread involve weaving the working thread under stitches you have already made. This holds the thread firmly. It is simple and strong.
Another way uses tiny knots. But knots can sometimes show through the fabric. They can also make the back bumpy. Weaving under stitches is often better for a smooth finish.
The goal is always to make the thread end safe and hidden. You do not want it to pull out. You also do not want it to make the back messy.
Deciphering When to End Your Thread
How do you know when to end a thread?
* When you run out of thread and need to start a new piece.
* When you finish a section of color or stitches.
* When you need to move a long distance across the fabric. It is better to end the thread and start a new one. This avoids long threads on the back. Long threads can get caught. They can also show through thin fabric.
Always finish your thread before it gets too short. It is hard to work with a very short thread. Leave enough length to weave it in easily. About 3-4 inches (7-10 cm) is good.
Ways to Secure Your Starting Thread
Before you finish your thread, you need to start it. How you start can make finishing easier later. Here are a few ways to start thread securely.
Loop Start Method
This is a very clean way to start. It works well if you use an even number of strands (like 2, 4, or 6).
- Cut a length of thread.
- Fold it in half. The two ends should meet.
- Thread the two cut ends through your needle. The loop is at the other end.
- Bring your needle up through the fabric from the back. Come up in the spot where your first stitch starts.
- Make your first stitch.
- On the back, your needle goes down through the fabric. When you pull the thread almost all the way, you will see the loop you made by folding the thread.
- Pass your needle through this loop.
- Gently pull the thread tight. The loop pulls flat against the fabric on the back. It catches the thread end.
This method means you have no thread tail to weave in later for the start. It is secure right away. It is great for securing cross stitch threads.
Waste Knot Method
This is good for single strands or odd numbers of strands. It is also helpful if you are starting a stitch far from any other stitches.
- Tie a knot about 2-3 inches (5-8 cm) from the end of your thread. This is a temporary knot.
- Bring your needle down through the front of your fabric. Start your first stitch area.
- Let the knot rest on the front of the fabric, away from where you are stitching. Leave a tail of thread (the part before the knot) on the back.
- Make several stitches, working towards the knot.
- As you stitch, make sure your new stitches on the back go over that thread tail you left. This catches and holds the tail.
- Once the tail is held down by several stitches, you can cut the knot off the front.
This method secures the start by trapping the tail under later stitches. It helps with tying off embroidery floss starts simply.
Running Under Existing Stitches (Start)
If you are starting a new thread near stitches you have already made, you can use them to secure the start.
- Bring your needle up from the back of the fabric.
- Before coming through to the front, run your needle horizontally on the back. Go under a few existing stitches.
- Pull the thread through. This anchors the thread.
- Now, bring the needle up to the front to start your new stitches.
This is a very clean start method. It leaves no tails on the back initially.
Main Ways to Secure Your Ending Thread
This is where you make sure your hard work stays put. These methods work for ending a thread. The goal is to weave the thread end under stitches on the back. This is the best way for ending thread in embroidery.
Weaving Under Stitches on the Back
This is the most common and often best way to finish a thread. It is neat, secure, and flat. It works for most embroidery and cross stitch. It is key for finishing embroidery on the back.
Here is how you do it:
- When you are ready to end your thread, turn your work over.
- Look at the back of your fabric. Find stitches you have already made nearby.
- Thread your needle through the back of several of these stitches. Go under the loops of the stitches. Do not go through the fabric to the front.
- Push the needle through about 1 inch (2-3 cm) of existing stitches.
- Pull the thread through gently.
- You can weave back the other way under some of the same stitches or different ones nearby. Weaving back makes it extra secure.
- Do this a few times. Go under stitches for maybe an inch total.
- Pull the thread gently to make sure it is flat against the back.
- Cut the thread close to the fabric. Be careful not to cut the fabric or other stitches.
This method is great for how to hide thread tails. The tail is hidden under existing stitches. It uses no knots, so the back stays flat. This is vital for preventing embroidery unraveling. It works well for finishing cross stitch threads.
Tiny Knot Method
Sometimes, weaving under stitches is hard. Maybe you are on a very thin area of fabric. Or maybe there are no nearby stitches to weave under. In these cases, a tiny knot might be needed. Use this only if you cannot weave.
- Turn your work over.
- Pass your needle under one or two threads of the fabric on the back, very close to where your thread comes out. Do not pull the loop tight yet.
- Pass your needle through the small loop you just made.
- Gently pull the thread to form a tiny knot against the fabric. Keep it very small.
- Make another tiny knot right on top of the first one for extra security.
- Now, if possible, weave the remaining thread tail under any nearby stitches you can find. Even a few will help. If there are no stitches, you can try to weave it under a few fabric threads.
- Cut the thread close to the knot/fabric.
The drawback here is the knot. Even a tiny one can make a bump. It can sometimes show through thin fabrics. But it can be necessary for ending embroidery knots in certain spots.
Whipping Stitches on the Back (for Needlepoint)
Needlepoint often uses a different structure than embroidery or cross stitch. The back can look different. Securing needlepoint stitches often involves ‘whipping’ the thread around stitches on the back edges.
- When ending your needlepoint thread, turn the work over.
- Bring your needle to an edge or a line of stitches on the back.
- Pass your needle behind several threads or stitches along the edge or line. It is like doing tiny whip stitches around the existing threads.
- Pull the thread through.
- Repeat this process, going around the back threads/stitches for about an inch.
- Cut the thread close to the whipping.
This creates a secure line of thread hidden along the back edge or under other stitches. It is effective for securing needlepoint stitches where weaving through the grid might not be as simple as in cross stitch.
Securing into Fabric Weave
On some fabrics, like linen, you might be able to secure the thread by carefully weaving it into the fabric threads on the back. This is different from weaving under stitches. This can be part of tying off embroidery fabric.
- Turn your work over.
- Use your needle to carefully pick up a few threads of the fabric weave on the back. Make sure the needle does not go through to the front.
- Weave the thread under and over several fabric threads for about an inch.
- Weave back the other way for extra hold.
- Cut the thread close to the fabric.
This needs careful work to ensure it does not show on the front. It is best on fabrics with a clear weave you can follow.
Grasping the Best Method for You
The best way to finish depends on several things:
- The kind of stitch: Cross stitch is easy for weaving under. Needlepoint might be better with whipping.
- The fabric: Thin fabric might show knots or tails. Thick fabric hides things better. The weave of the fabric matters for weaving into it. Tying off embroidery fabric method depends on the fabric type.
- Where you are finishing: Are you near other stitches? Are you on the edge?
- Personal preference: Some people prefer the flat finish of weaving. Others find tiny knots faster.
Most times, weaving the thread under existing stitches on the back is the best way. It is strong, flat, and tidy. It is the standard for securing embroidery stitches and finishing cross stitch threads.
Here is a quick look at common ending methods:
Table: Comparing Embroidery Thread Ending Methods
| Method | Security Level | Neatness on Back | Ease of Use | Best For | Notes |
|---|---|---|---|---|---|
| Weaving Under Existing Stitches | High | High | Medium | Most embroidery, cross stitch | Flat finish, requires nearby stitches. |
| Tiny Knot | Medium-High | Low-Medium | Easy | When no stitches are nearby | Can create bumps, may show on front. |
| Whipping (Needlepoint) | High | High | Medium | Needlepoint, edges of blocks of stitches | Specific technique for needlepoint structure. |
| Weaving into Fabric Weave | Medium-High | High | Medium-Difficult | Fabrics with clear weave (e.g., linen) | Needs careful work not to show on front. |
This table helps you see the pros and cons of each. It helps you choose the best way for ending thread in embroidery.
How to Hide Thread Tails Well
Simply weaving the thread under stitches is the key to how to hide thread tails. The stitches you weave under cover the tail.
- Weave under enough stitches. About 1 inch (2-3 cm) is usually plenty.
- Weaving back and forth a little makes it more secure.
- Make sure the tail is flat against the fabric. Do not let it bunch up.
- Check the front after weaving. Make sure the tail is not visible through the fabric.
- Cut the tail close to the fabric. You want no little ends sticking out.
If you use a knot, make the tail you cut off very short. But be careful not to cut the knot itself.
Properly how to hide thread tails makes the back look clean. It also makes the finish stronger. A tail sticking out can snag.
Common Issues and Troubleshooting
Even with good methods, things can go wrong.
- Thread coming loose: This means the thread was not woven under enough stitches. Or the stitches were not tight enough. Go back and weave the end under more stitches. Make sure you pull it through firmly. This helps with preventing embroidery unraveling.
- Knot showing on the front: If you used a knot and it shows, you might need to unpick it. Try weaving under stitches instead if possible. If not, try a smaller knot in a slightly different spot. This is why ending embroidery knots is often avoided.
- Bumpy back: This usually happens from knots or tails not woven in flat. Weaving tails flat under stitches fixes this.
- Can’t find stitches to weave under: This happens if you need to end in a blank area. This is when a tiny knot might be your only choice. Or, you can try to weave the thread into the fabric weave itself on the back.
Always check the back of your work as you go. Do not wait until the end. Fix problems right away. This saves you time and keeps your work looking good.
More on Securing Different Projects
The ideas we talked about work for many types of stitching.
Securing Cross Stitch Threads
Cross stitch is usually done on fabric with clear holes, like Aida or linen. The stitches form a clear ‘X’. The back often has straight lines of thread. Weaving under these straight lines on the back is very easy and effective for finishing cross stitch threads. The loop start is also great for starting cross stitch threads securely.
Securing Needlepoint Stitches
Needlepoint fills the fabric completely. The stitches are often slanting. The back can look quite different from cross stitch. As mentioned, whipping threads along the back edge or under existing rows of stitches is common for securing needlepoint stitches. Weaving under stitches is still possible, but the structure of the back might make whipping easier.
Securing Basic Embroidery Stitches
For stitches like backstitch, satin stitch, or French knots, the back can vary a lot. It depends on the stitch type and how you worked it. The main method of weaving under nearby stitches still applies. Find any place on the back where there are existing threads from your stitches. Weave the working thread under them. This is the core of securing embroidery stitches for all kinds of designs.
Tying off Embroidery Fabric
Sometimes, the term tying off embroidery fabric can mean finishing the edges of the fabric itself, not just the threads. But in the context of securing stitches, it means securing the thread to the fabric. The methods discussed do this. Whether weaving under stitches or into the fabric weave, you are anchoring the thread to the fabric base.
Why Avoid Front Knots
You might see some older guides that show starting or ending with a knot on the front of the fabric. They tell you to cut it off later. Do not do this.
- It can leave a tiny hole.
- It can leave a messy spot of fabric fibers.
- It can pull and damage the fabric weave.
Always start and end your threads on the back of the fabric. Use one of the clean starting methods (loop start, waste knot cut later, or running under stitches). Use one of the clean ending methods (weaving under stitches, whipping, or weaving into fabric). Avoid starting or ending embroidery knots on the front entirely.
Planning Your Thread Path
Thinking ahead helps when it is time to finish. Try to end your thread when you are near other stitches. This makes weaving under them easy.
If you are working a large area of one color, you can finish threads and start new ones within that area. This keeps thread ends contained.
Do not carry thread long distances on the back. It is better to end the thread and start a new one closer to where you need it. This prevents long threads that might snag. It also helps with how to hide thread tails better. Short tails woven under stitches are the goal.
Final Checks for a Perfect Finish
When you think you are done, turn your work over. Look closely at the back.
- Are all thread ends secured?
- Are they woven in smoothly?
- Are there any knots that look too big?
- Are there any loose tails sticking out?
- Does the back look tidy overall?
Trim any tiny bits of thread that might still be showing after cutting. Be very careful not to cut your stitches or fabric.
A clean back means you did a great job with finishing embroidery on the back. It means your work is secure and will last. This process of securing embroidery stitches is a vital skill for any stitcher.
Frequently Asked Questions About Securing Stitches
Q: Can I use a knot every time I finish?
A: It is better not to. Knots can make bumps. They can sometimes show through your fabric. Weaving the thread under existing stitches on the back is usually more secure and makes the back flat and neat. It is the preferred way for ending thread in embroidery.
Q: My thread end came loose. What do I do?
A: If an end comes loose, just re-thread your needle with that tail. Then weave it under more stitches on the back. Weave it back and forth a few times for extra security. This helps with preventing embroidery unraveling.
Q: How long should the thread tail be when I weave it in?
A: About 1 to 1.5 inches (2.5 to 4 cm) is a good length to weave under stitches. This gives enough length to get a good grip under several stitches. You need enough to weave it securely.
Q: Does the type of thread matter for finishing?
A: Yes, a little. Cotton floss is easy to weave. Some specialty threads might be more slippery. You might need to weave slippery threads under a few more stitches to be sure they are secure.
Q: Is it okay to carry thread a long way on the back?
A: No, it is generally not a good idea. Long threads on the back can get caught. They can also show through lighter fabrics. It is better to finish the thread and start a new one closer to where you need it. This keeps the back neater and helps with how to hide thread tails.
Q: What is the best way for securing cross stitch threads?
A: The loop start is great for starting cross stitch. For ending, weaving the thread under the straight lines of stitches on the back of your cross stitch is the best and most common method. This ensures finishing cross stitch threads is secure and tidy.
Q: How is securing needlepoint stitches different?
A: Needlepoint often uses a whipping technique along back edges or rows of stitches because the stitch structure is different. While weaving is sometimes possible, whipping can be more effective for securing needlepoint stitches.
Q: Does securing the thread help with tying off embroidery fabric?
A: Yes, securing the thread, by whatever method you choose, anchors the thread ends firmly to the fabric itself. This prevents the stitches from coming undone, which is the main goal of tying off embroidery fabric threads.
Ending your embroidery stitches securely is a key skill. It protects your beautiful work. By using methods like weaving under stitches, you make sure your projects last. You keep the back neat and tidy. This is the mark of a careful stitcher. Practice these methods. Soon, they will be easy and automatic for you. Your projects will look better and last longer.