
Wondering how to put the bobbin in your Singer sewing machine? It’s a straightforward process that’s key to successful stitching. This guide will walk you through each step, from preparing your bobbin to ensuring it’s correctly seated for smooth operation.
Sewing machines are fantastic tools, but like any machine, they have parts that need to be handled correctly. The bobbin is one of the most crucial components, responsible for providing the lower thread that creates stitches along with the needle thread. When your Singer sewing machine bobbin isn’t installed correctly, you’ll likely encounter problems like skipped stitches, thread bunching, or even thread breakage. This in-depth guide will help you master the art of Singer sewing machine bobbin insertion and ensure your machine runs beautifully.
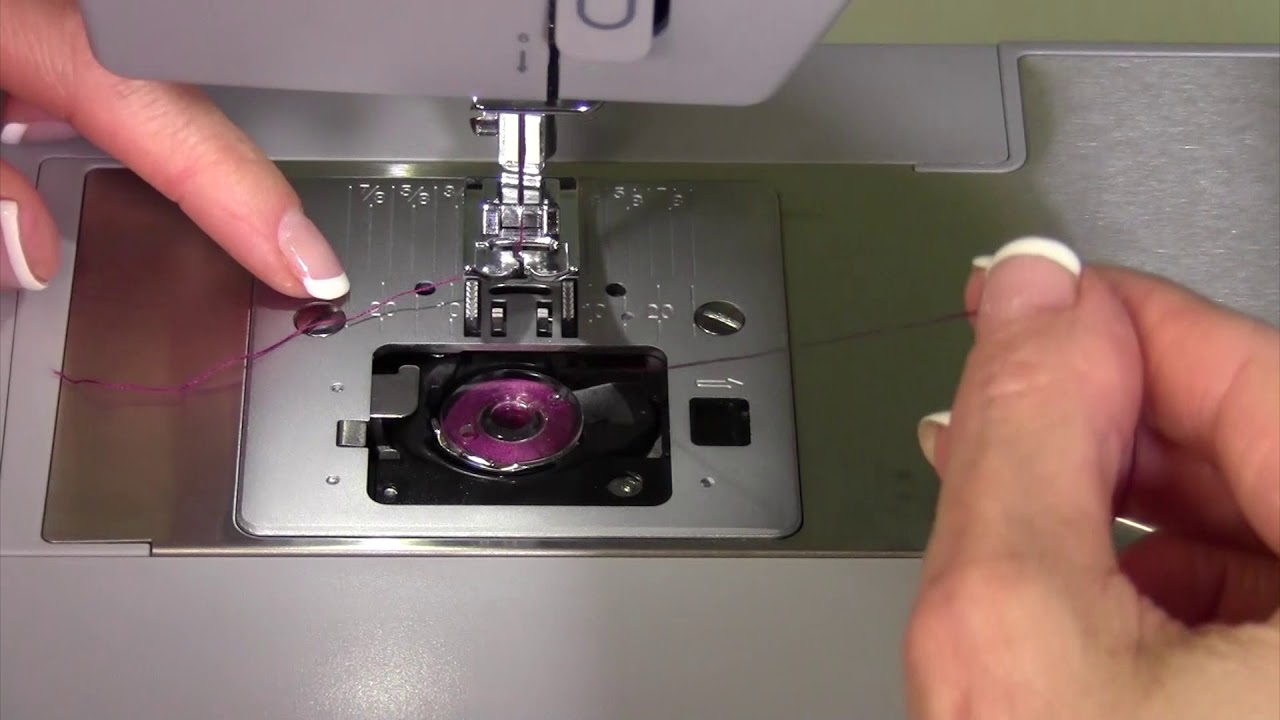
Image Source: i.ytimg.com
Preparing Your Bobbin: The Foundation of Good Stitching
Before you can install your bobbin, you need to make sure it’s properly wound. A well-wound bobbin provides even thread distribution, which is essential for balanced stitches.
Singer Sewing Machine Bobbin Winding: Getting it Right
Singer sewing machine bobbin winding is a fundamental skill for any sewer. Here’s how to do it effectively:
- Select the Right Bobbin: Always use bobbins specifically designed for your Singer sewing machine model. Using the wrong type can cause tension issues and damage your machine. Check your machine’s manual for the correct bobbin type (e.g., Class 15, Class 206).
- Secure the Thread: Place a spool of thread on the spool pin. Guide the thread through the thread guides, typically marked with numbers or arrows.
- Thread the Bobbin Winder: Lead the thread through the small hole in the bobbin. You can secure the end by winding it a few times around the bobbin.
- Engage the Bobbin Winder: Most Singer machines have a separate bobbin winder spindle. Push the bobbin onto this spindle. You might need to move a lever or disengage the machine’s needle mechanism (often by pushing the handwheel towards you) to activate the winder.
- Start Winding: Begin winding at a moderate speed. Ensure the thread winds evenly across the bobbin.
- Cut the Thread: Once the bobbin is nearly full, or when you have enough thread, stop the winder. Cut the thread close to the spool.
- Remove the Bobbin: Disengage the bobbin winder (move the lever back or push the handwheel away from you) and remove the full bobbin.
Important Note on Singer Sewing Machine Bobbin Winding: Avoid overfilling or underfilling the bobbin. An unevenly wound bobbin can lead to inconsistent stitch lengths and tension problems.
Choosing the Correct Singer Sewing Machine Bobbin Thread
The type of thread you use on your bobbin is just as important as the thread on your needle.
- Weight: Generally, the bobbin thread should be the same weight as your needle thread. If you’re using a heavy thread on top, use a heavier thread on the bobbin.
- Material: Most general-purpose sewing uses polyester or cotton threads. Ensure your bobbin thread is compatible with your fabric and needle thread.
- Quality: Always opt for good quality thread. Cheap thread can break easily, shed lint, and cause tension issues.
Singer Sewing Machine Bobbin Case: The Housing for Your Thread
Many Singer sewing machines, particularly older mechanical models, use a bobbin case. This small, often metal component holds the bobbin and fits into a shuttle hook mechanism.
Types of Bobbin Cases
- Removable Bobbin Case: This is the most common type. The entire case, with the bobbin inside, is removed from the machine.
- Non-Removable Bobbin Case (Front-Loading): In these machines, the bobbin is loaded directly into a basket or housing, but the case itself usually stays within the machine.
- Drop-in Bobbin: Modern machines often feature a “drop-in” bobbin system. Here, the bobbin is placed directly into a plastic bobbin case that’s part of the machine’s assembly, and there’s no separate bobbin case to remove and insert.
Cleaning and Maintaining Your Singer Sewing Machine Bobbin Case
The bobbin case and the area around it are prone to lint buildup. Regular cleaning is crucial for smooth operation.
- Remove the Bobbin: If you have a removable bobbin case, take it out.
- Remove Lint: Use a small brush, a lint roller, or a can of compressed air to clean away any lint or dust from the bobbin case, the shuttle hook, and the surrounding area.
- Inspect for Damage: Check the bobbin case for any nicks, dents, or warping. A damaged bobbin case can cause thread snags. If damaged, consider Singer sewing machine bobbin replacement.
- Lubrication (if applicable): Some older Singer machines may require a drop of oil in the bobbin case area. Consult your machine’s manual.
Singer Sewing Machine Bobbin Insertion: Step-by-Step Guide
The method for Singer sewing machine bobbin loading varies slightly depending on your machine’s type (front-loading or drop-in).
For Front-Loading Bobbin Systems (Removable Bobbin Case)
This is common in many classic Singer models.
What You Need:
- A properly wound bobbin.
- Your Singer sewing machine.
- Your machine’s manual (highly recommended).
Steps:
- Prepare the Machine: Ensure the presser foot is up. Remove the needle plate (or throat plate). This usually involves a small latch or screws.
- Locate the Shuttle Hook: You will see the shuttle hook assembly, which is the part that rotates to catch the needle thread.
- Insert the Bobbin into the Case:
- Place the wound bobbin into the bobbin case.
- Guide the thread through the small slot at the front of the bobbin case. There’s usually a small spring or tensioner within the case that the thread passes through.
- Pull about 4-6 inches of thread from the bobbin case.
- Place the Bobbin Case into the Shuttle Hook:
- Hold the bobbin case with the thread tail pointing to the left (usually).
- There will be a small lip or notch on the shuttle hook assembly that aligns with a corresponding notch on the bobbin case.
- Insert the bobbin case into the shuttle hook assembly, ensuring it clicks or seats firmly into place.
- Crucial: The thread from the bobbin should be hanging freely and should not be caught or trapped.
- Thread the Needle: Thread your sewing machine needle as usual, bringing the needle thread down towards the front.
- Catch the Bobbin Thread: Hold the needle thread tail with your left hand. Turn the machine’s handwheel towards you (counter-clockwise) to lower and raise the needle. As the needle rises, it will catch the bobbin thread and pull a loop of it up through the needle plate.
- Retrieve the Bobbin Thread: Use your fingers or tweezers to pull this loop of bobbin thread up and through the needle plate.
- Position the Threads: Bring both the needle thread and the bobbin thread back and under the presser foot. Ensure they are behind the presser foot and any thread guides.
- Replace the Needle Plate: Put the needle plate back on the machine.
- Check Tension: Lower the presser foot. Gently pull on the needle thread. The bobbin thread should offer a slight resistance. If the tension feels too loose or too tight, you’ll need to adjust it.
For Drop-in Bobbin Systems (Modern Machines)
This system is designed for simplicity.
What You Need:
- A properly wound bobbin (often a different style than for front-loaders).
- Your Singer sewing machine.
- Your machine’s manual.
Steps:
- Prepare the Machine: Ensure the presser foot is up. Remove the needle plate and presser foot if your manual instructs you to (some drop-in systems allow loading without this).
- Locate the Bobbin Holder/Basket: You’ll see a removable plastic or metal bobbin case or a basket where the bobbin sits. Remove this if it’s not fixed.
- Place the Bobbin:
- Take your wound bobbin. Check your manual for the correct bobbin placement – some require the thread to unwind clockwise, others counter-clockwise. There’s usually an arrow on the bobbin case or machine indicating the correct direction.
- Drop the bobbin into the bobbin holder/basket, ensuring it sits correctly and the thread is coming off in the right direction.
- Thread the Bobbin Case (if applicable): Some drop-in systems require you to guide the thread through a small notch or slot in the bobbin case before placing it back into the machine.
- Insert the Bobbin Holder/Basket: If you removed it, carefully place the bobbin holder/basket back into its designated spot in the machine. It should usually only fit one way.
- Thread the Needle: Thread your sewing machine needle as usual.
- Catch the Bobbin Thread: Hold the needle thread tail. Turn the machine’s handwheel towards you to lower and raise the needle. This action should pull a loop of bobbin thread up.
- Retrieve the Bobbin Thread: Use your fingers or tweezers to pull this loop of bobbin thread up.
- Position the Threads: Bring both threads back under the presser foot and behind it.
- Replace Parts: Reattach any parts you removed (presser foot, needle plate).
- Check Tension: Lower the presser foot and test the tension.
Singer Sewing Machine Bobbin Tension: The Key to Balanced Stitches
Singer sewing machine bobbin tension refers to how tightly the bobbin thread is held as it’s pulled through the fabric. Correct tension is vital for creating neat, durable stitches.
How Tension Works
- Needle Thread Tension: This is adjusted by the dial on the front or top of your machine.
- Bobbin Thread Tension: This is controlled by a small screw on the bobbin case (for removable cases) or is often pre-set in drop-in systems.
Adjusting Bobbin Tension (Removable Bobbin Case)
Caution: Only adjust bobbin tension if you’ve confirmed your needle thread tension is correct and you’re still experiencing problems. Improperly adjusted bobbin tension can cause more issues than it solves.
- Remove the Bobbin Case: Take the bobbin case out of the machine.
- Locate the Tension Screw: There are usually two small screws on the bobbin case. The one that adjusts tension is typically the smaller one.
- The “Drop Test”: Hold the bobbin case by the thread tail. Let the bobbin dangle.
- Too Loose: If the bobbin drops freely or the thread unwinds easily, the tension is too loose.
- Too Tight: If the bobbin doesn’t move at all or you have to pull hard to get the thread to release, the tension is too tight.
- Just Right: The bobbin should just begin to unwind with a gentle tug, or it should resist slightly before unwinding.
- Making Adjustments:
- To Tighten: Use a small screwdriver to turn the tension screw slightly clockwise (in the direction the clock’s hands move).
- To Loosen: Use a small screwdriver to turn the tension screw slightly counter-clockwise.
- Testing: Put the bobbin back in the case, insert it into the machine, and do the drop test again. Make very small adjustments at a time.
- Re-thread and Test Stitch: After each small adjustment, re-thread your machine completely, bring up the bobbin thread, and sew a test stitch on a scrap of fabric. Check for balanced stitches on both sides.
Important Note on Singer Sewing Machine Bobbin Tension: If your machine has a drop-in bobbin system, the bobbin tension is usually factory-set and cannot be easily adjusted. If you suspect a bobbin tension issue with a drop-in system, it might indicate a damaged bobbin case, lint buildup, or a problem with the machine’s internal mechanisms, requiring professional attention or Singer sewing machine bobbin replacement.
Singer Sewing Machine Bobbin Troubleshooting: Common Issues and Solutions
Even with the best practices, you might encounter problems. Here are some common Singer sewing machine bobbin troubleshooting tips:
| Problem | Possible Cause | Solution |
|---|---|---|
| Thread Bunching Under Fabric | Bobbin not seated correctly. | Re-insert the bobbin, ensuring it’s in the correct direction and the thread is properly seated in the bobbin case slot. Check the needle plate for burrs. |
| Needle thread tension too loose. | Increase needle thread tension. | |
| Bobbin thread tension too loose. | Slightly tighten the bobbin thread tension screw (if applicable). | |
| Bobbin thread snagged. | Ensure the bobbin is wound evenly and is not caught on anything within the bobbin case. | |
| Skipped Stitches | Bobbin not inserted correctly. | Re-insert bobbin, ensuring correct orientation and thread path. |
| Wrong needle type or size for fabric. | Use the correct needle type and size. Ensure the needle is inserted correctly and is not bent or dull. | |
| Bobbin wound unevenly or incorrectly. | Rewind the bobbin, ensuring even winding. | |
| Bobbin case damaged or dirty. | Clean the bobbin case and shuttle area. Inspect for damage; consider Singer sewing machine bobbin replacement. | |
| Thread Breaking (Bobbin Thread) | Bobbin thread snagged or caught. | Check the bobbin and bobbin case for snags or lint. |
| Bobbin wound too tightly or unevenly. | Rewind the bobbin smoothly. | |
| Bobbin case tension too tight. | Slightly loosen bobbin thread tension. | |
| Bobbin case damaged. | Inspect the bobbin case for burrs or damage. Consider Singer sewing machine bobbin replacement. | |
| Bobbin Not Turning | Bobbin not inserted correctly. | Ensure the bobbin is seated properly and the thread is in the correct path. |
| Lint or debris obstructing the shuttle hook. | Thoroughly clean the shuttle hook area. | |
| Bobbin case is jammed or damaged. | Remove and inspect the bobbin case. If damaged, replace it. |
Singer Sewing Machine Bobbin Replacement: When to Swap It Out
Sometimes, even with proper care, a bobbin or bobbin case can become damaged or worn. Knowing when it’s time for Singer sewing machine bobbin replacement is important.
Signs a Bobbin Needs Replacement:
- Cracks or Chips: Any visible damage on a plastic bobbin.
- Warping: If a bobbin or bobbin case looks bent or out of shape.
- Nicks or Burrs: Especially on metal bobbin cases, these can snag thread.
- Consistent Tension Issues: If you’ve tried all troubleshooting steps and still have tension problems, the bobbin case might be the culprit.
- Incorrect Bobbin Type: If you’ve been using a bobbin that isn’t the correct size or type for your machine.
When purchasing new bobbins or a bobbin case, always ensure they are compatible with your specific Singer sewing machine model. Refer to your manual or contact Singer customer support if you’re unsure.
Final Checks and Sewing
Once your bobbin is installed and you’ve checked your tension, it’s time to sew!
- Lower the Presser Foot: Make sure the presser foot is down.
- Hold Both Threads: Hold onto both the needle thread and the bobbin thread tails for the first few stitches to prevent them from getting pulled back into the machine.
- Start Sewing: Begin sewing at a slow, steady pace.
- Observe Your Stitches: Watch your stitches as you sew. Look for evenness and consistent tension on both sides of the fabric.
By following these steps for Singer sewing machine bobbin loading, you’ll be well on your way to achieving professional-looking stitches and enjoying a smoother sewing experience. Remember that regular maintenance and attention to detail are key to keeping your Singer sewing machine running perfectly.
Frequently Asked Questions (FAQ)
Q1: What is the correct way to insert a bobbin into my Singer sewing machine?
A1: The insertion method varies by machine type. For front-loading machines, the bobbin goes into a removable bobbin case, which is then placed into the shuttle hook. For drop-in systems, the bobbin is placed directly into a bobbin holder or basket, usually with the thread unwinding in a specific direction (check your manual). In both cases, ensure the thread is properly guided and the bobbin is seated correctly.
Q2: Can I use any bobbin with my Singer sewing machine?
A2: No, you must use bobbins specifically designed for your Singer sewing machine model. Using the wrong type can cause skipped stitches, thread breakage, and damage to your machine. Check your manual for the correct bobbin class (e.g., Class 15, Class 66).
Q3: Why is my bobbin thread bunching up underneath my fabric?
A3: This usually indicates a tension problem or an improperly seated bobbin. Check that the bobbin is wound evenly and inserted correctly. Ensure the needle thread tension is not too loose, and if you have a removable bobbin case, check if the bobbin thread tension is too loose. Also, make sure the needle is correctly inserted and not dull.
Q4: How do I adjust the bobbin tension on my Singer sewing machine?
A4: Bobbin tension is typically adjusted on removable bobbin cases using a small screw on the case itself. Make very small adjustments (clockwise to tighten, counter-clockwise to loosen) and test frequently. Machines with drop-in bobbins often have pre-set tension that is not user-adjustable.
Q5: My Singer sewing machine is skipping stitches, what should I do?
A5: Skipped stitches can be caused by several factors related to the bobbin. Ensure the bobbin is wound evenly and inserted correctly. Check that you are using the correct needle type and size for your fabric and that it is not bent or dull. Clean the bobbin area and shuttle hook for lint buildup. If the problem persists, consider Singer sewing machine bobbin replacement or consulting a sewing machine technician.
Q6: How do I know when it’s time for Singer sewing machine bobbin replacement?
A6: You should consider bobbin replacement if your bobbins are cracked, chipped, warped, or have nicks or burrs. Persistent tension issues that cannot be resolved through cleaning or needle/thread checks may also indicate a need for a new bobbin or bobbin case.
Q7: What is the “drop test” for bobbin tension?
A7: The drop test is a method to gauge bobbin tension. After inserting the bobbin into its case and the case into the machine (for front-loaders), hold the thread tail and let the bobbin dangle. The bobbin should offer slight resistance and just begin to unwind with a gentle tug, rather than dropping freely or refusing to move.