
Getting the thread right in your sewing machine is key. One big part of this is putting the bobbin in correctly. If the bobbin is not set up the right way, your sewing machine won’t make good stitches. The thread might break, or the stitches could look messy. This guide will walk you through how to put the bobbin in your Brother sewing machine, step by simple step. We will look at how to wind the thread onto the bobbin and then how to place the bobbin inside the machine.
Bobbin loading is a common step for all sewing projects. Doing it right helps your machine work smoothly. Let’s make this easy for you.
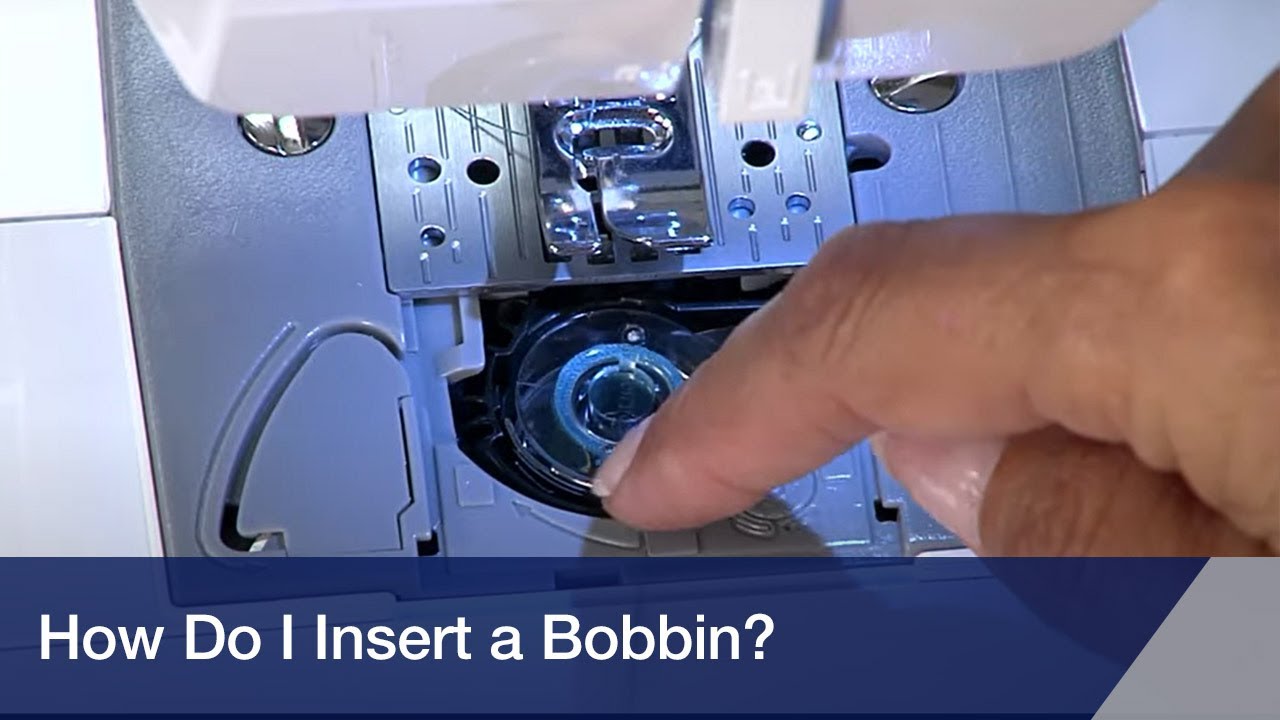
Image Source: i.ytimg.com
Starting the Process
Before you put the bobbin in your Brother machine, you need to do a few things. These steps help get your machine ready and make loading the bobbin easier.
Clear Your Work Space
Make sure you have a clear spot around your sewing machine. Move away fabric, scissors, or other tools. This gives you room to work.
Gather Your Supplies
You will need a few items:
- Your Brother sewing machine.
- A bobbin that fits your machine. Brother machines usually use a specific type of bobbin. Check your machine book if you are not sure.
- The thread you want to use.
- Small scissors (optional, but helpful).
Turn Off the Machine
Safety first! Always turn off your sewing machine when you are touching the needle area or the bobbin area. This stops the machine from starting by mistake. Find the power switch and flip it off.
Raise the Needle
Turn the handwheel on the side of your machine. Turn it towards you slowly. Watch the needle go up. Keep turning until the needle is as high as it can go. This makes space under the needle plate.
Remove the Fabric
If there is any fabric under the presser foot, take it out. This gives you a clear view of the bobbin area.
Now you are ready to get the bobbin ready. The first step is usually winding thread onto an empty bobbin.
Winding the Thread Onto the Bobbin
Before you can load a bobbin, it needs thread on it! This process is called winding the bobbin. Winding bobbin Brother machine is a standard step. Your Brother machine has a special spot for this.
Find the Bobbin Winder
Look on the top or front of your Brother sewing machine. You will see a small pin that sticks up. This is the bobbin winder spindle. There is also a tension disk or guide near it. This guide helps the thread wind on smoothly.
Place the Empty Bobbin
Take an empty bobbin. Put it onto the bobbin winder spindle. Push it down firmly. Make sure it sits flat. On many Brother machines, you will push the spindle to the side, towards the right. This tells the machine you want to wind the bobbin.
Set Up the Thread
Take your spool of thread. Place it on the thread spool pin on top of your machine. Now, guide the thread.
- Take the thread end from the spool.
- Pull it through the thread guide at the top.
- Wrap the thread around the bobbin winding tension disk. This disk puts a little pull on the thread. This helps the thread wind tightly and neatly onto the bobbin. There is often a picture or number showing the path. Follow it closely.
Attach Thread to Bobbin
Take the end of the thread that came from the tension disk. Thread it through one of the small holes on the empty bobbin. Pull about 3 to 4 inches of thread through the hole.
Start Winding
Hold the end of the thread sticking out of the bobbin hole. Be ready to trim this end later. Now, press the foot pedal or the start/stop button on your machine.
The bobbin will start to spin very fast. The thread will wind onto it. The machine will stop winding when the bobbin is full. Some machines have a sensor for this. On others, you might need to watch it. Do not overfill the bobbin. It should not go past the edge of the bobbin.
Cut the Thread
Once the bobbin is full, stop the machine. Cut the thread connecting the bobbin to the spool. Cut it right next to the bobbin.
Remove the Bobbin
Push the bobbin winder spindle back to its original spot (usually towards the left or center). Take the full bobbin off the spindle.
Now you have a full bobbin ready to go! This process of Winding bobbin Brother machine correctly sets you up for good stitches.
Knowing Your Bobbin System
Brother sewing machines have different ways of holding the bobbin. It’s important to know which type your machine has. The two main types are:
- Drop-in Bobbin System: This is a Top loading bobbin system. The bobbin drops in from the top, right under the needle plate. The bobbin sits flat, facing up. This is also called Horizontal bobbin loading. It’s very common on newer machines.
- Front-Loading Bobbin System: This system uses a metal or plastic bobbin case. The bobbin goes inside this case. Then, the case goes into a spot in the front of the machine, often behind a door.
Look at your machine. Where is the bobbin area? Is it under a clear plastic cover on top? Or is it behind a small door on the front? Knowing this tells you which steps to follow next for Installing bobbin Brother.
We will cover how to load the bobbin for both systems.
Loading the Drop-in Bobbin (Top Loading)
This system is easy and popular. The bobbin just drops in. This is the Drop-in bobbin Brother method. It uses Horizontal bobbin loading.
Here is how to do it:
Step 1: Open the Bobbin Cover
Find the clear plastic cover over the bobbin area. It is usually right in front of the needle. There is often a small lever or button on the side to open it. Push or slide it gently. The cover will lift up or come off. Now you can see the bobbin spot.
Step 2: Get the Bobbin Ready
Take your full bobbin. Look at the thread on it. It is important which way the thread unwinds. This is called Bobbin orientation Brother.
For most Brother drop-in systems, the thread should unwind counter-clockwise. Imagine the bobbin is a clock face. The thread end should come off the bobbin towards the left side, like the hand on a clock moving backward.
Hold the bobbin in your hand. Pull a few inches of thread tail off the bobbin. Make sure the thread is coming off the side that lets it unwind counter-clockwise when placed in the machine.
Step 3: Place the Bobbin in the Compartment
Put the bobbin into the round spot in the machine. It should sit flat with the thread facing up. Make sure it drops all the way down into the space. The thread tail should be hanging out towards the front or side.
Remember the Bobbin orientation Brother – thread unwinding counter-clockwise is key for this type.
Step 4: Guide the Thread
This is a very important step for Threading bobbin Brother sewing machine in this system. Your machine has a special path for the bobbin thread.
- Look closely at the bobbin area. You will see a slot or a channel. This path guides the thread from the bob bobbin to the sewing area.
- Take the thread tail you left hanging.
- Pull the thread into the first part of the slot. It might feel like it clicks into place.
- Keep following the path. It usually goes around a corner and then towards the back or side. There are often arrows or numbers marked on the machine to show the path. Follow these arrows carefully.
- Pull the thread firmly but gently through the whole channel. The thread should be snug in the path. It should not be loose.
Step 5: Leave a Thread Tail
Once the thread is through the guides, leave about 4 to 6 inches of thread tail. It should lie on the needle plate. You will pull this thread up later.
Step 6: Replace the Bobbin Cover
Put the clear plastic bobbin cover back into place. Make sure it clicks shut. It needs to be closed before you sew.
You have now completed Putting bobbin in Brother machine for a drop-in system. The next step is to bring the bobbin thread up to the top. We will cover that after looking at the other bobbin system.
Loading the Front-Loading Bobbin (with Bobbin Case)
Older machines or some heavier-duty Brother models use a Brother sewing machine bobbin case. The bobbin goes into this case first. Then the case goes into the machine.
Here is how to do it:
Step 1: Open the Front Cover
Find the door or cover on the front of your machine, usually below the needle area. Open this door. You will see a metal part inside. This is where the bobbin case goes.
Step 2: Remove the Bobbin Case
If there is a bobbin case inside, you need to take it out. There is usually a small latch or handle on the bobbin case. Hold onto this latch. Pull the bobbin case straight out of the machine.
Step 3: Get the Bobbin Ready
Take your full bobbin. Hold it in your hand. For this system, the Bobbin orientation Brother is different. The thread should unwind clockwise. Imagine the bobbin is a clock face. The thread end should come off the top of the bobbin towards the right side, like the hand on a clock moving forward.
Step 4: Put the Bobbin in the Bobbin Case
Hold the empty or removed bobbin case. Take your full bobbin with the thread unwinding clockwise. Place the bobbin inside the bobbin case. It should fit snugly.
Step 5: Thread the Bobbin Case
This is the Threading bobbin Brother sewing machine step for this type. The bobbin case has a special path for the thread.
- Look at the edge of the bobbin case. You will see a slot.
- Take the thread tail from the bobbin inside the case.
- Pull the thread into this first slot on the bobbin case edge.
- Keep pulling the thread. It should go under a small flat spring or tension plate on the side of the bobbin case. There is often a second small slot at the end of the spring.
- Pull the thread through this second slot. The thread should now be held by the tension spring. Pull on the thread tail. You should feel a slight pull or tension. This is important for good stitches.
- Leave about 4 to 6 inches of thread hanging from the bobbin case.
Step 6: Insert the Bobbin Case into the Machine
Hold the bobbin case by its latch or handle with the threaded bobbin inside. Look at the opening in the machine where the bobbin case came from. There is a pin or notch inside this opening.
Look at the back of the bobbin case. There is often a notch or part that fits with the pin inside the machine.
- Line up the notch on the bobbin case with the pin inside the machine’s opening.
- Gently push the bobbin case straight back into the machine.
- You will hear and feel it click into place. Make sure it is fully seated.
- Release the latch or handle you were holding.
Step 7: Close the Front Cover
Close the door or cover on the front of your machine.
You have now completed Installing bobbin Brother using a bobbin case.
Bringing Up the Bobbin Thread
No matter which system you have (drop-in or front-loading), you need to bring the bobbin thread up through the needle plate before you can sew.
Here is how to do it:
- Make sure the presser foot is up.
- Hold the end of the needle thread. This is the thread coming from the spool on top of your machine, through the needle. Hold it gently to the side.
- Turn the handwheel on the side of your machine towards you (counter-clockwise). Turn it slowly, one full turn.
- As you turn the handwheel, the needle will go down into the bobbin area. It will grab the bobbin thread.
- Keep turning the handwheel until the needle comes all the way back up to its highest point.
- As the needle comes up, it will bring up a loop of the bobbin thread.
- Use the end of your needle thread (the one you are holding) or a small tool like scissors or a seam ripper to grab the loop of bobbin thread.
- Pull the loop up gently through the hole in the needle plate.
- Pull the bobbin thread tail fully up.
- You should now have two threads coming up through the needle plate hole: the needle thread and the bobbin thread.
- Pull both thread tails under the presser foot and towards the back of the machine. Leave about 4 to 6 inches of both threads behind the foot.
Now your machine is threaded with both the top thread and the bobbin thread!
Checking Your Setup
Before you start sewing, it is smart to check if everything is set up right. This helps avoid problems.
- Check the Threads: Are both threads (top and bobbin) pulled under the presser foot and towards the back?
- Check the Bobbin: Is it in the machine correctly? Is the thread coming out of the correct guide or slot? Remember Bobbin orientation Brother is different for drop-in vs. front-load.
- Check the Top Thread: Is the top thread correctly threaded through all the guides, tension disks, and the needle?
- Close Covers: Is the bobbin cover or front door closed?
- Needle Up: Is the needle in the highest position?
Doing these quick checks makes sure you are ready to sew.
Fixing Things That Go Wrong
Sometimes, things don’t work perfectly when loading the bobbin. These are Common bobbin loading issues Brother. Here are some things that can happen and how to fix them:
| Problem | Possible Reason | How to Fix |
|---|---|---|
| Thread breaks often | Bobbin thread path is wrong; Tension is off | Re-thread the bobbin (check guides/slots). Make sure bobbin tension is right (if adjustable). |
| Stitches loop on top of fabric | Bobbin thread not pulled through tension | Re-thread bobbin, making sure thread goes under tension spring (front-load) or through guide (drop-in). |
| Stitches loop on bottom of fabric | Top thread not pulled through tension | Check top threading path. Make sure thread is correctly in tension disks. |
| Machine makes loud noise | Bobbin or bobbin case is not seated fully | Remove and re-insert the bobbin or bobbin case. Make sure it clicks in. |
| Bobbin won’t spin when winding | Spindle not pushed over; Machine not set to wind | Push bobbin winder spindle fully to the side. Check machine settings. |
| Thread winds unevenly | Thread not going through tension disk when winding | Make sure thread is wrapped around the bobbin winding tension disk. |
| Can’t pull up bobbin thread | Needle not going down far enough; Thread not caught | Turn handwheel one full turn slowly. Make sure bobbin thread is in place. |
| Bobbin thread tangled below fabric | Bobbin is not in right way; Starting sewing wrong | Check Bobbin orientation Brother. Pull both thread tails back before starting. |
These are just a few common problems. Always check your machine’s manual for specific help. If you are still having trouble, try removing both the top thread and the bobbin. Then, start threading the machine from the very beginning.
Tips for Success
- Use the Right Bobbin: Brother machines work best with Brother bobbins or bobbins made to the exact same size and shape. Using the wrong bobbin can cause many problems.
- Wind Bobbins Evenly: When Winding bobbin Brother machine, make sure the thread winds smoothly and evenly. An unevenly wound bobbin can cause tension issues.
- Clean the Bobbin Area: Lint and dust can build up in the bobbin area. This can cause problems with thread tension and movement. Use a small brush to clean the area often.
- Pull Enough Thread: When you finish threading and bring up the bobbin thread, pull both thread tails 4-6 inches long. This helps prevent tangled threads when you start sewing.
- Check Your Manual: Your Brother sewing machine manual has pictures and steps made just for your model. It is the best place to look if you get stuck.
More About Your Bobbin Setup
Let’s look a little deeper into some key parts of the bobbin system in a Brother machine.
Comprehending the Bobbin Type
Not all bobbins are the same. Brother sewing machines usually use a specific type of bobbin. These are often plastic bobbins, Type 15 or Class 15. They have a standard size. Using bobbins that are too tall, too short, or have a different shape can make your machine unhappy.
Think of it like putting the wrong key in a lock. It just doesn’t work right. Always use bobbins that came with your machine or are clearly marked as compatible with your Brother model. This is important for good stitch quality and machine health.
Deciphering Bobbin Orientation
We talked about Bobbin orientation Brother. Let’s make it super clear why this matters.
- Drop-in System (Top Loading): The thread needs to come off the bobbin going counter-clockwise. Why? Because the machine’s path for the thread is set up for this direction. If it unwinds clockwise, the thread won’t sit correctly in the tension guides. This leads to loose or skipped stitches. Imagine the bobbin spinning. The thread needs to feed smoothly into the first slot. The counter-clockwise spin makes this happen naturally for the horizontal setup. This is key for Horizontal bobbin loading.
- Front-Loading System (with Bobbin Case): The thread needs to come off the bobbin going clockwise when it is inside the bobbin case. Why? The slot and tension spring on the bobbin case are designed for the thread to pull smoothly from this direction. If it goes the other way, the tension won’t be right, and the thread might catch.
So, looking at the bobbin as it sits before you thread it into the case or guide tells you the correct way to insert it.
Grasping the Bobbin Case (Front Load)
The Brother sewing machine bobbin case is more than just a holder. It has its own tension system. The little flat spring on the side puts tension on the bobbin thread as it pulls through. This tension must be just right. If the tension is too loose, you get loops on the bottom of your fabric. If it’s too tight, the thread might break or pull the top thread too hard.
Most home sewing machine bobbin cases have tension set at the factory. You usually don’t need to adjust it. But if you have ongoing problems with bottom thread tension and have tried everything else, check your manual. Some advanced users might adjust the small screw on the case, but this is often not needed and can cause more problems if done wrong.
When you are Installing bobbin Brother with a case, making sure the case is pushed all the way in until it clicks is vital. If it’s not fully seated, the machine won’t sew, or it will make a loud noise.
Interpreting the Top Loading System
The Top loading bobbin system, or Drop-in bobbin Brother, is popular because it is easy to see and load. The clear cover lets you see how much thread is left. The main challenge here is making sure the thread is correctly pulled through the guided path.
When you are Putting bobbin in Brother machine with this system, the thread must go through the marked channel. There is a tension mechanism built into this area under the needle plate. The thread needs to pass through it to get the right pull. If you just drop the bobbin in and don’t guide the thread through the channel, the stitch will not form correctly. You will get loose, loopy stitches on the bottom.
The Installing bobbin Brother process for drop-in is fast once you know the path. Always follow the numbers or arrows printed on the machine bed.
Fathoming Common Issues Further
Let’s add a little more detail on troubleshooting Common bobbin loading issues Brother.
- Looping Stitches: This is the most common problem.
- If loops are on the top (bobbin thread is loose), the problem is with the top thread tension. Re-thread the entire top of the machine. Make sure the presser foot is UP when threading the top thread so the tension disks are open.
- If loops are on the bottom (top thread is loose), the problem is with the bobbin thread tension or path. Re-thread the bobbin. For drop-in, check the path through the channel. For front-load, check the thread is under the spring on the bobbin case.
- Thread Breaking:
- Is the thread old or poor quality?
- Is the needle bent or old? A bad needle can cut the thread.
- Is the tension too high (either top or bobbin)?
- Is the machine clean? Lint can snag the thread.
- Is the bobbin wound too full or unevenly?
- Is the bobbin the wrong size?
- Machine Not Sewing / Making Noise:
- Is the bobbin or bobbin case in fully? Remove and reseat it.
- Is something jammed in the bobbin area? Check for tangled thread or lint.
- Is the machine set to sew (not bobbin winding mode)?
Taking the time to check these things can save a lot of frustration. Proper Threading bobbin Brother sewing machine is the first step to good sewing.
Frequently Asked Questions (FAQ)
Here are some common questions people ask about putting the bobbin in a Brother sewing machine.
Q: My bobbin won’t fit in the spot. What’s wrong?
A: Make sure you are using the correct size bobbin for your Brother machine. Brother usually uses standard Class 15 plastic bobbins. If the bobbin is too big or too small, it won’t fit right and can cause problems. Also, make sure it is clean and has no thread snags.
Q: The thread isn’t catching when I try to pull up the bobbin thread.
A: Turn the handwheel one full, slow turn towards you. Watch the needle go down and come back up. It should grab the bobbin thread. Make sure the bobbin is in correctly and the thread is coming out of the right spot (guide channel for drop-in, under tension spring for front-load). Make sure the needle is high enough when you start turning the wheel.
Q: How much thread should I put on the bobbin?
A: Fill the bobbin until it is just below the edge. Do not wind it past the edge. Overfilling can cause the thread to snag and cause problems. Your machine’s bobbin winder usually stops automatically when it’s full.
Q: Can I use metal bobbins in my Brother machine?
A: Check your machine’s manual! Many newer Brother machines are designed for plastic bobbins only. Using metal bobbins in a machine meant for plastic can damage the machine or affect stitch quality. The magnet in some metal bobbins can interfere with the electronic sensors or magnetic bobbin systems in some machines.
Q: The thread gets tangled right when I start sewing.
A: Make sure you pulled both the top thread and the bobbin thread under the presser foot and towards the back before you started sewing. Leave a tail of 4-6 inches. Hold these thread tails gently for the first few stitches. This helps start the seam neatly. Also, double-check your Bobbin orientation Brother.
Q: Why do I need to thread the bobbin through the guide or spring?
A: This guide or spring provides tension to the bobbin thread. The machine needs this tension to form a balanced stitch with the top thread. Without the right tension, your stitches will be loose and uneven. This is a key part of Threading bobbin Brother sewing machine.
Q: My drop-in bobbin thread looks loose in the channel.
A: Make sure you have pulled the thread firmly into the channel/slot. You might hear a small click as it snaps into place. If it’s not seated properly, the tension won’t work. Re-thread the bobbin, following the arrows or numbers carefully.
Q: What is the difference between Horizontal bobbin loading and other types?
A: Horizontal bobbin loading means the bobbin sits flat. This is the drop-in or top-loading system. The other common type is vertical loading, where the bobbin stands on its edge and goes into a bobbin case, often at the front of the machine. Brother primarily uses horizontal (drop-in) or vertical (front-load case) systems.
Q: How often should I clean the bobbin area?
A: It is good practice to clean the bobbin area every time you change the bobbin or start a new sewing project. Lint and small thread bits build up quickly and can cause many problems. Use a small brush, not canned air, as air can push lint deeper into the machine.
Getting the bobbin right is a key skill for sewing. By following these steps, you can load the bobbin in your Brother sewing machine correctly. This helps you get neat, strong stitches and enjoy your sewing time more. Happy sewing!