
Yes, you absolutely can make a pillow without a sewing machine! You don’t need any sewing skills at all. You can make a pillow using simple methods like fabric glue, iron-on tape, or by tying pieces of fabric together. This makes a DIY pillow no sewing project easy and fun for anyone. You can have a new pillow quickly with just a few simple supplies.
Making a cozy pillow is easier than you think. You do not need needles or thread. You can make beautiful pillows just by sticking fabric or tying it. These simple ways let you create pillows for your home. You can make a No sew pillow for a chair or a No sew throw pillow for your couch. It is a great way to get new home decor fast. Let’s look at some ways to make a pillow without sewing.
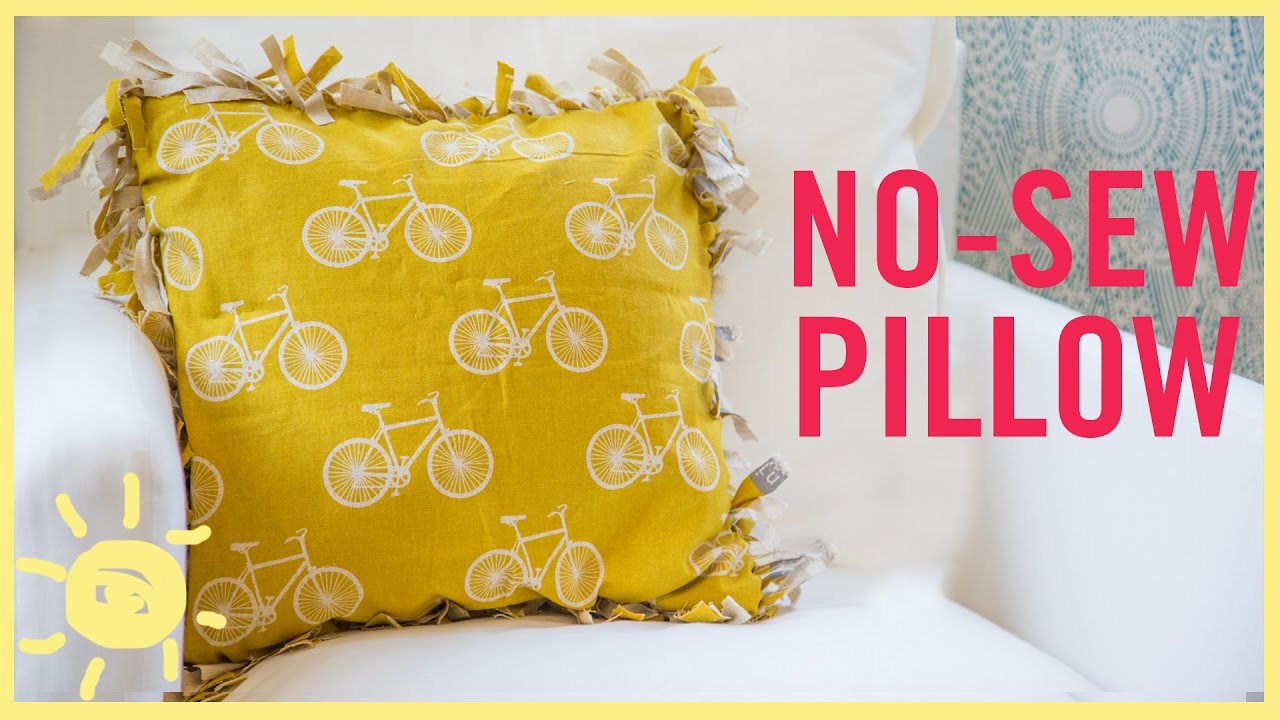
Image Source: i.ytimg.com
Simple Ways to Make a Pillow
There are a few good ways to make a pillow without sewing. Each way uses different things to hold the fabric together.
* You can use fabric glue. This is like using strong glue for cloth. It sticks the fabric edges together.
* You can use iron-on tape. This tape melts when you iron it. It makes the fabric stick together.
* You can tie the fabric. This method uses cuts on the fabric edges to tie them into knots.
Each way has its good points. Some are faster. Some are better for kids. Some are very strong. We will look at each way step by step.
Making a Fabric Glue Pillow
This is a simple way to make a pillow. You just need fabric and special glue. The glue holds the fabric edges tight. This makes a Fabric glue pillow that looks nice.
What You Need
Gather these items to make your glue pillow:
* Two pieces of fabric the same size. These will be the front and back of your pillow. Make them the size you want your pillow to be, plus a little extra for the edges.
* Fabric glue. Get glue that says it works on fabric and is strong.
* Scissors. You need these to cut the fabric.
* Stuffing. This is what goes inside the pillow to make it soft. You can use poly-fill or old fabric scraps.
* Something to protect your work area, like old paper or plastic.
* Clips or heavy books (helpful to hold fabric down while glue dries).
Getting Started with Glue
Let’s get your fabric ready.
1. Choose your fabric. Any fabric can work, but cotton or felt is easy.
2. Cut two squares or rectangles. Make them the same size. Think about how big you want the finished pillow. Add about one inch extra on each side. This extra bit is for the edge where you will put glue. So, if you want a 12-inch pillow, cut two pieces that are 14 inches by 14 inches.
Steps to Make the Pillow with Glue
Follow these steps to make your pillow stick together:
1. Put your two fabric pieces together. The sides you want on the outside of the pillow should face inward. This is called putting right sides together.
2. Lay the fabric flat on your work surface. Make sure it is smooth.
3. Pick one side. Put a line of fabric glue near the edge. Put the glue about half an inch from the raw edge of the fabric. Do not put glue too close to the very edge.
4. Press the two fabric pieces together where you put the glue. Press along the whole edge. You can use your fingers or a flat object.
5. Repeat this on two more sides. Now you have three sides glued shut. One side is open.
6. Leave the open side for now. Let the glue dry on the three closed sides. Check the glue bottle to see how long it takes to dry. It might take an hour or more.
7. After the glue is dry, turn the fabric piece right side out. The good sides of the fabric are now on the outside. You should have a pocket shape with three sides closed by glue.
8. Now it’s time to stuff the pillow. Push the stuffing into the open side. Fill it up until the pillow is as soft and full as you like. Do not overstuff it too much. It should feel comfy.
9. You need to close the last side. Fold the raw edges of the opening inward. Fold them in by about half an inch. Make the fold neat.
10. Put a line of fabric glue inside this fold. Make sure the glue sticks the folded edge of the back piece to the folded edge of the front piece. You are gluing the fold to the fold.
11. Press the edges together firmly. You can use clips or put heavy books on top to help it stick while it dries.
12. Let the glue dry completely. This might take longer for the last side because the pillow is full.
Good Tips for Using Fabric Glue
- Use a little glue at a time. Too much glue can make the fabric hard or soak through.
- Read the glue bottle instructions. Different glues dry at different speeds. Some need you to wait before pressing.
- Test the glue on a small piece of your fabric first. See how it works and if it holds well.
- Make sure the edges line up well before pressing.
- Let the glue dry fully before using the pillow. This makes sure it stays shut.
Good Points and Not So Good Points of Glue
Good points:
* It is easy to do.
* It does not need special tools like an iron or scissors for fringes.
* It can be very strong if you use good glue.
* Makes a clean, smooth edge like a sewn pillow.
Not so good points:
* You have to wait for the glue to dry. This takes time.
* Using too much glue can make the pillow edge stiff.
* Some glues might not wash well later. Check the bottle.
* Needs careful work to make edges line up neatly.
This Fabric glue pillow method is good if you like a clean look and have time for drying. It is a simple Pillow without sewing tutorial that gives a nice result.
Making an Iron-On Hem Tape Pillow
This method uses heat from an iron to stick the fabric edges together. It is called an Iron on hem tape pillow. It is also a Fabric tape pillow. The tape melts and acts like glue between the fabric pieces.
What You Need
Get these items ready for your iron-on tape pillow:
* Two pieces of fabric the same size. Same idea as the glue pillow, add extra for edges.
* Iron-on hem tape. This tape has glue on it that melts when heated. Make sure you get tape that is made for fabric. Get enough tape for three or four sides of your fabric pieces.
* Scissors.
* An iron and an ironing board.
* Stuffing.
* A cloth or paper to protect your ironing board.
Getting Ready for Ironing
Prepare your fabric just like for the glue method.
1. Choose your fabric. Cotton works well with iron-on tape.
2. Cut two pieces the same size. Remember to add about one inch on each side for the edge where you will use the tape. For a 12-inch pillow, cut two pieces 14×14 inches.
3. Put the fabric pieces together with the good sides facing inward.
Steps to Make the Pillow with Iron-On Tape
Follow these steps carefully:
1. Lay the double layer of fabric flat on your ironing board. The good sides are inside.
2. Take your iron-on hem tape. Put a strip of tape along one edge, between the two layers of fabric. Place the tape about half an inch from the raw edge. Make sure the tape goes from one corner almost to the next. Do not go all the way to the corner edge yet.
3. Heat your iron to the setting the tape instructions tell you to use. Usually, it’s a medium to hot setting for cotton. Do not use steam unless the tape says so.
4. Press the hot iron down on the fabric where the tape is. Hold it there for the time the tape instructions say. This melts the glue on the tape. Lift the iron and move to the next spot along the edge. Overlap the iron slightly as you move.
5. Do this for three sides of the fabric. Leave one side open for now.
6. Let the ironed sides cool down completely. The glue needs to cool to make a strong bond.
7. Once cool, turn the fabric piece right side out. The good sides of the fabric are now on the outside. You have a pocket with three closed sides.
8. Stuff the pillow with your chosen stuffing. Fill it until it feels right.
9. To close the last side, you need to make a neat edge. Fold the raw edges of the opening inward by about half an inch. Press this fold with the iron (no tape yet).
10. Now, place a strip of iron-on hem tape inside this folded edge. Make sure the tape is between the two folded edges you want to stick together.
11. Press the hot iron down on the folded edge where the tape is. Hold it for the time needed. Lift and press along the entire opening.
12. Let the last side cool down completely. Do not touch or move it until it is fully cool and the glue is hard.
Good Tips for Using Iron-On Tape
- Always read the instructions on the hem tape package. Time and heat needed can be different.
- Test the tape on a small piece of your fabric first. See if it sticks well and if the heat is right.
- Use a cloth over the fabric if you are worried about the iron being too hot for your fabric.
- Make sure the tape goes all the way to the corners on the first three sides. For the last side, make sure the tape fills the gap.
- Let it cool completely! This step is very important for a strong hold.
Good Points and Not So Good Points of Iron-On Tape
Good points:
* It is usually faster than waiting for glue to dry.
* The bond can be very strong.
* Makes a clean, smooth edge like sewing.
* Great for a quick DIY pillow no sewing project.
Not so good points:
* You need an iron and ironing board.
* Using too much heat can harm some fabrics.
* Getting the last side sealed neatly while it is stuffed can be a little tricky.
* Can feel stiff at the edges if not done right.
This Iron on hem tape pillow method is great if you have an iron and want a quick project with strong edges. It is another good way how to make a cushion without sewing.
Making a Tie Pillow
This method is fun and does not use any glue or tape. You just use scissors to cut fringes and then tie them together. This makes a Tie pillow with soft, fringed edges. It is an easy no sew pillow for kids or beginners.
What You Need
Here is what you need for a tie pillow:
* Two pieces of fabric the same size. For this method, you do NOT need to add extra for edges in the same way. You will cut fringes from the main fabric size.
* Scissors. Very sharp scissors work best.
* Stuffing.
Getting Ready for Tying
This method uses the fabric itself to make the edges.
1. Choose your fabric. Fleece, felt, or cotton flannel work very well because they do not fray much when cut. Cotton can work too, but the fringes might fray more.
2. Cut two squares or rectangles. Decide how big you want the pillow part to be. For a 12-inch pillow, cut two pieces that are 12 inches by 12 inches. You will make fringes around this size.
3. Place the two fabric pieces together. This time, put the good sides OUTWARD. You want the good sides to be on the outside of the pillow right away.
Steps to Make the Pillow by Tying
Follow these steps to cut and tie your pillow:
1. Lay the double layer of fabric flat. Smooth it out.
2. Cut a small square out of each corner. Cut a square about 1 inch by 1 inch from all four corners through both layers of fabric. This helps make neat fringes.
3. Now, cut strips from the edge inward towards the corner hole you just cut. Make the strips about 1 inch wide and about 4 inches long. Cut through both layers of fabric at the same time. Cut these fringes all along one side.
4. Repeat step 3 on the next side, and then the next. Do this for three sides. You will have fringes cut on three sides, going in about 4 inches. One side will have no cuts yet. This is the open side for stuffing.
5. Take the top fringe strip and the bottom fringe strip on one edge. Tie them together in a double knot. Tie them tightly, but not so tight that the fabric rips.
6. Go along the first side you cut and tie every pair of fringes together.
7. Repeat this on the second side you cut. Tie all the fringe pairs.
8. Repeat this on the third side you cut. Tie all the fringe pairs. Now you have three sides of your pillow closed with knots. You should have one side still open with uncut fabric.
9. Cut fringes on the fourth side, just like you did on the other three sides.
10. Now, stuff the pillow through the opening on the fourth side. Push the stuffing inside until the pillow is as full as you want it. Push the stuffing down towards the already tied sides.
11. Once it is stuffed, begin tying the fringe pairs on the last side. Start at one end and tie pairs until you reach the other end. Make sure all the stuffing stays inside as you tie the last few knots.
Good Tips for Making a Tie Pillow
- Use a ruler or mark lines with chalk to keep your fringes the same width and length. This makes the edges look neater.
- Cut through both fabric layers at the same time. This makes sure the fringes line up to be tied.
- Double knot each pair of fringes to make sure they do not come undone.
- Tie the knots firmly near the main part of the pillow fabric.
- Fleece is a great fabric for this because it is soft and easy to cut, and it does not fray.
Good Points and Not So Good Points of Tying
Good points:
* Very easy and fast. No drying time needed.
* Does not need any special tools (no iron, no glue). Just scissors and fabric.
* Kids can easily help or make one themselves.
* Creates a fun, soft, decorative edge.
* Very simple How to make a cushion without sewing tutorial.
Not so good points:
* The fringed edge is part of the design, not a hidden seam.
* Can use up more fabric than the other methods because of the fringes.
* The knots might come undone over time with rough use or washing if not tied well.
* Stuffing the last side can be a little tricky with all the fringes.
This Tie pillow method is perfect if you want a fast project, do not have glue or an iron, or if you like the look of the tied edges. It is a truly Easy no sew pillow.
Comparing the No-Sew Methods
Let’s look at how the three ways stack up.
| Feature | Fabric Glue Pillow | Iron-On Hem Tape Pillow | Tie Pillow |
|---|---|---|---|
| Tools Needed | Glue, Scissors, Stuffing | Tape, Iron, Scissors, Stuffing | Scissors, Stuffing |
| Skill Level | Easy | Easy | Very Easy (Great for kids) |
| Edge Look | Clean, Flat Edge | Clean, Flat Edge | Fringed, Knotted Edge |
| Time Taken | Needs drying time (hours) | Needs ironing time, cooling time | Fast, no waiting needed |
| Strength | Good, if using quality glue | Very Good, if ironed well | Good, if knots are tight |
| Best Fabric | Most fabrics | Most fabrics (check iron heat) | Fleece, Felt (non-fraying) |
| Washability | Check glue type | Check tape type | Usually washable (knots may loosen) |
| Project Type | Clean finish DIY pillow no sewing | Quick finish Fabric tape pillow | Fun, fast No sew pillow |
Each method is a great way to make a pillow without a sewing machine. Your choice depends on what tools you have and what kind of look you want for your pillow.
Picking the Right Fabric
Choosing the right fabric makes a big difference in your no-sew pillow project.
* Cotton: Easy to cut, glue, and iron. Comes in many colors and patterns. Can fray, especially with the tie method.
* Felt: Does not fray at all. Great for all three methods, especially the tie method. Comes in solid colors. Can be a bit thin.
* Fleece: Soft, does not fray much, stretchy. Perfect for the tie method. Can be used with glue, but glue might make it stiff. Iron-on tape might melt it if the iron is too hot.
* Flannel: Soft, little fraying. Good for tie method. Works okay with glue or tape.
* Decorator Fabric: Often thicker and more durable. Good for glue or tape methods if not too thick to handle. Might fray a lot if used for tying.
Think about how the pillow will be used. For a couch, you might want something durable. For a kid’s room, maybe something soft like fleece.
Adding Style Without Sewing
You can make your No sew pillow even more special. You do not need a sewing machine to add decoration.
* Fabric Paint or Markers: Draw designs or write words on the fabric before you make the pillow.
* Stencils: Use stencils with fabric paint for shapes and patterns.
* Fabric Appliques: Cut out shapes from different fabric. Glue them onto your main pillow fabric using fabric glue.
* Ribbon or Trim: You can glue ribbon or decorative trim onto the edges of your finished glue or tape pillow.
Be sure to add any decorations before you stuff and fully close the pillow. It is much easier to work on flat fabric.
Filling Your Pillow
The stuffing inside makes the pillow soft and gives it shape.
* Polyester Fiberfill: This is the most common stuffing. It is soft, light, and washable. You can buy bags of it at craft stores.
* Fabric Scraps: Use leftover pieces of fabric from other projects. Cut them into small pieces. This is a good way to use up waste. It might make the pillow feel a little heavier or less smooth than fiberfill.
* Old Clothes or Blankets: Cut up old t-shirts, sweaters, or blankets that are clean. Like fabric scraps, cut them small. This is recycling and makes the pillow feel different depending on the material.
* Cotton Batting: Similar to what is used in quilts. Can make a flatter, denser pillow.
Fill the pillow enough to make it firm but still soft and squishy. Do not cram too much in, or it might stress the edges you made with glue, tape, or ties.
What If Things Go Wrong?
Sometimes, when you try a new DIY pillow no sewing project, you might have small problems.
* Glue or Tape Not Sticking: Did you use the right glue or tape for your fabric? Was the iron hot enough? Did you hold it long enough? Did you let it cool/dry completely? Make sure the fabric is clean and dry. Try adding a bit more glue or ironing again.
* Gaps in the Edge: Maybe the glue or tape did not go all the way to the edge, or a tie came loose. You can add a little extra glue carefully to fill small gaps. For tie pillows, just tie the loose fringe again.
* Uneven Fringes or Knots: This is okay! It is a handmade pillow. A few uneven spots give it character. Next time, try measuring or using chalk lines to cut fringes more evenly.
* Stuffing Coming Out: Push the stuffing back in and make sure your edge is sealed tightly. For glue or tape, add more glue or iron the spot again. For tie pillows, tie the knots closer together or add more knots if you can.
Do not worry about small mistakes. The goal is to have fun and make something yourself.
Why Go No-Sew?
Why choose to make a pillow without a sewing machine?
* It’s Easy: You do not need to learn how to use a machine.
* It’s Fast: Many no-sew methods are quicker than setting up a machine and sewing. The tie method is very fast.
* It’s for Everyone: Anyone can do this, including kids (with help for scissors or iron).
* It Saves Money: You don’t need to buy a sewing machine or pay for sewing lessons.
* It’s Creative: You can pick any fabric and make it your own.
* It’s Great for Beginners: If you are new to DIY, this is a perfect first project.
Making an Easy no sew pillow is a great way to start making things for your home. It shows you how to make a cushion without sewing in simple steps. These Pillow without sewing tutorial options make it possible for anyone. Whether you make a Fabric glue pillow, an Iron on hem tape pillow, or a Tie pillow, you are making something special. You can quickly make a No sew throw pillow to match your room.
More Ideas for No-Sew Pillows
Think about using old items to make your pillows:
* Use an old t-shirt with a cool design. Cut two squares from it. Use the tie method or glue/tape.
* Cut up an old, soft blanket. Fleece blankets work very well for the tie method.
* Use tea towels or placemats. Their edges are already finished! Just glue or tape three sides together, stuff, and close the last side. This is a very easy Fabric tape pillow or Fabric glue pillow idea.
Making a No sew pillow is about being creative and using what you have. It is a simple project that can make your home feel more cozy.
Wrapping Up Your No-Sew Journey
You have seen how simple it is to make a pillow without a sewing machine. We covered using fabric glue, iron-on tape, and tying fabric. Each method gives you a lovely pillow without any stitching. You can make a clean-edged Fabric glue pillow, a strong Iron on hem tape pillow (or Fabric tape pillow), or a fun Tie pillow. All these are great ways to create a DIY pillow no sewing project. You now know how to make a cushion without sewing easily. Try one of these Pillow without sewing tutorial guides today and make your own Easy no sew pillow or No sew throw pillow! It is easier than you think and the results are rewarding.
Questions People Ask
Here are some common questions about making pillows without sewing.
h4: Can I wash a no-sew pillow?
It depends on how you made it.
* Pillows made with fabric glue: Check the glue bottle. Some fabric glues are washable once they are fully dry. Wash on a gentle cycle in cool water.
* Pillows made with iron-on hem tape: Check the tape package. Most iron-on tapes are made to be washed. Wash on a gentle cycle.
* Tie pillows: Yes, you can wash tie pillows. The knots might get a little looser or messier, but they usually stay tied. You can retie any that come undone.
Always use cool water and a gentle wash cycle to be safe. Air drying is best if you are unsure about the heat of a dryer.
h4: What is the best fabric for a no-sew pillow?
The best fabric depends on the method.
* For glue or tape: Cotton is a good choice. It is easy to work with. Linen blends also work. Avoid fabrics that fray heavily if you want clean edges.
* For tying: Fleece is the best choice. It is soft, stretchy, and does not fray when cut. Felt and flannel are also good options.
Choose a fabric that you like the look and feel of, but also think about how it will work with your chosen method.
h4: How much fabric do I need?
You need two pieces of fabric the same size.
* For glue or tape methods: Decide the finished size you want. Add about 1 inch to each side for the edges. So, for a 16×16 inch finished pillow, cut two pieces that are 18×18 inches.
* For the tie method: Decide the finished size you want (not including the fringes). Add the length you want your fringes to be, times two, to each side. If you want a 16×16 inch pillow with 4-inch fringes, cut two pieces that are 16 + 4 + 4 = 24×24 inches. The middle 16×16 inches will be the pillow body, and the outer 4 inches on each side will be cut into fringes.
Always buy a little extra fabric just in case you make a mistake.
h4: How much stuffing do I need?
It is better to buy a little more stuffing than you think you need. You can always use leftover stuffing for another project. The amount you need depends on how big your pillow is and how firm you want it. A small bag (like 12-16 ounces) is usually enough for one standard throw pillow size (like 16-18 inches). For larger pillows or if you want a very full pillow, you might need more.
h4: Can I make different shapes?
Yes! You can make square, rectangle, or even round no-sew pillows.
* For glue or tape methods: Just cut your two fabric pieces into the shape you want (circle, heart, star). Add about an inch around the edge for the seam. It can be trickier to make smooth curves with glue or tape than straight lines, but it is possible with care.
* For tying methods: Square and rectangle shapes work best because cutting and tying straight fringes is easy. Curved shapes are much harder to do neatly with fringes.
Start with simple shapes like squares or rectangles for your first No sew pillow project.
h4: Is making a no-sew pillow cheaper than buying one?
Sometimes, yes. If you use fabric you already have or find fabric on sale, it can be much cheaper. Buying new fabric and stuffing might cost about the same as a basic store pillow, but you get to choose the exact fabric you want. Making your own pillow is also about the fun of the DIY pillow no sewing project.
h4: How long does a no-sew pillow last?
If made well with good materials, a no-sew pillow can last a long time, just like a sewn one. The strength depends on the method. Glue or tape that is washable and applied correctly should hold up well. Tied edges will last as long as the knots stay tied. Using durable fabric will also help your No sew throw pillow last longer.
Making a pillow without a sewing machine is a rewarding project. Give it a try and see how easy it is!