
A sewing knot is a small loop you make at the end of your thread. You use it when you start sewing. It stops your first stitch from pulling through the fabric. You also use a knot at the end of your sewing. This helps in Securing hand stitches. Tying a knot in thread is a basic but very important step for anyone who wants to sew by hand. It makes sure your stitches stay in place.
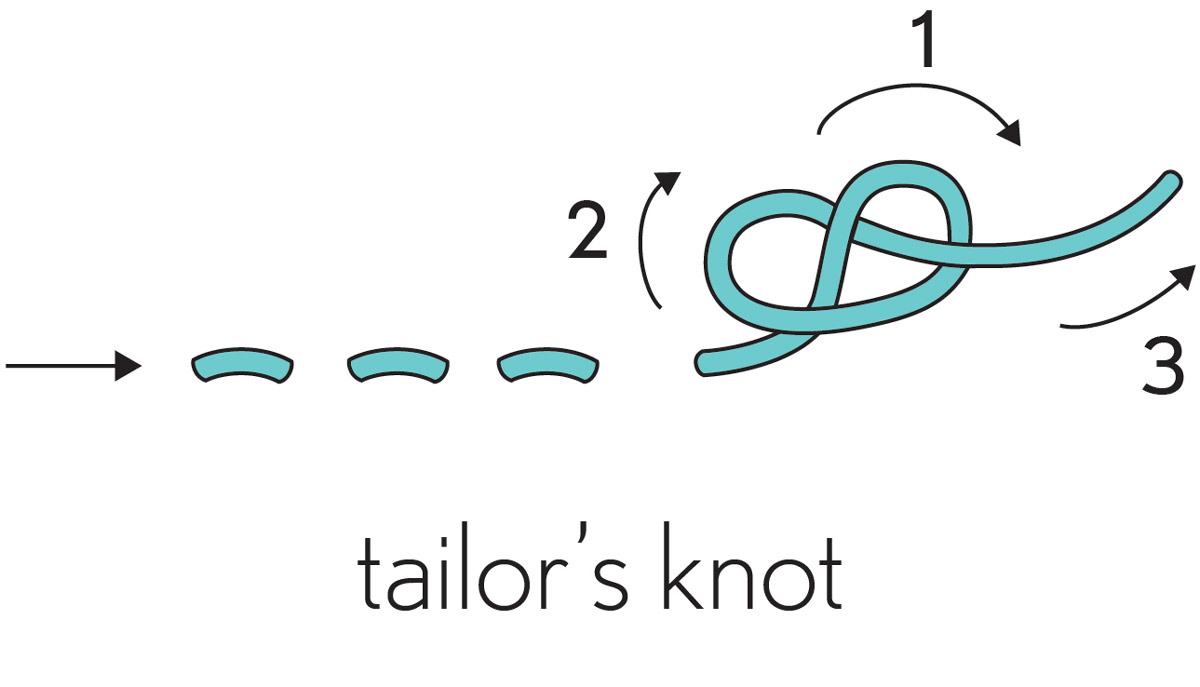
Image Source: oliverands.com
Why Sewing Knots Are So Important
Sewing knots are the tiny heroes of hand sewing. They do a very big job. Without a knot, your thread would just pull out of the fabric. Your sewing would not hold together.
Think of a knot like an anchor. It holds your thread in place. It keeps your stitches from coming undone. This is true for starting and ending your sewing.
Starting Sewing Stitches
When you begin to sew, you need to fix your thread to the fabric. A knot does this job. You make a knot at the end of your thread. You put the needle through the fabric. The knot stops the thread. It cannot pass through the fabric. This is how you start your line of stitches firmly.
Ending Sewing Stitches
When you finish sewing, you also need a knot. This knot holds your last stitches. It stops them from coming loose. Ending sewing stitches needs a strong knot. It seals your work. It keeps your sewing from falling apart later.
Securing Hand Stitches
Every stitch you make builds on the last one. The knot at the start holds the first stitch. The knot at the end holds the last stitch. Together, they help in Securing hand stitches along the whole seam. A good knot means your sewing will last. It will not unravel easily. This is vital for anything you sew by hand.
Preventing Knot from Coming Undone
A key goal when making a knot is to make it stay tight. You want it to be strong. You do not want it to slip or pull open. We will show you how to make a knot that stays put. A knot that stays put is key to neat and strong sewing. It prevents your hard work from getting ruined.
Learning About The Basic Sewing Knot
The most common knot in hand sewing is simple. It is often called a basic sewing knot. It is easy to learn. It works for almost all basic sewing tasks. This knot is often made with the needle. It is a quick Needle and thread knot technique. You can tie this knot quickly. It does not take long to learn.
Let’s learn this basic knot. It is the first step in learning Hand sewing knot technique. This is how you tie a knot with a needle. It is faster than tying a knot with just your fingers.
How To Make The Basic Needle Knot
This is a step-by-step guide. It shows you how to make a knot at the end of your thread. You will use your needle to help.
Step 1: Get Your Thread Ready
First, you need a piece of thread. Cut your thread the length you need. Thread your needle. Pull the thread through the eye of the needle. One end of the thread will be short. The other end will be long. The long end is the one you will sew with. The short end is where you make the knot. You will make the knot at the very end of the long piece of thread.
Step 2: Lay The Thread On The Needle
Take the long end of the thread. Hold the needle in your other hand. Lay the very end of the thread on the needle. Put it right next to the eye. Do not lay it on the sharp point. Lay it on the part near the eye. It should be parallel to the needle. You are holding the thread and the needle side by side.
Step 3: Wrap The Thread
Now, wrap the end of the thread around the needle. Wrap it maybe two or three times. Wrap it towards the sharp point of the needle. Hold the wraps tightly on the needle with your finger. Keep them from unwinding. Wrapping the thread makes the knot bigger and stronger. Two wraps are good for thin thread. Three wraps might be better for thicker thread. Do not wrap too many times. Too many wraps make a messy knot.
Step 4: Slide The Thread Off The Needle
Keep holding the wraps on the needle with your finger. Now, gently pull the needle away from the thread wraps. Pull it out carefully. The wraps should stay on the thread, not the needle. Use your finger to guide the wraps. Slide them down the thread.
Step 5: Pull The Knot Tight
The wraps are now a loop sliding down the thread. Slide the loop all the way down to the very end of the thread. Keep pulling the thread. Pull it until the loop gets small. The loop will form a knot at the end. Pull it tight. Make sure it is a firm knot. This is your basic sewing knot. You did it!
Step-by-Step Using Bullet Points
Let’s list the steps simply. This is the Hand sewing knot technique. This is how to tie a knot with a needle.
- Thread your needle. Use the long end of the thread.
- Lay the thread end on the needle near the eye.
- Wrap the thread around the needle 2 or 3 times. Keep the wraps tight with your finger.
- Pull the needle out of the wraps.
- Slide the wraps down the thread to the end.
- Pull the thread tight to form the knot.
This method is fast. It makes a nice knot. It is the most common way of Tying a knot in thread for hand sewing.
Why This Knot Works Well
This basic method makes a secure knot. Wrapping the thread makes the knot bigger than just a simple loop. A bigger knot is less likely to pull through the fabric holes. It sits against the fabric. It holds the thread. This is important for Securing hand stitches right from the start. It helps in Preventing knot from coming undone easily.
Other Kinds of Sewing Thread Knots
While the basic needle knot is great, there are other Types of sewing thread knots. You might use them for different reasons.
The Finger Knot
This is another way to tie a knot. You do not use the needle. You use your finger instead.
- Hold the end of the thread on your finger.
- Wrap the thread around your finger once. Cross it over the part on your finger.
- Roll the thread loop off your finger.
- Put the end of the thread through the loop you just made.
- Pull the thread tight.
This makes a simple knot. It is also a basic sewing knot. Some people find it easier. It is another way of Tying a knot in thread. It is good for Starting sewing stitches if you prefer not using the needle.
The Tailor’s Knot (or Quilter’s Knot)
This knot is often used by tailors or quilters. It is a bit more complex but makes a very secure knot. It is often used for starting stitches when strength is needed. It is another Hand sewing knot technique.
- Hold the needle in one hand.
- Dangle the thread end down.
- Hold the thread end with the thumb and finger of your other hand.
- Wrap the thread around your thumb tip. Wrap it twice. The wraps cross over each other.
- Slide the wraps off your thumb carefully onto your index finger.
- Hold the needle in your sewing hand. Use the point to scoop under the wraps on your index finger.
- Pull the needle and thread through the wraps.
- Slide the knot down the thread end.
- Pull it tight.
This makes a strong knot. It is good for Securing hand stitches at the start. It helps greatly in Preventing knot from coming undone. It is one of the more robust Types of sewing thread knots for starting.
Knotting At The Fabric
Sometimes you do not want a knot showing on the front of your work. You can hide your knot. This is a way of Starting sewing stitches without a visible knot.
- Make a few tiny stitches in the same spot on the back of your fabric.
- Sew back and forth a few times. Make the stitches very small.
- Pull the thread tight. This makes a tiny build-up of thread. This build-up acts like a knot.
- You can also loop the thread under a stitch on the back. Pull the thread part-way through. This makes a loop. Put the needle through the loop. Pull tight. Do this a few times. This secures the thread on the back.
This technique is great for fine fabrics. It is useful when you do not want the knot bump. It is a different Hand sewing knot technique for starting.
Knotting To End Your Sewing
Ending sewing stitches also needs a knot. This knot is usually made right on the fabric. It locks the last few stitches in place. It is key for Preventing knot from coming undone.
Method 1: Knotting Near The Fabric
This is a common way to finish.
- Finish your last stitch. Bring the needle to the back of the fabric.
- Make a small stitch right next to where the thread came out. Do not pull it all the way. Leave a small loop of thread.
- Put your needle through that loop.
- Pull the thread. The loop will close up and form a knot right at the fabric surface.
- You can repeat steps 2-4 one or two more times. Make the knots in the same spot. This makes the knot stronger. It makes it bigger. A bigger knot is better for Preventing knot from coming undone.
This method makes a basic sewing knot right at the end of your stitching line. It is a strong way of Ending sewing stitches.
Method 2: Knotting Through a Stitch
This method uses a stitch you already made to help form the knot.
- Finish your last stitch. Bring the needle to the back.
- Slide your needle under the last stitch you made on the back of the fabric. Do not pull the thread all the way through. Leave a loop.
- Put your needle through the loop.
- Pull the thread tight. This makes a knot that wraps around the stitch.
- Repeat steps 2-4 one or two more times under the same stitch. This makes a very strong knot. It wraps the thread securely. This is excellent for Securing hand stitches at the end. It prevents the thread from pulling out. It is a reliable Hand sewing knot technique for finishing.
Both methods are good for Ending sewing stitches. Choose the one you find easiest. The goal is to make a knot that will not pull through. It must sit securely against the fabric. This helps in Preventing knot from coming undone.
Tips for Making Good Knots
Making a good knot is easy with a few tips. These tips help make your knots strong and neat.
Keep the Knot Small But Secure
You want your knot to be big enough not to pull through the fabric hole. But you do not want it too big. A very large knot can look messy. It can create a bump in your fabric. Aim for a small, tight knot. The basic needle knot makes a good size. Pull it firmly but gently to make it tight.
Make Sure It Sits At The End
When Tying a knot in thread for starting, make sure the knot slides all the way to the very end of the thread. If it forms a little way up the thread, you have wasted thread. It also means your knot might not be as strong. For Ending sewing stitches, make sure the knot forms right against the fabric. It needs to sit flat to hold the thread well.
Use the Right Thread
The thread you use matters. Thin thread might need more wraps in the basic needle knot (maybe 3 instead of 2). Thicker thread might only need 1 or 2 wraps. Test it out. The knot needs to be bigger than the weave of your fabric. If your fabric is loosely woven, you might need a bigger knot. This helps in Preventing knot from coming undone through the fabric holes.
Practice The Technique
Tying a knot with a needle gets easier with practice. Try it a few times on a scrap piece of thread. Do it without sewing first. Just practice making the knot. Once you feel good at making the knot, try Starting sewing stitches on some scrap fabric. Practice Ending sewing stitches too. Practice makes you fast and makes your knots neat.
Check Your Knot
Before you start sewing, look at your knot. Is it tight? Is it at the very end of the thread? Does it look secure? If it looks loose or messy, cut it off. Make a new one. A good start leads to good sewing. For the end knot, pull on the thread gently after making the knot. Does it feel secure? Will it help in Preventing knot from coming undone? If yes, trim the excess thread.
Troubleshooting Common Knot Problems
Sometimes knots do not work perfectly. Here are some problems you might have and how to fix them.
Problem: The Knot Pulled Through The Fabric
This happens if your knot is too small. Or your fabric has big holes (loose weave).
- Fix: Make the knot bigger. For the basic needle knot, wrap the thread 3 times instead of 2. If using a finger knot, wrap twice. If your fabric is very loose, you might need to use a stronger knot like the tailor’s knot. Or you might need to make a double knot (tie the same knot twice in the same spot). This helps in Securing hand stitches on tricky fabrics.
Problem: The Knot Is Messy Or Big
This can happen if you wrap too many times or pull the thread unevenly.
- Fix: Try wrapping fewer times (2 instead of 3). Make sure you hold the wraps tightly on the needle or finger before sliding them off. Pull the thread smoothly and evenly when tightening the knot. Practice the motion. A neat Basic sewing knot comes with smooth movements.
Problem: The Knot Comes Undone While Sewing
This usually happens if the knot was not pulled tight enough. Or if it was not made right at the end of the thread.
- Fix: Always pull your knot firmly to tighten it. Make sure it slides all the way to the very end of the thread before tightening. When Ending sewing stitches, make sure the knot is pulled tight against the fabric. Make an extra knot or two in the same spot for more strength. This is key for Preventing knot from coming undone.
Problem: The Thread Gets Tangled When Making The Knot
This can happen if you do not control the thread loops as you slide them.
- Fix: Hold the thread wraps carefully with your finger as you slide them off the needle. Guide them down the thread slowly. Do not let them bunch up. Keep the rest of the thread smooth, not twisted. Smooth action is part of a good Hand sewing knot technique.
Types of Sewing Thread Knots Overview
Let’s quickly look at the knots we talked about.
| Knot Name | Method Used | Best For | Strength |
|---|---|---|---|
| Basic Needle Knot | Uses needle to wrap | Starting basic sewing | Good |
| Finger Knot | Uses finger to wrap | Starting, easy for some | Good |
| Tailor’s Knot | Uses thumb/finger + needle | Starting, needs more strength | Very Good |
| Knotting at Fabric | Tiny stitches on back | Starting, no visible knot | Good (if repeated) |
| Ending Knot 1 | Loop and knot near fabric | Ending stitches | Good (repeat for strength) |
| Ending Knot 2 | Loop under stitch | Ending stitches | Very Good (wraps stitch) |
Most of the time, the Basic sewing knot made with the needle will be perfect for Starting sewing stitches. For Ending sewing stitches, the knot-near-fabric or knot-under-stitch methods work best for Securing hand stitches. Knowing these Types of sewing thread knots gives you options. But mastering the basic needle knot is a great start. It covers most needs for Tying a knot in thread quickly and easily.
Getting To Know Your Sewing Thread
The kind of thread you use affects your knot. Cotton thread is common. It grips itself well. This helps the knot stay tight. Polyester thread is stronger. It is also smoother. It might slip a little more. You might need to make polyester knots a bit tighter or make a double knot. Always check if your Needle and thread knot feels secure for the thread type you are using.
Thin threads need more wraps for a good-sized knot. Think about fine silk thread. You might need three wraps for a knot that will not pull through. Thick threads need fewer wraps. Think about embroidery floss. One wrap might be enough. This is all part of the Hand sewing knot technique. Adjust based on your materials.
Preventing Knot from Coming Undone: More Ideas
Making a tight knot is step one. But there are other tricks to make sure your knot stays put. This is important for long-lasting sewing.
- Double Knot: For the basic needle knot, you can slide the wraps down. Pull tight. Then, make the knot again in the same spot. This makes a bigger, stronger knot. It is like putting two knots on top of each other. This is very good for Preventing knot from coming undone on slippery fabrics or threads.
- Using Fabric Weave: When Ending sewing stitches, try to make your knot right next to a thread in the fabric weave on the back. The knot can sit snugly against that thread. This helps hold it in place.
- Thread Wax or Conditioner: You can buy special wax or conditioner for thread. You pull the thread through it. This makes the thread a little sticky. It helps knots grip themselves better. This makes them less likely to slip. This is a good idea if you find your knots often come loose. It can help with Securing hand stitches, especially on slippery threads.
Why Simple Is Often Best
For most hand sewing tasks, the basic needle knot is all you need for Starting sewing stitches. It is fast. It is easy. It makes a reliable basic sewing knot. Do not feel you need to learn many different knots right away. Master one knot first. This will build your confidence. Tying a knot in thread should not be hard. It should be quick so you can get to the sewing part!
Once you are comfortable with the basic knot, you can try others. Learning different Types of sewing thread knots is useful later. It gives you more tools for different projects. But the first step is mastering the simple one. This guide focuses on making that first step zero frustration. Learning Hand sewing knot technique starts with one simple method. Learning how to tie a knot with a needle is very helpful.
Making It Habit
Make tying your knot the first thing you do after threading your needle. Make it a habit. Check your knot before you make your first stitch. This prevents problems later. Getting into good habits makes sewing easier and more fun. A good knot at the start means you can focus on making nice stitches. It takes away the worry of the thread pulling through.
When you finish a section of sewing, make your ending knot carefully. Do not rush this step. This knot holds everything. Make sure it is tight against the fabric. Trim your thread close to the knot, but not so close you risk cutting the knot itself. Leaving a tiny tail (maybe 1/8 inch) is safer than cutting right next to the knot. This helps in Preventing knot from coming undone.
Recapping The Easy Knot
Let’s quickly remember the simple way to tie the basic sewing knot using the needle. This is the core skill for Tying a knot in thread.
- Thread needle, long tail hangs down.
- Lay end of tail on needle near eye.
- Wrap tail around needle 2-3 times, hold wraps.
- Slide needle out of wraps.
- Pull thread to slide wraps to end.
- Pull tight. Knot formed.
This is your go-to Needle and thread knot. Use it for Starting sewing stitches on most projects.
Moving On From Knots
Once you have mastered making knots, you are ready for the fun part: sewing! The knot is just the beginning. It is the foundation. A strong knot lets you make strong, neat stitches. Whether you are sewing a seam, mending a hole, or doing embroidery, knowing how to secure your thread is key. Securing hand stitches properly begins and ends with good knots.
Do not get frustrated if your first few knots are not perfect. Keep practicing. You will get better quickly. Soon, tying a knot will be automatic. You will do it without thinking. It will become a simple, fast part of your sewing process. This guide aims to make learning this basic step easy. Zero frustration means you can enjoy learning to sew.
Frequently Asked Questions
Here are some common questions people ask about sewing knots.
Q: How many times should I wrap the thread for the basic knot?
A: Usually 2 or 3 times is good. For thin thread or loose fabric, wrap 3 times. For thicker thread, 2 times is often enough. If your knot pulls through, try wrapping more times next time.
Q: My knot keeps coming loose. What am I doing wrong?
A: Make sure you are pulling the knot very tight. Also, ensure it slides all the way to the very end of the thread before tightening. For Ending sewing stitches, make sure the knot is right against the fabric. You might need to make a double knot for extra security, especially on slippery thread types like polyester or silk.
Q: Can I use the same knot for starting and ending?
A: The basic needle knot is mostly for starting. For ending, you usually tie the knot right on the fabric, using a loop from your last stitch or the fabric itself. These ending knots are tied differently than the starting needle knot. They are designed to lock the thread right at the fabric surface.
Q: My knots are too big and look messy. How can I fix this?
A: You might be wrapping the thread too many times around the needle or finger. Try wrapping fewer times. Make sure you slide the wraps down smoothly. Pull the thread evenly to tighten the knot. Practice making the knot without sewing first to get a feel for it.
Q: Is there a knot that is completely invisible?
A: A knot itself cannot be truly invisible if it’s holding thread. However, the “Knotting At The Fabric” method (making tiny stitches on the back) is a way to start without a visible knot on the front. For ending, hiding your knots neatly on the back of the fabric helps make them less noticeable.
Q: Why is my thread getting tangled when I try to tie the knot?
A: This often happens when the thread is twisted. Try to keep your thread smooth. When sliding the wraps off the needle or finger, guide them carefully. Don’t let the rest of the thread get tangled. Using shorter pieces of thread can also help prevent tangles while you work.
Learning How To Make A Sewing Knot is the first step on your sewing journey. With a little practice, you will be making perfect knots every time. Happy sewing!