
Yes, you can absolutely make embroidery designs on your computer! Modern technology allows you to transform your ideas into beautiful stitched artwork. This guide will walk you through the entire process, from choosing the right software to saving your finished design. Whether you’re a hobbyist looking to personalize gifts or a small business owner wanting to create custom merchandise, learning to create embroidery designs on your computer opens up a world of creative possibilities.
Creating embroidery patterns on a computer involves using specialized software. The primary goal is to convert your chosen artwork or a new design into a format that an embroidery machine can read and stitch. This process is often called “digitizing.”
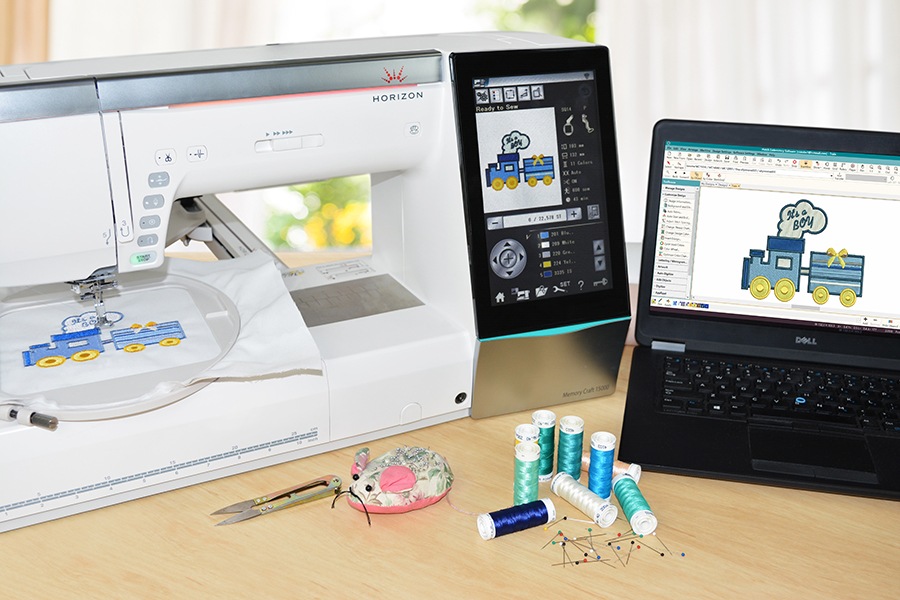
Image Source: blog.hatchembroidery.com
Getting Started: What You Need
Before diving into the creative process, let’s gather your essential tools.
1. A Computer
This is your digital canvas! Any modern computer (desktop or laptop) will suffice, running either Windows or macOS. Ensure it has enough processing power and storage to run the software smoothly.
2. Embroidery Digitizing Software
This is the heart of your digital embroidery creation. There are various computer embroidery programs available, each with its own strengths and price points. We’ll explore some popular options and what to look for.
- Professional Software: These are powerful and offer the most flexibility and control. They often have a steeper learning curve but provide industry-standard features. Examples include:
- Wilcom Embroidery Software
- Tajima DG/ML by Pulse
- Embroidery Studio by Wilcom
- Mid-Range Software: These offer a good balance of features and user-friendliness, making them suitable for serious hobbyists and small businesses. Examples include:
- Brother PE-Design
- Janome Digitizer
- Embrilliance Essentials
- Beginner/Consumer Software: These are typically more affordable and easier to learn, often focusing on simpler design creation and editing. They might be a good starting point if you’re new to the craft. Examples include:
- MySewNet™ Embroidery Software
- Singer Futura Software
- Free/Trial Software: Some companies offer free or trial versions of their software, which can be a great way to experiment before committing to a purchase.
Key Features to Look For in Embroidery Digitizing Software:
- Vector to Stitch Conversion: The ability to import vector graphics (like SVG or AI files) and automatically convert them into stitches.
- Manual Stitch Editing: Control over individual stitch types, directions, and densities.
- Object-Based Editing: Treating design elements as objects that can be easily manipulated, resized, and recolored.
- Lettering and Monogramming: Built-in fonts and tools for adding text to your designs.
- Embroidery File Format Support: The ability to save designs in various embroidery file formats recognized by most embroidery machines (e.g., .PES, .DST, .JEF, .EXP, .VP3).
- Import/Export Capabilities: The ability to import common image formats (like JPG, PNG) for tracing and export in multiple embroidery formats.
- 3D/Visualisation Tools: To see how your design will look before stitching.
3. Artwork or Idea
You need something to digitize! This could be:
- A drawing you’ve created.
- A photograph you want to convert to an embroidery pattern.
- A logo for a business.
- A design you’ve found online (ensure you have the rights to use it).
- A concept you want to bring to life from scratch.
4. Embroidery Machine (Optional for Design Creation)
While you don’t need an embroidery machine to create the designs, you’ll need one to stitch them. The software will generate the instructions for your machine.
The Process of Creating Embroidery Designs On Computer
Let’s break down the steps involved in turning your vision into an embroidery-ready file.
Step 1: Preparing Your Artwork
The quality of your final embroidery often starts with the quality of your initial artwork.
- For Designs from Scratch: If you’re drawing your design digitally, use a vector graphics program like Adobe Illustrator or Inkscape. This allows for clean lines and easy scaling.
- For Existing Images: If you’re using a photograph or a drawing you’ve scanned, you’ll need to clean it up and simplify it.
- Remove Backgrounds: Use image editing software (like Photoshop or GIMP) to isolate your subject.
- Simplify Colors: Reduce the number of colors in your image. Embroidery works best with distinct color areas.
- Trace Outlines: For complex images, you might need to manually trace the main shapes and outlines.
- Convert to Vector (Recommended): If possible, convert your cleaned-up image into a vector format (like SVG). This makes it much easier for embroidery digitizing software to interpret.
Step 2: Importing Your Artwork into Embroidery Digitizing Software
Once your artwork is ready, it’s time to bring it into your chosen machine embroidery design software.
- Most programs have an “Import” or “Open” function. Select your artwork file (JPG, PNG, SVG, AI, etc.).
- The software will often ask you to specify the desired size of the embroidery. It’s generally best to start with the largest size you anticipate needing, as scaling up raster images (like JPGs) can lead to pixelation. Vector files are more forgiving with scaling.
Step 3: The Art of Embroidery Digitizing
This is where the magic happens – converting your image into stitches. There are two main approaches:
a) Automatic Conversion (Autodigitizing)
Many computer embroidery programs offer an automatic conversion feature. You provide the software with your artwork, and it attempts to create stitches based on predefined rules.
- How it Works: The software analyzes the colors and shapes in your image and automatically applies stitch types (like satin stitch, fill stitch, or running stitch).
- Pros: Quick and easy, especially for simple logos or designs with clear shapes.
- Cons: Often requires significant manual editing afterward. The automatic stitches might not be optimized for fabric, density, or push/pull compensation (how the fabric stretches under stitches).
b) Manual Digitizing (Creating Embroidery Patterns from Scratch or Refining Autodigitizing)
This method involves using the software’s embroidery design tools to place and manipulate individual stitches or stitch objects. It offers the most control and results in the highest quality embroidery.
- Selecting Stitch Types: Different stitch types are used for different purposes:
- Fill Stitches: Used to fill areas with color. Common types include Tatami, Satin, and various fills.
- Tatami Fill: Long, parallel stitches that create a dense, flat fill. Good for large areas.
- Satin Stitch: Stitches placed side-by-side at an angle, creating a smooth, shiny surface. Ideal for lettering and thin columns.
- Motifs: Pre-designed stitch patterns that can be applied to fill areas.
- Run Stitches: Simple stitches that create outlines or details.
- Single Run: A basic straight stitch, good for thin lines and details.
- Triple Run: Three parallel run stitches, providing more thickness for outlines.
- Motifs/Specialty Stitches: Some software offers decorative stitches, cross-stitch effects, or appliqué functions.
- Fill Stitches: Used to fill areas with color. Common types include Tatami, Satin, and various fills.
- Stitch Direction and Angle: Crucial for how light reflects off the stitches and the overall appearance of the design. Experiment with angles to achieve the desired look.
- Stitch Density: This determines how close together the stitches are. Too dense, and the fabric might pucker; too sparse, and you’ll see the fabric through the design. Density is often controlled by stitch length.
- Underlay Stitches: These are stitches placed beneath the main fill stitches to help stabilize the fabric, prevent puckering, and create a smooth surface for the top stitches. Common underlay types include centerline, edge run, and satin.
- Push and Pull Compensation: Fabrics stretch. Digitizing software needs to account for this. Push compensation adds a slight overlap of stitches to prevent gaps when the fabric pulls away, while pull compensation adjusts stitch length to counteract the fabric’s tendency to pull stitches tighter.
- Start and End Points: Carefully consider where each color or section of the design begins and ends to minimize jump stitches and ensure clean transitions.
- Trims: The software can often be programmed to tell the embroidery machine to trim threads between color changes.
Example Workflow for Manual Digitizing a Simple Shape (e.g., a Leaf):
- Import Outline: Import a clean vector outline of the leaf.
- Add Centerline Run: Use a running stitch to create a centerline down the middle of the leaf. This acts as a guide for your fill stitches.
- Apply Fill Stitch: Select a fill stitch (e.g., Tatami) and draw it over the leaf area, following the natural curves of the leaf. Pay attention to stitch direction to mimic leaf veins.
- Add Satin Stitch Outline: Use a satin stitch to outline the edges of the leaf. Adjust the width of the satin stitch to create smooth, tapered edges.
- Add Details: Use running stitches for any additional details like leaf veins or textures.
- Review and Refine: Zoom in and check stitch quality. Adjust density, stitch direction, and angles as needed. Ensure all sections are well-covered and there are no gaps or overlapping issues.
Step 4: Adding Lettering and Monograms
Most embroidery digitizing software comes with built-in fonts designed for embroidery.
- Choose Your Font: Select a font that is suitable for embroidery. Some fonts are too thin or have intricate details that don’t stitch well.
- Type Your Text: Enter the desired text.
- Adjust Size and Spacing: Resize your text and adjust the spacing between letters (kerning) for optimal appearance.
- Convert to Stitches: The software will convert your text into stitch objects. You can then often edit the stitch type (e.g., satin for letters) and angles.
- Creating Personalized Embroidery Patterns: This is where you can truly make designs your own by adding custom text to logos, monograms to towels, or names to clothing.
Step 5: Color Management and Sequencing
- Color Stops: Organize your design into color changes. The software will create “color stops,” indicating when the machine needs to change thread color.
- Thread Colors: Assign actual thread colors from popular brands (like Madeira or Isacord) if your software supports it. This helps in visualizing the final product.
- Order of Stitches: The order in which different parts of the design are stitched is crucial. Generally, you want to:
- Stitch underlay stitches.
- Stitch smaller details or outlines before larger fill areas.
- Stitch from back to front if layering elements.
- Ensure that jump stitches between color changes are minimized or placed in less visible areas.
Step 6: Saving Your Design
Once your design is complete and optimized, you need to save it in an embroidery file format that your sewing machine can read.
- Common Embroidery File Formats:
- .DST (Tajima): A widely compatible format that contains stitch data but no color information.
- .PES (Brother/Babylock/Bernina): Popular format for Brother machines, often includes color information.
- .JEF (Janome): Common for Janome machines.
- .EXP (Melco/Suga): Used by Melco machines.
- .VP3 (Husqvarna Viking/Pfaff): Used by Viking and Pfaff machines.
- .XXX (Singer): Singer’s proprietary format.
- Saving Options: Your stitch design software will usually have a “Save As” or “Export” option. Choose the format appropriate for your embroidery machine. It’s also good practice to save your master design file (often a proprietary format of the software, like .EMF or .EMB) which allows you to re-edit the design later.
Essential Embroidery Design Tools Within Software
Good embroidery digitizing software will offer a suite of tools to help you create intricate and beautiful designs.
Object Editing Tools
- Resizing: Scale your design up or down. Be mindful that resizing raster images can degrade quality, but vector-based designs are more flexible.
- Rotating and Mirroring: Flip or rotate design elements for different effects.
- Grouping and Ungrouping: Combine multiple elements into a single object for easier manipulation, or separate them for individual editing.
- Align and Distribute: Perfectly align multiple objects or space them evenly.
Stitch Editing Tools
- Stitch Editor: A dedicated mode to manually move, add, or delete individual stitches. Essential for fine-tuning and correcting any imperfections.
- Density Adjustment: Tweak the spacing of stitches within fill areas.
- Pull Compensation Control: Fine-tune how the software compensates for fabric stretch.
Specialty Tools
- Appliqué Tools: Software often has specific tools to help create appliqué designs, which involve layering fabric pieces onto a base fabric and stitching them down.
- Cutwork Tools: For designs that involve cutting away fabric.
- Trapunto Tools: For creating raised, padded effects.
- Pattern Fills: Applying pre-designed stitch patterns (like cross-hatch or decorative motifs) to fill areas.
Tips for Successful Embroidery Digitizing
- Start Simple: Don’t try to digitize a complex photorealistic image as your first project. Begin with basic shapes, letters, or simple logos.
- Use High-Quality Source Images: The better your starting artwork, the easier the digitizing process will be.
- Master Your Software: Invest time in learning all the features of your chosen embroidery digitizing software. Watch tutorials, read the manual, and practice regularly.
- Test Your Designs: Before stitching a final project, always do a small test stitch-out on a piece of scrap fabric similar to what you’ll be using. This helps you catch any issues with density, underlay, or stitch direction.
- Consider Fabric Type: The fabric you intend to embroider on will influence your digitizing choices. Different fabrics (like stretchy t-shirts, stable denim, or delicate satin) require different stitch densities, underlays, and compensation settings.
- Embrace the Learning Curve: Digitizing is a skill that takes practice. Be patient with yourself, and don’t be discouraged if your first attempts aren’t perfect.
Understanding Embroidery File Formats
Choosing the right embroidery file format is crucial for successful stitching. Your embroidery machine’s manual will specify which formats it supports.
| File Format | Common Machine Brands | Key Characteristics | Color Information | Editable in Software |
|---|---|---|---|---|
| .DST | Tajima, Melco, others | Stitch data only; no color information. Widely compatible. | No | Yes |
| .PES | Brother, Babylock, Bernina | Often includes color data and machine-specific settings. | Yes | Yes |
| .JEF | Janome, Elna | Janome’s proprietary format; includes color data. | Yes | Yes |
| .EXP | Melco, Brother (older) | Melco’s format; includes color and stitch data. | Yes | Yes |
| .VP3 | Husqvarna Viking, Pfaff | Modern format with extensive stitch and color data. | Yes | Yes |
| .XXX | Singer | Singer’s proprietary format. | Yes | Yes |
Pro Tip: Always save your original, editable design file (e.g., in the software’s native format) before exporting to your machine’s specific embroidery file format. This allows you to go back and make changes without losing quality.
Frequently Asked Questions (FAQ)
Q: What is the best embroidery digitizing software?
A: The “best” software depends on your needs, budget, and experience level. Professional software like Wilcom or Tajima DG/ML offers the most features but is expensive and has a steep learning curve. Mid-range options like Embrilliance or PE-Design are excellent for serious hobbyists. For beginners, simpler or trial versions can be a good starting point.
Q: Can I convert any image into an embroidery design?
A: While you can attempt to convert most images, the quality of the embroidery will depend heavily on the complexity of the image and the skill of the digitizer. Simple, clear designs with distinct colors digitize best. Highly detailed photos or images with gradients are very challenging to digitize effectively.
Q: How long does it take to digitize a design?
A: The time it takes varies greatly. A simple logo might take 15-30 minutes for an experienced digitizer using automatic tools and manual refinement. A complex design, such as a detailed illustration or a large multi-color piece, could take several hours or even days to digitize properly.
Q: What is the difference between embroidery digitizing and graphic design?
A: Graphic design focuses on creating visual art for digital displays or print, using pixels or vectors. Embroidery digitizing is a specialized process that converts graphic designs into a series of stitch commands that an embroidery machine can interpret and execute on fabric. It involves thinking about stitch types, density, direction, and fabric behavior.
Q: Do I need to buy expensive software to create embroidery designs?
A: Not necessarily to start. Many software programs offer free trials, allowing you to test their capabilities. There are also more affordable mid-range and beginner-friendly options. For serious professional work, investment in high-end software is often worthwhile.
Q: How do I create personalized embroidery patterns for custom gifts?
A: You can use embroidery digitizing software to add names, initials, dates, or custom graphics to existing designs or create unique patterns from scratch. This allows you to create truly bespoke items like personalized baby clothes, custom tote bags, or embroidered portraits.
By following these steps and exploring the powerful capabilities of embroidery digitizing software, you can unlock your creativity and bring your unique embroidery visions to life on your computer. Happy stitching!