
Can I place the bobbin in my Singer sewing machine myself? Yes, you absolutely can! Learning how to place the bobbin correctly is a fundamental skill for anyone using a Singer sewing machine, and it’s a surprisingly straightforward process. This guide will walk you through the entire journey of Singer bobbin placement, from understanding the parts to troubleshooting common issues. We’ll cover everything from loading Singer bobbin onto the winder to its final home in the Singer bobbin compartment.
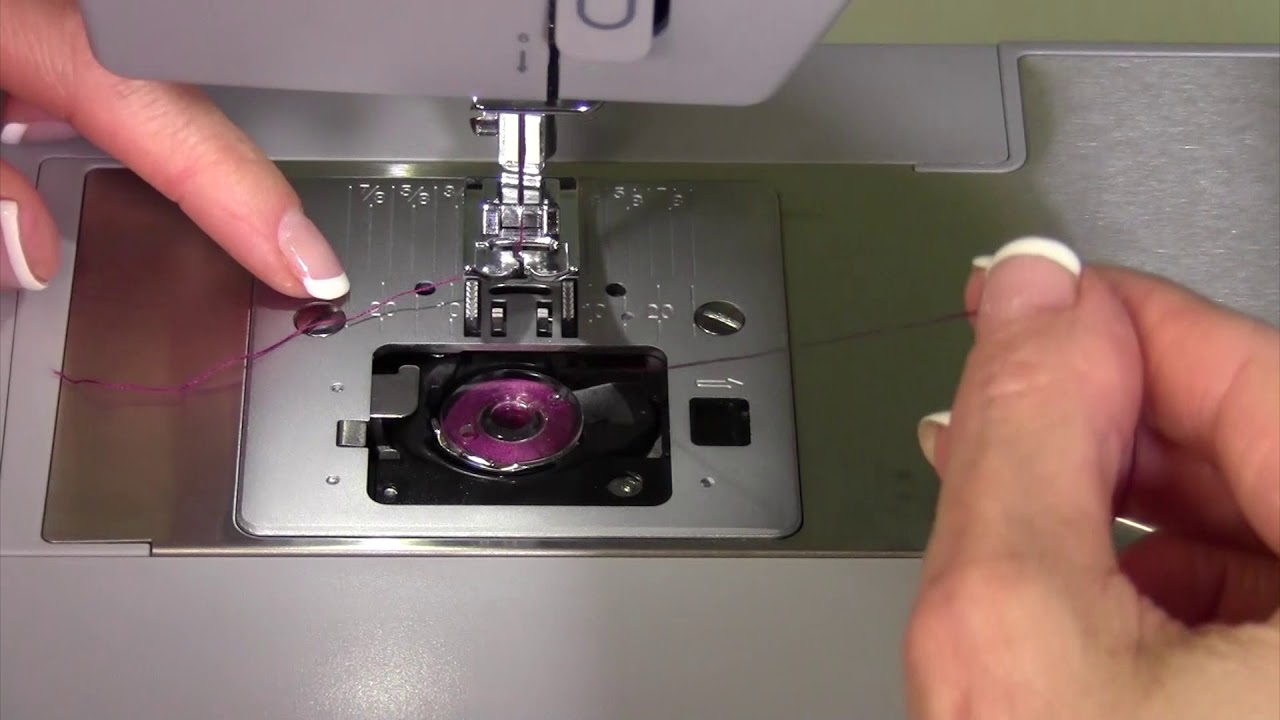
Image Source: i.ytimg.com
What is a Bobbin and Why is it Important?
Before we dive into the practical steps, let’s briefly touch on what a bobbin is and its crucial role in sewing. The bobbin is a small spool, usually made of metal or plastic, that holds the bottom thread. Together with the needle thread, it creates the stitches that hold your fabric together. Without a properly placed and threaded bobbin, your sewing machine simply won’t stitch. It’s the unsung hero of your sewing project, providing the tension and structure for every seam.
Preparing Your Singer Bobbin: Winding the Thread
Before you can place the bobbin, you usually need to fill it with thread. This process is called bobbin winding. Most Singer sewing machines have a built-in bobbin winder.
Steps for Singer Bobbin Winding:
- Get a Bobbin: Make sure you have the correct type of bobbin for your specific Singer model. They come in different sizes and shapes, and using the wrong one can cause problems. Check your machine’s manual if you’re unsure.
- Thread the Bobbin Winder:
- Place an empty bobbin onto the bobbin winder spindle.
- Find the thread guide for the bobbin winder. It’s usually a small metal loop or post.
- Bring the thread from your spool through the main thread guides on the machine, just as you would for sewing.
- Then, guide the thread through the bobbin winder thread guide.
- Insert the end of the thread into one of the holes on the bobbin.
- Secure the thread: Some machines have a small clip or slit on the bobbin to hold the thread end. Others require you to hold it manually at first.
- Engage the Bobbin Winder:
- Most Singer machines have a small lever or switch that you push to the right or left to engage the bobbin winder.
- Important: On many models, you’ll need to disengage the needle by pushing the handwheel towards you or flipping a small clutch. This prevents the needle from moving while the bobbin winds.
- Start Winding:
- Hold the thread tail firmly for the first few turns.
- Gently press the foot pedal.
- The bobbin will start to wind. As it fills up, the thread might start to wind unevenly, covering the bobbin. Many machines have an automatic cutoff or a guide that helps distribute the thread evenly.
- Stop Winding:
- Once the bobbin is full, the winding process usually stops automatically, or you might notice the thread winding loosely. Some machines have a sensor that stops the winding when the bobbin is full.
- If not, stop by releasing the foot pedal.
- Disengage the bobbin winder by moving the lever back to its original position.
- If you disengaged the needle clutch, remember to re-engage it by pushing the handwheel back towards the machine.
- Cut the Thread: Cut the thread from the spool. The bobbin is now wound and ready for Singer bobbin insertion.
Table: Bobbin Winding Essentials
| Step | Action | Key Consideration |
|---|---|---|
| Bobbin Selection | Choose the correct bobbin for your Singer model. | Wrong bobbin size = Stitch problems. |
| Thread Path | Guide thread through spool, main guides, and bobbin winder guide. | Ensure smooth thread flow. |
| Bobbin Securing | Insert thread tail into bobbin hole/slit; hold tail initially. | Prevents thread tangling at the start. |
| Winder Engagement | Push winder lever; disengage needle clutch if applicable. | Protects needle and ensures bobbin-only winding. |
| Winding Process | Use foot pedal, hold thread tail until winding starts evenly. | Even winding = Better stitch quality. |
| Stopping and Resetting | Release pedal, disengage winder, re-engage needle clutch, cut thread. | Prepares machine for sewing. |
Types of Singer Bobbin Systems
Singer sewing machines use different bobbin systems. Knowing which one you have is crucial for correct Singer bobbin placement. The two most common types are:
- Top Loading (Drop-in) Bobbin: This is the most modern and user-friendly system. The bobbin is placed in a clear plastic or metal case on top of the machine, usually visible through a cover plate. There’s no separate bobbin case to insert.
- Front Loading Bobbin: Older Singer models often feature a front-loading bobbin. Here, the bobbin is housed in a removable metal bobbin case, which is then inserted into a compartment at the front of the machine, below the needle plate.
Identifying Your Bobbin System
- Look at the needle plate area: If you see a clear plastic cover and a circular bobbin housing directly on top of the machine, you likely have a top-loading system. If there’s a removable metal case that goes into a compartment below the needle plate, it’s a front-loading system.
- Check your manual: The easiest and most reliable way is to consult your Singer sewing machine’s manual. It will clearly identify your bobbin system and provide specific instructions.
How to Place Bobbin in Singer Sewing Machine: Step-by-Step
Let’s break down the process for both types of bobbin systems.
For Top Loading (Drop-in) Singer Bobbins:
This is generally the simpler of the two.
Step 1: Remove the Needle Plate Cover and Bobbin Cover
- Lift the presser foot.
- Remove the throat plate or needle plate cover. This is usually a rectangular piece that sits over the bobbin area. It might lift off or have a small catch.
- You’ll see the bobbin case (a clear or metal housing). Remove this if it’s not already out.
Step 2: Prepare the Bobbin
- Ensure your bobbin is wound correctly and the thread is cut, leaving a tail of about 4-6 inches.
Step 3: Insert the Bobbin Correctly
- Orientation is Key: This is the most important part. Look at the bobbin. Notice the thread coming off the bobbin. For most Singer top-loading systems, the thread should be coming off the bobbin in a counter-clockwise direction.
- Place the Bobbin: Place the bobbin into the bobbin case (if it’s a separate piece that was removed) or directly into the bobbin housing.
- Guide the Thread: There’s usually a small slot or notch in the bobbin case or housing. Guide the thread tail into this slot. Then, pull the thread tail under the tension spring and through the little opening at the end of the slot. This ensures the thread goes through the machine’s tension mechanism.
Step 4: Replace the Bobbin Cover and Needle Plate
- Place the bobbin case back into its housing if you removed it. Ensure it sits snugly.
- Replace the needle plate or throat plate cover.
Step 5: Thread the Top Thread and Pull Up the Bobbin Thread
- Now, thread the machine’s top thread as you normally would.
- Bring the presser foot down.
- Hold the tail of the top thread with your left hand.
- Turn the machine’s handwheel towards you (this moves the needle down and then up). As the needle comes up, it will catch the bobbin thread and pull a loop of it up through the needle plate.
- Use your fingers or tweezers to grab this loop of bobbin thread and pull it up through the needle plate, so both the top thread and bobbin thread tails are in front of the presser foot.
Congratulations! You’ve completed the Singer bobbin setup for a top-loading system.
For Front Loading Singer Bobbins (with Bobbin Case):
This system involves inserting a bobbin case.
Step 1: Remove the Bobbin Case and Needle Plate
- Lower the presser foot.
- Slide off or remove the needle plate cover (often a flat metal plate).
- You will see the Singer sewing machine bobbin case inside a metal compartment.
- Gently pull the bobbin case out. It usually has a small metal “finger” or lever that you can hold to remove it.
Step 2: Prepare the Bobbin
- Ensure your bobbin is wound correctly.
- Cut the thread, leaving a tail of about 4-6 inches.
Step 3: Place the Bobbin into the Bobbin Case
- Orientation is Crucial: Look at the bobbin case. It has a small slit and a spring mechanism.
- Place the bobbin into the bobbin case. The thread should be coming off the bobbin in a clockwise direction for most front-loading Singer machines.
- Guide the thread tail through the slit in the bobbin case.
- Pull the thread tail under the small metal spring (the tension spring) and then through the small opening at the end of the slit. The thread should be snug but able to pull freely. This step is vital for proper tension.
Step 4: Insert the Bobbin Case into the Machine
- Alignment is Key: Look at the bobbin case. It usually has a small protrusion or “ear” on the top.
- Look inside the bobbin compartment in the machine. You’ll see a corresponding slot or notch.
- Align the protrusion on the bobbin case with the slot in the machine.
- Slide the bobbin case into the compartment until it clicks or sits firmly in place. Ensure it is seated correctly.
Step 5: Replace the Needle Plate
- Put the needle plate back on, making sure it’s properly aligned.
Step 6: Thread the Top Thread and Pull Up the Bobbin Thread
- Thread the machine’s top thread as usual.
- Lower the presser foot.
- Hold the tail of the top thread with your left hand.
- Turn the machine’s handwheel towards you. As the needle moves down and then back up, it will catch the bobbin thread.
- Grab the loop of bobbin thread that comes up and pull it out so both thread tails are in front of the presser foot.
You have now completed the Singer bobbin setup for a front-loading system!
Table: Bobbin Placement Comparison
| Feature | Top Loading (Drop-in) | Front Loading (with Bobbin Case) |
|---|---|---|
| Bobbin Location | On top of the machine, visible through a cover. | In a compartment at the front, below the needle plate. |
| Bobbin Case | Often integrated or a separate removable piece. | Always a separate metal case that holds the bobbin. |
| Bobbin Thread Direction | Usually counter-clockwise. | Usually clockwise. |
| Thread Guiding | Through a slot and under a tension spring in the housing. | Through a slit and under a tension spring in the bobbin case. |
| Insertion | Place bobbin into housing, guide thread. | Place bobbin into case, guide thread, insert case into machine. |
Singer Bobbin Troubleshooting Common Issues
Even with careful Singer bobbin placement, you might encounter problems. Here are some common issues and how to fix them:
| Problem | Possible Cause(s) | Solution |
|---|---|---|
| Skipped Stitches | Bobbin not seated correctly; Incorrect bobbin thread direction; Lint in bobbin area; Wrong bobbin type; Needle issues. | Re-insert bobbin, checking orientation. Clean lint from bobbin compartment. Ensure you’re using the correct bobbin type. Check if the needle is bent or dull and replace it. |
| Thread Bunching/Nesting on Bottom | Top thread tension too loose; Bobbin not threaded properly; Top thread not pulled up correctly before sewing. | Tighten top thread tension. Re-thread the bobbin, ensuring thread goes under the tension spring. Make sure you pull up the bobbin thread loop before starting to sew. |
| Bobbin Thread Breaking | Bobbin wound unevenly or too tightly; Bobbin snagging on something; Rough edge on bobbin or bobbin case; Top thread tension too tight. | Rewind the bobbin. Check the bobbin compartment for any obstructions. Inspect the bobbin and bobbin case for damage or burrs. Loosen the top thread tension. |
| Machine Not Picking Up Bobbin Thread | Bobbin not inserted correctly; Bobbin thread not guided through the tension spring; Top thread not caught by bobbin thread. | Double-check Singer bobbin insertion and ensure the thread is routed correctly under the tension spring. Make sure the top thread is properly threaded through all guides and the needle. Try turning the handwheel towards you to pick up the thread again. |
| Bobbin Spins Freely/Doesn’t Engage | Bobbin winder clutch not disengaged after winding; Bobbin not seated firmly. | Ensure the bobbin winder mechanism is disengaged. Make sure the bobbin is seated properly in its housing or case. |
Cleaning the Bobbin Area
Lint build-up is a primary culprit for many sewing machine problems, especially related to the Singer bottom thread. Regularly cleaning the bobbin area is essential.
- Top Loading: After removing the needle plate and bobbin case, use a small brush (often supplied with the machine) or a lint roller to remove any accumulated lint, dust, or stray threads from the bobbin housing and the area around it. A can of compressed air can also be helpful.
- Front Loading: Remove the bobbin case. Use your brush to clean out the bobbin compartment thoroughly. Pay attention to the area where the bobbin case sits.
Advanced Singer Bobbin Setup Tips
- Thread Tension: While the bobbin has its own tension, the interaction with the top thread tension is crucial. A balanced stitch should look the same on both the top and bottom. If you see loops on the top, the bobbin tension might be too loose or the top tension too tight. If you see loops on the bottom, the top thread tension might be too loose or the bobbin tension too tight. Adjustments are usually made to the top thread tension first.
- Bobbin Quality: Use good quality bobbins and thread. Cheap or damaged bobbins can cause consistent issues.
- Needle and Thread Match: Ensure your needle type and size are appropriate for your thread and fabric. A dull or bent needle can cause skipped stitches or thread breakage.
Frequently Asked Questions (FAQ)
Q1: What is the correct way to thread the bobbin on my Singer sewing machine?
A1: For top-loading Singer machines, the bobbin thread usually comes off counter-clockwise. For front-loading machines with a bobbin case, it typically comes off clockwise. Always check your machine’s manual for specific instructions.
Q2: Why is my sewing machine skipping stitches?
A2: Skipped stitches can be caused by several factors, including incorrect bobbin placement, lint in the bobbin area, a dull or bent needle, or improper threading of the top thread. Ensure your bobbin is seated correctly and clean the bobbin compartment.
Q3: My bobbin thread keeps breaking. What should I do?
A3: Check if the bobbin is wound too tightly or unevenly. Make sure the thread is properly guided through the bobbin case tension spring. Also, inspect the bobbin and bobbin case for any burrs or rough spots that might be snagging the thread.
Q4: How do I know if I have a top-loading or front-loading bobbin system?
A4: Top-loading systems have the bobbin housed on top, often visible through a clear cover. Front-loading systems have a removable metal bobbin case that fits into a compartment below the needle plate. Your machine’s manual will confirm this.
Q5: Can I use any type of bobbin in my Singer sewing machine?
A5: No, it’s essential to use the correct type and size of bobbin specified for your particular Singer model. Using the wrong bobbin can lead to poor stitch quality or even damage to the machine.
Learning how to thread bobbin Singer machines and properly execute Singer bobbin placement is a key step in becoming a confident sewer. By following these detailed steps and paying attention to the specifics of your machine, you’ll be well on your way to creating beautiful stitches and completing your sewing projects with ease. Remember that practice makes perfect, so don’t be discouraged if it takes a few tries to get it just right. Happy sewing!