
Do you need to know how to put a bobbin in a Brother sewing machine? Yes, putting the bobbin in the right way is a key step for your machine to sew correctly. It makes the lower thread setup work, letting you make stitches that look good. This guide will show you how to do it right, step by simple step, whether your machine has a drop-in bobbin or a front-loading one. Getting the sewing machine bobbin placement right helps you avoid problems and sew smoothly.
Putting the bobbin in your sewing machine might seem like a small thing. But doing it the wrong way can cause big problems. You might get tangled threads. Stitches might skip. The machine might even jam. This guide helps you put the bobbin in your Brother machine the correct way. We will cover the two main types of bobbin systems Brother uses. Knowing your machine’s type is the first step. We will also talk about how to get the bobbin ready and what to do if things go wrong. Learning how to put the bobbin in right makes sewing much easier and more fun.
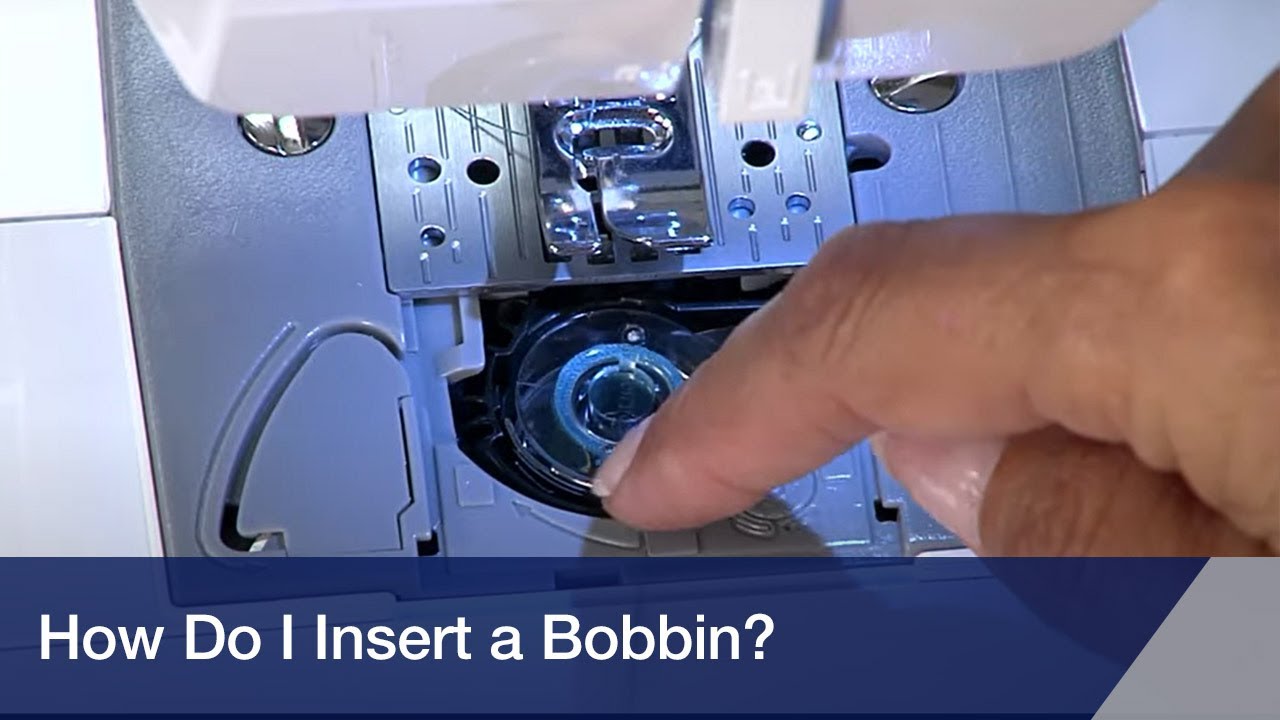
Image Source: i.ytimg.com
Knowing Your Bobbin System
Brother sewing machines usually have one of two types of bobbin systems. Knowing which one your machine has is important. The steps for loading a bobbin Brother machine are different for each type.
The two types are:
- Drop-in Bobbin System Brother: This is the most common type on newer machines. The bobbin goes into a flat area on top, under a clear plastic cover. The bobbin sits flat.
- Front-Loading Bobbin Brother: This type is often on older or more basic machines. The bobbin goes into a metal case. The case then goes into a slot on the front of the machine, often behind a small door or panel.
Look at your sewing machine manual. It will tell you which type you have. You can also just look at your machine. Can you see a clear plastic cover on the sewing bed where the bobbin goes flat? That’s a drop-in type. Do you open a little door on the front to find a metal case? That’s a front-loading type.
Getting Your Bobbin Ready
Before you put the bobbin in the machine, you need thread on it. This is called winding the bobbin. You cannot sew without thread on the bobbin. The bobbin holds the lower thread.
How to Wind a Bobbin Sewing Machine
Winding a bobbin is easy. Most sewing machines have a special spot for it.
Here are the basic steps for winding a bobbin:
- Find the Bobbin Winder: Look on the top or front of your machine. You will see a small metal pin or holder. There is also often a guide or disk to put the thread around.
- Place the Empty Bobbin: Put an empty bobbin onto the bobbin winder pin. Make sure it fits snugly. Some bobbins have a small hole or slot. You might put the thread end through this hole.
- Set Up the Thread: Get your spool of thread. Put the thread spool on the spool pin of your machine.
- Guide the Thread: Follow the winding path shown on your machine. There are usually numbers or pictures. You will likely wrap the thread around a tension disk or guide. This helps the thread wind evenly.
- Attach to the Bobbin: Take the end of the thread from the guide. Put it onto the empty bobbin. You can hold the thread end for a moment until it starts to catch on the bobbin. If your bobbin has a hole, put the thread end through it from the inside out.
- Push the Winder: Push the bobbin winder pin over to the side. This locks it in place for winding. It also stops the sewing needle from moving while you wind.
- Start Winding: Press the foot pedal or the start button slowly. The bobbin will spin and wind the thread. Watch it. It should fill up evenly.
- Fill the Bobbin: Let the bobbin wind until it is full. Do not overfill it. Most winders have a stopper. It will click or stop winding when the bobbin is full enough.
- Cut the Thread: Stop the machine. Move the bobbin winder pin back to its first spot. Cut the thread connecting the bobbin to the spool.
- Remove the Bobbin: Take the full bobbin off the pin. It is now ready to use.
Always use the right size bobbin for your machine. Brother machines use specific bobbins. Using the wrong size can cause problems.
Loading the Bobbin: Drop-in System
The drop-in bobbin system Brother is popular because it is easy to use. The bobbin drops right into the bobbin compartment Brother, which is under a clear lid on the sewing bed.
Here are the steps for loading a bobbin Brother machine with a drop-in system:
- Turn Off the Machine: This is a safety step. Make sure the power switch is off.
- Lift the Needle: Turn the handwheel to raise the needle to its highest point. This also raises the take-up lever. This step is very important.
- Open the Bobbin Cover: Slide or lift off the clear plastic cover plate over the bobbin area on the sewing bed. This area is the bobbin compartment Brother.
- Hold the Bobbin: Take your full bobbin. Hold it in your hand.
- Check the Thread Direction: This is the most important step for a drop-in bobbin. Look at the thread coming off the bobbin. For most Brother drop-in systems, the thread should come off the left side of the bobbin. When you drop it in, the thread should look like it’s making a lower-case ‘p’ or that the thread is coming off counter-clockwise. Check your manual! Some older or specific models might be different, but left/counter-clockwise is very common for Brother drop-in.
- Drop the Bobbin In: Place the bobbin into the bobbin compartment Brother. It should sit flat. Make sure it is seated correctly in the little well.
- Guide the Thread: Look for a slot or channel marked near the bobbin area. This is part of the Brother sewing machine lower thread setup. Take the thread coming off the bobbin. Pull it gently through this slot. The thread usually goes under a small metal guide or tension spring.
- Follow the Path: Continue pulling the thread along the marked path. It usually goes around a corner or two. There might be arrows showing you where to pull the thread. Pull it until it reaches the end of the marked path. The thread should be held in place by the channel. Leave a tail of thread about 4-6 inches long hanging out.
- Replace the Cover: Put the clear plastic cover plate back into place. Make sure it snaps or slides securely.
You have now placed the bobbin correctly in a drop-in system. The sewing machine bobbin placement is done. The next step is to bring the bobbin thread up through the needle plate.
Loading the Bobbin: Front-Loading System
The front-loading bobbin Brother system uses a separate bobbin case. You put the bobbin into this case first, then put the case into the machine.
Here are the steps for loading a bobbin Brother machine with a front-loading system:
- Turn Off the Machine: Always turn off the power first.
- Lift the Needle: Turn the handwheel to bring the needle to its highest point. This is very important.
- Open the Bobbin Door: Find the small door or cover on the front of your machine, usually near the needle area. Open or remove it. This gives you access to where the bobbin case goes.
- Get the Bobbin Case: If the bobbin case is in the machine, take it out. There is usually a small latch or handle on it. Use this to pull it out.
- Hold the Bobbin Case: Hold the empty bobbin case in one hand. Look for a slot or opening on the side of the case where the thread comes out. There is also a tension spring near this slot.
- Hold the Bobbin: Take your full bobbin. Hold it in your other hand.
- Check the Thread Direction: This is key for threading the bobbin case Brother. For most Brother front-loading systems, the thread should come off the right side of the bobbin. When you put it in the case, the thread should look like a lower-case ‘q’ or that the thread is coming off clockwise. Again, check your manual to be sure, but right/clockwise is common for front-load.
- Put Bobbin in Case: Put the bobbin into the bobbin case. It should fit snugly inside.
- Guide Thread into Case Slot: Take the thread coming off the bobbin. Pull it through the slot on the edge of the bobbin case.
- Pull Under Tension Spring: Continue pulling the thread gently. You need to pull it under the tension spring on the bobbin case. The thread should click into place under the spring. This spring gives the bobbin thread tension, which is needed for good stitches. Leave a tail of thread about 4-6 inches long hanging out of the case.
- Hold the Case Latch: Hold the bobbin case by its little hinged latch or handle. This keeps the bobbin from falling out while you put the case in the machine.
- Insert the Bobbin Case: Find the round opening inside the machine where the bobbin case goes. It’s usually a metal hook mechanism. Push the bobbin case into this opening. It should fit right in. You might feel or hear a click when it is seated correctly. Make sure it is not crooked or forced.
- Release the Latch: Once the case is in place, let go of the latch. It should sit flat against the case.
- Close the Bobbin Door: Close the door or put the cover panel back on the front of the machine.
You have now placed the bobbin correctly in a front-loading system by threading the bobbin case Brother and inserting it. The sewing machine bobbin placement is done. The next step is to bring the bobbin thread up through the needle plate.
Bringing Up the Lower Thread
After putting the bobbin in, you need to bring the bobbin thread up. This mixes the bobbin thread with the upper thread so they can make a stitch. This is a key part of the Brother sewing machine lower thread setup.
Here’s how to do it (works for both drop-in and front-loading):
- Make Sure Upper Thread is Ready: Your machine must be threaded with the upper thread. The upper thread should go through the needle. Leave a tail of upper thread about 4-6 inches long.
- Hold the Upper Thread: Hold the end of the upper thread gently in your hand. Hold it slightly to the side.
- Lower the Needle: Turn the handwheel slowly towards you. Watch the needle go down into the needle plate hole. It goes all the way down.
- Raise the Needle: Keep turning the handwheel towards you. Let the needle come back up out of the needle plate hole.
- Look for a Loop: As the needle comes up, it should catch the bobbin thread. It will pull a small loop of bobbin thread up through the hole in the needle plate.
- Pull the Loop: Use your finger, a pin, or small scissors to gently pull this loop of bobbin thread upwards.
- Pull Out the Thread: Pull the loop until the end of the bobbin thread comes out fully through the needle plate hole.
- Arrange Threads: Now you have both the upper thread and the bobbin thread coming up through the needle plate. Pull both threads towards the back of the machine, under the presser foot. Leave tails about 4-6 inches long.
Your machine is now threaded and ready to sew! Both the upper and lower threads are in place and pulled towards the back. This completes the Brother sewing machine lower thread setup.
Composing the Significance of Correct Placement
Putting the bobbin in the right way is more than just following steps. It makes sure your machine works as it should. Correct sewing machine bobbin placement impacts the quality of your stitches and how smoothly your machine runs.
Here’s why it matters:
- Thread Tension: The way the bobbin thread comes out of the bobbin (or bobbin case) sets its tension. If the thread direction is wrong, the tension spring or guide does not work right. This leads to stitches that are too loose or too tight. You might see loops on the top or bottom of your fabric.
- Smooth Feeding: The thread needs to come off the bobbin smoothly. If the bobbin is not seated correctly in the bobbin compartment Brother or case, it can snag or stop turning. This causes the upper thread to break or tangle, leading to nests of thread.
- Hook Mechanism: The lower part of the machine has a hook that spins around the bobbin (or case). This hook catches the upper thread loop and pulls it around the bobbin thread to make a stitch. If the bobbin is not in correctly, the hook can’t catch the thread right. This causes skipped stitches or the machine to jam.
- Avoiding Bobbin Thread Issues Brother: Many problems with sewing are because of the bobbin thread. These bobbin thread issues Brother include tangling underneath the fabric (called bird nesting), broken bobbin thread, or uneven stitches. Most of these can be fixed by putting the bobbin in correctly and making sure it’s wound right.
- Machine Health: Forcing a bobbin that is not in correctly, or sewing with major tangles, can put stress on your machine’s parts. This can lead to bigger problems or need repairs.
So, taking the time to load a bobbin Brother machine the right way saves you time and frustration later. It helps your machine last longer and work better.
Deciphering Common Bobbin Problems
Even when you try your best, you might run into bobbin thread issues Brother. Here are some common problems and what might cause them related to the bobbin:
- Thread Tangling Underneath (Bird Nesting): This is the most common bobbin issue.
- Likely Cause 1: The upper thread is not threaded right. Check the entire upper threading path, from the spool to the needle. Make sure the presser foot was up when you threaded the top. The upper tension must be right.
- Likely Cause 2: The bobbin is not in the correct direction (clockwise vs. counter-clockwise). Re-insert the bobbin, making sure the thread comes off the side shown in your manual (usually left for drop-in, right for front-load).
- Likely Cause 3: The bobbin thread is not correctly pulled through the tension spring or guide in the bobbin compartment Brother or bobbin case. Take the bobbin out and put it back in, carefully guiding the thread through the path.
- Likely Cause 4: The bob bobbin might be wound unevenly or too loosely. Rewind the bobbin.
- Bobbin Thread Breaks Often:
- Likely Cause 1: The bobbin thread tension is too high (pulled too tight by the case spring). Check the bobbin case (front-load) or guide (drop-in). Make sure the thread is under the tension spring but not stuck. On front-load cases, the tension screw might need a tiny adjustment (turn screw counter-clockwise a tiny bit).
- Likely Cause 2: The bobbin thread is old or poor quality. Use good quality thread.
- Likely Cause 3: The bobbin is damaged (cracked, bent). Use a new bobbin.
- Likely Cause 4: Machine needs cleaning. Lint in the bobbin area or hook area can cause thread breaks.
- Skipped Stitches:
- Likely Cause 1: The bobbin is not seated correctly in the bobbin compartment Brother or bobbin case. It might be loose or not fully clicked in.
- Likely Cause 2: The upper threading is wrong. Check the full Brother sewing machine threading guide for the top thread path.
- Likely Cause 3: The needle is bent, dull, or the wrong type for the fabric. Change the needle.
- Machine Jams:
- Likely Cause: Severe thread tangles (bird nesting) or something is stuck in the bobbin area or hook. Turn off the machine immediately. Cut away all tangled thread. Carefully remove the bobbin and needle plate to clear the jam. Check the bobbin placement again.
When you have bobbin thread issues Brother, the first steps are often to check the upper threading and the bobbin placement and winding. Make sure the sewing machine bobbin placement is perfect according to your machine type.
Grasping the Full Threading Process
Putting the bobbin in is only half of the job. You also need to thread the top of the machine correctly. Both upper and lower threads must be done right for the machine to sew. The Brother sewing machine threading guide in your manual shows the full path for the upper thread.
Here is a simple look at the full process:
- Wind the Bobbin: Put thread on the bobbin using the winder.
- Load the Bobbin: Place the full bobbin in the bobbin compartment Brother or in the bobbin case (depending on your machine type), making sure the thread comes off in the right direction.
- Thread the Upper Machine: Follow the numbered path on your machine.
- Put the thread spool on the spool pin.
- Guide the thread through the thread guides.
- Pull the thread down into the tension disks (with the presser foot up).
- Bring the thread up and through the take-up lever (make sure the lever is at its highest point).
- Guide the thread back down through more guides.
- Thread the needle from front to back (or side to side, check your manual).
- Pull about 4-6 inches of thread through the needle eye.
- Bring Up the Bobbin Thread: Hold the upper thread, turn the handwheel to lower and raise the needle, and pull the loop of bobbin thread up through the needle plate.
- Position Threads: Pull both threads under the presser foot and towards the back of the machine.
Once both threads are ready like this, you can place your fabric under the presser foot and start sewing. Always start sewing slowly for the first few stitches to make sure everything is working.
Looking After the Bobbin Area
Keeping the bobbin compartment Brother clean is important for smooth sewing. Lint and small pieces of thread can build up in the bobbin area and around the hook mechanism. This can cause bobbin thread issues Brother, tension problems, or even machine damage.
- Clean Regularly: Use a small brush (often comes with the machine) to gently brush away lint from the bobbin area. Do this after every few sewing projects or when you change the bobbin.
- Check the Manual: Your Brother manual will show you how to open the bobbin area fully for cleaning, especially the hook area.
- No Canned Air: Avoid blowing compressed air into the machine. This can push lint further inside.
- Oil (if needed): Some older or front-loading machines need a tiny drop of oil in the hook race area. Your manual will tell you if and where to oil. Most newer drop-in machines do not need oiling by the user in the bobbin area.
A clean bobbin area helps ensure correct sewing machine bobbin placement and function.
Table: Bobbin System Quick Guide
| Feature | Drop-in Bobbin System Brother | Front-Loading Bobbin Brother |
|---|---|---|
| Bobbin Position | Sits flat in a compartment on the sewing bed. | Goes into a metal case, which is then inserted. |
| Access | Clear plastic cover plate on top. | Door or panel on the front of the machine. |
| Bobbin Case? | No separate bobbin case. | Uses a separate metal bobbin case. |
| Thread Direction | Thread usually comes off the LEFT (counter-clockwise). | Thread usually comes off the RIGHT (clockwise). |
| Tension | Thread passes through a tension guide/spring in the machine bed. | Thread pulls under a tension spring on the bobbin case. |
| Visibility | Easy to see how much thread is left through the clear cover. | Harder to see thread level without removing the case. |
| Common on: | Newer computerized and mechanical machines. | Older or basic mechanical machines. |
Always check your machine manual for exact details, especially thread direction.
Table: Common Bobbin Thread Issues and Fixes
| Problem | Possible Bobbin-Related Cause | How to Fix |
|---|---|---|
| Thread tangling underneath (Bird Nest) | Bobbin in wrong direction. | Re-insert bobbin with correct thread direction (check manual). |
| Bobbin thread not through tension guide/spring. | Remove bobbin, re-thread carefully through the correct path/spring. | |
| Unevenly wound bobbin. | Rewind the bobbin evenly. | |
| Bobbin thread breaks | Bobbin thread tension too high (front-load). | Check thread is correctly under bobbin case spring. Maybe slightly loosen tension screw (tiny turns!). |
| Bobbin damaged. | Use a new, correct bobbin. | |
| Lint in bobbin area. | Clean the bobbin compartment Brother thoroughly. | |
| Skipped Stitches | Bobbin not seated correctly. | Remove and re-insert bobbin/case, ensure it clicks or sits correctly. |
| Machine Jams | Severe thread tangle in bobbin compartment. | Turn off machine. Remove needle plate/bobbin. Cut and clear all tangled thread. Clean area. Re-load correctly. |
Note: Many sewing problems can also be caused by incorrect upper threading, wrong needle, or fabric issues. Always check these too!
Conclusion: The Value of Getting it Right
Learning how to put a bobbin in a Brother sewing machine correctly is a core skill for anyone who sews. Whether you have a drop-in bobbin system Brother or a front-loading bobbin Brother machine, following the steps precisely ensures the Brother sewing machine lower thread setup works.
You learned how to wind a bobbin sewing machine properly. You know the different steps for sewing machine bobbin placement based on your machine type. You also saw how to bring the bobbin thread up.
Putting the bobbin in right prevents many bobbin thread issues Brother. It helps you avoid frustrating problems like tangles, skipped stitches, and broken threads. It also helps your machine run smoothly and last longer.
Think of it as setting the stage for good sewing. A well-placed bobbin with correctly set tension is just as important as threading the top thread perfectly.
So, the next time you need to change your bobbin, take a moment. Check your manual for the right thread direction. Follow the steps carefully for your machine type. Make sure the thread is in the guides or under the tension spring. Bring the lower thread up before you start sewing. Doing these simple things makes a big difference in your sewing results. Happy sewing!
Frequently Asked Questions (FAQ)
Q: What is the difference between a drop-in bobbin and a front-loading bobbin?
A: A drop-in bobbin sits flat in a clear plastic compartment on the top bed of the machine. A front-loading bobbin goes into a metal case first, and then the case slides into a slot on the front of the machine.
Q: How do I know which way the bobbin thread should come off?
A: This is very important and depends on your machine type. For most Brother drop-in systems, the thread comes off counter-clockwise (to the left). For most Brother front-loading systems, the thread comes off clockwise (to the right). Always check your machine manual to be 100% sure for your specific model. There might be a small picture near the bobbin area showing the correct direction.
Q: My thread keeps tangling underneath the fabric. What causes this?
A: This is usually called “bird nesting”. The most common cause related to the bobbin is putting the bobbin in the wrong direction or not guiding the thread correctly through the bobbin tension path. It can also be caused by incorrect upper threading (especially not threading with the presser foot up) or incorrect upper tension. Check your bobbin placement and re-thread the upper part carefully.
Q: Do I need a bobbin case for my Brother machine?
A: You only need a separate bobbin case if your machine has a front-loading bobbin system. Machines with a drop-in bobbin system do not use a separate bobbin case; the bobbin drops directly into a built-in compartment.
Q: How do I wind a bobbin?
A: Most Brother machines have a bobbin winder pin and guides on the top or front. Put an empty bobbin on the pin, guide the thread from the spool following the machine’s path, attach thread to bobbin, push the winder over, and press the foot pedal until full. Cut the thread and remove the bobbin.
Q: How much thread should I leave hanging after loading the bobbin?
A: It is good practice to leave a tail of bobbin thread (and upper thread) about 4-6 inches long pulled under the presser foot and towards the back before you start sewing.
Q: Why won’t the bobbin thread come up when I turn the handwheel?
A: Make sure the needle is threaded. Make sure the upper thread is being held gently when you turn the handwheel. Make sure the needle is going down into the needle plate hole. Also, check that the bobbin is correctly placed and the thread is pulled through its guide or tension spring. Ensure the needle is at its highest point before starting the process.
Q: Can I use any bobbin in my Brother sewing machine?
A: No. Sewing machines use specific bobbin sizes and types. Using the wrong bobbin can cause problems. Always use bobbins made for or recommended by Brother for your specific machine model. They are usually marked with a letter or number (like Class 15 or specific Brother codes).
Q: How often should I clean the bobbin area?
A: Clean the bobbin compartment Brother regularly to prevent lint buildup. It’s a good idea to give it a quick brush out every time you change the bobbin or after finishing a project. Check your manual for how to access the area for cleaning.
Q: What if my bobbin case (front-load) feels too tight or loose?
A: The tension spring on the bobbin case controls how much pull is on the bobbin thread. There is a small screw on the case. Adjusting this screw slightly changes the tension. Turning it clockwise increases tension (tighter pull), counter-clockwise decreases tension (looser pull). Make only tiny adjustments (e.g., 1/4 turn) at a time and test. If the case is damaged or the spring is bent, it might need replacing.
Q: Does the upper threading affect the bobbin thread issues Brother?
A: Yes, absolutely. Many problems that look like bobbin issues (like tangling underneath) are actually caused by the upper thread not being threaded correctly, having too much or too little tension from the upper tension disks, or not being in the take-up lever. Always check both upper and lower threading paths.