
Sewing a fleece blanket with a sewing machine is a great way to make something soft and warm. Many people ask if it is hard to sew fleece. The answer is no, it is not hard. Fleece is one of the best fabrics for people learning to sew. It is also good for quick projects. Making a fleece blanket is an easy sewing project fleece. This guide will show you just how simple it is to make a fleece blanket using your sewing machine.
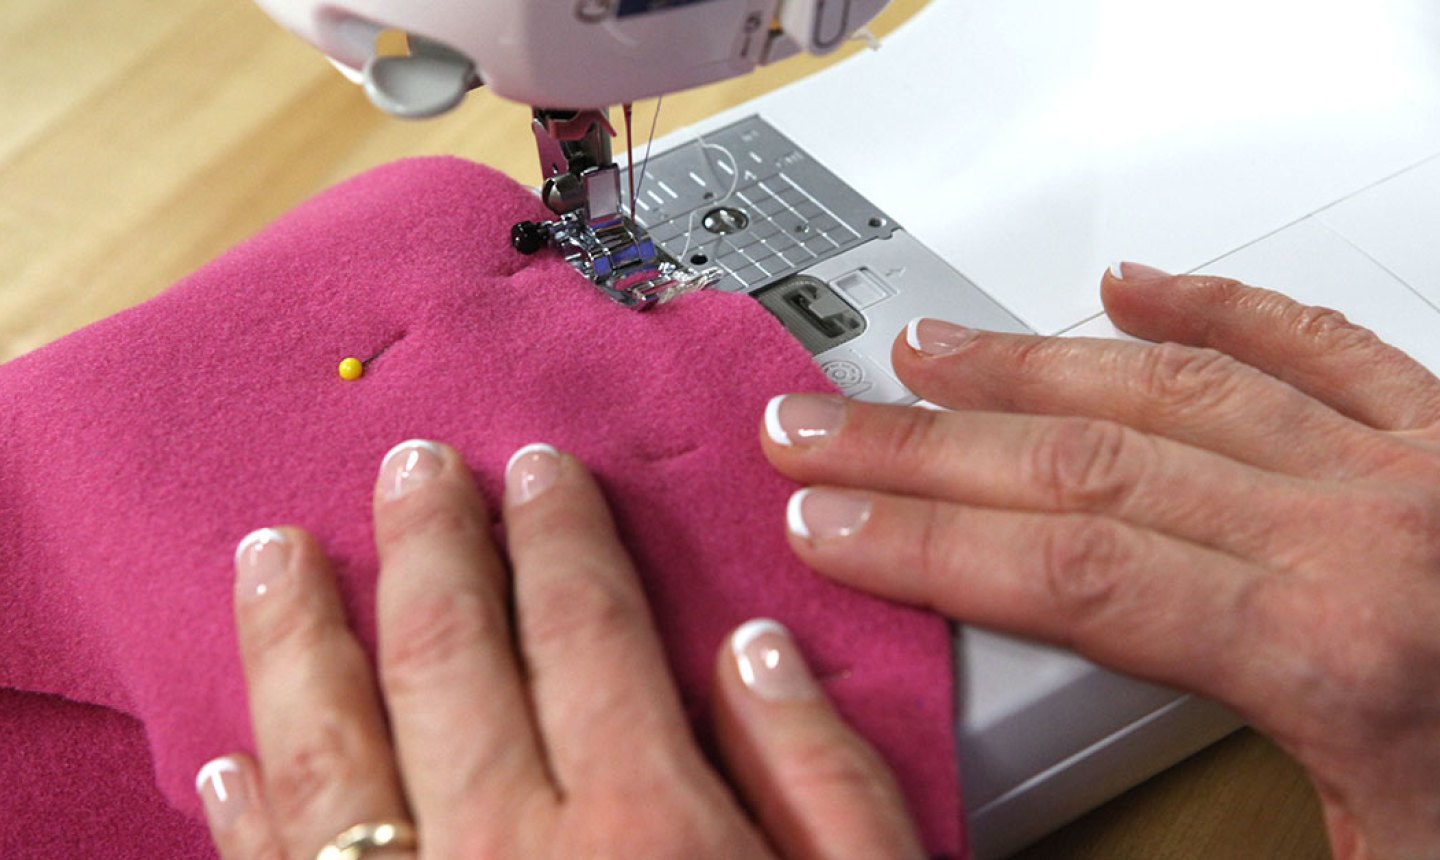
Image Source: d2culxnxbccemt.cloudfront.net
Gathering What You Need
First, you need to get your things ready. Having everything nearby makes sewing easier. You will need some basic sewing items. You will also need the star of the show: fleece fabric for blankets.
Picking Your Fabric
Fleece fabric is soft. It feels nice. It keeps you warm. It comes in many colors and designs. Look for fleece that feels good to you.
- Kinds of Fleece: There are different kinds of fleece.
- Polyester fleece is common. It is soft. It is strong.
- Anti-pill fleece is a good choice. This kind of fleece does not get little balls of fuzz on it over time. Using anti-pill fleece sewing makes your blanket look new longer.
- Blizzard fleece is thick. It is very warm.
- Minky fleece is extra soft. It has a low pile. It can be a little tricky to sew because it is very slippery.
- How Much Fabric: You need enough fabric for the size of blanket you want.
- For a baby blanket, about 1 to 1.5 yards is good.
- For a child’s blanket, about 1.5 to 2 yards works well.
- For a small throw blanket for a couch, 2 yards is often enough.
- For a larger blanket, you might need more. Think about how big you want it. Measure the person or place it will cover.
- If you are making a double layer fleece blanket sewing project, you will need two pieces of fabric. Each piece should be the size you want the finished blanket to be. For a double layer, buy double the amount of fabric you would for a single layer.
Selecting Your Thread
You need thread to sew your fleece. The right thread makes sewing easier. It also makes your blanket last longer.
- Best Thread: For sewing fleece, use a good quality polyester thread. Polyester thread is strong. It has a little stretch. This stretch is good because fleece stretches a little too. Cotton thread can break more easily on fleece because fleece moves more than cotton. So, polyester thread is the best thread for sewing fleece.
- Matching Color: Pick a thread color that matches your fabric. Or pick a color that stands out for a fun look. If you use two layers of fabric for a double layer fleece blanket sewing project, pick a thread color that works with both fabrics, or choose a neutral like white or grey.
Other Needed Items
Besides fabric and thread, you will need some tools.
- Sewing Machine: Of course, you need a sewing machine. Any basic sewing machine will work for sewing fleece. You do not need a fancy one.
- Needles: You need sewing machine needles. A Universal needle is often okay for fleece. A size 80/12 or 90/14 is usually good. If your fleece is very thick or has stretch, a Stretch needle or Ballpoint needle might be better. These needles have a rounded tip. They go between the fabric fibers instead of poking through them. This helps with sewing stretchy fabric tips.
- Scissors: Sharp scissors are important. Fabric scissors are best. Do not use these scissors to cut paper! Paper makes them dull. You will also need small scissors to trim threads.
- Pins or Clips: Pins hold your fabric together while you sew. Fabric clips are also very helpful. Clips hold thick fabric layers better than pins sometimes. Clips do not leave small holes like pins can.
- Measuring Tape or Ruler: You need to measure your fabric.
- Chalk or Fabric Marker: You can use this to mark lines on your fabric if you need to.
- Iron and Ironing Board: An iron is not always needed for fleece. Fleece can melt or flatten if it gets too hot. If you do use an iron, use a low heat setting. Test it on a small scrap first. Use a pressing cloth. Sometimes just finger pressing the seams is enough.
- Rotary Cutter and Mat (Optional): A rotary cutter makes cutting straight lines fast and easy. A mat protects your table. This is great if you cut a lot.
Arranging Your Fabric
Getting your fabric ready is the next step. This part is simple for fleece.
Checking Your Fabric
When you buy fabric, it might have folds. Lay it out flat. Check for any flaws.
Cutting Your Fabric
Cut your fabric to the size you want. Remember the size needed for your blanket. If you are making a single layer blanket, you just need one piece. For a double layer fleece blanket sewing project, cut two pieces the same size.
- Getting Straight Cuts: Fleece can be tricky to cut straight because it is stretchy. Fold your fabric neatly. Line up the edges. Use sharp scissors. Or use a rotary cutter and a ruler for a straight edge. Take your time. A straight edge makes the sewing easier later.
- Checking for Squareness: Make sure the corners are square. This helps when you sew the edges. You want nice, neat fleece corners.
To Wash or Not To Wash?
Some people pre-wash fabric before sewing. This is because some fabrics shrink. Fleece usually does not shrink much.
- Most people do not pre-wash fleece fabric for blankets. It is soft already. It does not shrink much.
- If your fleece feels stiff or has a smell, you might want to wash it. Use cool water. Tumble dry on low or no heat. Heat can hurt fleece fibers.
- If you are using different types of fabric together (like cotton with fleece), washing is a good idea. It lets all the fabrics shrink the same amount before you sew. But for a simple fleece blanket, washing first is usually not needed.
Setting Up Your Sewing Machine
Now you need to get your sewing machine ready to sew fleece. Fleece needs a little care when sewing.
Selecting Your Needle
As mentioned, a Universal needle (size 80/12 or 90/14) often works. If the fleece is very soft or stretchy, try a Stretch needle or Ballpoint needle. These needles help prevent skipped stitches. They are key sewing stretchy fabric tips.
Choosing Your Stitch
Most sewing on fleece uses a straight stitch. You will sew around the edges.
- Stitch Length: This is important for fleece. Fleece is thick. If your stitches are too short, they can make holes in the fabric. The feed dogs (the little teeth under the needle that move the fabric) can chew up the fleece. A longer stitch is much better. Set your stitch length to about 3.0 mm to 3.5 mm. This length works well for fleece. It gives strong seams without damaging the fabric. This is part of the important sewing machine settings fleece.
Adjusting Thread Tension
Thread tension needs to be right so your stitches look good on both sides of the fabric.
- Start with your machine’s normal tension setting. For most machines, this is around 4 or 5.
- Sew a test seam on a scrap piece of your fleece fabric.
- Look at the stitches on the top and bottom.
- If the top thread looks flat and the bottom thread has loops, your top tension is too tight. Lower the top tension number.
- If the bottom thread looks flat and the top thread has loops, your top tension is too loose. Raise the top tension number.
- Keep sewing tests and adjusting until the stitches look the same on the top and bottom. They should look like two threads locking neatly in the middle of the fabric layers. Getting the tension right is part of the sewing machine settings fleece.
Using the Right Presser Foot
Your machine likely came with different presser feet. The standard presser foot that came on your machine will probably work fine.
- Sometimes, fleece can stick to the bottom of the presser foot. This makes it hard for the fabric to move smoothly.
- If your fabric is sticking, you can try a Walking Foot. A walking foot helps move the top layer of fabric at the same speed as the bottom layer. This stops the fabric from stretching or shifting as you sew. It is very helpful for sewing stretchy fabric tips or thick layers like those in a double layer fleece blanket sewing project.
- If you do not have a walking foot, just go slowly. Gently help the fabric through the machine. Do not push or pull hard.
Sewing a Single Layer Fleece Blanket
A single layer fleece blanket is very fast and simple. The main task is to finish the edges. You do not have to finish fleece edges because fleece does not fray (the edges do not unravel like cotton). But finishing the edges makes the blanket look nice and finished.
Options for Finishing Edges
There are several ways to finish the edges of a fleece blanket. This is how to finish fleece blanket edges.
- Leaving Edges Raw: This is the easiest way. Just cut the fabric nicely. Fleece does not fray, so the edge will stay as it is. This is fine for a very simple blanket.
- Sewing a Simple Hem: This is a common way to finish edges with a sewing machine. You fold the edge over and sew it down.
- Adding Binding: You can sew a strip of fabric (like cotton or satin) around the edge. This gives a nice contrast.
- Serging the Edge: If you have a serger machine, you can use it to quickly finish the edge with a nice stitch.
We will focus on sewing a simple hem with your sewing machine as part of this fleece blanket sewing tutorial.
Steps for a Simple Hem
- Trim Edges: Make sure your edges are cut straight and your corners are square. This helps make neat fleece corners.
- First Fold: Fold the edge of the fabric over by about 1/2 inch (1.2 cm). Pin it or clip it in place all around the blanket. Take your time. This first fold starts the hem.
- Second Fold: Fold the edge over again, this time by about 1 inch (2.5 cm). This hides the raw edge inside the fold. Pin or clip this fold in place. Do this all around the blanket. The double fold makes a clean edge.
- Sewing the Hem: Go to your sewing machine. Use a straight stitch. Remember your longer stitch length (3.0 – 3.5 mm). Sew close to the inner folded edge. This stitch holds the hem down.
- Start sewing on one side. Sew slowly. Keep the fabric straight. Guide it with your hands. Do not pull.
- When you reach a corner, sew close to the edge. Stop with your needle down in the fabric at the corner point. Lift the presser foot. Turn the fabric. Lower the presser foot. Then keep sewing down the next side. Doing this carefully helps make neat fleece corners.
- Sew all the way around the blanket. Overlap your stitches by about an inch (2.5 cm) when you get back to where you started. Backstitch a few stitches at the start and end to lock the seam. This stops the stitches from coming undone.
- Finishing Touches: Trim any loose threads. Check your stitches. You now have a simple, finished fleece blanket!
Sewing a Double Layer Fleece Blanket
Making a double layer fleece blanket sewing project gives you a thicker, warmer blanket. It is also a great way to use two different fun fleece prints.
Preparing the Layers
- Cut Two Pieces: Cut two pieces of fleece fabric the same size. Make sure they are square. Check for nice edges for good fleece corners.
- Place Right Sides Together: Put the two pieces of fabric on top of each other. The sides you want to show on the outside of the blanket (the “right sides”) should be facing inward, touching each other. The duller, less pretty sides (“wrong sides”) should be facing out.
- Pin or Clip: Pin or clip the two layers together all around the edges. Put pins or clips about every 6-8 inches (15-20 cm). This stops the layers from shifting. Fleece is stretchy. Holding the layers together well is one of the key sewing stretchy fabric tips.
Sewing the Layers Together
- Mark the Opening: You need to leave a gap when you sew. This gap is for turning the blanket right side out later. On one side of the blanket, mark a space about 8-10 inches (20-25 cm) long. Use pins or fabric chalk to mark the start and end of this opening. You will not sew in this space.
- Set Up Machine: Use your sewing machine. Use a straight stitch. Set the stitch length to 3.0 – 3.5 mm. Use your polyester thread.
- Sew Around the Edge: Start sewing at one of the marks for your opening. Sew about 1/2 inch (1.2 cm) away from the raw edge of the fabric. This is your seam allowance.
- Sew down the side.
- When you get near a corner, sew slowly. Stop sewing when you are 1/2 inch (1.2 cm) away from both edges at the corner. Leave the needle down in the fabric.
- Lift the presser foot. Turn the fabric so you are ready to sew down the next side.
- Lower the presser foot. Continue sewing. This makes a nice square corner. Do this for all four fleece corners.
- Sew all the way around the blanket until you reach the other mark for your opening.
- Remember to backstitch a few stitches at the start and end of your seam (at both marks for the opening). This makes the seam strong.
- Make sure you do not sew across the opening you marked! Leave that section open.
Finishing the Double Layer Blanket
- Clip Corners: The corners will be bulky. To make them turn out neatly, cut the fabric off the very tip of the four corners. Be careful not to cut your stitches! Just cut the extra fabric outside the seam line at an angle.
- Turn Right Side Out: Reach into the opening you left. Grab the corner farthest from the opening. Pull the fabric through the hole. Keep pulling until the whole blanket is turned right side out. The right sides of the fabric are now on the outside.
- Poke Out Corners: Use a tool like a chopstick or a point turner (or just your fingers!) to gently push out the corners. Make them nice and sharp. Be gentle so you do not push through the fabric or stitches. This helps shape the fleece corners.
- Close the Opening: Now you need to close the hole you used for turning. You can do this in two ways:
- Machine Stitch: This is the fastest way. Fold the raw edges of the opening inward, so they are even with the sewn seam. Pin or clip the opening closed. Go back to your sewing machine. Sew very close to the edge of the blanket, about 1/8 inch (0.3 cm) from the fold. Sew all the way around the blanket’s edge. This gives the blanket a nice finished look all around and closes the hole. Use your longer stitch length again. This edge stitch helps the layers stay together.
- Hand Stitch (Ladder Stitch): This way hides the stitches better. Fold the raw edges of the opening inward. Use a needle and thread that matches your fabric. Use a ladder stitch or blind stitch to sew the opening closed by hand. This method makes the closing seam almost invisible.
- Final Press (Optional): You can press the edges lightly with a warm iron (test first!) and a pressing cloth. Or just finger press the edges to make them crisp.
- Admire Your Work: You have finished your double layer fleece blanket! This is a great example of a fleece blanket sewing tutorial step-by-step process.
Getting Your Machine Settings Right for Fleece
Making sure your sewing machine is set correctly is key for good results with fleece. We talked about some settings already, but let’s look closer at sewing machine settings fleece.
Needle Choice Matters
Using the right needle prevents problems.
- Universal Needle (80/12 or 90/14): Good for many kinds of fleece.
- Stretch or Ballpoint Needle (90/14 is common): Better for very soft, fuzzy, or stretchy fleece. Helps avoid skipped stitches and tiny holes.
- Why the Right Needle: Fleece is knit fabric. Knit fabrics have loops of thread. A sharp needle can break these loops. A ballpoint needle pushes between the loops. This is a key tip for sewing stretchy fabric tips.
Stitch Length Control
We talked about this, but it is so important for fleece.
- Short Stitches (under 2.5 mm): Can make the fleece look like it has tiny holes along the seam. Can cause fabric to bunch up. Can make stitches disappear into the pile of the fleece.
- Longer Stitches (3.0 – 3.5 mm): Lets the feed dogs move the thick fabric better. Stitches are visible but do not damage the fabric. Seams are strong. This is the best stitch length for most fleece sewing.
Adjusting Pressure Foot Pressure
Some sewing machines let you change how hard the presser foot pushes down on the fabric.
- If your machine has this setting, lower the pressure slightly for fleece.
- Too much pressure can flatten the fleece pile. It can also make it harder for the fabric to move, leading to stretching or wavy seams.
- Less pressure helps the fabric feed more smoothly, which is helpful when sewing stretchy fabric tips. Test on a scrap piece to see if adjusting pressure helps your fabric feed better.
Thread Tension Check
Always test tension on scraps!
- Good tension means the stitch looks the same on both sides.
- Bad tension can cause loops on one side, loose seams, or seams that pull tight and break.
- For polyester thread on fleece, you usually use your normal tension setting, but testing is always wise.
Dealing with Bulk
Fleece can be thick, especially in a double layer fleece blanket sewing project or at the corners.
- Go slowly when sewing over thick spots.
- Your machine might have a button or lever to help the presser foot go over thick seams. Use it if you do.
- Using clips instead of pins can help manage bulk.
By checking these sewing machine settings fleece, you make your sewing experience much better.
Tackling Fleece Corners
Sewing nice, neat fleece corners is important for a good-looking blanket. Whether you are hemming a single layer or sewing layers together, corners need care.
Sewing Corners on a Hemmed Blanket
- When sewing the second fold of the hem, aim for a mitered corner look.
- To do this, when you fold the side edges, let the fabric meet at the corner at an angle (like a 45-degree angle). Then fold the corner point down neatly before making your second fold. This makes the corner lay flatter.
- Or, you can just fold the edges as described before. When you get to the corner with your sewing, stop with the needle down, turn, and sew the next side. This is simpler and still works well with fleece. Just make sure the fabric is folded neatly at the corner point before you turn.
Sewing Corners on a Double Layer Blanket
- As described earlier, when sewing the two layers together, sew right up to where your seam allowance meets the edge, leave the needle down, lift the foot, turn the fabric, drop the foot, and sew. This makes a sharp corner line of stitches.
- Clipping the Corners: Cutting off the extra fabric right at the point of the corner before turning helps a lot. Cut close to the stitches but not through them. This removes bulk so the corner turns out more pointed.
- Pushing Out Corners: After turning the blanket right side out, gently push the corner points out. Use a dull tool so you do not poke a hole. This shapes the fleece corners nicely.
Good corners make your fleece blanket look finished and well-made.
Sewing Stretchy Fabric Tips for Fleece
Fleece is a knit fabric. It has stretch. Sewing stretchy fabric tips helps you sew fleece without it getting wavy or stretched out.
- Do Not Pull: The most important tip is never pull the fabric as you sew. Let the sewing machine feed the fabric at its own pace. Gently guide it with your hands in front and behind the needle area. Pulling will stretch the fleece as you sew, making wavy seams.
- Use the Right Needle: A Stretch or Ballpoint needle is designed for knits. It goes between the fabric fibers instead of piercing them, which helps keep the fabric from stretching out of shape or getting damaged.
- Adjust Stitch Length: A longer stitch length (3.0 – 3.5 mm) is less likely to stretch the fabric than short stitches. Short stitches put more holes in the fabric per inch, which can make it stretch.
- Consider a Walking Foot: If your machine has trouble feeding the fleece evenly, a walking foot is a great help. It moves both layers of fabric at the same time, preventing stretching and shifting. This is especially useful for sewing thick or very stretchy fleece.
- Use Pins or Clips Wisely: Place pins or clips often enough to keep the fabric layers together. For long seams, put them closer together. Clips are often better for thicker fleece because they hold the layers firmly without distortion.
- Test on Scraps: Always sew a test seam on a scrap piece of your fleece before sewing your actual blanket. See how the fabric feeds. Check the stitch tension and length. Make any adjustments needed. This is the best way to check your sewing machine settings fleece for your specific fabric.
Using these sewing stretchy fabric tips will help you sew fleece with smooth, even seams.
How to Finish Fleece Blanket Edges: More Ideas
We talked about the simple hem. But there are other ways how to finish fleece blanket edges.
- Binding: You can use cotton fabric strips, satin binding, or even pre-made bias tape.
- Cut strips of binding fabric. Sew the strips together to make one long strip.
- Fold the strip in half lengthwise and press (be careful with heat).
- Sew the raw edges of the binding strip to the raw edge of the fleece blanket, right sides together. Sew all the way around.
- Fold the binding over to the other side of the blanket edge.
- Stitch the folded edge of the binding down. You can sew this by machine (stitch in the ditch from the front, or sew close to the edge on the back) or by hand. Binding gives a very finished, clean look.
- Serged Edge: If you have a serger, this is very fast.
- Thread your serger.
- Simply run the raw edge of the fleece through the serger. The serger trims the edge and wraps it with thread very quickly.
- Adjust serger settings for stitch width and length that look good on your fleece scrap.
- This creates a durable, professional-looking edge.
- Decorative Stitches: Some sewing machines have decorative stitches.
- You can fold the edge over once (not twice) and sew it down with a fun stitch like a zig-zag or a scallop stitch.
- Test the stitch on a scrap first to make sure it looks good on the fleece and does not make it curl or stretch too much. Use a slightly longer stitch length even for decorative stitches on fleece if possible.
Choosing how to finish the edges is part of the fun of this fleece blanket sewing tutorial. Pick the method you like best!
Anti-Pill Fleece Sewing: Keeping It Nice
Using anti-pill fleece is a great idea for blankets. It helps the blanket stay looking nice and soft. But even with anti-pill fleece sewing, there are things to remember.
- Quality Matters: Not all anti-pill fleece is the same quality. Better quality fleece tends to pill less.
- Cutting: Use sharp scissors or a rotary cutter for clean cuts. This makes the edges look better even if you leave them raw.
- Sewing: Use the right needle, stitch length, and tension as discussed in the sewing machine settings fleece section. Proper sewing helps the fabric hold up better. Do not stress the fabric too much.
- Washing: Wash fleece in cool water. Use a gentle cycle. Do not use fabric softener sheets in the dryer; they can leave a coating that makes fleece pill more. Use liquid fabric softener in the wash if desired, or skip it. Dry on low heat or air dry. High heat can damage the fibers and might cause pilling.
- Anti-pill fleece sewing does not mean it will never pill, but it will pill much, much less than regular fleece. Following care instructions helps keep any fleece nice.
Making sure your anti-pill fleece sewing techniques are good from the start means your easy sewing projects fleece will last longer and look great.
Grasping Sewing Machine Basics for Fleece
Before you start this fleece blanket sewing tutorial, it helps to know your machine basics.
- Threading: Know how to thread your machine correctly. Bad threading is the most common cause of stitch problems.
- Winding a Bobbin: You will need thread on your bobbin. Wind it evenly.
- Lowering the Presser Foot: Always lower the presser foot before you start sewing. If you do not, your stitches will be a messy loop.
- Backstitching: Learn to backstitch at the start and end of seams. Sew forward a few stitches, then backstitch a few stitches, then sew forward again. This locks the seam so it does not come undone.
- Guiding Fabric: Learn how to guide the fabric with your hands without pushing or pulling it. Let the machine feed it.
- Knowing Your Machine Parts: Know where the stitch length dial is, the tension dial, the reverse lever or button, and how to change the needle and presser foot.
If you are new to using a sewing machine, practice on scrap fabric first. Sew some straight lines. Try sewing corners. Get a feel for the machine before you start your fleece blanket. Sewing machine settings fleece is easier when you know your machine.
Frequently Asked Questions
Here are some common questions people ask about sewing fleece blankets.
Q: Can I make a no-sew fleece blanket?
A: Yes, you can. No-sew fleece blankets are made by cutting fringe around the edges and tying the fringe pieces together. This is a very easy project. But this guide is about sewing a fleece blanket with a sewing machine. Sewing gives different edge finishes and lets you make double layer blankets easily.
Q: My fleece is stretching as I sew. What can I do?
A: This is a common problem with sewing stretchy fabric tips. Do not pull the fabric. Use a longer stitch length (3.0-3.5 mm). Try a Stretch or Ballpoint needle. Consider using a walking foot. Make sure your tension is not too tight.
Q: The stitches are skipping on my fleece. Why?
A: Skipped stitches often mean the needle is not right for the fabric or the needle is old or bent. Try a new Universal needle or switch to a Stretch or Ballpoint needle. Make sure the needle is put into the machine correctly. Check that the machine is threaded right.
Q: My machine is having trouble feeding the thick fleece layers.
A: Fleece can be thick. Make sure your stitch length is long enough. Lower the presser foot pressure if your machine allows it. Go slowly. Use a walking foot if possible. It helps the machine pull the fabric layers through.
Q: How do I make the corners neat on my double layer blanket?
A: Sew carefully into the corner, stopping with the needle down before turning. Clip the extra fabric from the corner point before you turn the blanket right side out. After turning, use a dull tool to push the corner point out fully. This helps make clean fleece corners.
Q: Do I need a serger to sew a fleece blanket?
A: No, you do not. A serger can finish the edges fast, but you can sew a beautiful and strong fleece blanket using just a regular sewing machine and a straight stitch. This fleece blanket sewing tutorial uses only a standard sewing machine.
Q: Can I mix fleece with other fabrics?
A: Yes, you can. You could back a cotton panel with fleece for a blanket, for example. Just remember that different fabrics might need different needles, stitches, or care. If mixing fabrics, it is a good idea to pre-wash them first to deal with any shrinkage.
Sewing a fleece blanket is a rewarding project. It is simple enough for beginners but fun for anyone. With the right fabric, thread, and machine settings, you can quickly make a soft, warm blanket. This fleece blanket sewing tutorial covers the main steps for both single and double layer blankets. Enjoy your sewing!