
Can you put a bobbin into a Singer sewing machine without a manual? Yes, you can! This guide will walk you through the process of correctly inserting a bobbin into your Singer sewing machine, ensuring your sewing projects go smoothly. We’ll cover everything from identifying the right bobbin to the final thread check.
Getting your Singer sewing machine ready to stitch involves a few key steps, and one of the most fundamental is ensuring the bobbin is correctly installed. The bobbin, a small spool that holds the lower thread, is crucial for creating stitches. Without it, your machine simply won’t sew. This detailed guide will help you master the Singer sewing machine bobbin installation, making sure you’re ready to tackle any project. We’ll cover the Singer sewing machine bobbin loading process from start to finish.
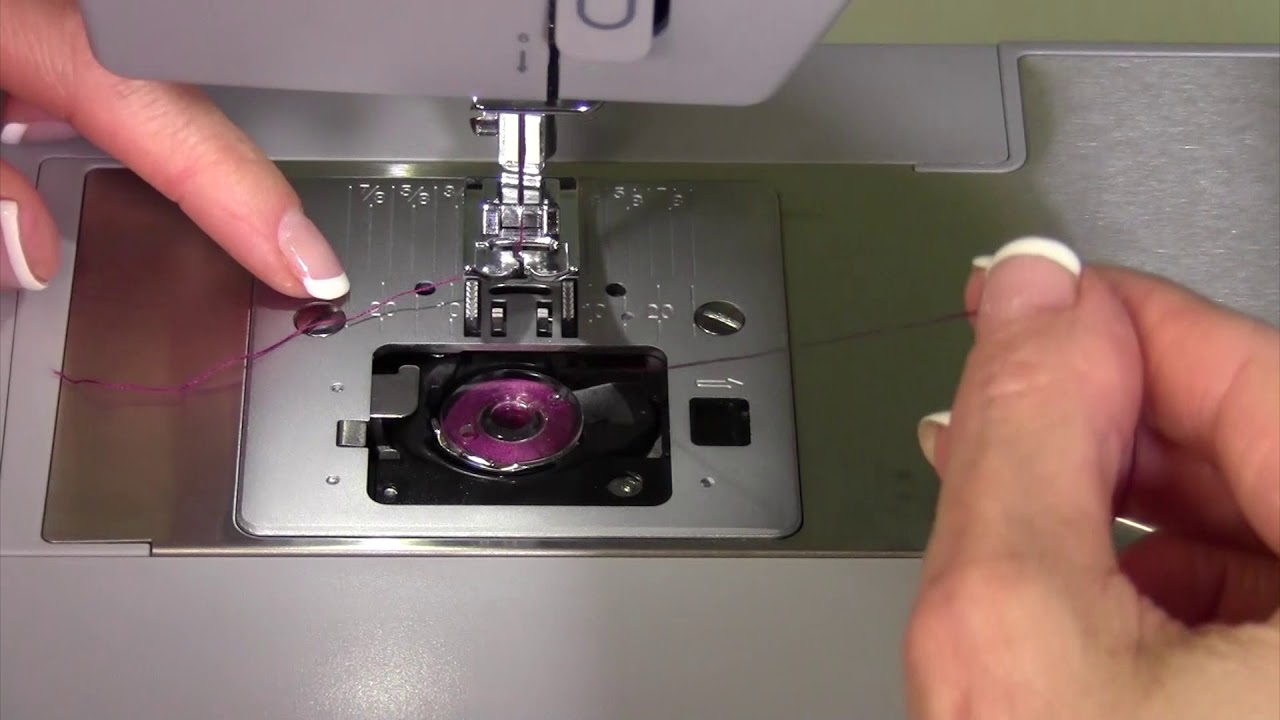
Image Source: i.ytimg.com
Preparing Your Singer Sewing Machine For Bobbin Insertion
Before you even think about putting a bobbin in, it’s essential to prepare your machine. This involves a few simple checks to make sure everything is in order for a smooth sewing experience.
Clearing the Area Around the Bobbin Area
First, open up the area where the bobbin goes. This is usually under the needle plate. You might need to lift a flap or remove a small cover. Make sure there are no loose threads, scraps of fabric, or dust bunnies lurking around. A clean bobbin area prevents snags and ensures the Singer sewing machine lower thread can move freely.
Checking for Existing Thread or Bobbins
It’s vital to ensure there isn’t already a bobbin in place, or any stray threads caught in the mechanism. If you find an old bobbin, remove it carefully. If there are threads tangled, gently pull them out. Trying to insert a new bobbin over existing ones can cause jams and damage your machine.
Identifying the Correct Bobbin for Your Singer Sewing Machine
Not all bobbins are created equal. Using the wrong type of bobbin can lead to stitching problems, skipped stitches, or even damage to your machine. Singer has produced many models over the years, and while many use similar bobbins, there are differences.
Types of Singer Sewing Machine Bobbins
Singer sewing machines typically use one of a few common bobbin types. The most common are:
- Class 15 Bobbins: These are often made of plastic and are a very common type found in many modern Singer machines. They are usually clear or colored plastic.
- Class 66 Bobbins: Similar to Class 15, these are also very common, often found in older Singer machines. They can be plastic or metal.
- Drop-in Bobbins: Many newer Singer machines feature a “drop-in” bobbin system, where the bobbin is placed directly into a bobbin case within the machine, rather than into a removable bobbin case that then slots into the machine.
How to Determine Your Machine’s Bobbin Type
The best way to know which bobbin your Singer sewing machine uses is to consult your machine’s manual. If you don’t have the manual, you can often find it online by searching for your specific Singer model number.
Alternatively, you can take an existing bobbin from your machine (if you have one that works) to a sewing machine repair shop or a fabric store that sells sewing machine parts. They can help you identify it. You can also compare the size and shape of your bobbin to images of different bobbin classes online. The key features to look at are the diameter, height, and whether it has any notches or holes.
Why Using the Correct Bobbin Matters
Using the correct Singer sewing machine thread bobbin ensures that it fits snugly and spins correctly in the bobbin case and bobbin holder. An incorrect bobbin might be too loose, too tight, or have a slightly different shape that prevents the thread from feeding smoothly. This can result in uneven stitches, thread breakage, or damage to the bobbin case or shuttle mechanism.
The Singer Sewing Machine Bobbin Winding Process
Before you can insert a bobbin, you usually need to wind it with thread. Most Singer sewing machines have a built-in Singer sewing machine bobbin winder to make this task easy.
Setting Up for Bobbin Winding
- Thread the Machine: First, thread your sewing machine as if you were going to sew normally, but skip the step of bringing the thread down to the needle.
- Find the Bobbin Winder: Locate the bobbin winder spindle on your machine. It’s usually a small, often metal, peg that sticks up.
- Place the Bobbin: Put a new, empty bobbin onto the bobbin winder spindle. Some machines have a small groove or hole to secure the bobbin in place.
- Secure the Thread: Take the end of the thread from your spool and pass it through the small hole or slot on the side of the bobbin. Pull a few inches of thread through and hold onto it.
- Engage the Winder: Push the bobbin and spindle to the side until it engages with the motor’s drive mechanism. There might be a small lever or a sliding action involved. Your machine’s manual will show you the exact way to do this.
The Singer Sewing Machine Bobbin Winding Process
- Start Slowly: With the thread end held firmly, press the foot pedal gently to start the winding process. This will help you wrap the thread evenly around the bobbin.
- Guide the Thread: As the bobbin starts to wind, guide the thread evenly across the bobbin, ensuring it fills from the bottom up.
- Cut the Thread: Once you have a few layers wound, you can stop and snip the thread tail that you were holding. Continue winding.
- Fill Evenly: Try to fill the bobbin evenly. Most machines have an automatic stop mechanism that disengages the winder when the bobbin is full. If yours doesn’t, watch carefully to avoid overfilling or uneven winding, which can cause problems.
- Disengage the Winder: Once the bobbin is wound and the winder has stopped (either automatically or by you releasing the foot pedal), disengage the bobbin winder spindle by sliding it back to its original position.
- Snip the Thread: Cut the thread connecting the bobbin to the spool. Remove the wound bobbin from the spindle.
Tips for Efficient Bobbin Winding
- Use the Right Thread: Use the same type and weight of thread for the bobbin as you plan to use for your top thread.
- Check for Snags: Ensure the thread is feeding smoothly from the spool and through the machine’s threading path before winding.
- Practice: The more you practice the Singer sewing machine bobbin winding process, the faster and more proficient you’ll become.
Inserting the Bobbin: A Step-by-Step Guide
Now that you have a wound bobbin, it’s time for the main event: Singer sewing machine bobbin installation. The exact steps can vary slightly depending on whether your Singer has a front-loading bobbin system (requiring a separate Singer sewing machine bobbin case) or a top-loading “drop-in” bobbin system.
Method 1: For Machines with a Removable Bobbin Case (Front-Loading)
This is common in many older and some mid-range Singer models.
Step 1: Accessing the Bobbin Area
- Lift the presser foot lever.
- Remove the needle plate or throat plate (the metal piece that covers the bobbin area). This usually slides or lifts off. Refer to your manual if you’re unsure how it detaches on your specific model.
- You will now see the bobbin case assembly.
Step 2: Removing and Inserting the Bobbin Case
- Removing the Old Bobbin Case: If there’s already a bobbin case in the machine, grasp it and gently pull it out. If there’s thread in it, remove that too.
- Preparing the New Bobbin Case: Take your wound bobbin. Notice the small slot or opening on the side of the bobbin case.
- Threading the Bobbin Case: Hold the bobbin case with the opening facing you. Take the thread tail from your wound bobbin and pass it through the small slot in the bobbin case. Pull the thread through until it comes out the other side.
- Ensuring Proper Tension: The thread should pass through the tension spring on the bobbin case. You should feel a slight resistance when you pull on the thread.
- Inserting the Bobbin Case: Carefully place the bobbin case, with the bobbin inside and threaded, back into the shuttle race of the machine. There’s usually a small notch or hook on the bobbin case that aligns with a corresponding groove in the machine’s shuttle.
Step 3: Bringing Up the Lower Thread
- Hold the thread from the spool in your left hand.
- Use your right hand to turn the handwheel towards you (one full rotation). This brings the needle down and then back up.
- As the needle rises, it will catch the bobbin thread and pull a loop of it up through the bobbin area.
- Use your fingers or tweezers to gently pull this loop of bobbin thread up and out.
- You should now have both the top thread and the bobbin thread coming up through the needle plate.
Step 4: Placing the Threads Correctly
- With both thread tails pulled forward, place them under the presser foot and behind the presser foot shank. This positions them correctly for the first stitch.
- Reattach the needle plate or throat plate.
Method 2: For Machines with a Drop-In Bobbin System (Top-Loading)
These machines are designed for simpler bobbin insertion.
Step 1: Accessing the Bobbin Area
- Lift the presser foot lever.
- Remove the needle plate, if necessary. On many drop-in systems, you simply lift off a removable cover that sits directly over the bobbin area.
- You will see a clear plastic or metal bobbin cover and the bobbin itself.
Step 2: Inserting the Bobbin
- Remove the Bobbin Cover: Gently lift off the clear plastic bobbin cover.
- Place the Bobbin: Take your wound bobbin. Look for a small notch or slit on the top of the bobbin. This is where the thread will anchor.
- Orient the Bobbin: Most drop-in systems require the bobbin to be placed with the thread unspooling in a specific direction (usually counter-clockwise). Check for an arrow or indicator on the machine or bobbin case that shows the correct orientation. A common way is to have the thread tail hanging down and to the right.
- Seat the Bobbin: Gently place the bobbin into its designated space. It should fit snugly.
- Guide the Thread: Find the small notch or slot in the bobbin housing where the bobbin sits. Guide the thread tail into this slot. This helps the bobbin case tension mechanism engage with the thread.
Step 3: Bringing Up the Lower Thread
- Hold the Top Thread: Hold the top thread tail in your left hand.
- Turn the Handwheel: Turn the machine’s handwheel towards you (one full rotation). The needle will go down and then come back up, catching the bobbin thread.
- Pull the Thread: As the needle comes up, it will pull a loop of bobbin thread with it. Use your fingers or tweezers to gently pull this loop free.
- Position the Threads: You should now have both the top thread and the bobbin thread coming up through the needle hole. Pull both thread tails forward, under the presser foot and behind the presser foot shank.
Step 4: Replacing the Bobbin Cover
- Gently place the clear plastic bobbin cover back over the bobbin area.
Post-Installation Checks and Troubleshooting
Once the bobbin is installed and the thread is brought up, a few final checks will ensure everything is ready for sewing.
Checking Thread Tension
The Singer sewing machine lower thread tension is controlled by the bobbin case. If your stitches look messy, or if the bobbin thread is looping on the top of your fabric, you may need to adjust the tension.
- Too Loose: If the bobbin thread is looping on the top of the fabric, the bobbin case tension might be too loose.
- Too Tight: If the bobbin thread is breaking or you can barely pull it from the bobbin case, the tension might be too tight.
Note: Adjustments to the bobbin case tension are usually made by turning a small screw on the bobbin case itself (for removable bobbin cases) or by a tension mechanism on the machine for drop-in bobbins. Consult your manual for specific instructions, as over-tightening can damage the mechanism. Generally, you want a slight resistance when you pull the thread.
The First Few Stitches
- Test Sew: Before sewing your actual project, try sewing a few stitches on a scrap piece of fabric.
- Observe Stitches: Look at the stitches on both the top and the bottom of the fabric. Ideally, the bobbin thread should not be visible on the top, and the top thread should not be visible on the bottom. They should interlock neatly in the middle of the fabric layers.
- Troubleshooting Common Issues:
- Skipped Stitches: This can happen if the bobbin is inserted incorrectly, the needle is bent or incorrect for the fabric, or the thread path is obstructed.
- Thread Breaking: This is often due to incorrect tension, a burr on the needle or bobbin case, or using the wrong type of thread.
- Bird’s Nesting (Thread Buildup Under Fabric): This usually means the top tension is too loose, or the bobbin thread is not seated correctly.
Maintaining Your Singer Sewing Machine’s Bobbin Area
Regular maintenance ensures your machine runs smoothly and the bobbin system works optimally.
Cleaning the Bobbin Area
- Regularly: After each project, or even after long sewing sessions, open the bobbin area and use a small brush (often provided with the machine) or a lint roller to remove any lint, dust, or thread bits.
- Deep Cleaning: Periodically, you might want to remove the needle plate and bobbin case (if applicable) and clean them more thoroughly. Compressed air can be helpful for blowing out dust.
Lubrication
Your Singer sewing machine may require occasional lubrication in the bobbin area. Check your manual to see if and where your specific model needs oil. Using the wrong type of lubricant or oiling the wrong parts can cause damage.
Frequently Asked Questions about Singer Sewing Machine Bobbins
Here are some common questions about installing and using bobbins in Singer sewing machines:
Q1: What happens if I use a metal bobbin in a machine that requires plastic?
A1: While sometimes a metal bobbin might fit, it can cause problems. Metal bobbins are often slightly heavier and can put extra strain on the bobbin case or shuttle mechanism. They might also have a different thread groove, leading to uneven winding or tension issues. It’s best to stick to the type recommended in your manual.
Q2: My bobbin thread keeps breaking. What should I do?
A2: Several things can cause this. Check that you are using the correct bobbin for your machine. Ensure the bobbin is wound evenly and not overfilled. Make sure the bobbin case tension is set correctly (not too tight). Inspect the needle for any burrs or damage, and check that the thread path is clear of lint.
Q3: How do I know if my bobbin is wound correctly?
A3: A correctly wound bobbin will have thread wound evenly across its surface, without any overlapping or messy sections. The thread should fill the bobbin without going over the edges.
Q4: Can I use any brand of bobbin with my Singer sewing machine?
A4: While many generic bobbins are designed to fit common machines, it’s always safest to use bobbins specifically recommended for your Singer model. Generic bobbins might have slight variations in size or material that can affect performance.
Q5: What is the “Singer sewing machine bobbin holder”?
A5: The “Singer sewing machine bobbin holder” refers to the part of the machine where the bobbin is inserted. In machines with a removable bobbin case, it’s the shuttle assembly and the bobbin case itself that holds the bobbin. In drop-in systems, it’s the housing where the bobbin sits directly.
By following these detailed steps, you’ll become adept at Singer sewing machine bobbin loading and installation. A properly inserted and wound bobbin is the foundation of beautiful, consistent stitching. Happy sewing!