
Image Source: www.applegreencottage.com
How To Put Needle In Sewing Machine Easy: A Step-by-Step Guide
What is the correct way to put a needle in a sewing machine? The correct way to put a needle in a sewing machine is to ensure the flat side of the needle faces away from you, then push it all the way up into the needle clamp and tighten the screw.
Sewing can be a wonderful hobby, bringing life to fabric with stitches and creativity. But even the simplest sewing task, like changing a needle, can feel a bit daunting if you’re new to it. Don’t worry! This guide will walk you through sewing machine needle insertion step-by-step, making the process smooth and simple. We’ll cover everything from selecting the right needle to troubleshooting common issues.
Why Changing Your Sewing Machine Needle Matters
Think of your sewing machine needle as the vital tool that makes every stitch possible. Just like a knife needs sharpening or a pen needs ink, your sewing machine needle needs to be in good condition to perform its best. A dull or bent needle can cause a host of problems, from skipped stitches to fabric damage.
Reasons to Change Your Needle:
- Dullness: Needles become dull with use. A dull needle can snag or tear fabric, especially delicate materials.
- Bent or Damaged: A bent or damaged needle can cause incorrect stitching and even damage your machine.
- Wrong Type: Using the wrong sewing machine needle type for your fabric can lead to poor results.
- Routine Maintenance: Most sewers recommend changing your needle after every 6-8 hours of sewing, or at least after finishing a large project.
Choosing the Right Sewing Machine Needle
Before we get to changing sewing machine needle, it’s important to know that not all needles are the same. There are various sewing machine needle types, each designed for specific fabrics and tasks. Using the correct needle ensures clean stitches and prevents fabric damage.
Here’s a look at some common needle types:
- Universal Needles: These are your go-to needles for everyday sewing on woven fabrics and some knits. They have a slightly rounded point. A universal sewing machine needle is a great starting point for beginners.
- Ballpoint Needles (Jersey Needles): These have a rounded tip that pushes the fabric fibers aside rather than piercing them. This is essential for knit fabrics to prevent holes and runs.
- Sharp Needles (Microtex Needles): These have a very fine, sharp point, perfect for tightly woven fabrics like silk, microfiber, and faux leather. They provide precise stitching.
- Denim Needles (Jeans Needles): These are strong and sharp, designed to go through thick, dense fabrics like denim and canvas.
- Leather Needles: These have a chisel or wedge-shaped point that pierces leather cleanly, preventing tearing.
- Embroidery Needles: These have a larger eye to accommodate thicker embroidery threads and a scarf on the needle to help prevent skipped stitches.
- Topstitch Needles: These have a larger eye and a sharper point than universal needles, ideal for using thicker topstitching or embroidery threads.
Understanding Sewing Machine Needle Size
Needle size is indicated by a number. For example, an 80/12 needle means it’s a size 80 in metric and a size 12 in the old American system. Smaller numbers indicate finer needles, suitable for delicate fabrics, while larger numbers indicate thicker needles, for heavier fabrics.
| Needle Size (Metric/American) | Fabric Type | Best Use |
|---|---|---|
| 60/8, 70/10 | Very fine fabrics (silk, chiffon) | Fine stitches, delicate materials |
| 80/12 | Medium-weight fabrics (cotton, polyester) | General sewing, universal sewing machine needle |
| 90/14 | Heavier fabrics (denim, canvas, upholstery) | Sturdier materials, quilting |
| 100/16, 110/18 | Very heavy fabrics (denim, leather, vinyl) | Thick materials, multiple layers |
The sewing machine needle size you choose depends directly on the fabric you’re working with.
Step-by-Step Guide: How to Put Needle in Sewing Machine Easy
Now that you know why and which needle to use, let’s get down to the actual process of sewing machine needle insertion. This guide is designed to be clear and easy to follow, whether you’re inserting needle in Janome, inserting needle in Singer, or any other brand.
Tools You’ll Need:
- Your sewing machine
- A new, appropriate sewing machine needle
- A small screwdriver (often included with your machine) or the needle clamp knob
Important Safety Note: Always unplug your sewing machine before changing the needle or performing any maintenance.
Step 1: Prepare Your Machine
- Turn Off and Unplug: Ensure your sewing machine is turned off and unplugged from the power outlet. This is a crucial safety step.
- Lower the Presser Foot: Lower the presser foot. This helps stabilize the needle holder.
- Remove the Old Needle: If there’s an old needle in the machine, you’ll need to remove it first.
Step 2: Removing the Old Needle
- Locate the Needle Clamp Screw: Look at the needle holder, which is the part that grips the needle. There’s usually a small screw or knob on the side or front of this holder. This is the needle clamp screw.
- Loosen the Screw: Use your screwdriver or the knob to turn the screw counter-clockwise. You don’t need to remove the screw completely, just loosen it enough so the needle can slide out.
- Slide Out the Needle: Once the screw is loose, the needle should be free. Gently pull the old needle straight down and out of the needle holder. Be careful not to drop it.
Step 3: Inserting the New Needle
This is where correct sewing machine needle insertion is vital.
- Select Your New Needle: Choose the correct sewing machine needle type and sewing machine needle size for your project.
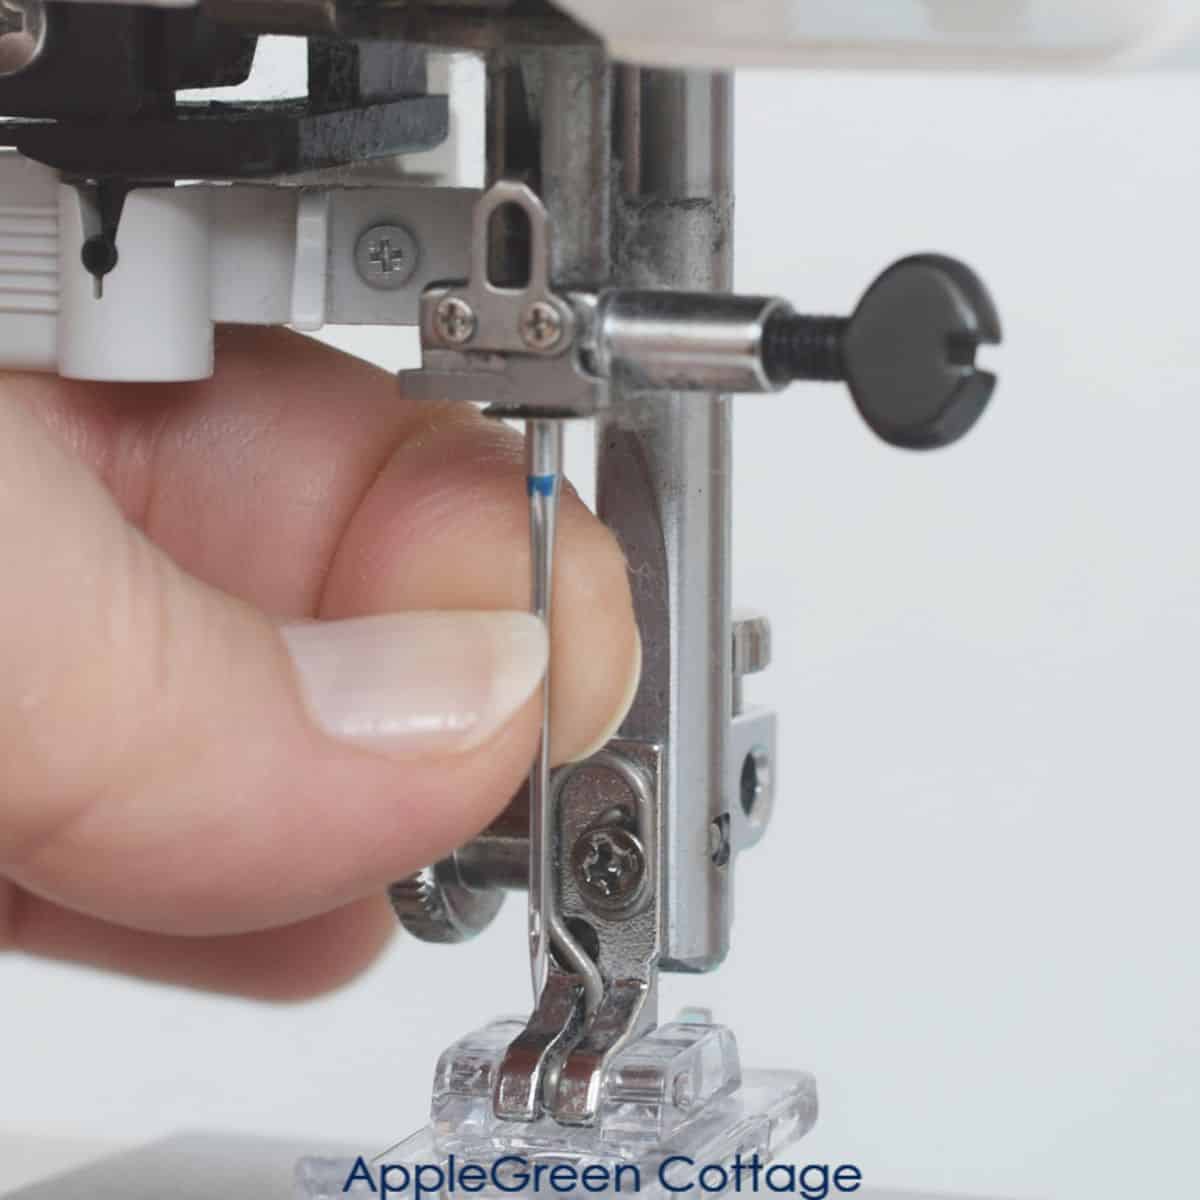
- Identify the Flat Side: Most sewing machine needles have a flat side on the shank (the top part that goes into the clamp). The flat side of the sewing machine needle should always face away from you (towards the back of the machine). This is the most important detail for correct insertion.
- Align the Needle: Hold the new needle with the flat side facing away from you.
- Push the Needle Up: Guide the shank of the needle into the needle holder.
- Push it All the Way Up: Push the needle as far up into the needle holder as it will go. You should feel it seat firmly.
- Tighten the Needle Clamp Screw: Using your screwdriver or knob, turn the needle clamp screw clockwise until it is snug. Don’t overtighten, as this can strip the screw or damage the needle holder. Just make sure the needle is secure and doesn’t wiggle.
Step 4: Test Your Stitch
- Raise the Presser Foot: Raise the presser foot.
- Thread Your Machine: Properly thread your sewing machine, making sure the needle is correctly threaded as well. If you are having trouble with threading sewing machine needle, refer to your machine’s manual.
- Perform a Test Stitch: Place a scrap piece of your fabric under the presser foot and sew a few stitches. Check the stitches on both sides of the fabric. They should be even and clean.
Common Sewing Machine Needle Insertion Mistakes and Troubleshooting
Even with a step-by-step guide, sometimes things don’t go perfectly. Here are some common issues and how to resolve them, addressing the question of what to do if your sewing machine needle is not catching thread.
H3: Troubleshooting: Sewing Machine Needle Not Catching Thread
This is a very common problem, often linked to incorrect needle insertion or threading.
- Needle Not Fully Inserted:
- Problem: The needle might not be pushed all the way up into the needle clamp.
- Solution: Unplug the machine, loosen the needle clamp screw, push the needle up as far as it will go, and retighten the screw. Ensure the flat side is correctly oriented.
- Needle Inserted Backwards:
- Problem: The most common reason for the sewing machine needle not catching thread is that it’s inserted with the flat side facing you instead of away from you. This prevents the bobbin thread from looping around the needle.
- Solution: Unplug the machine, loosen the needle clamp screw, remove the needle, reinsert it with the flat side facing the back of the machine, push it up firmly, and tighten the screw.
- Incorrect Threading:
- Problem: The machine or the needle itself might be improperly threaded. This is a major cause of the sewing machine needle not catching thread.
- Solution: Re-thread the entire machine, paying close attention to the upper threading path and ensuring the thread goes through all the guides and tension discs correctly. Make sure the presser foot is up when threading the top thread, and down when sewing. Consult your machine’s manual for specific threading instructions.
- Bobbin Issues:
- Problem: The bobbin might be inserted incorrectly, or the bobbin case might be dirty or damaged.
- Solution: Ensure the bobbin is inserted in the correct direction (check your manual) and that the thread is seated in the bobbin case tension spring. Clean any lint or thread pieces from the bobbin area.
- Timing Issues:
- Problem: In rare cases, the sewing machine’s internal timing may be off. This means the needle and bobbin hook are not synchronized correctly.
- Solution: This is a more complex mechanical issue. If the above steps don’t resolve the problem, it’s best to take your machine to a qualified technician.
H4: Troubleshooting: Skipped Stitches
Skipped stitches are frustrating and can happen for several reasons related to the needle.
- Dull or Damaged Needle:
- Problem: A dull or bent needle can’t properly pierce the fabric or create a clean loop for the bobbin thread.
- Solution: Change to a new, sharp needle of the correct type and size.
- Incorrect Needle Type for Fabric:
- Problem: Using a universal needle on a very stretchy knit fabric, for example, can cause skipped stitches.
- Solution: Switch to a ballpoint or jersey needle for knits.
- Needle Not Fully Inserted or Loosely Clamped:
- Problem: If the needle isn’t seated correctly, it won’t reach the bobbin hook at the right time.
- Solution: Re-seat and securely tighten the needle.
- Improper Threading:
- Problem: As mentioned before, incorrect upper or bobbin threading can lead to skipped stitches.
- Solution: Re-thread both the top thread and bobbin.
H4: Troubleshooting: Needle Breaking
Needle breakage is usually a sign that something is wrong and could be dangerous.
- Using the Wrong Needle Size or Type:
- Problem: Using a fine needle on heavy fabric or a thick needle on delicate fabric can cause it to break.
- Solution: Ensure you’re using the appropriate sewing machine needle size and type for your fabric.
- Needle Not Fully Inserted or Loose:
- Problem: A needle that isn’t pushed all the way up or is loosely clamped can hit the presser foot or the throat plate as it moves, causing it to break.
- Solution: Ensure the needle is pushed all the way up and the clamp is tight.
- Bent Needle:
- Problem: A needle that has been bent from hitting something or being forced through fabric can break.
- Solution: Remove and discard any bent needles immediately. Always use a new, straight needle.
- Fabric Bunching or Resistance:
- Problem: If the fabric is getting caught or bunched up and you try to force the machine, the needle can break.
- Solution: Stop the machine. Check for thread jams or fabric snags. Make sure you’re not pushing the fabric too hard or trying to sew over pins.
- Machine Timing:
- Problem: As with skipped stitches, incorrect machine timing can lead to the needle breaking.
- Solution: If needle breakage persists, contact a sewing machine technician.
H5: Specific Machine Considerations
While the general process for sewing machine needle insertion is the same across most brands, there can be minor differences.
- Inserting Needle in Janome: Janome machines, like most modern machines, typically have a needle clamp with a screw. Ensure you follow the steps above, always pushing the needle up firmly with the flat side to the back.
- Inserting Needle in Singer: Singer sewing machines also generally use a needle clamp with a screw. The orientation of the flat side of the needle (away from you) remains consistent. Some older Singer models might have a slightly different clamp design, but the principle of securing the needle firmly in the correct orientation is the same. Always refer to your specific Singer model’s manual if you’re unsure.
Frequently Asked Questions (FAQ)
Here are some common questions about sewing machine needles:
- Q: How often should I change my sewing machine needle?
A: It’s recommended to change your needle every 6-8 hours of sewing time, or at the beginning of a new project. A dull needle can cause many sewing problems. - Q: Can I use a needle from one brand of sewing machine on another?
A: Yes, most home sewing machines use a universal needle system (often referred to as 130/705 H or 2020 system). As long as the needle shank fits your machine’s needle clamp, you can use needles from different reputable brands. However, always ensure the needle type and size are correct for your fabric. - Q: What does the number on a sewing machine needle mean?
A: The number indicates the needle’s diameter. For example, an 80/12 needle is size 80 in metric and size 12 in the American system. Smaller numbers mean finer needles, larger numbers mean thicker needles. - Q: My sewing machine skips stitches. What should I do?
A: Check if your needle is dull, bent, or inserted incorrectly. Ensure you’re using the right type of needle for your fabric. Also, re-thread both the upper thread and the bobbin. If these steps don’t help, your machine might need professional servicing for timing issues. - Q: Is it okay to sew over pins?
A: It’s generally not recommended. Sewing over pins can bend or break your needle, damage your machine, or cause skipped stitches. It’s best to remove pins just before you reach them.
Conclusion
Putting a needle in a sewing machine is a fundamental skill that every sewer needs to master. By following these simple steps, paying attention to the correct needle orientation, and choosing the right needle for your fabric, you can ensure smooth, successful sewing. Remember to prioritize safety, always unplug your machine, and don’t hesitate to consult your machine’s manual. Happy sewing!