
Can you put a needle in a Singer sewing machine? Absolutely! Putting a needle in your Singer sewing machine correctly is a fundamental skill for any sewer. It ensures your stitches are consistent and prevents frustration.
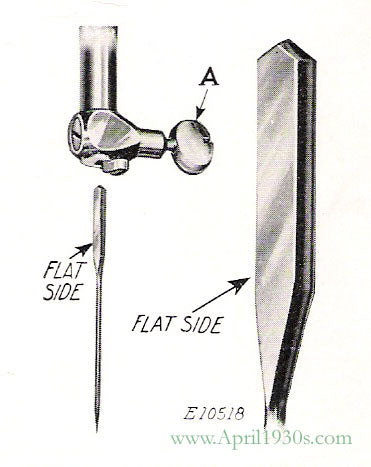
Image Source: cdn.shopify.com
Why Proper Needle Insertion Matters
Your sewing machine’s needle is the tool that pierces the fabric and carries the thread to create stitches. If the needle isn’t inserted correctly, it can lead to a host of problems:
- Skipped stitches: The thread can’t form a proper loop.
- Thread breaking: The needle might be hitting the bobbin case or presser foot incorrectly.
- Bent or broken needles: Improper alignment puts stress on the needle.
- Fabric damage: A dull or wrongly inserted needle can snag or tear your material.
- Machine malfunction: In severe cases, incorrect needle placement can damage internal machine parts.
This guide will walk you through the simple, step-by-step process of putting a Singer sewing machine needle into your machine, making sure you get it right every time. We’ll cover everything from selecting the right needle to the final check.
Deciphering Sewing Needle Types
Before you insert a needle, it’s crucial to know there isn’t a one-size-fits-all needle for every sewing task. Different sewing needle types are designed for various fabrics and threads. Using the wrong needle can cause poor stitching or damage to your fabric or machine.
Common Sewing Needle Types and Their Uses:
| Needle Type | Description | Best For |
|---|---|---|
| Universal Needle | A slightly rounded point; a good all-rounder. | Most everyday fabrics like cotton, polyester, blends, and lightweight knits. |
| Ballpoint Needle | Has a rounded tip that pushes fabric fibers aside rather than piercing them. | Stretchy fabrics, knits, jersey, spandex, lycra, and activewear. Prevents skipped stitches on knits. |
| Sharps Needle | Has a very sharp point for precise piercing. | Woven fabrics like quilting cottons, linen, and fine silks. Also good for microfibers. |
| Denim/Jeans Needle | Stronger and sharper than universal needles, designed to penetrate thick fabrics. | Denim, jeans, canvas, upholstery fabric, and other heavy-duty materials. |
| Leather Needle | Has a wedge-shaped or chisel point to cut through leather without tearing. | Leather, vinyl, and other tough, non-woven materials. |
| Embroidery Needle | Features a larger eye to accommodate thicker embroidery threads and a smooth surface to prevent snagging. | Machine embroidery, decorative stitching, and using specialty threads. |
| Topstitch Needle | Has a larger eye and a sharper point than universal needles. | Topstitching, using heavier threads, and quilting. The larger eye makes threading easier with thicker threads. |
What is Needle Size Singer?
When selecting a needle size Singer, you’ll see numbers like 70/10, 80/12, 90/14, 100/16, and 110/18. The smaller number (e.g., 70) is the European sizing, and the larger number (e.g., 10) is the American sizing.
- Smaller numbers (e.g., 70/10, 80/12): These needles are finer and thinner. They are used for lightweight and delicate fabrics like silk, chiffon, and fine cottons.
- Medium numbers (e.g., 90/14): These are general-purpose needles suitable for medium-weight fabrics like quilting cottons, linens, and light denims.
- Larger numbers (e.g., 100/16, 110/18): These needles are thicker and stronger, designed for heavy-duty fabrics like denim, canvas, upholstery, and leather.
Always match your needle to your fabric type and thread weight for the best results.
Preparing Your Singer Sewing Machine for Needle Insertion
Before you start changing sewing machine needle, ensure your machine is ready.
Safety First
- Turn off the machine: Always unplug your sewing machine or turn off the power switch before touching the needle or needle area. This prevents accidental starting and potential injury.
- Lower the presser foot: Lower the presser foot lever. This helps stabilize the needle holder and makes inserting sewing needle easier.
Accessing the Needle Clamp
Your Singer sewing machine has a needle clamp singer which holds the needle in place. This clamp is usually a small metal piece with a screw.
- Locate the needle clamp: Look at the needle bar (the part that moves up and down). You’ll see the needle clamp mechanism attached to it.
- Identify the clamp screw: The needle clamp has a screw that you need to loosen to remove the old needle and insert a new one. Some models have a thumb screw, while others might require a small screwdriver.
Step-by-Step Guide: Inserting the Needle
Now that you’re prepared, let’s get to the main event: needle insertion singer.
Step 1: Remove the Old Needle
If a needle is already in the machine, it’s time to remove it.
- Locate the clamp screw: Find the screw on the needle clamp singer.
- Loosen the screw: Turn the screw counter-clockwise using your fingers or a screwdriver. You only need to loosen it enough to slide the old needle out. Don’t unscrew it completely, or you might lose it.
- Grasp the old needle: Carefully pull the old needle straight down and out of the clamp. Be mindful that it might still have a sharp point. Dispose of it safely.
Step 2: Prepare the New Needle
Before inserting sewing needle, check its condition.
- Inspect the new needle: Ensure the new needle is the correct type and size for your project. Look for any burrs, bends, or dullness on the point.
- Identify the flat side: Singer sewing machine needles, like most machine needles, have a flat side on the shank (the part that goes into the clamp). This flat side is crucial for proper needle placement.
Step 3: Inserting the New Needle
This is where needle insertion singer happens.
- Hold the needle correctly: Take the new needle and hold it with the flat side of the shank facing towards the back of the machine (away from you). This is a critical step for correct proper needle placement.
- Insert the needle into the clamp: Slide the shank of the needle up into the needle clamp. Push it up as far as it will go. You should feel it seat firmly against the back of the clamp opening.
- Tighten the clamp screw: While holding the needle firmly in place, tighten the clamp screw clockwise. Turn it until it’s snug. Don’t overtighten, as this can damage the needle or the clamp.
Step 4: Test and Verify
A quick check ensures everything is right.
- Raise the presser foot: Gently raise the presser foot lever.
- Turn the handwheel: Slowly turn the machine’s handwheel towards you (always turn the handwheel towards you). Watch the needle as it moves up and down.
- Check for clearance: Ensure the needle moves freely without hitting the presser foot, the feed dogs (the little teeth that move the fabric), or the bobbin cover. If you hear any scraping or see it hitting anything, turn the machine off, unplug it, and re-check your proper needle placement.
Threading Your Singer Sewing Machine (Crucial Companion Step)
While not directly about needle insertion, threading singer sewing machine is intrinsically linked to using the needle correctly. A properly inserted needle won’t work if the thread isn’t routed correctly.
Understanding the Thread Path
The thread path guides your thread from the spool to the needle eye. Each Singer model might have slight variations, but the general path is consistent.
- Thread the spool pin: Place your thread spool on the spool pin.
- Follow the numbered guides: Most Singer machines have small numbers or arrows indicating the correct path for the thread.
- Go through the tension discs: The thread must pass between the tension discs. This is where the thread tension is regulated.
- Up through the take-up lever: The thread should go up and through the eye of the take-up lever, then back down.
- Down to the needle: Finally, guide the thread through the guides near the needle bar.
Threading the Needle
This is where the bobbin and needle work together.
- Thread the needle eye: Pass the thread through the eye of the needle. For most Singer machines, this means passing the thread through from left to right. Some Singer models have a built-in needle threader, which makes this step significantly easier. If yours does, consult your machine’s manual for its specific operation.
- Pull thread through: Pull about 4-6 inches of thread through the needle eye.
Bringing Up the Bobbin Thread
- Hold the top thread: With your left hand, hold the end of the thread that came through the needle.
- Turn the handwheel: With your right hand, turn the handwheel towards you to lower the needle into the fabric, then bring it back up.
- Catch the bobbin thread: As the needle rises, it will catch the bobbin thread and pull it up through the bobbin case.
- Pull up the bobbin loop: Use your fingers or tweezers to pull the loop of bobbin thread completely through the needle plate hole.
- Position threads: Place both the top thread and the bobbin thread underneath the presser foot and to the back of the machine.
Now your machine is threaded and ready to sew with the needle properly in place!
Troubleshooting Common Needle Issues
Even with careful attention, you might encounter problems. Here are some common issues and how to resolve them, often related to the needle.
My Singer Sewing Machine is Skipping Stitches
Can I skip stitches if the needle is wrong? Yes!
- Solution: Ensure you are using the correct sewing needle types for your fabric. A bent or blunt needle can also cause skipped stitches. Replace the needle. Also, check that your threading singer sewing machine is correct and that the bobbin and needle are working in harmony.
The Thread Keeps Breaking
Why does my thread break?
- Solution: Check for a burr on the needle. Ensure you’re using the right needle size Singer. Verify the thread is correctly routed through all the guides and tension discs. Make sure the top thread and bobbin and needle tension are balanced. A needle that isn’t seated correctly in the needle clamp singer can also cause this.
The Needle Won’t Go in Straight
What if the needle insertion singer is not right?
- Solution: Double-check that the flat side of the needle shank is facing the correct direction as per your machine’s manual. For most Singer machines, this is towards the back. Ensure the needle is pushed all the way up into the needle clamp singer before tightening.
My Fabric is Puckering or Bunching
Why is my fabric puckering?
- Solution: This could be a tension issue, but it can also be caused by using too large a needle for a fine fabric. Try a finer needle (smaller number) and ensure your thread is correctly seated in the tension discs.
Maintaining Your Singer Sewing Machine Needle
To ensure consistent performance and longevity of your sewing machine, a little maintenance goes a long way.
When to Change Your Needle
- After a specific number of hours: Many manufacturers recommend changing your needle after 6-8 hours of continuous sewing.
- After completing a project: Especially if you’ve sewn through heavy or dense fabrics.
- If you notice any issues: Skipped stitches, thread breakage, fabric damage, or unusual noises are signs that your needle needs replacing.
- Before starting a new project: It’s good practice to start a new project with a fresh needle.
Storing Needles Safely
- Keep them in their original packaging: This protects them from damage and moisture.
- Store in a needle case: If you remove needles from their packaging, use a dedicated needle case to keep them organized and prevent accidental injury.
- Dispose of old needles properly: Place used needles in a sharps container or a sturdy, sealed container to avoid pricking yourself or others.
Frequently Asked Questions (FAQ)
Q1: Do all sewing machine needles fit all machines?
A1: No, most domestic sewing machines use a universal shank size, but it’s always best to check your machine’s manual. Singer sewing machines typically use the standard home sewing machine needle system.
Q2: What happens if I put the needle in backwards?
A2: If you insert the needle with the flat side facing the front instead of the back, the thread will likely not form a proper stitch. You will experience skipped stitches, thread breakage, and potentially damage to your machine.
Q3: Can I use a sewing machine needle in a hand-sewing needle kit?
A3: No, sewing machine needles have a specific shank designed to fit into a machine’s needle clamp and a different eye shape compared to hand-sewing needles.
Q4: My Singer sewing machine needle broke. What should I do?
A4: Turn off and unplug your machine immediately. Carefully remove the broken needle pieces using pliers if necessary. Inspect the needle clamp and surrounding area for any damage. Insert a new, correct needle and test the machine slowly by turning the handwheel.
Q5: How do I know if I need a different needle size?
A5: If you are sewing a very fine fabric like silk or chiffon, and experiencing skipped stitches or fabric snags, you likely need a smaller, finer needle (e.g., 70/10 or 80/12). If you are sewing heavy denim and your needle is bending or breaking, you need a larger, sturdier needle (e.g., 90/14 or 100/16).
By following these steps and keeping these tips in mind, you’ll be able to confidently put the needle in your Singer sewing machine every time, ensuring smooth and successful sewing projects. Happy sewing!