
Ready to sew something great? Sewing starts with a pattern. A pattern is like a map. It tells you how to cut fabric pieces. It also tells you how to put them together. Learning to read this map is key. This guide will show you how. It makes reading sewing patterns easy. You will learn all the important parts. You will know what the little lines and pictures mean. Soon, you will be sewing your own clothes or home items. Let’s get started!
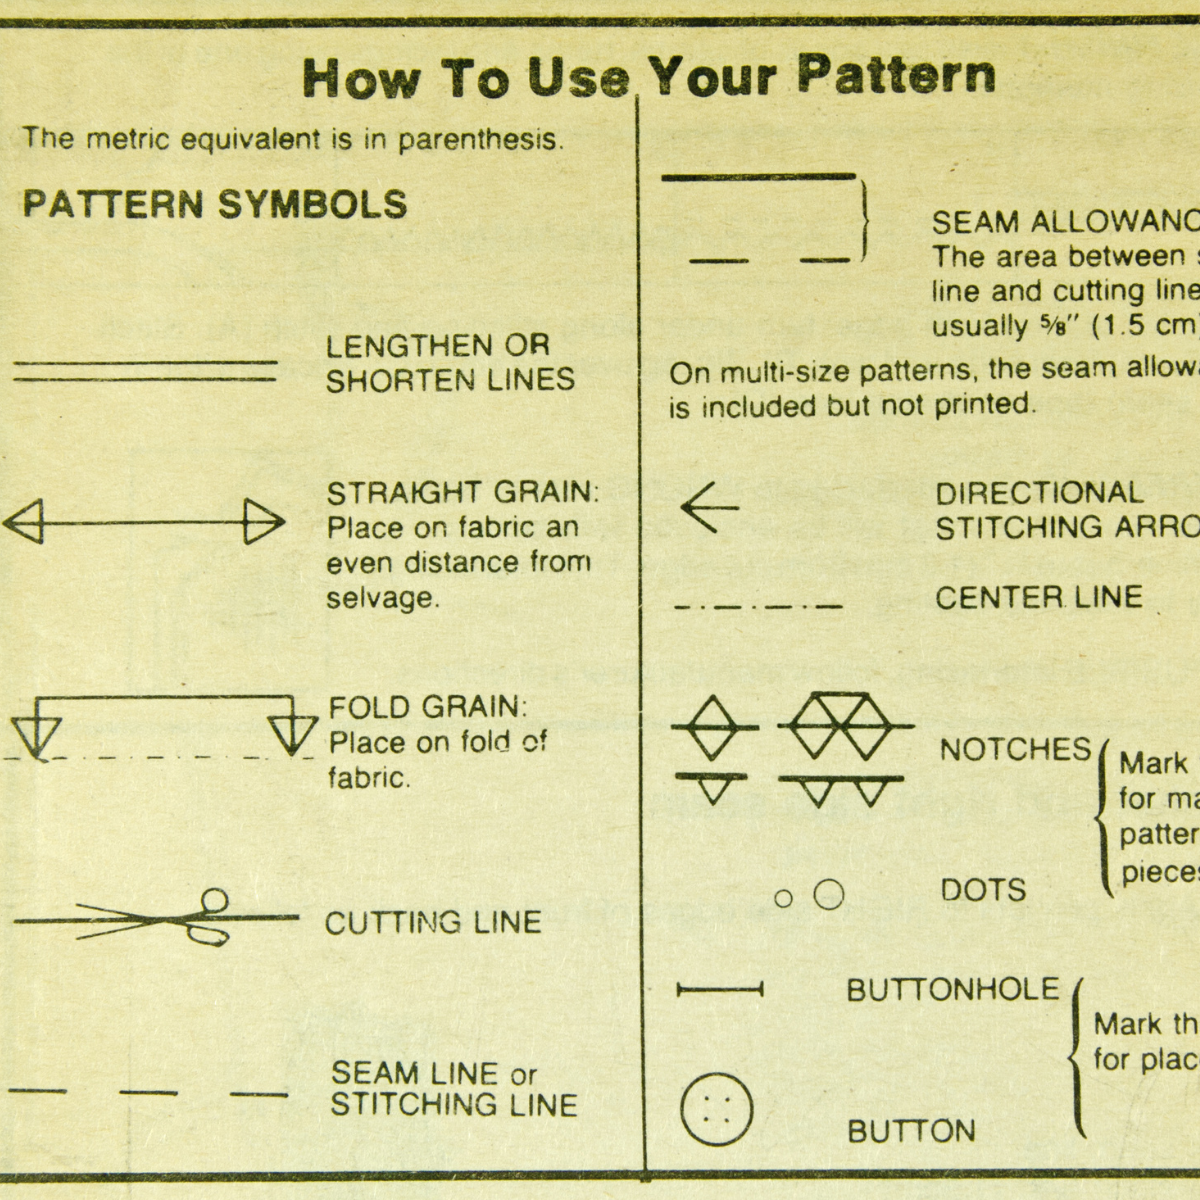
Image Source: letslearntosew.com
Your First Look: The Pattern Envelope
Every sewing pattern comes in an envelope. This envelope holds lots of key details. Think of it as the book cover. It gives you a quick look at what is inside. This is the start of reading your pattern. We call this pattern envelope information.
Look at the front of the envelope first. You will see pictures. These pictures show you what the finished item will look like. They show different styles you can make from the same pattern. Pick the style you like best.
Now, turn the envelope over. The back has even more information. This is where you find important lists and charts.
Here is what you will find on the back:
- Description: A short write-up. It tells you about the item you will make. It lists the different styles shown on the front.
- Suggested Fabrics: This list tells you what types of fabric work well for this pattern. Using the right fabric is important. It makes sure your project looks and feels right. For example, a dress pattern might suggest cotton, linen, or rayon. A pajama pattern might suggest flannel or knit fabric.
- Notions List: Notions are extra things you need besides fabric. This list tells you what notions you need. It might list buttons, zippers, elastic, thread, ribbon, or interfacing. Check this list before you go shopping. Make sure you get everything.
- Sizing Chart: This chart helps you pick the right size pattern to use. It lists body measurements. You need to measure yourself. Then, you compare your measurements to the chart. This helps with choosing pattern size. We will talk more about this later.
- Fabric Yardage Chart: This chart tells you how much fabric you need. It lists the different styles and sizes. It also lists different fabric widths (like 45 inches or 60 inches). Find your chosen style, size, and fabric width. The chart will tell you the exact amount of fabric to buy. It often lists yardage for the main fabric and lining fabric, if needed.
- Finished Garment Measurements: Sometimes, patterns give you the size of the finished item. This helps you see how loose or tight it will be.
- Skill Level: The envelope might tell you if the pattern is easy, medium, or hard. Start with easy patterns if you are new to sewing.
Looking at the envelope is the first step. It helps you get ready. It tells you what you need to buy. It helps you pick your size.
Following the Steps: Reading Sewing Instructions
Inside the envelope, you will find the paper pattern pieces. You also find a booklet or sheet with reading sewing instructions. These instructions tell you exactly what to do. They show you how to sew the fabric pieces together.
The instructions start with a list of things you need. This list is like the notions list on the envelope. But it is often more detailed. It might list thread color, zipper length, or button size.
Next, the instructions usually show layout guides. These guides are diagrams. They show you how to place the pattern pieces on your fabric. This is very important for cutting. How you place pieces saves fabric. It also makes sure your fabric stretches or hangs the right way.
Then come the step-by-step directions. These directions tell you how to sew the project.
The directions might use:
- Words: Simple sentences tell you what to do. For example, “Sew the shoulder seams.” or “Attach the collar.”
- Pictures or Diagrams: Small drawings show you each step. These pictures help you see what the words mean. They show how pieces fit together. They show where to sew.
Follow the steps in order. Do not skip steps. Read each step before you do it. Look at the pictures too. The instructions are your guide. They lead you from cut fabric to finished item.
The instructions also explain important things. They tell you about seam allowance. They tell you about pressing seams. They might teach you new sewing skills needed for the project.
Pay attention to these instructions. They are made to help you. They use specific words and phrases. These are part of sewing pattern terminology. You will learn these words as you sew more.
What the Pictures Mean: Interpreting Pattern Symbols
Sewing patterns have special marks on the paper pieces. These marks are like a secret code. They are called pattern symbols. Knowing what they mean is key. It helps you cut and sew the pieces right.
Let’s look at common symbols you will see:
Grasping Common Pattern Symbols
| Symbol | What it looks like | What it means |
|---|---|---|
| Grainline | A long line with arrows at both ends | Place this line on your fabric so it is parallel to the fabric edge (selvage). |
| Fold Line | A line with bent arrows | Place this edge of the pattern piece right on the folded edge of your fabric. |
| Cutting Line | An outside solid line | This is where you cut the fabric. |
| Stitching Line | An inside dashed line | This is where you sew. Often 5/8 inch from the cutting line. |
| Notches | Small triangles or lines | Match these up when you sew two pieces together. They show you matching points. |
| Dots or Circles | Small filled-in circles | Use these to match up pieces. Or to place pockets, darts, or other details. |
| Triangles | Small filled-in triangles | Similar to dots. Used for matching or placing parts. |
| Squares | Small filled-in squares | Similar to dots or triangles. Use for matching or placing parts. |
| Darts | Lines that form a V or diamond | You sew along these lines. They shape the fabric to fit the body. |
| Pleats | Lines with arrows | These show you where to fold fabric to make a flat fold. |
| Gathering Lines | Two parallel lines, sometimes wavy | You sew stitches between these lines. Then pull the threads to gather fabric. |
| Button Placement | An X or circle | Shows where to sew buttons. |
| Buttonhole Placement | A line with small marks at ends | Shows where to make buttonholes. |
| Lengthen or Shorten Line | Two parallel lines with arrows | Shows you where to make the pattern piece longer or shorter. |
| Place on Fold | A line with bent arrows | Same as Fold Line. Put this edge on the fabric fold. |
Getting familiar with these symbols helps a lot. Look at the instructions page. It often has a key. This key explains all the symbols used in that specific pattern.
Picking the Right Parts: Identifying Pattern Pieces
Inside the pattern envelope, you will find large sheets of tissue paper. Printed on this paper are the pattern pieces. These are the shapes you will cut out. Each piece is a part of your finished item. For a shirt, you might have pieces for the front, back, sleeves, and collar.
The pattern sheet has many sizes printed on it. The lines for each size look different. One size might be a solid line. Another might be a dashed line. Another might be a dotted line. Look at the size chart on the envelope. Find your size line. You will follow this line when you cut.
Each pattern piece has a name. It tells you what it is. Like “Front Bodice” or “Sleeve”. The name might be written right on the piece. It might also have a number or letter. The instructions will tell you which pieces to use for your chosen style. For example, “Cut 2 of Piece A (Front)” or “Cut 1 of Piece B (Back) on Fold”.
It is important to use the correct pieces for your style. Some patterns have many styles. You might not need all the pieces on the sheet. Look at the instructions. It will list the pieces you need.
Before you cut, find the pieces you need. Circle them with a pen if it helps. Be careful not to cut out the wrong pieces.
Where Fabric Threads Go: Grainline on a Pattern
One of the most important marks on a pattern piece is the grainline on a pattern. It is a long line with arrows at both ends. This line must be placed a certain way on your fabric.
Fabric is made of threads woven together. Some threads run the long way, up and down the fabric roll. This is called the lengthwise grain. Other threads run across, from edge to edge. This is called the crosswise grain.
The grainline arrow on your pattern piece must line up with the lengthwise grain of your fabric. This means the grainline on the pattern should be parallel to the edge of your fabric (the selvage edge). The selvage is the finished edge of the fabric that does not fray.
Why is this important? It makes sure your clothes hang right. It makes sure they fit right. It stops things from twisting. It helps fabric stretch or not stretch the way it should.
To place the pattern piece correctly:
- Find the grainline on the pattern piece.
- Find the selvage edge of your fabric.
- Use a ruler or measuring tape. Measure the distance from one end of the grainline arrow to the selvage edge.
- Measure the distance from the other end of the grainline arrow to the selvage edge.
- These two measurements must be the same. Adjust the pattern piece until they are the same.
- Pin the pattern piece in place. Make sure the grainline stays straight and even with the selvage.
Doing this step right helps your finished item look and fit well. Do not skip checking the grainline.
Points for Matching: Notches on a Pattern
Look around the edge of the pattern pieces. You will see small marks. These marks are called notches on a pattern. They look like little triangles, diamonds, or just small lines. They are usually on the cutting line.
Notches are super helpful for putting pieces together. They tell you where to match up fabric edges before you sew.
If you have two pieces to sew together, look for notches on both. You might see single notches, double notches (two together), or even triple notches. Match a single notch on one piece to a single notch on the other piece. Match double notches to double notches.
This helps you know:
- Where the center of a seam is.
- Where seams should line up.
- Where to stop or start sewing.
- Where fullness (like gathers or pleats) should be placed.
When you cut out your fabric pieces, you need to mark these notches. You can snip small clips into the fabric edge where the notches are. Be careful not to snip too far into the seam allowance. You can also use chalk or a fabric marker to mark the notches just inside the cutting line.
Matching your notches before sewing makes sure pieces fit together correctly. It takes the guesswork out of sewing curves and long seams.
The Edge Space: Seam Allowance on a Pattern
Sewing patterns include extra fabric around the shape of the piece. This extra fabric is called the seam allowance on a pattern. It is the space between the cutting line (where you cut) and the stitching line (where you sew).
Most patterns use a standard seam allowance. A very common one is 5/8 inch (1.5 cm). This means the stitching line is 5/8 inch away from the cutting line edge.
The instructions will tell you the seam allowance. It might say it on the instruction sheet. It might be written on the pattern pieces. Or it might just be a standard amount for that pattern company.
When you sew two pieces of fabric together, you sew along the stitching line. This line is inside the cutting line. The seam allowance is the fabric outside your stitching line. After sewing, you might press the seam allowance open or to one side.
Why do we need seam allowance?
- It gives you room to sew neatly.
- It protects the edge from fraying while you sew.
- It lets you make small changes to the fit. If something is a little tight, you can sew a smaller seam allowance (like 1/2 inch). If it’s too loose, you can sew a bigger one (like 3/4 inch).
When you cut your fabric, you cut on the cutting line. Do not cut inside it. This cuts off your seam allowance. Then you won’t have room to sew. Most home sewing machines have marks on the metal plate. These marks help you sew a straight line at the correct seam allowance width. Line up the edge of your fabric with the 5/8 inch mark on your machine.
Getting the Perfect Fit: Choosing Pattern Size
One of the trickiest parts for new sewers is choosing pattern size. Unlike store-bought clothes, pattern sizes are different. Do not just pick the size you buy in a shop. Sewing pattern sizes are often based on different body measurements.
You need to measure your body.
- For tops, jackets, and dresses: Measure your bust (around the fullest part). Measure your waist (the narrowest part). Measure your hips (the fullest part).
- For pants and skirts: Measure your waist and hips.
Have someone help you measure for the best results. Write down your measurements.
Now, look at the Sizing Chart on the pattern envelope. Find your measurements on the chart.
Here is the tricky part: Your measurements might fall into different sizes. For example, your bust might be a size 12, but your waist is a size 14, and your hips are a size 10.
What size do you pick?
- For tops or dresses, usually pick the size that matches your bust measurement.
- For pants or skirts, usually pick the size that matches your hip measurement.
If your waist is a very different size, you might need to make changes later. This is called grading between sizes. For example, you might cut the pattern out at the size 12 bust. Then you would curve out to the size 14 waistline and back to the size 10 hipline if needed for a dress.
Patterns for tops and dresses sometimes have different cup sizes (like A/B, C, D). Pick the one that is closest to you.
Always pick size based on your body measurements, not the store size you usually wear. This is key for a good fit. If you are between sizes, you can often start with the smaller size. It is easier to make something bigger than smaller.
Making the Cut: Cutting Pattern Pieces
You have picked your size. You have found the right pattern pieces. You know about grainlines and notches. Now it is time for cutting pattern pieces. This step needs to be done carefully. Cutting well helps your sewing go smoothly.
First, iron your fabric. Make sure it is smooth. No wrinkles. Iron your pattern pieces too, if they are very creased.
Lay out your fabric on a large, flat surface. Your dining table or the floor works well. Check the pattern layout guide in the instructions. It shows you how to fold your fabric. It also shows you where to place the pattern pieces.
Fabrics are often folded in half lengthwise. This makes it easy to cut two mirror-image pieces at once (like two sleeves). If a piece needs to be placed on the fold line, make sure the fabric is folded. Place that edge of the pattern piece right on the folded edge of the fabric.
Place all the pattern pieces you need on the fabric before you start cutting. Look at the layout guide again. Use pattern weights or pins to hold the pieces down.
Remember the grainline? Make sure the grainline on each pattern piece is straight on the fabric. Use your ruler to check the distance from the grainline to the selvage. Pin the grainline down first. Then pin the rest of the piece.
Now, cut carefully. Use sharp fabric scissors. Cut right on the cutting line for your size. Do not cut inside or outside the line. Cut slowly and smoothly.
As you cut, you will come to the notches. Remember the notches help you match pieces. You can:
* Snip small V-shapes or clips away from the cutting line edge. This is fast. Do not snip more than 1/4 inch into the seam allowance.
* Snip straight into the seam allowance by about 1/4 inch at the notch mark.
* Use tailor’s chalk or a fabric marker to mark the notch location just inside the cutting line.
After cutting, you have your fabric pieces ready to sew. Keep them together with the instructions.
Speaking the Language of Sewing: Sewing Pattern Terminology
Sewing patterns and instructions use specific words. These words are part of sewing pattern terminology. Learning these terms helps you understand the instructions better.
Here are a few common terms:
- Selvage: The finished edge of the fabric. It does not fray. The grainline should be parallel to this.
- Raw Edge: The cut edge of the fabric. It will fray.
- Right Side of Fabric: The pretty side that will show on the outside of your finished item.
- Wrong Side of Fabric: The back side of the fabric. It will be on the inside.
- Right Sides Together (RST): Place two fabric pieces together with their right sides touching. This is how you sew most seams.
- Wrong Sides Together (WST): Place two fabric pieces together with their wrong sides touching. Used for some special seams or steps.
- Press: Use an iron to make seams flat. Follow the instructions: press seams open (iron flat with fabric layers split apart) or press seams to one side (iron both seam allowance layers to one side). Pressing is different from ironing (moving the iron back and forth). Pressing means lifting and putting the iron down.
- Baste: Sew with long, loose stitches. This is often done by hand or machine. Basting stitches are temporary. They hold pieces together before you sew the final seam. You usually remove them later.
- Staystitch: Sew a line of stitches just inside the seam allowance (usually 1/2 inch or less) on curved or angled edges. This stops the fabric from stretching out of shape. Do it before you sew the seam.
- Understitch: Sew a line of stitches through the seam allowance and one fabric layer. This is often done on facings or necklines. It helps the facing stay on the inside and gives a neat edge.
- Topstitch: Sew a line of stitches on the outside of the fabric. It is often used to make seams stronger or for decoration. It is done after the seam is finished.
- Facing: A piece of fabric used to finish an edge, like a neckline or armhole. It is sewn to the edge and then turned to the inside.
- Interfacing: A special fabric used to make parts of the project stiffer or stronger. It is often used in collars, cuffs, or waistbands. It can be ironed on (fusible) or sewn on (sew-in).
- Dart: A fold sewn into fabric. It shapes the fabric to fit curves of the body, like the bust or waist.
- Gather: To pull fabric into small folds. This is often done by sewing two lines of long stitches and pulling the threads. Used to make full skirts or sleeves.
- Hem: The finished edge on the bottom of a garment or item. Fabric is usually folded up and stitched down.
Learning these terms helps you follow the instructions step by step.
Putting It All Together
Reading a sewing pattern might seem like a lot at first. But it is just a skill you learn. Like reading a map or following a recipe.
Start with a simple pattern. Look at the envelope first. Understand the pattern envelope information. Pick your size based on your body measurements, not clothing size. This is choosing pattern size.
Read the sewing instructions all the way through before you start. Look at the pictures. Find the identifying pattern pieces you need for your style.
Look at the marks on the pattern pieces. Learn the pattern symbols. Find the grainline on a pattern and make sure it is straight on your fabric. Find the notches on a pattern and know you will match them later. Know where the seam allowance on a pattern is. Cut carefully, right on the line. This is cutting pattern pieces.
As you sew, refer back to the instructions and the diagrams. Pay attention to the sewing pattern terminology. If you do not know a word, look it up.
Practice makes perfect. Your first project might not be perfect. That is okay! Each time you read a pattern and sew, it gets easier. You will learn more pattern symbols. You will understand the instructions faster.
Sewing is a rewarding hobby. It lets you make things you love. Learning to read patterns opens up a world of creative ideas. You can make clothes that fit you perfectly. You can make unique gifts. You can decorate your home.
Do not be afraid of the pattern. It is your friend. It is your guide. Take your time. Read slowly. Look at the pictures. Soon, you will be reading patterns like a pro!
Frequently Asked Questions (FAQ)
h4: What if my body measurements fall into many different sizes on the chart?
This is very common! Sewers often use different sizes for different parts of their body. Pick the size that fits your largest measurement for that type of garment (bust for tops, hips for bottoms). Most patterns can be changed a little. You can sew slightly bigger or smaller seam allowances in different areas. Or you can learn to ‘grade’ between sizes on the pattern piece before you cut.
h4: Can I use a fabric that is not listed on the pattern envelope?
Maybe. The suggested fabrics work best for the way the pattern is designed. Using a different fabric can change how the finished item looks and feels. A pattern made for stretchy knit fabric will not work well with stiff woven fabric. If you use a different fabric, try to pick one with a similar weight and feel to those suggested. Test a small piece first if you are unsure.
h4: Do I have to wash my fabric before cutting?
Yes, you should wash your fabric the way you plan to wash the finished item. Fabrics can shrink the first time they are washed. If you cut and sew before washing, your finished item might be too small after you wash it. Pre-washing fabric is an important step.
h4: What is the difference between the cutting line and the stitching line?
The cutting line is the outside line on the pattern piece. It is where you use your scissors to cut the fabric. The stitching line is inside the cutting line. It is usually a dashed line. It shows you where to sew your seam. The space between these two lines is the seam allowance.
h4: Why are there so many lines on one pattern piece?
One pattern sheet usually has lines for many different sizes printed on top of each other. This saves paper. Find the line type (solid, dashed, dotted, etc.) that matches your chosen size on the pattern key or instructions. Follow only that line when you cut.
h4: How do I know which pattern pieces to use?
Look at the instruction sheet. It will have diagrams or a list of the pattern pieces needed for each style shown on the envelope. Find the style you want to make. Then find the pieces listed for that style. Each piece has a name or number on it.
h4: My pattern pieces are very wrinkled. What should I do?
Carefully iron the pattern pieces on a low heat setting. Do not use steam. Place a thin cloth (like a pillowcase) over the pattern paper if you are worried about the iron heat. Smooth pattern pieces are easier to lay flat and cut around.
h4: What does “place on fold” mean?
It means that edge of the pattern piece must be placed right on the folded edge of your fabric. Do not cut this edge. When you unfold the fabric, the piece will be a full piece, not a half piece. This is often used for things like the back of a shirt or a skirt front where you want one piece with no seam in the middle.
h4: How do I use the notches when sewing?
After cutting your fabric pieces, you will have small clips or marks where the notches were. When you are ready to sew two pieces together, match these clips or marks along the seam line. Pin the pieces together at the notches first. This helps make sure the pieces fit together correctly along the whole seam before you sew.
h4: What is seam allowance and why is it important?
Seam allowance is the extra fabric outside your stitching line. It is the space between where you cut and where you sew. It is important because it gives you room to sew. It also lets you make small fit changes. Sewing with the correct seam allowance helps your project turn out the right size.
h4: What is grainline and why is it important?
The grainline is a line on the pattern piece with arrows. It must be placed parallel to the straight threads (lengthwise grain) in your fabric. This makes sure the fabric hangs and stretches correctly. Placing the grainline right is key for how the finished item fits and looks.
h4: What is pattern terminology?
Pattern terminology is the special words used in sewing patterns and instructions. Words like ‘selvage’, ‘raw edge’, ‘right sides together’, ‘press’, ‘baste’, ‘staystitch’, and ‘facing’ are all terms you will see. Learning these words helps you understand what the instructions are telling you to do.
h4: Can I just trace the pattern pieces instead of cutting the paper?
Yes! Many sewers prefer to trace the pattern pieces onto tissue paper, tracing paper, or special pattern paper. This saves the original pattern piece. It is helpful if you think you might make the item in a different size later. You can trace the size you need now and the paper pattern stays whole.
h4: How do I know if a pattern is too hard for me?
Look at the skill level listed on the pattern envelope. Start with patterns marked “Easy” or “Beginner”. These patterns usually have fewer pieces and simpler steps. As you sew more, you can try patterns marked “Average” or “Advanced”.
h4: What tools do I need to read and use a pattern?
You will need:
* The pattern envelope with instructions and pieces.
* Fabric you have chosen.
* A measuring tape to measure your body.
* Sharp fabric scissors for cutting fabric.
* Paper scissors for cutting pattern pieces (optional, but good).
* Pins or pattern weights to hold pattern pieces on fabric.
* A ruler or measuring tape to check the grainline.
* Tailor’s chalk or fabric marker (optional, for marking).
* An iron and ironing board for pressing.
With these tools and this guide, you are ready to start! Happy sewing!