
Image Source: www.ageberry.com
Master How To Read A Sewing Measuring Tape Fast & Easy
Do you want to learn how to read a sewing measuring tape quickly and easily? Reading a sewing measuring tape is key to getting your sewing projects right. This tool helps you measure fabric, your body for patterns, and pattern pieces accurately. Knowing how to read the small lines and numbers is a basic but important skill for anyone who sews. Let’s break it down step by step.
What Is a Sewing Measuring Tape?
A sewing tape measure is a flexible ruler. It is often made of reinforced fabric or plastic. This lets it bend around curves. You need this when measuring your body. It also works for round objects.
Most sewing tapes are long. They are usually 60 inches. They can also be 150 centimeters. Many tapes have both inches and centimeters marked on them. One side shows inches. The other side shows centimeters. This helps you work with different patterns. Patterns might use inches or the metric system. Using a flexible measuring tape is much better than a stiff ruler for many sewing tasks.
Interpreting the Inch Side
The inch side is very common in sewing patterns from places like the United States. It uses inches and parts of an inch. These parts are called fractions. You will see different lines on this side. These lines stand for different measurements.
Deciphering Full Inches
Let’s start with the big numbers. You will see numbers like 1, 2, 3, and so on. These are full inches. They are marked by long lines. Sometimes these lines are red or black. The numbers tell you how many full inches you have measured from the start of the tape. The very beginning of the tape, where you start measuring from, is usually marked with a metal or plastic tip. This tip is the zero point.
Recognizing Half Inches (1/2)
Between each full inch mark, you will see shorter lines. The longest line between two inch marks is the half-inch mark. It is right in the middle. This line stands for 1/2 of an inch. So, after the 1-inch mark, the next longest line is 1 and 1/2 inches. After the 2-inch mark, the next longest line is 2 and 1/2 inches. And so on. Reading fractions on sewing tape starts with knowing the half-inch mark.
Finding Quarter Inches (1/4)
Between the full inch mark and the half-inch mark, there are shorter lines. Between the half-inch mark and the next full inch mark, there are also shorter lines. The next longest lines after the half-inch line are the quarter-inch lines.
Think of the space between two full inches. Imagine dividing this space into four equal parts.
* The first line after the full inch is 1/4 inch.
* The next line is the 1/2 inch mark (which is the same as 2/4 inch).
* The next line after the 1/2 inch mark is 3/4 inch.
* The next line is the next full inch (which is the same as 4/4 inch).
So, between 1 inch and 2 inches, you will find:
* 1 and 1/4 inches
* 1 and 1/2 inches
* 1 and 3/4 inches
These lines for 1/4 and 3/4 are usually the same length. They are shorter than the 1/2 inch line but longer than the even smaller lines. This helps you tell them apart. Understanding inches on measuring tape means seeing these divisions.
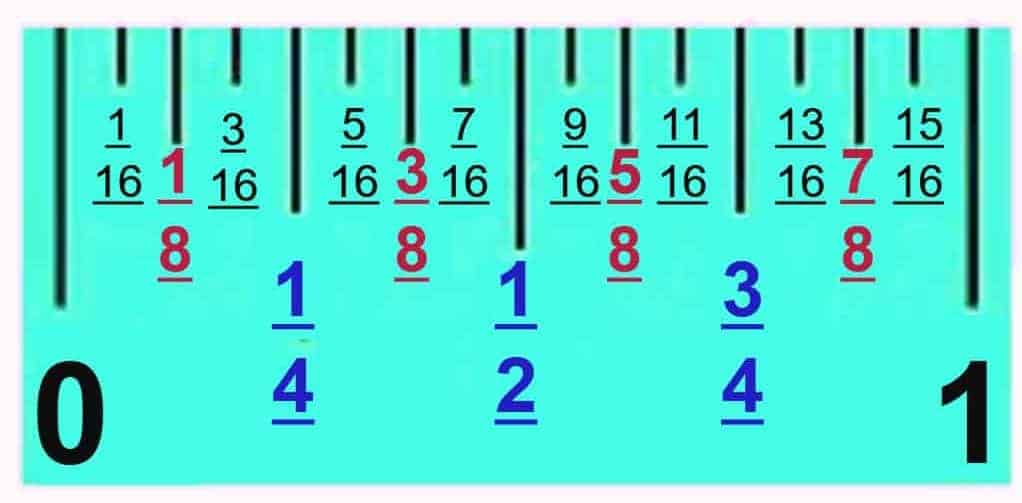
Spotting Eighth Inches (1/8)
Now let’s look closer. Between the full inch and the 1/4 inch mark, there are even smaller lines. Between the 1/4 inch and 1/2 inch marks, there are more small lines. These lines stand for eighths of an inch.
Think of the space between two full inches again. This time, imagine dividing it into eight equal parts.
* 1/8 inch
* 2/8 inch (which is the same as 1/4 inch)
* 3/8 inch
* 4/8 inch (which is the same as 1/2 inch)
* 5/8 inch
* 6/8 inch (which is the same as 3/4 inch)
* 7/8 inch
* 8/8 inch (which is the next full inch)
The lines for the eighths (like 1/8, 3/8, 5/8, 7/8) are shorter than the quarter-inch lines. They are usually the third longest lines between the full inches. This is part of sewing tape measure markings. Learning to spot these lines helps with accuracy.
Seeing Sixteenth Inches (1/16)
Some sewing tapes have even smaller lines. These are the shortest lines of all. They stand for sixteenths of an inch. Think of the space between two full inches divided into sixteen equal parts.
The lines for sixteenths fill in the gaps between the eighths.
* 1/16 inch
* 2/16 inch (same as 1/8)
* 3/16 inch
* 4/16 inch (same as 1/4)
* 5/16 inch
* 6/16 inch (same as 3/8)
* 7/16 inch
* 8/16 inch (same as 1/2)
* And so on, all the way to 15/16 inch before the next full inch.
The lines for the sixteenths (like 1/16, 3/16, 5/16, etc.) are the shortest lines between the full inches. Not all sewing tapes have sixteenths marked. But many do, especially quality ones. Reading fractions on sewing tape often involves these small marks.
Visualizing Lines and Lengths
The length of the lines helps you quickly see the measurement.
* Longest lines: Full inches (with numbers)
* Next longest line (in the middle): Half inch (1/2)
* Next longest lines: Quarter inches (1/4 and 3/4)
* Next longest lines: Eighth inches (1/8, 3/8, 5/8, 7/8)
* Shortest lines: Sixteenth inches (1/16, 3/16, 5/16, etc.)
This system of line lengths is a visual key to reading inches and fractions on tape measure.
Practicing Reading Fractions
Let’s look at some examples.
* Look at the tape after the 3-inch mark.
* The first short line is 3 and 1/16 inches.
* The next line (a bit longer) is 3 and 1/8 inches.
* The next line (even longer) is 3 and 3/16 inches.
* The next line (longer still) is 3 and 1/4 inches.
* The next line is 3 and 5/16 inches.
* The next line is 3 and 3/8 inches.
* The next line is 3 and 7/16 inches.
* The next line (the longest between the full inches) is 3 and 1/2 inches.
It might seem like a lot at first. But with practice, your eyes will get used to spotting the different line lengths. This helps you read the tape faster. Sewing tape measure markings follow a simple pattern once you know what to look for.
Decoding the Metric Side
Many sewing tapes also have a metric scale. This scale uses centimeters and millimeters. It is common in patterns outside the United States.
Grasping Centimeters (cm)
The larger numbers on the metric side are centimeters (cm). Like inches, these have long lines. They are easy to see. You will see numbers like 1, 2, 3, and so on. These are full centimeters. The starting point (zero) is at the metal tip, just like the inch side.
Interpreting Millimeters (mm)
Between each centimeter mark, there are smaller lines. There are usually ten small lines between each centimeter. These lines stand for millimeters (mm).
There are 10 millimeters in 1 centimeter.
* The first small line after a centimeter mark is 0.1 cm, which is 1 mm.
* The second small line is 0.2 cm, which is 2 mm.
* This goes up to the ninth small line, which is 0.9 cm or 9 mm.
* The tenth line is the next full centimeter mark (1.0 cm or 10 mm).
Usually, the line in the middle (the fifth line) is slightly longer than the others. This marks the half-centimeter point (0.5 cm or 5 mm).
Reading the metric scale on sewing tape measure is often easier for beginners than fractions. You count the small lines (millimeters) after the last full centimeter number.
Example:
* Look at the tape after the 10 cm mark.
* The first small line is 10.1 cm or 10 cm and 1 mm.
* The fifth small line (the slightly longer one) is 10.5 cm or 10 cm and 5 mm.
* The ninth small line is 10.9 cm or 10 cm and 9 mm.
* The next long line is 11 cm.
Choosing Your Scale
You will use the inch side or the metric side based on your sewing pattern. If your pattern gives measurements in inches (like “cut 2 pieces 10 x 12 inches”), use the inch side. If it gives measurements in centimeters (like “cut 2 pieces 25 x 30 cm”), use the metric side. Many patterns include both. Just be consistent with the side you choose for a single project.
Practical Ways to Use Your Tape Measure
Knowing how to read the tape is only the first part. The next part is using it correctly. Here are common ways you will use your sewing tape measure.
Measuring Fabric for Sewing
When you buy fabric or prepare fabric for a project, you need to measure it.
1. Lay the fabric flat: Make sure it is smooth. No wrinkles or folds.
2. Find the starting point: Place the metal tip of the tape measure at the edge of the fabric. This is your zero mark.
3. Measure length: Run the tape along the edge of the fabric to the length you need. For example, if you need 2 yards of fabric, measure to the 72-inch mark (since 1 yard = 36 inches).
4. Measure width: Fabric comes in standard widths (like 44/45 inches or 58/60 inches). Measure across the fabric from one finished edge (selvage) to the other. This tells you the actual width.
Accurate measuring helps you buy the right amount of fabric. It also helps you cut pieces to the correct size. This is a key part of how to measure fabric for sewing.
Taking Body Measurements for Patterns
Most garment patterns need your body measurements. This helps you choose the right pattern size. Sewing patterns are sized based on standard body sizes. But people come in all shapes and sizes. Taking your own measurements gives you the best fit. Using a flexible measuring tape is essential here.
Here are common body measurements needed:
* Bust: Measure around the fullest part of your chest. Keep the tape level around your back.
* Waist: Measure around the narrowest part of your torso. This is usually just above your belly button.
* Hip: Measure around the fullest part of your hips and bottom. Keep the tape level.
* High Bust: Measure around your chest, just under your arms and above your bust. This helps fit the upper chest and shoulders.
* Back Waist Length: Measure from the base of the neck (the bone that sticks out) down your back to your natural waistline.
* Front Waist Length: Measure from the top of your shoulder, across the bust, down to your natural waistline.
* Sleeve Length: Measure from the bone at the top of your shoulder down to where you want the sleeve cuff to be.
* Inseam: Measure from your crotch down the inside of your leg to your ankle.
Important Tips for Body Measurements:
* Wear clothes that fit close to your body. Or wear just your undergarments. Bulky clothes add extra inches.
* Stand up straight.
* Hold the tape measure snugly against your body. But do not pull it tight. It should not dig into your skin.
* Keep the tape measure level, especially for bust, waist, and hip. Look in a mirror to check.
* Have someone help you if possible. It is easier to get accurate measurements with help.
Taking body measurements for patterns is a vital first step in making clothes that fit well. This is part of a basic sewing measurements process.
Measuring Pattern Pieces
Once you have chosen your pattern size, you might need to measure parts of the pattern pieces themselves.
* Check lengths: Measure the length of a skirt panel or a sleeve piece.
* Check widths: Measure the width of a waistband or a pant leg.
* Measure curves: Use the flexible tape measure to measure curved edges, like necklines or armholes. Hold the tape on its edge to follow the curve accurately.
* Verify seam allowances: Patterns include extra fabric around the edges for sewing seams. This is the seam allowance. It is often 5/8 inch (about 1.5 cm) or 1/2 inch (about 1.3 cm). You can use your tape measure to check the width of the seam allowance marked on the pattern.
Measuring pattern pieces helps make sure everything is cut correctly.
Checking Seam Allowances and Hems
When you sew, you stitch at a certain distance from the edge of the fabric. This distance is the seam allowance. Using your tape measure helps you stitch a straight, accurate seam allowance.
You can:
* Mark the seam allowance on your fabric before sewing.
* Check your seam allowance while sewing by aligning the tape measure with your presser foot.
For hems, you fold up the edge of the fabric. You fold it up a certain amount. Use your tape measure to check that your fold is the correct depth all the way around. This ensures a neat and even hem.
Essential Basic Sewing Measurements
Certain measurements come up often in sewing. Knowing these helps you work with patterns and instructions. This is like having a sewing measurement guide in your head.
Here are some basic sewing measurements you will use often:
| Measurement Term | What it is | Common Use in Patterns |
|---|---|---|
| Bust Circumference | Around the fullest part of the chest | Choosing top/dress size |
| Waist Circumference | Around the narrowest part of the torso | Choosing pant/skirt/dress size, fitting waistbands |
| Hip Circumference | Around the fullest part of hips/bottom | Choosing pant/skirt size |
| Back Waist Length | From neck bone down back to waist | Fitting bodice length |
| Front Waist Length | From shoulder over bust to waist | Fitting bodice length |
| Shoulder Width | Across the back from shoulder point to point | Fitting shoulders of garments |
| Sleeve Length | From shoulder point down the arm | Deciding on sleeve type/length |
| Inseam Length | From crotch down inside of leg | Determining pant length |
| Outseam Length | From waist to ankle (or floor) outside of leg | Determining pant/skirt length from waist |
| Fabric Width | Across the fabric from selvage to selvage | Planning fabric needed, laying out pattern pieces |
| Fabric Length (Yardage) | How long the fabric piece is (measured) | Buying the right amount of fabric |
| Seam Allowance | Distance from fabric edge to stitch line | Sewing accurate seams (e.g., 5/8″, 1/2″, 1.5 cm) |
| Hem Allowance | Amount of fabric folded up at the bottom edge | Finishing edges of garments, curtains, etc. |
Understanding these basic sewing measurements makes reading patterns and instructions much clearer.
Useful Tips for Accurate Measuring
Getting accurate measurements is key to good sewing results. Here are simple tips to help you use your sewing tape measure correctly every time.
- Always start at Zero: The metal tip of the tape is usually the zero point. Make sure you place this tip right at the beginning of what you are measuring. Don’t start from the edge of the plastic end itself, but from where the tape starts.
- Keep the Tape Flat and Straight: When measuring flat things like fabric, keep the tape measure smooth. Don’t let it twist or bunch up. This adds extra length and makes your measurement wrong.
- Follow Curves Carefully: When measuring curved body parts or pattern pieces, let the tape bend. Hold it against the curve. Do not pull it straight across the shortest distance. This is why using a flexible measuring tape is important.
- Read at Eye Level: Look directly at the marking on the tape. Don’t look at it from an angle. Looking from an angle can make the measurement seem slightly different. This is called parallax error.
- Check Your Measurement Twice: It is easy to misread a number or fraction. Measure the same thing two times. If you get the same result both times, you know it is right. If you get different results, measure a third time.
- Mark Clearly: If you are measuring and marking on fabric, use a fabric pen or tailor’s chalk. Mark clearly where the measurement ends.
- Use the Right Side: Make sure you are using the correct side of the tape (inches or metric) for your pattern or project. Switching between them can cause big mistakes if you are not careful.
- Don’t Stretch the Tape: Fabric tape measures can stretch over time, especially if pulled tightly often. Be gentle with your tape. This helps it stay accurate.
By following these simple tips, you will improve your measuring skills. Accurate measuring leads to better fitting garments and more successful projects.
Caring for Your Tape Measure
Your sewing tape measure is a simple tool. But taking care of it helps keep it accurate for a long time.
* Keep it clean. Fabric can get dusty or dirty. Wipe it gently if needed.
* Store it rolled up or folded neatly. Don’t let it get tangled or kinked. Kinks can damage the tape.
* Keep it away from extreme heat. Some plastics can warp.
* Do not put heavy things on it.
* Check its accuracy sometimes. Compare it to a metal ruler or another known accurate measure. If it seems stretched or shrunk, it might be time for a new one.
A well-cared-for tape measure is a reliable tool in your sewing kit.
Putting it All Together: A Sewing Measurement Guide
Let’s quickly review how everything fits together in a typical sewing project using your tape measure. This is your basic sewing measurement guide.
- Get Your Tools Ready: Have your flexible sewing tape measure, pattern, and fabric.
- Measure Yourself (if making clothes): Use the inch or metric side (whichever your pattern uses) to take accurate body measurements. Refer to the list of common body measurements. Record these numbers. This helps you pick your pattern size.
- Check Your Fabric: Measure your fabric length and width to make sure you have enough. Use the how to measure fabric for sewing steps.
- Prepare Pattern Pieces: Measure any parts of the pattern pieces if the instructions tell you to. For example, checking length or confirming seam allowance width.
- Cut Fabric: Lay out your pattern pieces on the fabric according to the layout guide. Cut carefully.
- Sew: While sewing, use your tape measure to check seam allowances. Make sure you are stitching the correct distance from the edge. For example, measure 5/8 inch from the edge.
- Hemming: Use your tape measure to fold up the hem allowance evenly around the bottom edge of your garment.
- Finishing: Use your tape measure for any final measurements needed, like placing buttons evenly or checking the finished length of the garment.
Every step relies on getting the measurements right. Master how to read a sewing measuring tape, and you master a key sewing skill.
Frequently Asked Questions (FAQ)
Here are answers to common questions about using a sewing tape measure.
Q: What is the difference between a sewing tape measure and a regular ruler?
A: A regular ruler is stiff and straight. A sewing tape measure is flexible. You need flexibility to measure curves, like around a body part or a curved seam on a pattern piece.
Q: Why do some sewing tapes have two sides?
A: One side usually shows inches and fractions of an inch. The other side shows metric measurements (centimeters and millimeters). This lets you easily work with sewing patterns from different places that use either measurement system.
Q: How do I know which side (inches or metric) to use?
A: Look at your sewing pattern or project instructions. They will tell you which system to use. For example, if the pattern says “cut a 15 inch square,” use the inch side. If it says “sew 1.5 cm from the edge,” use the metric side.
Q: What does 5/8 inch mean on a sewing tape?
A: 5/8 inch is a common seam allowance. On the inch side, find the last full inch number (like 3 inches). Then count the eighth-inch lines after that number. There are 8 small eighth-inch lines between full inches. The 5/8 inch mark is the fifth eighth-inch line after the full inch mark. It is shorter than the 1/2 inch mark but longer than the 1/16 inch marks. Reading fractions on sewing tape gets easier with practice.
Q: My pattern says I need 2 yards of fabric. How do I measure that with my tape?
A: Most sewing tape measures are 60 inches long. One yard is 36 inches. So, 2 yards is 36 inches + 36 inches = 72 inches. If your tape is only 60 inches, you will need to measure 60 inches, make a mark, then move the tape and measure another 12 inches from that mark to reach 72 inches total. Or, you can use a longer tape measure if you have one. Many fabric stores have longer measuring tools.
Q: How do I measure around my head for a hat?
A: Use your flexible sewing tape measure. Wrap it around the widest part of your head, usually just above your eyebrows and ears. Keep the tape snug but not tight. Read the number where the tape overlaps. This is your head circumference measurement.
Q: My tape measure looks stretched. What should I do?
A: Fabric tape measures can stretch over time, especially older ones or those pulled too tight. If you think your tape is no longer accurate, it is best to buy a new one. Comparing it to a metal ruler is a good way to check. Place the start of your tape measure at the zero mark on the metal ruler. Check if the inch or centimeter marks match up down the length.
Conclusion
Learning how to read a sewing measuring tape is a basic step in sewing. It lets you work with patterns, measure fabric, and fit clothes. Start by knowing the full inches or centimeters. Then look at the lines for fractions or millimeters. Use your flexible tape for body measurements and curves. Keep it flat for straight lines. With a little practice, reading your tape measure will become fast and easy. Accurate measuring is the start of successful sewing projects.