
Setting up your new Brother sewing machine is a simple task. This guide will show you how to do the sewing machine initial setup step by step. It is perfect for your first time sewing machine setup. You will learn how to get your machine ready to sew quickly and easily.
Setting up a Brother sewing machine involves placing it correctly, winding and inserting the bobbin, putting in the needle, and threading the upper thread. Follow these steps, and you will be ready to sew in no time.
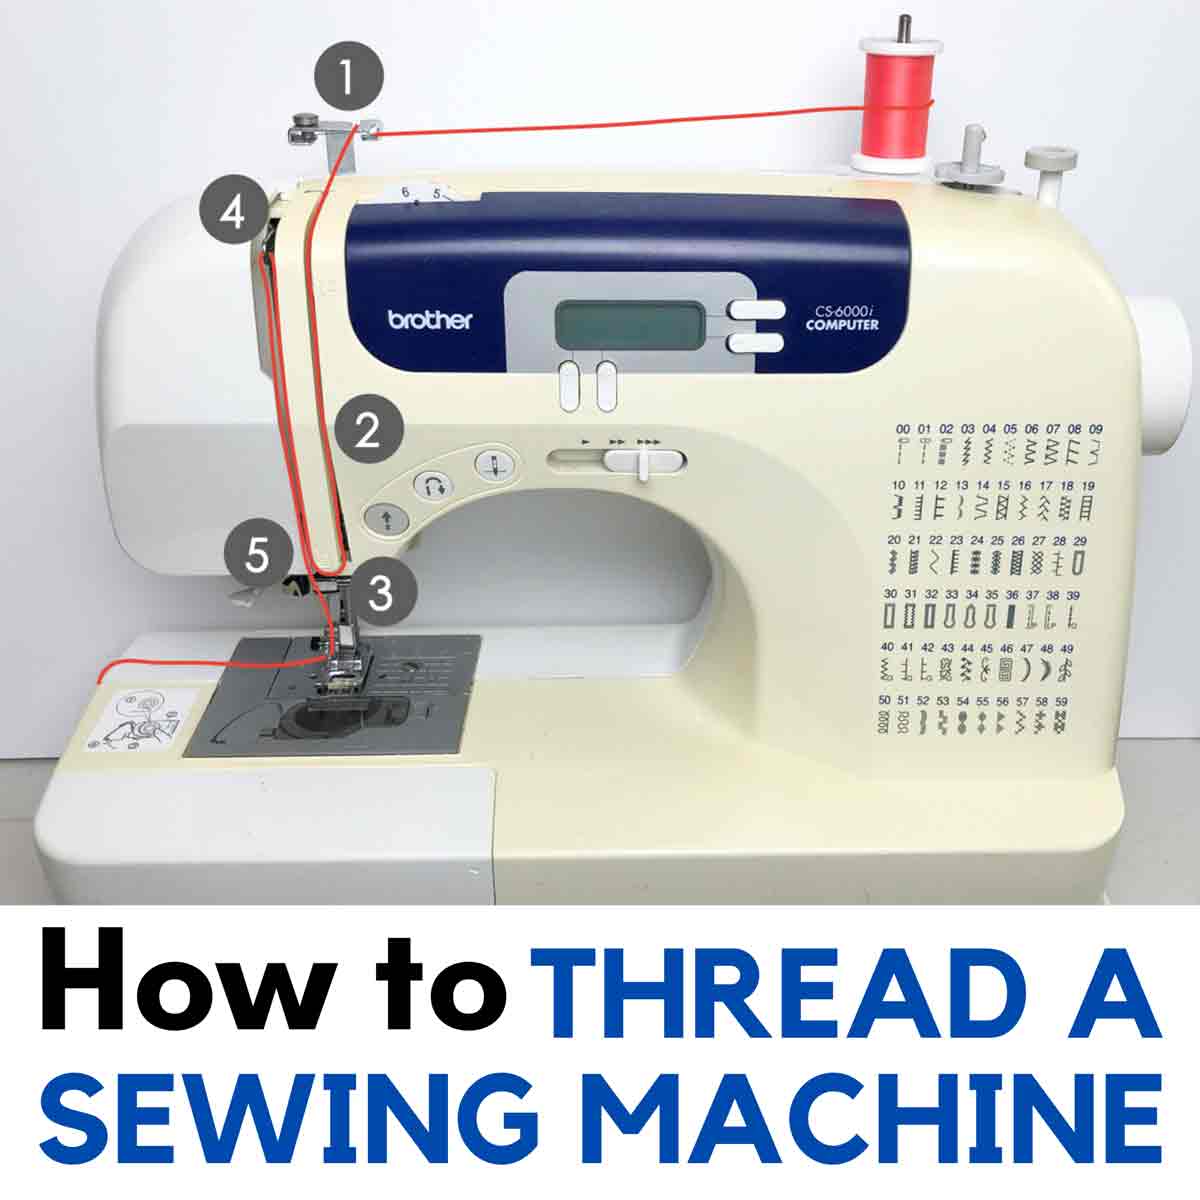
Image Source: mindymakes.com
Get Ready to Sew
Before you start, make sure you have everything you need. This makes the setup smooth. Think of this as your beginner sewing machine setup checklist.
- Your Brother sewing machine.
- The power cord.
- The foot controller.
- A new needle (if needed, or use the one already in the machine).
- A spool of thread.
- An empty bobbin that came with your machine.
- Your machine’s manual. Keep it close!
- A small piece of scrap fabric for testing.
Make sure you have a flat, sturdy place to put your machine. It should be at a comfortable height. You will need an electrical outlet nearby.
Place Your Machine
Pick a good spot for your sewing machine.
- Choose a level table or desk.
- Make sure it’s strong enough to hold the machine steady.
- You need space around the machine to move fabric.
- Sit in a comfortable chair in front of the machine.
Now, connect the power.
- Find the socket on your machine for the power cord.
- Plug one end of the power cord into the machine.
- Plug the other end into the wall outlet.
- Find the socket for the foot controller.
- Plug the foot controller into the machine.
- Turn on the machine’s power switch. It might light up.
Your machine is now connected to power. Do not press the foot controller yet.
Wind the Bobbin
Winding the bobbin is a key step. The bobbin holds the lower thread. You will need an empty bobbin and a spool of thread. Learning how to set up bobbin Brother machines is easy. This is also known as winding bobbin Brother sewing machine.
Get Your Thread Ready
- Take your spool of thread.
- Put it on the spool pin. The spool pin is usually on the top of the machine.
- Make sure the thread comes off the spool correctly. Check your manual for the right direction.
- Some spool pins stand up, some lay flat. Adjust yours if needed.
- Put a spool cap on the pin to hold the thread in place.
Set Up the Bobbin Winding
- Find the bobbin winding pin or spindle. It’s often on the top or front right of the machine.
- Place your empty bobbin onto this pin. Push it down firmly.
- Locate the thread guide for bobbin winding. It looks like a hook or disc.
- Take the thread from the spool.
- Guide the thread following the path shown on your machine or in the manual.
- Wrap the thread around the bobbin winding tension disc. This disc helps wind the bobbin evenly.
- Pull the thread towards the empty bobbin.
- Thread the end of the thread through the small hole on the edge of the bobbin. Pull about 3-4 inches through.
Start Winding
- Hold the thread end coming out of the bobbin. Keep it slightly away from the bobbin.
- Slide the bobbin winding pin to the winding position. This usually clicks into place. It moves the pin closer to the machine body.
- Gently press the foot controller or the start/stop button. The bobbin will start to spin.
- The machine might stop the sewing needle from moving during this time. This is normal.
- Let the bobbin wind. It will fill up with thread.
- The machine might automatically stop when the bobbin is full. Or you might need to stop it yourself. Watch it fill up.
- Stop winding when the bobbin is full but not overfilled. It should look smooth.
- Cut the thread between the spool and the full bobbin. Use the thread cutter if your machine has one.
Finish Winding
- Slide the bobbin winding pin back to its original position.
- Carefully take the full bobbin off the pin.
- Snip off the small thread tail you were holding at the start.
You now have a perfectly wound bobbin. This is a key part of the Brother sewing machine setup guide. Keep it close.
Insert the Bobbin
Now you need to put the wound bobbin into the machine. This is how you thread bobbin case Brother machines use. Brother machines usually have a top-loading bobbin or a front-loading bobbin case.
Top-Loading Bobbin
Most newer Brother machines have a top-loading bobbin. It’s very easy.
- Make sure the machine is off.
- Open the bobbin cover plate. This is usually a clear plastic cover on the flat bed part of the machine, below the needle. There might be a small lever or button to slide it open.
- Take out the empty bobbin if there is one.
- Take your full bobbin. Look at how the thread comes off the bobbin. It usually needs to unwind in a specific direction. For Brother top-loading systems, the thread often needs to come off the bobbin counter-clockwise, forming a ‘P’ shape with the thread coming towards you. Check your manual to be sure.
- Place the bobbin into the bobbin case area. It should drop in easily.
- Follow the thread path marked on the machine or the bobbin cover plate. There will be a small slot or groove.
- Pull the thread through this slot. Pull it gently until it goes under a metal guide. This is the bobbin tension spring. It controls the thread tension.
- Pull the thread about 4-6 inches past the guide.
- Close the bobbin cover plate.
Front-Loading Bobbin Case
Some older or mechanical Brother machines have a front-loading bobbin case.
- Make sure the machine is off.
- Open the cover on the front of the machine below the needle plate. This might swing open or pull off.
- Take out the bobbin case. It usually has a latch or handle.
- Open the bobbin case.
- Take your full bobbin. Place it inside the bobbin case. Make sure the thread unwinds in the correct direction for the case. There is usually a picture on the case or in the manual. It’s often clockwise for these cases.
- Guide the thread through the slot on the side of the bobbin case. Pull it under the tension spring.
- Leave about 4-6 inches of thread hanging out of the case.
- Hold the bobbin case by its latch.
- Insert the bobbin case back into the machine. It should click or slide firmly into place.
- Release the latch.
- Close the front cover.
Putting in the bobbin correctly is vital. This ensures the lower thread has the right tension. You have now successfully learned how to insert bobbin Brother sewing machine.
Insert the Needle
Putting the needle in correctly is very important. A wrong needle can cause problems. This step is also called needle insertion sewing machine.
Get the Right Needle
- Sewing machine needles have different types and sizes.
- The type depends on the fabric you will sew (e.g., universal, ballpoint, denim).
- The size depends on the thread and fabric weight (smaller numbers for lighter fabrics, larger for heavier).
- For beginners, a size 90/14 universal needle is a good start for medium cotton fabric.
- Always use a needle designed for home sewing machines.
Put the Needle In
- Make sure the machine is off. Safety first!
- Raise the needle to its highest position. Turn the handwheel towards you.
- Lower the presser foot lever. This makes it easier to reach the needle clamp.
- Look at the top of the needle. It has a flat side and a round side.
- Brother machine needles need the flat side to face the back of the machine. This is very important.
- Your machine has a needle clamp screw. You need to loosen this screw. Use a small screwdriver if your machine came with one. Or some machines have a knob you can turn by hand.
- Loosen the screw just enough to take the old needle out or put a new one in. Do not unscrew it completely.
- If there’s an old needle, pull it straight down and out. Put it in a safe place like an old container (needles are sharp!).
- Take your new needle. Hold it with the flat side facing the back.
- Push the needle up into the needle clamp as far as it will go. It should sit snugly at the top.
- While holding the needle up, tighten the needle clamp screw firmly. Do not overtighten.
- Make sure the needle is secure and facing the right way.
You have just finished inserting needle Brother sewing machine. A correctly inserted needle prevents skipped stitches and thread breaks.
Thread the Upper Thread
Now you need to thread the top part of the machine. This is often called threading Brother sewing machine. Follow the numbers or arrows on your machine. Most machines have a numbered path.
Start the Threading Path
- Make sure the machine is off.
- Raise the presser foot lever. This opens the tension discs. If the presser foot is down, the tension discs are closed, and the thread won’t go in correctly.
- Place your spool of thread on the spool pin. Put the spool cap on.
- Find the first thread guide. It’s usually at the top. Guide the thread into it.
- Follow the path down the right side of the machine. There’s usually a channel or groove.
- Guide the thread down to the tension discs. These are often hidden behind a cover. The thread must go between these discs. This gives the thread tension.
- Most machines have a U-turn or a sharp bend in the path after the tension discs. Follow this path upwards.
Catch the Take-up Lever
- This is a very important step. The take-up lever moves up and down as you sew. The thread must go through it.
- The take-up lever is usually on the front of the machine, visible in a slot.
- Make sure the take-up lever is at its highest point. Turn the handwheel towards you until it is up.
- Bring the thread up from the tension discs path.
- Thread the take-up lever. There is usually a hook or hole on the lever. Pull the thread through it. Sometimes you thread it from side to side, other times from front to back. Check your machine’s marking.
- After going through the take-up lever, the thread path goes back down.
Thread the Needle
- Follow the path down from the take-up lever towards the needle.
- There will be more thread guides along the way. Thread through each one. They keep the thread from tangling. There might be guides just above the needle.
- Now, you need to put the thread through the eye of the needle.
- Cut the end of the thread cleanly with scissors. This makes it easier to push through.
- Thread the needle from the front to the back.
- Pull about 4-6 inches of thread through the needle eye.
- Pull this thread tail under the presser foot and towards the back of the machine.
Many Brother machines have a needle threader. This tool makes threading the needle much easier. Learn how to use yours if you have one. It saves your eyes!
You have now threaded the upper thread. This completes the threading Brother sewing machine process.
Get the Bobbin Thread Up
You have the upper thread through the needle. You have the bobbin thread in the bobbin case. Now you need to bring the bobbin thread up so you can sew.
- Make sure the presser foot is down.
- Hold the end of the upper thread tail gently with your left hand.
- Turn the handwheel towards you slowly. Watch the needle go down into the needle plate hole. It goes all the way down and then comes back up.
- As the needle comes back up, it will catch the bobbin thread. It forms a small loop.
- Stop turning the handwheel when the needle is at its highest point.
- Use a pin, the tip of scissors, or your finger to pull on the loop of bobbin thread that has appeared on the needle plate.
- Pull the loop gently. The bobbin thread tail will come up through the needle plate hole.
- Pull both the upper thread and the bobbin thread tails under the presser foot.
- Pull them towards the back of the machine, about 4-6 inches long.
Now both threads are ready. They are under the presser foot and going towards the back. This is a key step in the first time sewing machine setup.
Check the Tension
Thread tension is important for nice stitches. You have tension on the upper thread (controlled by the tension discs) and on the bobbin thread (controlled by the bobbin case tension spring).
For beginners, the factory setting is usually good. It’s often marked with a number like 4 or 5.
If your stitches look messy, you might need to adjust the tension later. For now, just make sure the thread is properly seated in all the guides and tension areas.
Test Stitch
Before sewing on your real project, always test on a scrap of the same fabric.
- Take a small piece of your fabric.
- Place it under the presser foot. Line up an edge with a seam guide line on the needle plate.
- Lower the presser foot lever. The presser foot holds the fabric down. You cannot sew properly with the presser foot up.
- Hold the thread tails (both upper and bobbin) at the start of the fabric. Hold them gently towards the back for the first few stitches. This helps prevent tangling.
- Slowly press the foot controller or the start/stop button. The machine will start to sew.
- Guide the fabric gently with your hands. Do not push or pull it hard. The machine feeds the fabric itself.
- Sew a few inches in a straight line.
- Stop sewing. Raise the needle to its highest position.
- Raise the presser foot lever.
- Pull the fabric away from the machine towards the back.
- Cut the threads. Use the thread cutter on the side of the machine if it has one, or use scissors.
Now, look at your test stitch.
- Check the top side of the fabric. The stitches should look like even dashes.
- Check the bottom side of the fabric. The stitches should also look like even dashes.
- The upper thread and bobbin thread should meet neatly between the layers of fabric.
If the stitches look good, you are ready to sew! This test is part of your Brother sewing machine setup guide.
Beginner Tips for Success
Here are some extra tips for your beginner sewing machine setup and first projects.
- Read Your Manual: Seriously, read it. It has pictures and details specific to your model. It is the best Brother sewing machine setup guide you can have.
- Use the Right Needle: A dull or wrong needle causes problems. Change needles often (after every project or every 8-10 hours of sewing).
- Use Matching Thread: Use the same type and weight of thread for both the upper thread and the bobbin thread.
- Sit Straight: Sit comfortably and straight in front of the machine.
- Focus on Guiding: Your hands guide the fabric, they don’t push or pull.
- Start Slow: No need to go fast at first. Get comfortable with the machine speed.
- Practice: Sew straight lines, curves, and corners on scrap fabric.
- Clean Your Machine: Lint builds up. Clean out the bobbin area regularly. Your manual will show you how.
- Safety First: Always turn off the machine when changing the needle or presser foot. Keep fingers away from the needle while sewing.
Deciphering Common Problems
Sometimes things don’t work perfectly the first time. Don’t worry! Many issues are easy to fix. This helps you with your first time sewing machine setup and beyond.
- Thread breaks:
- Upper thread breaks: Check if the machine is threaded correctly (presser foot up?), check tension, check needle insertion (flat side back?), check if the needle is bent or dull, check if the thread is old or poor quality.
- Bobbin thread breaks: Check if the bobbin is wound correctly (too loose or too tight?), check if the bobbin is inserted correctly into the case (thread in the tension slot?), check for lint in the bobbin case area.
- Skipped Stitches:
- Most common cause is a bent, dull, or incorrectly inserted needle. Change the needle, make sure the flat side is to the back.
- Needle type is wrong for the fabric.
- Machine is not threaded correctly.
- Thread loops on top of fabric:
- This usually means the upper tension is too tight OR the bobbin tension is too loose. For beginners, the most likely cause is the upper thread is not correctly seated in the tension discs or not threaded through the take-up lever. Re-thread the entire upper path with the presser foot UP.
- Thread loops on bottom of fabric:
- This means the upper tension is too loose OR the bobbin tension is too tight. Again, re-threading the upper path correctly often fixes this. Make sure the thread is really in between the tension discs.
- Machine won’t sew:
- Is the power on?
- Is the foot controller plugged in?
- Is the bobbin winder pin pushed to the sewing position (not winding position)?
- Is the presser foot down? The machine won’t sew if the presser foot is up on most models.
- Is thread or fabric jammed anywhere?
Consult your manual for specific troubleshooting steps for your model.
Learning About Your Machine
Your Brother machine might have different stitches or features. Spend some time exploring them.
- Stitch Selector: This dial or buttons change the stitch pattern (straight stitch, zig-zag, etc.).
- Stitch Length: Controls how long each stitch is.
- Stitch Width: Controls how wide stitches like zig-zag are.
- Reverse Lever/Button: Allows you to sew backward to lock stitches.
- Presser Feet: Your machine came with different feet for different tasks (like zippers or buttons). Learn what they do.
Your sewing machine initial setup includes getting familiar with these parts.
Table: Basic Machine Parts
Here is a simple table of common parts you interacted with during setup.
| Part Name | What it does | Location (Typical) |
|---|---|---|
| Spool Pin | Holds the spool of thread | Top of machine |
| Spool Cap | Holds the thread spool in place | On the spool pin |
| Bobbin Winder Pin | Holds the bobbin while winding | Top or front right |
| Bobbin Winder Guide | Guides the thread for winding | Near the spool pin |
| Bobbin Tension Disc | Puts tension on the thread while winding bobbin | Near the bobbin winder guide |
| Handwheel | Manually moves the needle up and down | Side of the machine |
| Thread Guides | Guide the upper thread along its path | Various points on the machine body |
| Tension Discs | Control the tension of the upper thread | Usually behind a cover |
| Take-up Lever | Pulls the upper thread for each stitch | Visible slot on the front |
| Needle Clamp | Holds the needle in place | Bottom of the needle bar |
| Needle Clamp Screw | Tightens the needle in the clamp | On the needle clamp |
| Presser Foot | Holds the fabric down against the feed dogs | Below the needle |
| Presser Foot Lever | Raises and lowers the presser foot | Back or side of the needle bar area |
| Needle Plate | Metal plate under the needle with stitch guides | On the flat bed |
| Feed Dogs | Metal teeth that move the fabric forward | Under the presser foot, in the needle plate |
| Bobbin Case / Area | Holds the bobbin | Under the needle plate (top-load) or front (front-load) |
| Bobbin Cover Plate | Covers the top-loading bobbin area | On the flat bed (clear plastic) |
| Foot Controller | Controls the machine speed with your foot | On the floor, plugged into machine |
| Power Switch | Turns the machine on and off | Side of the machine |
FAQ
- Do I need to oil my new Brother sewing machine?
Your manual will tell you if and where to oil. Many modern machines are self-lubricating in key areas. Check your manual first before adding any oil. - Why is my machine making a strange noise?
Stop sewing! Check if the machine is threaded correctly, especially the bobbin. Is the needle bent? Is there thread or fabric caught somewhere? Often, re-threading fixes noise issues. If it continues, consult your manual or a service center. - Can I use any bobbin in my Brother machine?
No. You should only use bobbins that came with your machine or are specifically recommended for your model by Brother. Using the wrong bobbin size or type can cause major problems. - How often should I change the needle?
Change the needle for every new project or after about 8-10 hours of sewing. Needles get dull or slightly bent even if you can’t see it, and this causes sewing problems. - My thread keeps nesting (looping) on the bottom, what’s wrong?
This is a very common issue. It almost always means the upper thread is not correctly threaded or seated in the tension discs. Re-thread the entire upper path step-by-step, making sure the presser foot is UP when you thread the tension area. - The handwheel is stiff, or the machine won’t turn:
Make sure the bobbin winder spindle is pushed to the sewing position. If it’s in the winding position, the machine won’t sew. If that’s not it, there might be a jam or lint buildup. Check the bobbin area.
Final Thoughts
Setting up your Brother sewing machine for the first time might seem like a lot of steps. But each step is simple. Just follow this guide, use your manual, and take your time.
You have learned about winding bobbin Brother sewing machine, inserting needle Brother sewing machine, and threading Brother sewing machine. You’ve got your machine through its sewing machine initial setup.
With a little practice, setting up your machine will become fast and easy. Now you are ready to explore the fun world of sewing! Enjoy making wonderful things with your Brother machine.