
Learning how to thread a sewing machine needle is a fundamental skill for any sewer, whether you’re a beginner or an experienced crafter. This guide will walk you through the process with clear, simple steps. You’ll also learn about threading a serger needle, how to put thread in a sewing machine, and the best way to thread a sewing machine for optimal results. We’ll cover everything from manual threading to utilizing an automatic needle threader sewing machine, and even touch upon preparing your bobbin and needle for perfect stitches and basic sewing machine tension adjustment.
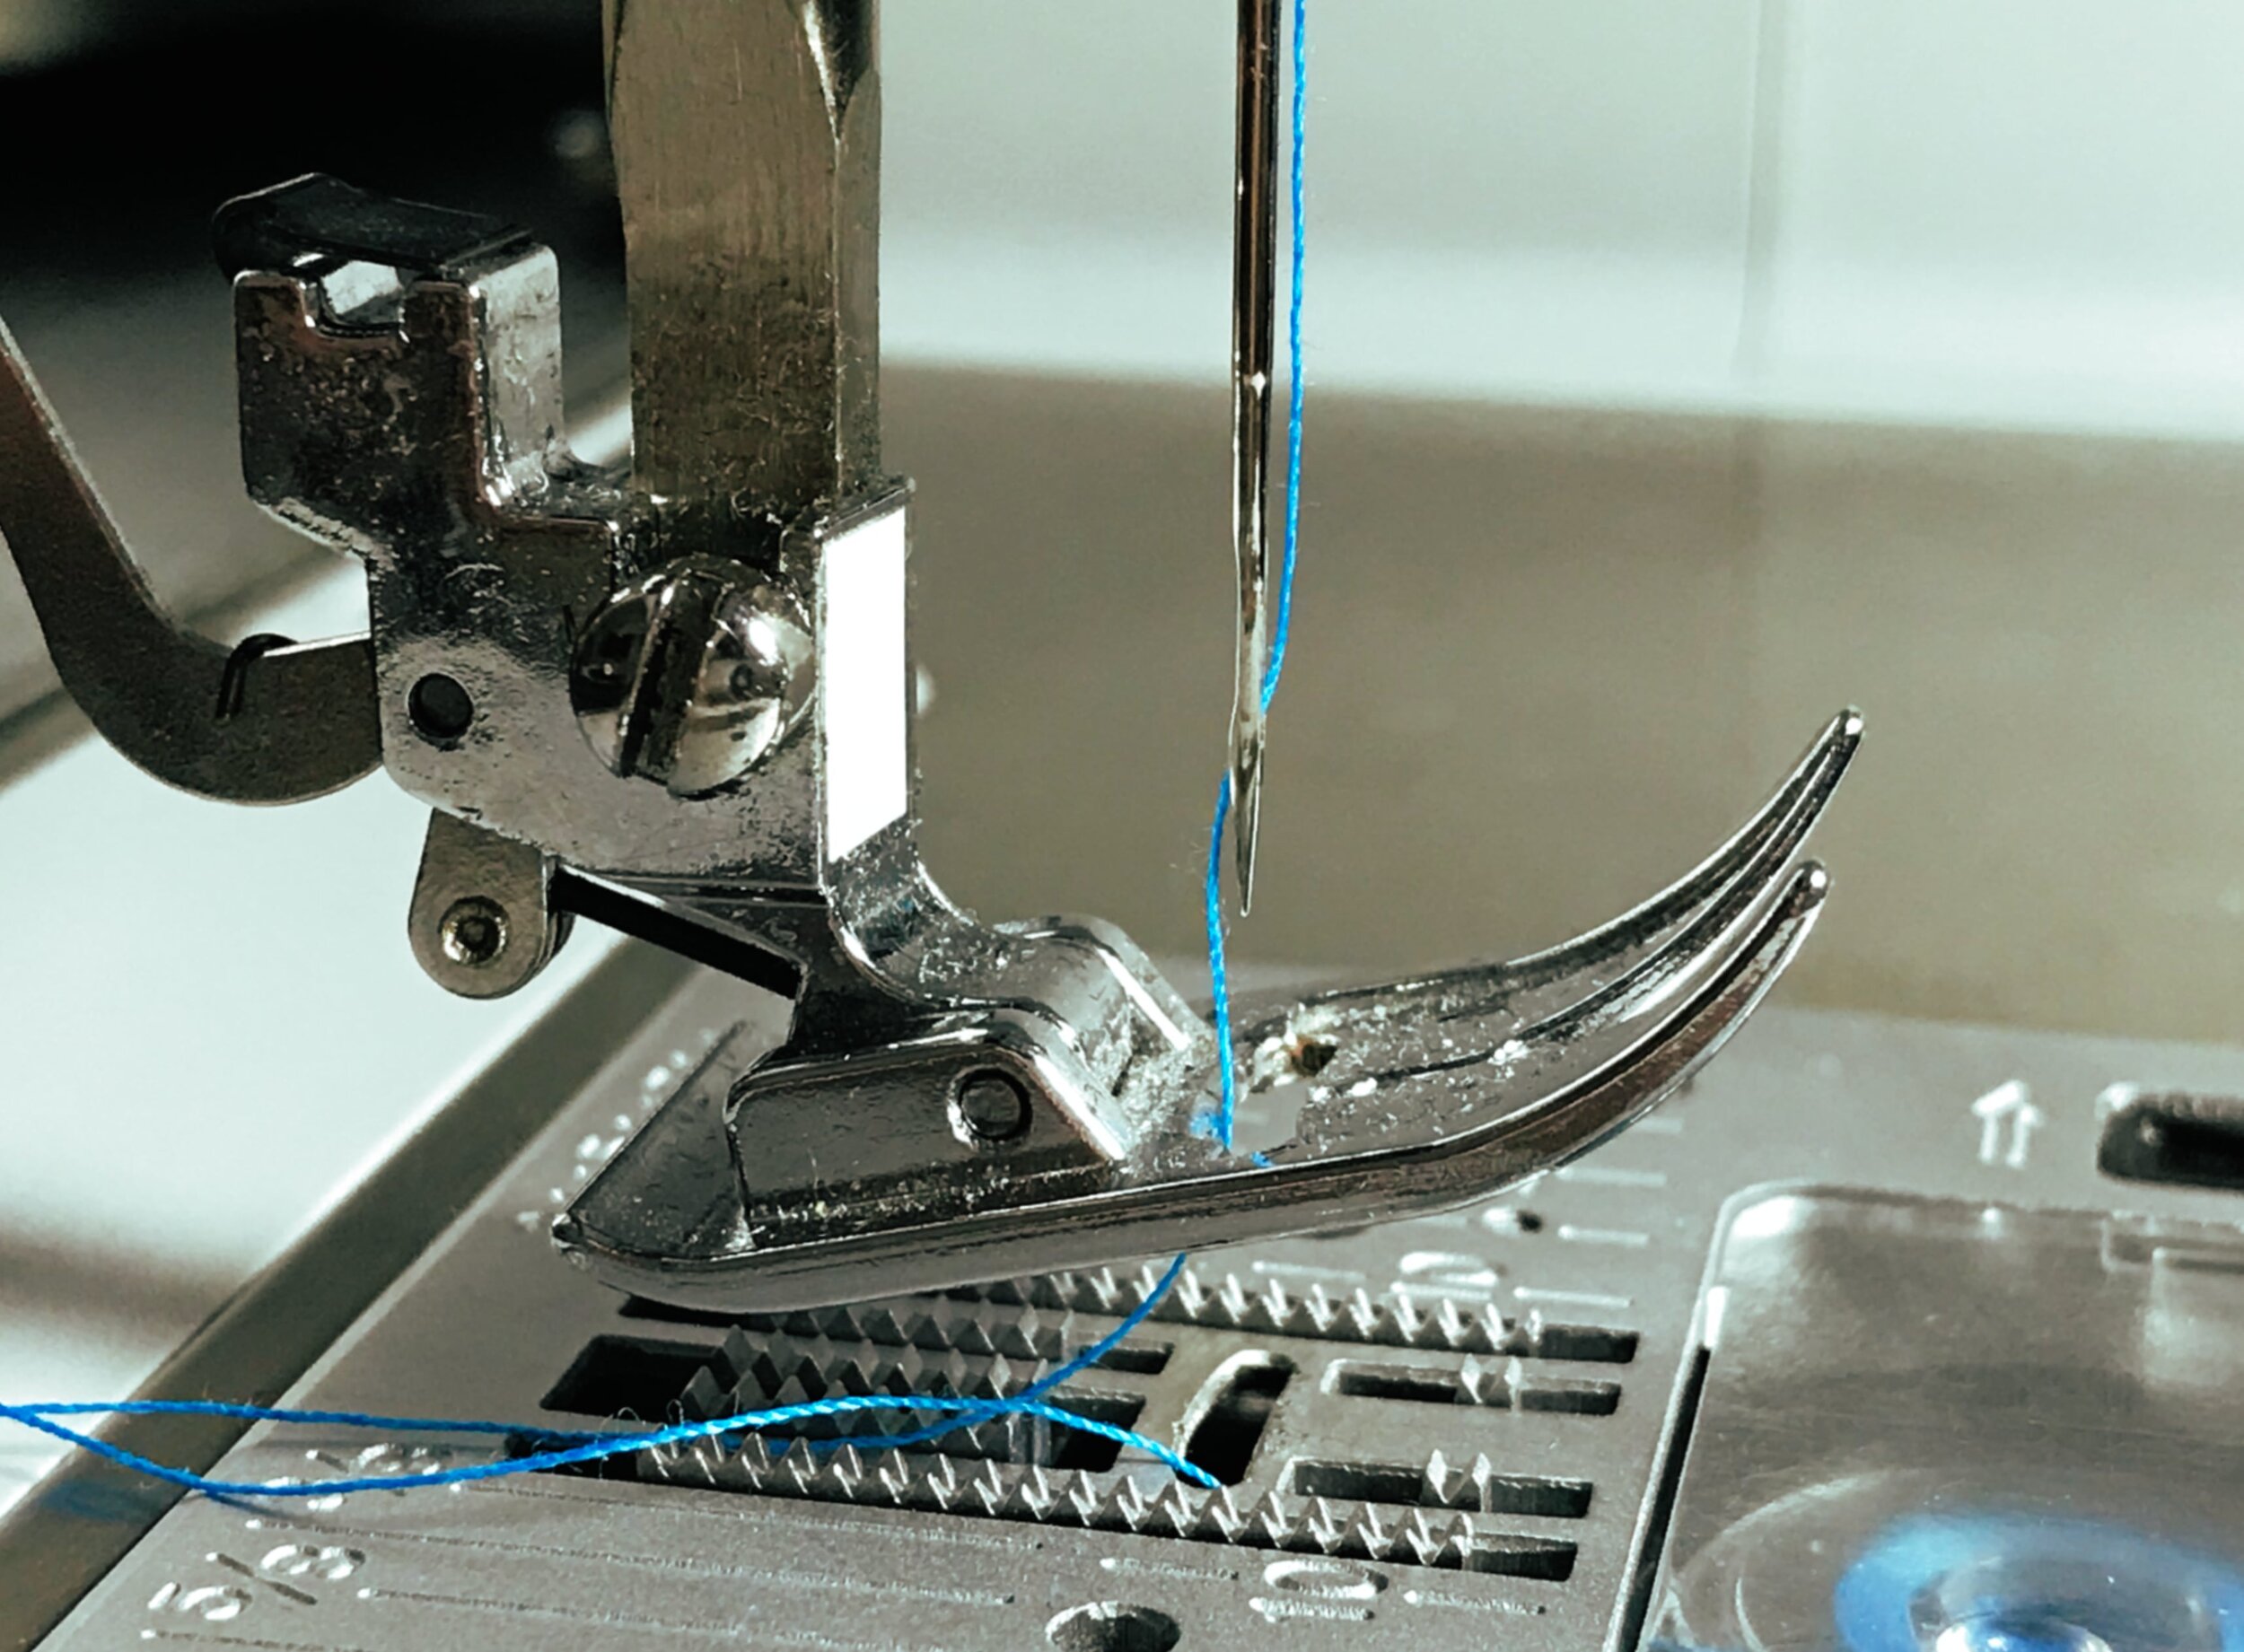
Image Source: images.squarespace-cdn.com
Getting Started: Preparing Your Sewing Machine
Before you begin threading, ensure your sewing machine is ready to go. This involves selecting the right needle for your fabric and thread, winding a bobbin, and making sure your machine is clean and in good working order. A clean machine with a new needle will make the threading process smoother and prevent skipped stitches or thread breaks.
Choosing the Right Needle
Needles come in various sizes and types for different fabrics and threads. Using the wrong needle can damage your fabric or cause thread issues.
- Universal Needles: Good for most everyday fabrics like cotton and polyester blends.
- Ballpoint Needles: Designed for knits and stretchy fabrics to prevent runs.
- Sharps Needles: For tightly woven fabrics like linen and denim.
- Leather Needles: Have a cutting point to pierce leather.
- Embroidery Needles: Feature a larger eye for embroidery thread.
Always check your sewing machine manual for recommended needle types and sizes.
Winding a Bobbin
A bobbin is a small spool that holds the lower thread for your stitches. Proper bobbin winding is crucial for even stitching.
Steps to Wind a Bobbin:
- Place a spool of thread on the spool pin.
- Find the bobbin winder spindle and place an empty bobbin on it.
- Loop the thread through the bobbin winder tension disc.
- Guide the thread through a small hole in the bobbin.
- Hold the tail of the thread with your finger.
- Engage the bobbin winder mechanism (usually by pushing the bobbin toward the winder spindle).
- Start the machine slowly to wind a few turns.
- Stop the machine and snip off the excess thread tail.
- Restart the machine and let it wind until the bobbin is full.
- Disengage the bobbin winder and cut the thread. Remove the full bobbin.
This is a vital part of knowing how to put thread in a sewing machine effectively.
Threading Your Sewing Machine: The Upper Thread
Threading the upper thread is the most critical step. Follow these sewing machine needle threading steps carefully for the best results.
Step 1: Position the Spool
Place your spool of thread on the spool pin. Ensure the thread unwinds in the correct direction, usually counter-clockwise, as indicated by your machine’s diagram. Some machines have horizontal spool pins, while others have vertical ones.
Step 2: Follow the Thread Path
Every sewing machine has a numbered or marked thread path. This path guides the thread through tension discs, guides, and a take-up lever.
- Guide the thread: Start by bringing the thread from the spool.
- Tension Discs: Pass the thread through the tension discs. These discs control how tightly the thread is pulled. Make sure the thread goes between the discs.
- Thread Guides: Follow the metal or plastic guides that direct the thread.
- Take-up Lever: This is a crucial step. The thread must pass through the eye of the take-up lever and be pulled from left to right (or as indicated by your manual).
- Lower Thread Guides: Continue following the path down towards the needle.
This part of the sewing machine threading guide is essential.
Step 3: Thread the Needle
Once the thread has followed the entire path, it’s time to thread the needle itself. This is where the “easy sewing machine threading” often gets tricky for beginners.
- Position the Needle: Ensure the needle is in its highest position. You can usually do this by turning the handwheel towards you.
- Thread Direction: Thread the needle from front to back or side to side, depending on your machine’s design and needle type. Most common is front to back.
- Amount of Thread: Pull about 4-6 inches of thread through the needle’s eye.
Step 4: Bring Up the Bobbin Thread
This step connects the upper thread to the bobbin thread, allowing you to create stitches.
- Hold the tail of the upper thread loosely with your left hand.
- Turn the handwheel towards you to lower the needle into the bobbin area. This action catches the upper thread.
- As the needle comes back up, it will snag the upper thread and pull a small loop of it down through the bobbin case.
- Use the tip of your needle or a small tool to pull this loop of thread completely through.
- You should now have two thread tails: one from the spool (upper thread) and one from the bobbin (bobbin thread).
- Place both thread tails under the presser foot and towards the back of the machine.
You have now successfully threaded the bobbin and needle for your sewing machine!
Threading a Manual Sewing Machine
Manual sewing machines, like treadle machines, operate without electricity. The threading process is similar but might have fewer guides.
- Spool Placement: Place the thread spool on the spool pin.
- Thread Path: Follow the visible thread guides and tension discs. The path might be simpler, but pay close attention to where the thread needs to go to engage the tension.
- Take-up Lever: Ensure the thread goes through the take-up lever. This is often a prominent arm that moves up and down.
- Needle Threading: Thread the needle from front to back.
- Bobbin Thread: After threading the upper thread, you’ll need to manually bring up the bobbin thread. This might involve turning a small knob or handwheel to rotate the bobbin mechanism and catch the upper thread. Pull the loop through and place both threads under the presser foot.
Manual sewing machine threading requires a bit more manual manipulation but follows the same core principles.
Using an Automatic Needle Threader Sewing Machine
Many modern sewing machines come equipped with an automatic needle threader. This feature makes threading the needle incredibly easy.
How to Use an Automatic Needle Threader:
- Thread the Machine: Follow all the steps above for threading the upper thread, up to the needle.
- Position the Thread: Drape the thread over the designated hook or guide on the automatic threader.
- Lower the Threader: Lower the automatic needle threading lever or mechanism. This usually swings a small hook or wire in front of the needle’s eye.
- Engage the Threader: The threader will automatically push a small loop of thread through the needle’s eye.
- Release the Threader: Once the thread is through, pull the threader back and up.
- Pull Through Thread: You’ll have a loop of thread. Pull about 4-6 inches through the needle.
- Bring Up Bobbin Thread: Proceed to bring up the bobbin thread as described in Step 4 of the upper thread section.
An automatic needle threader sewing machine is a fantastic convenience for sewers of all levels.
Threading a Serger Needle
Sergers (or overlock machines) thread differently than standard sewing machines because they have multiple needles and loopers. Threading a serger needle is often considered more complex.
General Steps for Threading a Serger Needle:
- Consult Your Manual: Sergers vary greatly, so your machine’s manual is your best friend.
- Color-Coded Paths: Most sergers have color-coded thread paths. Each color corresponds to a specific looper or needle.
- Order Matters: Sergers must be threaded in a specific order, usually starting with the lower loopers, then the upper looper, and finally the needles.
- Thread Guides: Follow all thread guides meticulously.
- Needle Threading: For threading a serger needle, you’ll typically thread the needle from front to back. Some sergers have air threading or automatic needle threading features.
- Tension Adjustment: After threading, tension adjustment is crucial for a balanced stitch.
Threading a serger needle requires patience and adherence to the specific sequence outlined in your machine’s manual.
Troubleshooting Common Threading Issues
Even with a detailed sewing machine threading guide, you might encounter problems. Here are some common issues and how to fix them.
Thread Not Going Through Needle
- Problem: The thread won’t pass through the needle’s eye.
- Solution:
- Ensure the needle is in its highest position.
- Check that you are threading from the correct direction (front to back or side).
- Trim the thread end cleanly with sharp scissors.
- If using an automatic needle threader, ensure it’s properly engaged and the thread is on its hook.
- Consider if the needle’s eye is too small for your thread.
Upper Thread Breaking
- Problem: The upper thread snaps during sewing.
- Solution:
- Check Thread Path: Make sure the thread is correctly seated in all guides and the tension discs.
- Needle Issues: Is the needle bent, dull, or the wrong type for the fabric? Replace it.
- Tension: Improper tension can cause stress on the thread. Adjust as needed.
- Thread Quality: Poor quality thread can be weak.
- Bobbin Area: Ensure no lint or thread is caught in the bobbin area or bobbin case.
Bobbin Thread Showing on Top
- Problem: The bobbin thread is too visible on the fabric’s surface.
- Solution:
- Upper Tension: The upper thread tension is likely too loose. Tighten it slightly.
- Lower Tension: The bobbin tension might be too tight. You might need to adjust the bobbin case screw, but be very careful and make tiny adjustments.
- Threading: Double-check that the upper thread is correctly threaded through the tension discs.
Skipped Stitches
- Problem: The machine misses stitches, leaving gaps.
- Solution:
- Needle: Ensure the needle is inserted correctly, not upside down, and is the right type and size. Replace if dull or bent.
- Threading: Re-thread the entire machine, both upper and bobbin threads.
- Bobbin: Ensure the bobbin is wound evenly and inserted correctly.
- Machine Timing: If problems persist, the machine might be out of time, requiring professional service.
Sewing Machine Tension Adjustment Basics
Proper sewing machine tension adjustment is key to creating beautiful, balanced stitches. Tension is controlled by the upper thread mechanism and the bobbin.
Upper Thread Tension
- The Dial: Most machines have a numbered dial for upper thread tension. Higher numbers generally mean tighter tension (less thread given to the stitch), and lower numbers mean looser tension.
- The Test: Always test your tension on a scrap piece of your project’s fabric. Sew a few stitches and examine them.
- Balanced Stitch: A balanced stitch looks the same on both sides of the fabric.
- Adjusting: If the bobbin thread shows on top, tighten the upper tension (increase the number). If the upper thread breaks or looks too tight, loosen the upper tension (decrease the number).
Bobbin Tension
- Bobbin Case: The tension on the bobbin is usually set by a small screw on the bobbin case (if it’s removable).
- Adjusting Bobbin Tension: This requires a small screwdriver.
- To Loosen: Turn the screw slightly counter-clockwise.
- To Tighten: Turn the screw slightly clockwise.
- Caution: Bobbin tension adjustments are delicate. Make very small turns (a quarter turn at most) and test after each adjustment. Over-tightening can cause thread breakage or damage.
The best way to thread a sewing machine also involves understanding how tension works.
Maintaining Your Sewing Machine for Easy Threading
Regular maintenance ensures your sewing machine runs smoothly and makes threading easier.
- Clean Regularly: Lint and dust can build up in the bobbin area, tension discs, and thread guides. Clean these areas after each project or regularly. Use a small brush or compressed air.
- Oiling: Follow your manual’s instructions for oiling moving parts.
- Needle Changes: Change your needle frequently, especially when switching fabrics or if you notice issues like skipped stitches or thread breakage. A dull needle is a common culprit for many sewing problems.
- Keep Manual Handy: Your sewing machine manual is invaluable for specific threading paths and maintenance advice.
Frequently Asked Questions (FAQ)
Q1: What is the easiest way to thread a sewing machine?
A1: The easiest way is to use a sewing machine with an automatic needle threader. For manual threading, ensure your machine is clean, you’re using the correct thread path, and you trim the thread end cleanly.
Q2: Can I thread my sewing machine with the presser foot down?
A2: Generally, no. For most machines, the presser foot should be in the raised position when threading the upper thread. This allows the thread to pass correctly through the tension discs. Check your manual, as some newer machines might have exceptions.
Q3: Why does my thread keep breaking when I try to thread the needle?
A3: This could be due to a bent or dull needle, the needle being inserted incorrectly, the thread snagging on a rough edge in the thread path, or the thread itself being weak.
Q4: How do I know if I’m threading my sewing machine correctly?
A4: You’ll know you’re threading correctly if the machine sews smoothly, creates balanced stitches, and doesn’t have issues like thread breaking or skipped stitches. Regularly checking your stitch quality on scrap fabric is a good indicator.
Q5: What’s the difference between threading a standard sewing machine and a serger?
A5: Standard sewing machines typically have one needle and one bobbin. Sergers have multiple needles and loopers and require threading in a specific sequence to create overlock stitches, often involving color-coded paths.
Learning how to thread a sewing machine needle is a foundational skill that opens up a world of creative possibilities. By following these steps and understanding the mechanics of your machine, you’ll be sewing with confidence in no time. Remember, practice makes perfect, so don’t be discouraged if it takes a few tries. Happy sewing!