
Can you sew without threading a sewing machine? No, you cannot sew without properly threading your sewing machine. Threading is the very first step in any sewing project. This comprehensive sewing machine threading guide will walk you through the process, from winding the bobbin to setting the stitches.
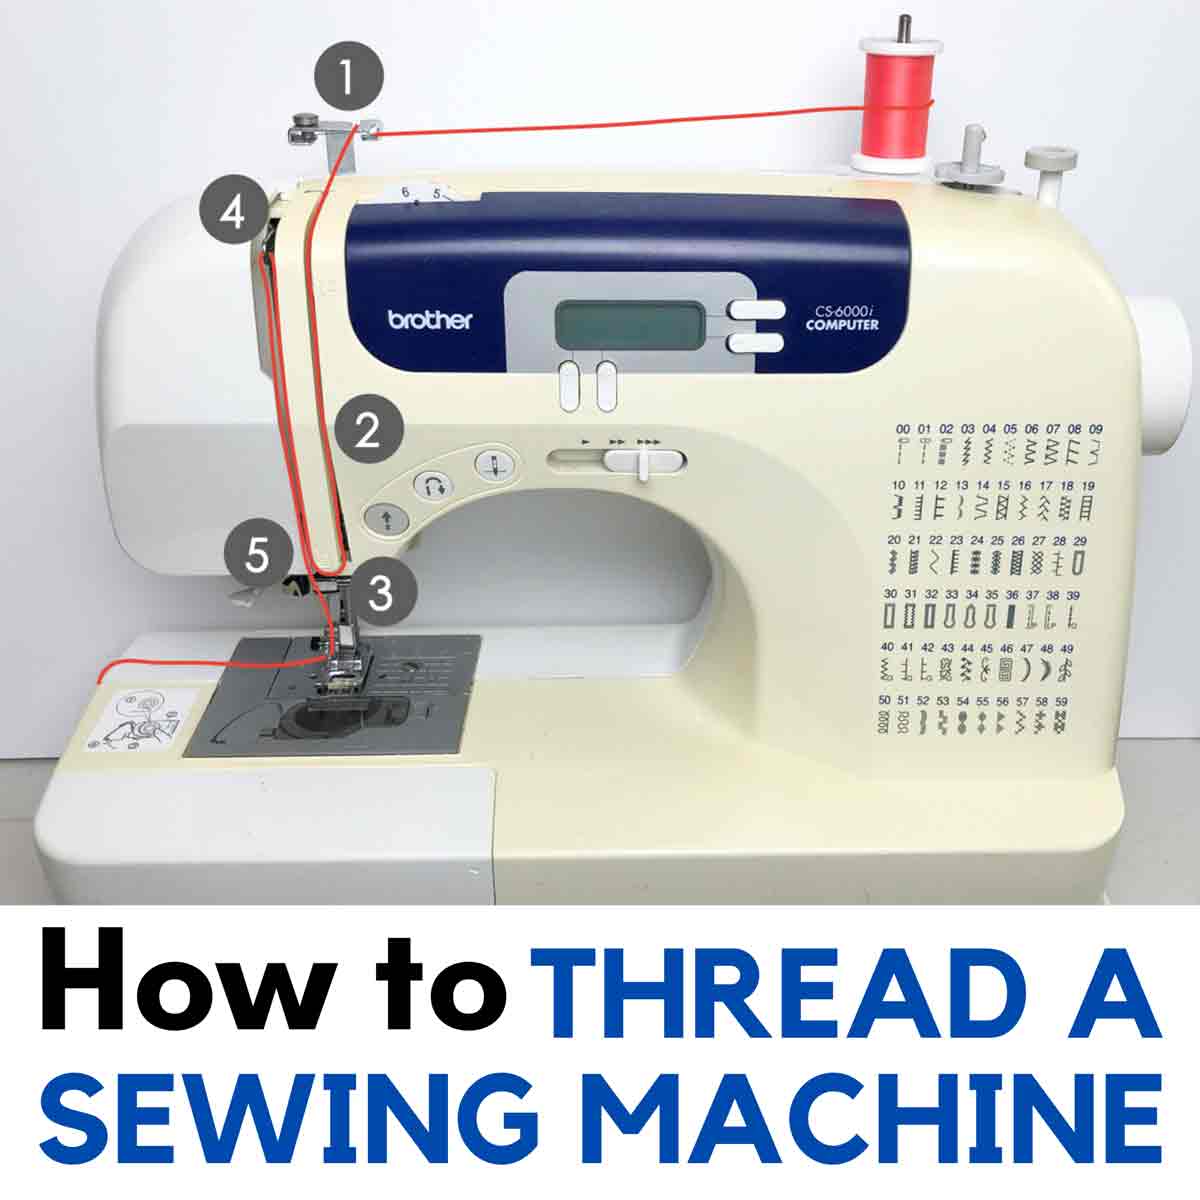
Image Source: mindymakes.com
Getting Started: Essential Sewing Machine Setup
Before we dive into threading, let’s ensure your sewing machine setup is complete. This involves a few key steps to prepare your machine for action.
Gathering Your Supplies
You’ll need a few things before you begin:
- Your Sewing Machine: Ensure it’s plugged in and powered on.
- Thread: Choose a good quality all-purpose polyester thread.
- Bobbins: Make sure they are the correct type for your machine.
- Needles: Have a few spare needles on hand.
- Your Sewing Machine Manual: This is your best friend! It has specific instructions for your model.
- A Small Scissors or Thread Cutter: For snipping the thread.
Familiarizing Yourself with Your Machine
Take a moment to look at your sewing machine. Identify these key parts:
- Spool Pin: Where you place the spool of thread.
- Thread Guides: Various loops and slots that direct the thread.
- Take-Up Lever: An arm that moves up and down, guiding the thread.
- Presser Foot: Holds the fabric in place while you sew.
- Needle Clamp Screw: Holds the needle in place.
- Bobbin Winder: For winding thread onto the bobbin.
- Bobbin Case: Holds the wound bobbin.
- Stitch Selector: For choosing different stitch types.
- Handwheel: Can be turned manually to move the needle up or down.
Step-by-Step: Threading the Upper Thread Sewing Machine
This is often the most crucial part of sewing machine manual threading. Getting the upper thread sewing machine path correct ensures your stitches will form properly.
Step 1: Placing the Spool of Thread
- Locate the spool pin on your sewing machine. It’s usually at the top.
- Slide your spool of thread onto the spool pin.
- Ensure the thread unwinds from the spool in the correct direction. Most machines require the thread to unwind from the front of the spool. Check your manual if you’re unsure.
- Place a spool cap on the end of the spool to keep it secure if your machine came with one.
Step 2: Winding the Bobbin
Before you can thread the lower thread sewing machine, you need a wound bobbin. This process is called sewing machine bobbin winding.
- Prepare the Bobbin: Place an empty bobbin onto the bobbin winder spindle. Make sure it’s seated correctly. Some machines have a small peg or clip to hold the bobbin in place.
- Thread the Bobbin Winder:
- Bring the end of your upper thread from the spool.
- Find the bobbin winder thread guide, usually a small hole or hook near the winder spindle.
- Guide the thread through this guide.
- Now, you need to thread the sewing machine needle to start the winding. Take the thread end and pass it through the small hole in the center of the bobbin from the inside out.
- Pull a few inches of thread through the bobbin.
- Hold the thread tail securely.
- Engage the Bobbin Winder: Move the bobbin winder spindle to the engaged position. Often, this involves sliding or pushing a mechanism so the bobbin spindle is next to the handwheel.
- Start Winding: Gently turn the handwheel towards you to start winding the bobbin. As it starts to wind, snip off the excess thread tail from the bobbin.
- Wind Evenly: Continue winding. Most machines have an automatic stop when the bobbin is full, or a built-in thread cutter. Try to guide the thread so it winds evenly onto the bobbin. Uneven winding can cause tension issues later.
- Stop Winding: Once the bobbin is full, the machine may stop automatically. If not, stop it manually.
- Disengage and Trim: Disengage the bobbin winder spindle by moving it back to its original position. Trim the thread close to the bobbin.
- Remove the Wound Bobbin: Carefully slide the wound bobbin off the spindle.
Step 3: Threading the Upper Thread Path
Now that your bobbin is wound, let’s get the upper thread sewing machine threaded. Follow these general steps, but always refer to your machine’s manual for precise guidance.
-
Guide the Thread:
- Bring the thread from the spool, over the spool pin.
- Follow the numbered thread path on your machine. These numbers are your best friend!
- Pass the thread through the first thread guide.
- Go up and around to the take-up lever. Make sure the thread passes through the slot of the take-up lever from the outside inwards. The take-up lever should be in its highest position for this. You can turn the handwheel towards you to ensure this.
- Continue following the path downwards. Pass through any other thread guides and tension discs.
- There’s usually a specific way to go around the tension discs. Often, you’ll loop the thread through them, ensuring it’s seated correctly between the discs.
- Continue guiding the thread down the front of the machine.
- There might be a final thread guide near the needle.
-
Threading the Needle: This is where the threading sewing machine needle magic happens.
-
Manual Method:
- Cut the thread end cleanly with scissors. A sharp, angled cut makes it easier to insert.
- Hold the needle firmly with one hand.
- With the other hand, guide the thread through the eye of the needle. If the thread is too floppy, you can moisten the end slightly or use a thread wax.
- Push about 4-6 inches of thread through the eye.
-
Using an Automatic Needle Threader: Many modern machines have an automatic needle threader.
- First, ensure the needle is in its highest position by turning the handwheel towards you.
- Follow your machine’s specific instructions for the automatic threader. Usually, this involves guiding the thread to a small hook or wire.
- Press a lever or button. The threader will swing around and push a small loop of thread through the needle’s eye.
- Once the loop is through, pull the thread gently to pull the rest of the thread through the eye.
-
Step 4: Inserting the Bobbin and Lower Thread
Now, let’s get the lower thread sewing machine ready.
- Locate the Bobbin Case Area: This is typically under a small plate on the sewing machine bed, often called the needle plate or throat plate.
- Open the Bobbin Cover: Remove the throat plate if necessary, or open the bobbin cover.
- Insert the Bobbin:
- Hold the wound bobbin with the thread unwinding in the direction specified by your manual (usually counter-clockwise or from the front).
- Place the bobbin into the bobbin case.
- Ensure the bobbin is seated correctly. There’s often a small notch or clip that the thread should go into.
- Thread the Bobbin Case and Bring Up the Bobbin Thread:
- Hold the end of the upper thread with one hand.
- With your other hand, guide the thread coming from the bobbin through the slit in the bobbin case.
- Pull the thread so it runs through the tension spring of the bobbin case.
- Pull about 4-6 inches of thread through the bobbin case.
- Now, you need to “catch” this thread with the upper thread.
- Hold the upper thread loosely.
- Turn the handwheel towards you one full rotation. This will bring the upper thread down, catch the bobbin thread, and pull a loop of the bobbin thread up through the needle plate.
- Use your fingers or tweezers to pull this loop of bobbin thread completely out.
- You should now have both the upper thread and the bobbin thread loops sticking out from under the needle plate.
- Place the Bobbin Cover Back: Secure the bobbin case and replace the throat plate.
Step 5: Securing the Threads and Preparing to Sew
- Position the Threads: Lay both the upper thread and the bobbin thread strands towards the back of the presser foot. This prevents them from getting caught when you start sewing.
- Lower the Presser Foot: Lower the presser foot onto the fabric (or just onto the machine bed if you’re not sewing yet). This engages the tension mechanism.
Table: Common Threading Path Differences
| Machine Type | Upper Thread Path Variations | Bobbin Insertion Variations |
|---|---|---|
| Basic Mechanical | More manual guides, distinct take-up lever path. | Often involves a removable bobbin case that you thread. |
| Computerized | May have more automated guides, sometimes a different take-up lever design. | Can have top-loading, drop-in bobbins where the case is built-in. |
| Serger | Threading serger machine is complex with multiple threads (3-5 typically). Each thread has its own path. | Bobbins are usually not used; threads feed from cones directly. |
Troubleshooting Common Threading Issues
Even with a guide, threading can sometimes be tricky. Here are some common problems and solutions:
Thread Bunching or Breaking
- Incorrect Thread Path: The most common cause. Double-check that you followed every guide and the take-up lever.
- Needle Not Fully Inserted: Ensure the needle is pushed all the way up into the needle clamp and the screw is tightened.
- Wrong Needle Type/Size: Using a blunt or incorrect needle can cause issues.
- Tension Issues: The sewing machine tension adjustment might be too tight.
- Thread Snagged: Check the spool of thread for knots or snags.
- Bobbin Wound Incorrectly: Uneven winding can cause problems.
Stitches Not Forming Properly
- Upper and Lower Thread Not Laced: Ensure you brought the bobbin thread up and have both threads under the presser foot before starting.
- Tension Incorrect: This is a major factor.
- Too Tight: Stitches will be bumpy on top and pull the bobbin thread through.
- Too Loose: Stitches will be loopy on the bobbin side and thread will break easily.
- Needle Inserted Backwards: Most needles have a “right” side (the groove faces the front).
- Bobbin Inserted Incorrectly: Make sure the thread is running off the bobbin in the correct direction and through the tension spring.
Mastering Sewing Machine Tension Adjustment
Sewing machine tension adjustment is vital for creating balanced stitches. The tension controls how tightly the thread is pulled through the fabric.
The Tension Discs
The upper thread passes through two tension discs. When you turn the tension dial, these discs move closer together or further apart, increasing or decreasing the resistance on the thread.
Bobbin Tension
The bobbin also has its own tension, controlled by a small screw on the bobbin case. However, for most beginners, it’s best to leave the bobbin tension as is unless you’re experienced.
How to Adjust Upper Thread Tension
- Test Stitch: Sew a short seam on a scrap piece of fabric.
- Examine Stitches: Look at the stitches on both sides of the fabric.
- Perfect Stitch: Stitches look the same on both sides, with no loops or puckering.
- Too Tight (Top): Stitches are pulled down into the fabric, making the top look messy or creating a ridge. You’ll see the bobbin thread loops on the top. Solution: Lower the upper thread tension (turn the dial to a lower number).
- Too Loose (Top): The bobbin thread loops are visible on the top side of the fabric. Solution: Increase the upper thread tension (turn the dial to a higher number).
- Adjust and Test Again: Make small adjustments to the tension dial, sew another test stitch, and examine again. Repeat until you achieve a balanced stitch.
Table: Common Tension Issues and Solutions
| Symptom | Cause | Solution |
|---|---|---|
| Loopy stitches on the top (bobbin thread visible) | Upper thread tension too loose | Increase upper thread tension (higher number). |
| Loopy stitches on the bottom (upper thread visible) | Upper thread tension too tight | Decrease upper thread tension (lower number). |
| Thread breaking (upper thread) | Tension too high, needle dull, wrong thread path | Check thread path, lower tension slightly, change needle. |
| Thread breaking (bobbin thread) | Bobbin tension too tight, bobbin thread snagged | Check bobbin winding, ensure thread runs smoothly, check bobbin case. |
| Puckering or gathering of fabric | Tension too tight overall | Lower upper thread tension. |
Threading a Serger Machine: A Different Ballgame
If you’re moving beyond a basic sewing machine, you might encounter a threading serger machine. Sergers are different and more complex because they use multiple threads to create overlocked edges.
Key Differences in Serger Threading:
- Multiple Threads: Sergers typically use 3 to 5 threads.
- Thread Cones: Thread comes from cones, not spools.
- Complex Thread Path: Each thread follows a specific path through guides, tension discs, and into the loopers.
- Color Coding: Many sergers are color-coded to help you follow the thread paths for each component (upper looper, lower looper, needles).
- Order Matters: The order in which you thread the loopers and needles is critical.
General Serger Threading Steps (Highly Variable):
- Raise Presser Foot and Needles: Ensure everything is in the highest position.
- Thread the Upper Looper: This is often the first thread to be threaded, following its specific path and tension.
- Thread the Lower Looper: This is usually the second thread, often requiring you to swing out the lower looper mechanism to access its guides.
- Thread the Needles: Thread the needles from right to left (usually).
- Bring Up Lower Looper Threads: Similar to a sewing machine, you’ll need to pull the looper threads up.
- Test Stitches: Sergers require careful tension adjustments for all threads to create a balanced stitch.
Important Note: Threading a serger is significantly more involved. Always consult your serger’s manual and consider watching dedicated video tutorials. It’s a skill that requires patience and practice.
Frequently Asked Questions (FAQ)
Q1: What is the most common mistake beginners make when threading a sewing machine?
The most common mistake is not following the complete thread path, especially missing the take-up lever or not seating the thread correctly between the tension discs.
Q2: Can I use any type of thread on my sewing machine?
While you can use many types of thread, all-purpose polyester is the most versatile and recommended for general sewing. Rayon, silk, or metallic threads might require different tensions or needle types. Avoid very fine or very thick threads until you are more experienced.
Q3: My sewing machine is making a terrible noise. What could be wrong?
A loud noise can indicate several issues:
* The needle is hitting the presser foot or throat plate.
* The bobbin is inserted incorrectly.
* Thread is caught in a moving part.
* The machine needs cleaning and oiling.
* Ensure you are not forcing the machine against resistance.
Q4: What does “tension is too high” mean in sewing?
It means the thread is being pulled too tightly by the machine’s tension mechanism. This causes the upper thread to pull the bobbin thread through to the top side of your fabric, creating a messy or puckered stitch.
Q5: How often should I re-thread my sewing machine?
You should re-thread the machine every time you change your thread color or type, or when you switch from bobbin winding to sewing. It’s also a good idea to re-thread if you notice your stitches looking unusual, as the thread path might have shifted.
Q6: What is an automatic needle threader?
An automatic needle threader is a device built into some sewing machines that helps guide the thread through the eye of the needle automatically, saving you the frustration of manual threading, especially with very fine needles.
Threading your sewing machine might seem daunting at first, but with practice and by following these steps, it will become second nature. Remember, your sewing machine manual is your ultimate guide. Happy sewing!