
Setting up your Brother sewing machine and getting it ready to sew is easy. It mainly involves putting the thread in the right places. You will need to fill a bobbin with thread first. Then you put this bobbin into the machine. After that, you thread the top part of the machine. Let’s walk through how to thread my Brother sewing machine step by step.
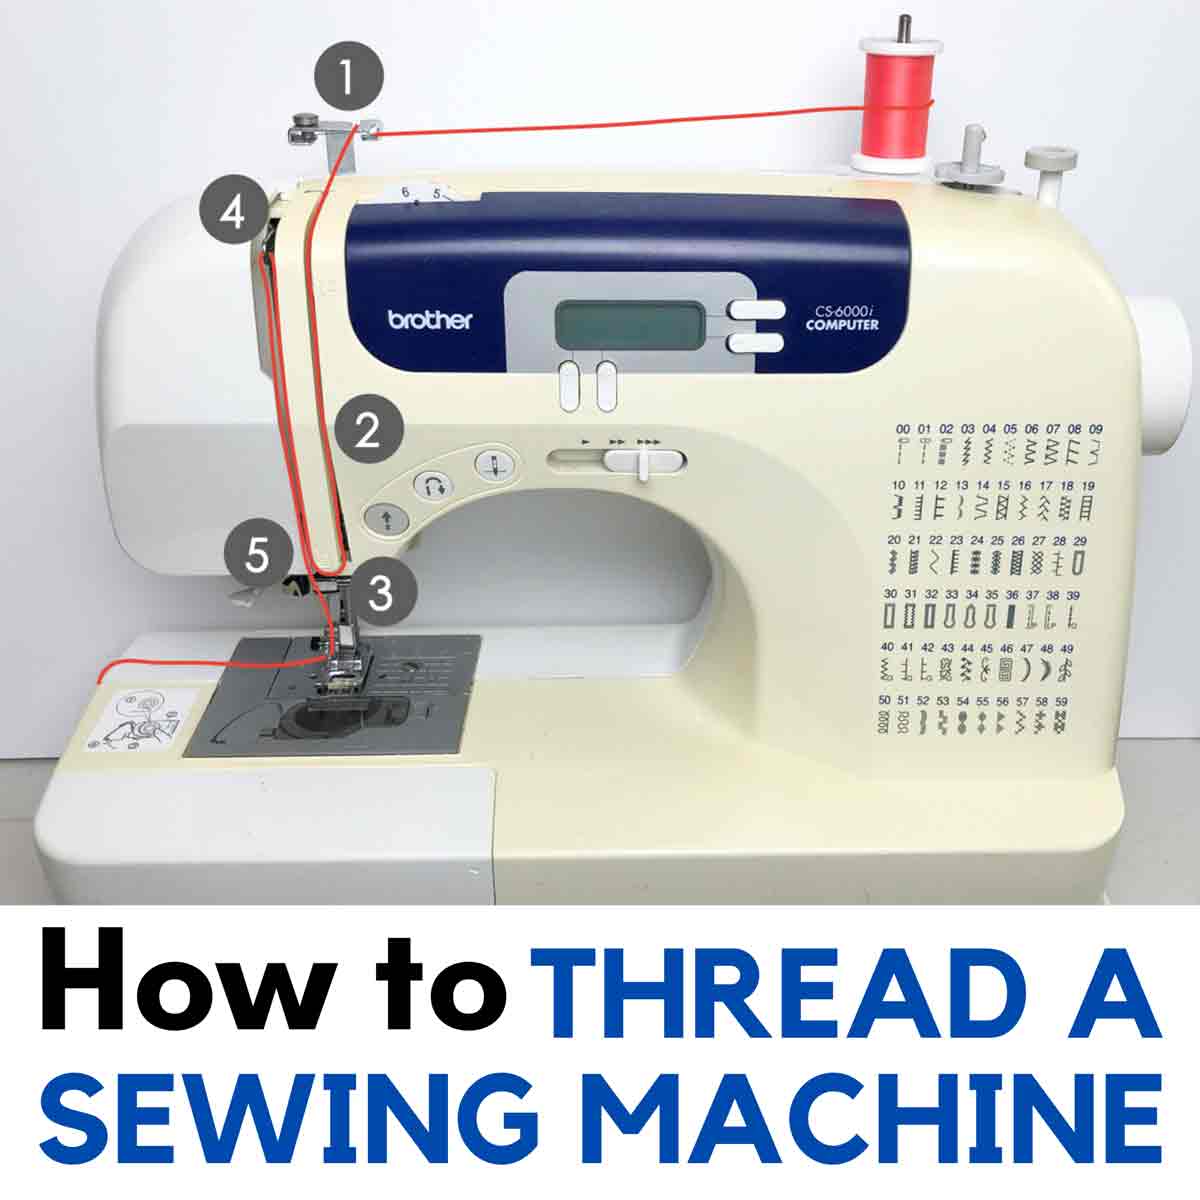
Image Source: mindymakes.com
Getting Your Machine Ready
First, find a good place for your sewing machine. It should be a flat, steady table or desk. Make sure you have enough light. Plug the power cord into your machine. Then plug it into the wall.
Finding Your Brother Machine Parts
Knowing a few key parts helps a lot. Your machine has a spool pin. This is where you put the spool of thread. It has guides that the thread must follow. There is a take-up lever that goes up and down. The needle is at the very bottom. You also have the bobbin area. A brother sewing machine parts diagram in your manual can show you where everything is. But we will point out the key parts as we go.
Turning On Your Machine
Find the power switch. It is usually on the side of the machine. Flip the switch to turn the machine on. A light might come on. Your machine is now ready to start threading.
Winding the Bobbin
The bobbin holds the thread for the bottom stitch. Winding bobbin brother sewing machine is the first threading step.
Steps for Winding a Bobbin
- Get a Bobbin: You need an empty bobbin made for your Brother machine.
- Put Thread on Pin: Put your spool of thread on the spool pin. This is often on the top of the machine.
- Find the Guide: Look for a little guide near the spool pin. The thread needs to go through this guide first. It makes the thread go to the bobbin winder.
- Wrap the Bobbin: Find the bobbin winder pin. It sticks out. Put your empty bobbin onto this pin. Look for a small hole on the bobbin. Put the end of your thread through this hole. Wrap the thread around the bobbin a few times. Do this by hand. Keep the thread neat.
- Push the Pin: Push the bobbin winder pin towards the right. This locks it in place. It tells the machine you want to wind a bobbin.
- Hold the Thread Tail: Hold the end of the thread that came through the hole. Hold it until the bobbin starts spinning. Then you can let go. The machine will cut it for you later. Or you can trim it.
- Start Winding: Press the foot pedal or the start button. The bobbin will spin fast. The thread will fill the bobbin.
- Stop Winding: The machine might stop by itself when the bobbin is full. If not, stop when the bobbin looks full. Do not overfill it. It should be smooth, not lumpy.
- Cut the Thread: Cut the thread connecting the spool to the full bobbin.
- Remove Bobbin: Slide the bobbin winder pin back to the left. Take the full bobbin off the pin.
You now have a full bobbin. This bobbin is needed for the bottom part of your stitch. Having the bobbin wound right is important. If the thread wraps unevenly, it can cause problems later.
Inserting the Bobbin
Now you need to put the bobbin into the machine. Inserting bobbin brother machine varies a little bit. Most newer Brother machines have a drop-in bobbin. This is very easy.
Steps for Drop-In Bobbin
- Open the Cover: Look for a clear plastic cover near the needle plate. Slide this cover off or open it.
- Place the Bobbin: Take your full bobbin. Look at how the thread comes off the bobbin. It usually needs to spin in a certain way. For most Brother drop-in bobbins, the thread should come off the bobbin counter-clockwise. This looks like the letter ‘P’ or ‘Q’. Place the bobbin into the bobbin case area.
- Follow the Path: There is a small groove or path to guide the thread. Pull the thread from the bobbin. Guide it through this groove. It will go under a small metal guide. This sets the bobbin thread tension.
- Pull Thread Out: Pull out about 4 to 6 inches of thread. Leave this thread tail resting on the needle plate.
- Close the Cover: Put the clear plastic cover back on.
Why Bobbin Direction Matters
Putting the bobbin in the right way is key. If it spins the wrong way, the thread will not pull up correctly. This can cause loose stitches. Or it can make the machine jam. Always check your manual for the correct bobbin direction.
Upper Threading
This is threading the top part of the machine. This thread goes through the needle. It joins the bobbin thread to make a stitch. Brother sewing machine upper threading must be done just right. Follow the numbered steps on your machine. This is your thread path brother sewing machine.
Steps for Upper Threading
- Raise the Needle: Turn the handwheel on the side of the machine. Turn it towards you. Make the needle go all the way up. The take-up lever must also be at its highest point. This is very important! Threading with the needle down causes issues.
- Put Spool on Pin: Place your spool of thread on the spool pin. Use the right size spool cap to hold it.
- Follow the First Guide: Find the first thread guide. It is often on top or side. Pull the thread from the spool. Guide it through this first guide.
- Go Down the Channel: Pull the thread down the main channel. This is usually a deep groove on the front of the machine. Follow the number “1”.
- Around the Bottom: At the bottom of this channel, the path turns. The thread goes around a U-shape turn. Follow the number “2”. The thread goes back up.
- Reach the Take-Up Lever: The thread goes up the second channel. It needs to go into the take-up lever. This is a hook or loop that moves up and down. The take-up lever must be at its highest point for the thread to go in right. If it is not up, the thread will not catch. This is a common problem spot. Follow the number “3”.
- Go Down Again: The thread then goes back down another channel. Follow the number “4”.
- Through Guides: The thread passes through small guides. These are often near the needle bar. There might be one or two guides. Follow the numbers “5” and “6”.
- Thread the Needle: The final step is putting the thread through the eye of the needle. The thread usually goes from front to back. Some machines have a needle threader. This helps push the thread through the tiny eye. If you use a needle threader, follow its steps carefully. If you do it by hand, cut the thread end cleanly. This makes it easier to push through the needle eye.
- Pull Thread Back: Pull about 4 to 6 inches of the top thread through the needle. Let it rest under the presser foot. The presser foot is the part that holds the fabric down.
These steps describe the standard brother sewing machine manual threading. Following these steps in order is key. Each guide and turn is there for a reason. It keeps the thread running smoothly. It also helps set the thread tension brother sewing machine.
Checking Your Thread Tension
Thread tension brother sewing machine controls how the stitches look. The top thread and bobbin thread loop together inside the fabric.
- If the top thread tension is too loose, loops of top thread will show on the bottom of your fabric.
- If the top thread tension is too tight, loops of bobbin thread will show on the top of your fabric.
Correct threading is the first step to good tension. If the thread is not in the guides right, or misses the take-up lever, the tension will be off no matter what the tension dial is set to. Most machines have a tension dial or setting. Start with the middle setting. Adjust it only after you check your threading first.
Bringing Up the Bobbin Thread
Before you sew, you need to bring the bobbin thread up through the needle plate hole.
- Hold the Top Thread: Hold the end of the top thread that you pulled through the needle. Hold it gently to the side.
- Turn the Handwheel: Use the handwheel. Turn it towards you one full turn. The needle will go down into the bobbin area. It will grab the bobbin thread. Then the needle comes back up.
- Catch the Loop: As the needle comes up, it will pull a loop of bobbin thread up. Use your finger or a small tool (like tweezers) to catch this loop.
- Pull Out the Bobbin Thread: Pull the loop until the end of the bobbin thread comes up through the hole.
- Place Both Threads: Pull both the top thread and the bobbin thread towards the back of the machine. Place them together under the presser foot.
Your machine is now fully threaded and ready to sew.
Testing Your Stitch
Always test your stitch on a scrap piece of fabric. Use the same kind of fabric you plan to sew. Sew a few lines. Check the stitches. They should look the same on the top and the bottom. They should look like small, even dashes. If they look messy, you might have a threading problem.
Troubleshooting Threading Problems
Even when you follow the steps, common brother sewing machine threading problems happen. If your stitches look bad, or the machine jams, check your threading first. Troubleshooting brother sewing machine threading often means re-threading the machine carefully.
Common Issues and Fixes
- Thread breaks often:
- Check threading: Did you miss a guide? Is the thread in the take-up lever? Is the bobbin in right? Is the thread path brother sewing machine clear? Re-thread the machine from the start.
- Check thread type: Are you using the right thread for the needle size? Too thick thread in a small needle breaks.
- Check needle: Is the needle bent or dull? A bad needle can snag and break thread. Put in a new needle.
- Check tension: Is the top thread tension too tight?
- Machine Jams (thread bird nesting under fabric):
- Most common cause: The top thread is not in the take-up lever. Or the needle was not at the highest point when you started threading. This makes loops of thread pile up under the fabric.
- Fix: Remove the fabric and threads. Cut away tangled thread. Re-thread the entire machine carefully. Make sure the needle and take-up lever are fully up when you start.
- Check bobbin: Is the bobbin in the right way? Is the bobbin case area clean?
- Skipped stitches:
- Check needle: Is the needle in fully? Is it facing the right way? Is it the right type for your fabric? Is it bent? Change the needle.
- Check threading: Is the thread in all the guides?
- Check bobbin: Is the bobbin case area clean?
- Uneven stitches or loops:
- Check bobbin winding: Was the bobbin wound smoothly? If it’s lumpy, the thread pulls unevenly. Wind a new bobbin.
- Check bobbin insertion: Is the bobbin in the case correctly? Did the thread go through the tension groove?
- Check upper threading: Is the thread in every guide? Is it in the take-up lever?
- Check tension: Adjust the tension dial slightly.
Most threading problems come from a small mistake in the brother sewing machine manual threading steps. It is easy to miss a guide or forget to put the thread in the take-up lever. Re-threading from scratch is often the fastest way to fix many stitch problems. Always thread with the presser foot UP. This opens the tension discs. If the presser foot is down, the tension discs are closed. The thread will not sit in them right. This causes loose stitches or jams.
Grasping the Thread Path
To avoid problems, it helps to visualize the thread path brother sewing machine. Think of the thread as following a specific road.
- Start: Spool pin.
- First Checkpoint: Upper thread guide.
- Go Down: First channel (often marked ‘1’).
- Turn Around: U-turn at the bottom (marked ‘2’). This is where the tension discs are. The thread must sit between these discs. Threading with the presser foot up makes sure this happens.
- Go Up: Second channel.
- Key Spot: Take-up lever (marked ‘3’). The thread must go through the eye or hook of this lever.
- Go Down Again: Third channel (marked ‘4’).
- Final Guides: Small guides near the needle bar (marked ‘5’, ‘6’).
- End: Needle eye.
If the thread misses any of these spots, the machine will not sew right. This is why following the numbered path on your machine is so important. It is the correct brother sewing machine manual threading path.
Setting Up Your Brother Sewing Machine for a Project
How to set up brother sewing machine for sewing goes beyond just threading.
- Choose Thread and Needle: Pick the right thread color and type. Choose a needle that matches your fabric type and thread size.
- Thread the Machine: Follow the steps for winding the bobbin and upper threading.
- Prepare Fabric: Cut your fabric pieces using a pattern.
- Choose Stitch: Select the stitch type you need (like a straight stitch or zig-zag). Set the stitch length and width.
- Check Tension: Do a test sew on scrap fabric. Adjust thread tension brother sewing machine if needed.
- Place Fabric: Put your fabric under the presser foot. Lower the presser foot.
- Start Sewing: Begin sewing slowly. Guide the fabric.
Proper how to set up brother sewing machine involves these steps working together. Good threading is the base for good stitches.
Comprehending Your Manual
Your Brother sewing machine manual is your best friend. It has specific pictures and steps for your exact model. While this guide gives general steps for brother sewing machine manual threading, your manual will be the most accurate. It shows your machine’s specific brother sewing machine parts diagram and thread path brother sewing machine. Keep it handy. Refer to it if you get stuck.
Deep Dive: Why Threading Order Matters
You might wonder, does it really matter what order I thread in? Yes, it does!
- Bobbin First: You need a full bobbin before you can bring the bobbin thread up to meet the top thread. You bring it up after the top is threaded.
- Upper Threading – Needle Up: Threading the top path only works when the needle and take-up lever are at their highest point. If they are not, the thread cannot correctly seat in the tension discs or go through the take-up lever eye. This is the most common cause of loops and jams.
- Through All Guides: Each guide keeps the thread in line. It stops the thread from tangling. It helps control how the thread feeds off the spool.
- Through the Take-Up Lever: This lever pulls up the slack in the thread after each stitch. If the thread isn’t in it, you get big loops of thread on the bottom of your fabric (a “bird’s nest”). This is a very frequent common brother sewing machine threading problem.
Following the numbered thread path brother sewing machine guides ensures the thread travels the correct way. It puts the thread through the tension system and the take-up lever correctly. This is essential for balanced stitches and smooth sewing.
Interpreting Troubleshooting Signs
When things go wrong, the stitches themselves often tell you what is happening. Learning to read these signs helps with troubleshooting brother sewing machine threading.
- Top thread loops on the bottom: Top thread tension is too loose. Or, more likely, the top thread is not in the take-up lever or tension discs correctly. Re-thread the top.
- Bottom thread loops on the top: Bobbin tension is too loose (less common problem). Or top thread tension is too tight. Or the bobbin is not inserted correctly (missed the tension groove in the bobbin case). Re-insert the bobbin carefully.
- Tangled mess under fabric (bird’s nest): Almost always, the top thread is not in the take-up lever or tension discs. Re-thread the top, making sure the needle and take-up lever are fully up when you start.
- Thread breaking: See the list in the troubleshooting section above (bad needle, wrong thread, tension too tight, missed guide).
- Skipped stitches: Check the needle first (bent, wrong type, not inserted right). Then check threading.
Tips for Easier Threading
- Good Light: Make sure you can see clearly.
- White Paper: Place a piece of white paper under the needle area. It helps you see the needle eye better when threading.
- Cut Thread End Clean: Use sharp scissors to cut the thread end at an angle. This makes a sharp point that is easier to push through the needle eye.
- Use Tweezers: Small tweezers can help guide the thread through tricky spots or catch the bobbin thread loop.
- Presser Foot Up: Always thread with the presser foot lifted. Lower it only when you are ready to sew. This is a critical step for correct tension.
- Slow Down: Don’t rush. Follow each step carefully.
- New Needle Often: A fresh needle prevents many stitch problems and makes threading easier. Change your needle after every project or every 8-10 hours of sewing.
- Clean Machine: Dust and lint can build up in the bobbin area and affect tension and threading. Clean your machine often.
Using these tips makes brother sewing machine manual threading a quick and easy task.
Fathoming Machine Differences
While this guide covers general Brother machine threading, small details can differ. Some machines have different spool pin types. Some have horizontal spool pins. The thread path brother sewing machine might have slightly different guide shapes or numbers. Always look at your specific machine and its manual. This guide gives you the core process, which is very similar across most Brother home sewing machines. The steps for winding bobbin brother sewing machine and inserting bobbin brother machine (especially drop-in) are quite standard. The brother sewing machine upper threading path follows the same basic idea of going down, up through the lever, and down to the needle.
Conclusion: Making Threading Quick and Easy
Threading your Brother sewing machine might seem tricky at first. But once you know the steps, it becomes fast and easy. Remember the main parts: winding the bobbin, inserting the bobbin, and threading the upper path. Always follow the guides on your machine. Pay special attention to the take-up lever and threading with the presser foot up. If you have problems, re-threading is the first thing to try. By following this quick & easy: how to thread my Brother sewing machine guide and using your manual, you’ll be ready to sew in no time!
Frequently Asked Questions (FAQ)
h4 Why does my top thread keep breaking when I sew?
h5 This is a very common issue. First, re-thread your machine carefully from the start. Make sure the thread goes through every guide and into the take-up lever. Check that you threaded with the presser foot up. Also, check your needle. A bent, dull, or wrong-size needle is a main cause of thread breaks. Change to a new needle that matches your fabric and thread. If it still breaks, check your top thread tension brother sewing machine; it might be too tight.
h4 My machine is making big loops of thread on the bottom of the fabric. What is wrong?
h5 This is often called a “bird’s nest.” It almost always means the top thread is not seated correctly in the tension discs or it missed the take-up lever. This happens if you thread with the presser foot down, or if the needle/take-up lever wasn’t fully up when you started threading. Cut away the tangled thread. Remove your fabric. Re-thread the top of the machine very carefully, making sure the presser foot is up and the needle is high.
h4 How do I know which way to put the bobbin in?
h5 For most Brother drop-in bobbins, the thread should come off the bobbin in a counter-clockwise direction. It should look like the letter ‘P’ when you place it. There is usually a small picture near the bobbin case area showing the correct direction and the path for the thread. Always check your specific model’s manual to be sure. Correct inserting bobbin brother machine is important for good tension.
h4 What is the take-up lever, and why is it important?
h5 The take-up lever is a moving part on the upper thread path brother sewing machine. It goes up and down with the needle. Its job is to pull up the slack in the thread after each stitch is formed. If the thread is not through the eye or hook of the take-up lever, the machine cannot control the thread correctly. This leads to loose stitches or big tangles under the fabric. Making sure the thread is in the take-up lever is a key step in brother sewing machine upper threading.
h4 Do I have to follow the numbered guides on my machine?
h5 Yes, absolutely! The numbered guides show you the correct thread path brother sewing machine. Each guide, turn, and hook is part of the machine’s system for controlling the thread. Following the numbers in order ensures the thread goes through the tension system and the take-up lever correctly. This is how you get balanced stitches. Not following the path is a main cause of common brother sewing machine threading problems. This is the core of brother sewing machine manual threading.
h4 My machine is jamming as soon as I start sewing. What could be wrong?
h5 Jams are often related to threading issues. Check for a bird’s nest under the fabric (see above). Make sure you pulled both the top and bobbin threads to the back under the presser foot before starting. Check that the bobbin is inserted correctly and its cover is closed. If you had trouble winding bobbin brother sewing machine, the bobbin might be wound unevenly, causing issues. Cut away any jammed thread, check your threading carefully, and try again.
h4 What should I do if my stitches are too loose or too tight?
h5 First, check your threading. Make sure both the upper thread and bobbin are threaded perfectly according to the manual. If threading is correct, then adjust the thread tension brother sewing machine. Your machine has a tension dial (usually numbered). Turn it to a higher number for tighter top tension, and a lower number for looser top tension. Test on scrap fabric after each small adjustment. The bobbin tension is rarely adjusted unless your manual tells you to.
h4 Should I lift the presser foot before threading?
h5 Yes! This is very important. Always lift the presser foot before threading the upper thread path brother sewing machine. Lifting the foot opens the tension discs in the machine. This lets the thread sit down into them correctly. If the foot is down, the discs are closed, and the thread just sits on top. This will cause very loose top tension and messy stitches or jams.
h4 How often should I change my needle?
h5 It’s a good idea to change your needle after finishing a project or after about 8-10 hours of sewing time. Needles get dull or slightly bent even if you can’t see it. A fresh needle helps prevent skipped stitches and thread breaking. It also makes threading the needle eye easier.
h4 Where can I find a diagram of my machine parts?
h5 Your Brother sewing machine manual is the best place to find a brother sewing machine parts diagram. It shows all the parts specific to your model. This can be very helpful when learning to thread or troubleshoot. Keep your manual in a safe place.
h4 Why is winding bobbin brother sewing machine so important?
h5 A properly wound bobbin ensures the thread comes off smoothly. If the bobbin is wound unevenly, the bobbin thread tension will be inconsistent. This leads to uneven stitches. Do not overfill the bobbin. It should be smooth and not touch the sides of the bobbin case area. Always use bobbins made for your machine.
h4 Can I use any size spool of thread?
h5 Most home sewing machines can use standard spools. Use the correct size spool cap on the spool pin to keep the thread feeding smoothly. If you use a very large cone of thread, you might need a separate thread stand. Make sure the thread comes off the spool smoothly without catching.
h4 What is brother sewing machine manual threading?
h5 Brother sewing machine manual threading just means using your hands to follow the steps and guides on your machine to put the thread in the correct path. It’s the standard way to get your machine ready to sew, as opposed to using a built-in automatic threader (though manual threading is still needed up to the needle even with an auto threader).
h4 Are common brother sewing machine threading problems hard to fix?
h5 No, most common problems like thread breaking, skipped stitches, or bird’s nests are fixed by simply re-threading the machine carefully. Making sure you follow the steps exactly, especially using the presser foot and checking the take-up lever, solves most issues. Don’t be afraid to cut the thread and start over.